Classic Camp Stoves :: View topic - making pump washers
Classic Camp Stoves :: View topic - making pump washers
Classic Camp Stoves :: View topic - making pump washers

Create successful ePaper yourself
Turn your PDF publications into a flip-book with our unique Google optimized e-Paper software.
<strong>Classic</strong> <strong>Camp</strong> <strong>Stoves</strong> :: <strong>View</strong> <strong>topic</strong> - <strong>making</strong> <strong>pump</strong> <strong>washers</strong><br />
updated 8 July 2006<br />
visitor<br />
http://spiritburner.com/forum/view<strong>topic</strong>.php?t=4782<br />
The online resource for the stove collector & enthusiast<br />
Please visit our forum sponsor<br />
Sorry!<br />
We do not give<br />
valuations -<br />
please check<br />
please support<br />
this free site<br />
Welcome to the forum. For the main site please use the links below:<br />
Home | What's New | Stove FAQ | Manufacturers List | Articles & Features | Catalogues & Parts | Instructions | Advertising |<br />
Labels & Packaging<br />
Patents | <strong>Stoves</strong> in Literature | Paraffinalia | Collectors Galleries | Action Gallery | Mystery <strong>Stoves</strong> | The Collectors |<br />
Merchandise | Events | Links<br />
<strong>making</strong> <strong>pump</strong> <strong>washers</strong><br />
Goto page 1, 2, 3 Next<br />
kaw550red<br />
FAQ Search Memberlist Usergroups Register Profile<br />
Log in to check your private messages Old forum archive Log in<br />
<strong>Classic</strong> <strong>Camp</strong> <strong>Stoves</strong> Forum Index -> Fettling Forum<br />
Author Message<br />
Joined: 22 Aug 2004<br />
Posts: 190<br />
Location: Durham North East<br />
England<br />
Posted: Fri Sep 08, 2006 4:33 pm Post subject: <strong>making</strong> <strong>pump</strong> <strong>washers</strong><br />
INTRODUCTION<br />
<strong>View</strong> previous <strong>topic</strong> :: <strong>View</strong> next <strong>topic</strong><br />
I am writing this at the instigation of George Linnekar. I thought that I had already done a post on this subject but if<br />
I have I cannot find it.<br />
It is not intended as a comprehensive post about how to make <strong>pump</strong> <strong>washers</strong> but as a source of information to<br />
develope your own techniques for <strong>making</strong> them.<br />
If you have leather, a hammer, a set of punches and a stove you have the means to make a <strong>pump</strong> washer that<br />
works. Really the idea of how to make <strong>pump</strong> <strong>washers</strong> originated in the States. Someone on the website had a lot<br />
of difficulty "tyre levering" a new <strong>pump</strong> washer into the tube and took about an hour to do it. He wrote in asking for<br />
advice. An American answered and said to soak the <strong>pump</strong> washer well with oil and reverse the piston, insert the<br />
assembly into the tube and leave it for 24 hours. The <strong>pump</strong> washer gets compressed into the tube size. Taking it<br />
out and putting the piston round the right way gives a snug fitting <strong>pump</strong> washer when it is reinserted in the tube. I<br />
thought that if this worked with a poorly formed washer it might work with a water soaked plain leather washer and<br />
it did. The rest is just a natural progression from using the <strong>pump</strong> tube as a mould.<br />
PHOTOGRAPHS<br />
Please excuse the quality of my photos as I have not had time to edit them and most are as they came off the<br />
camera<br />
PUNCHES<br />
Page 1<br />
30.09.2006 04:51:09
<strong>Classic</strong> <strong>Camp</strong> <strong>Stoves</strong> :: <strong>View</strong> <strong>topic</strong> - <strong>making</strong> <strong>pump</strong> <strong>washers</strong><br />
http://spiritburner.com/forum/view<strong>topic</strong>.php?t=4782<br />
These are some of the punches that I use for washer <strong>making</strong>. The main set allows holed <strong>washers</strong> to be punched in<br />
one operation. They are expensive BUT their cost is soon recovered by the savings in the cost of commercialy<br />
made <strong>washers</strong>. They were obtained from www.axminster.co.uk and are part number JLB330. Other punches are in<br />
the box as well as the standard set.<br />
LEATHER<br />
One of the hardest things to find for <strong>pump</strong> washer <strong>making</strong> is the leather. Ideally it should be about 1.75 mm thick<br />
but you can use 2 mm however it has to be compressed more when it goes into the mould so is more difficult to<br />
use. I currently am using some pigskin coasters which were bought of ebay but I am nearly out of them so if<br />
anyone knows a source of a stiff leather about 1.75 mm thick please let me know<br />
BASIC PUMP WASHER MAKING<br />
You may find it difficult to believe but apart from a hammer and the punches this is all you need to make <strong>pump</strong><br />
<strong>washers</strong><br />
You can make the <strong>pump</strong> <strong>washers</strong> using <strong>pump</strong> pistons and <strong>pump</strong> tubes. I use 22mm diameter blank <strong>washers</strong> for<br />
the small diameter <strong>washers</strong> and 24 mm diameter blank <strong>washers</strong> for the large ones. Ideally the holes in the middle<br />
of the blank <strong>washers</strong> need to be about 7 mm if you use this method. The holes have to be stretched onto the <strong>pump</strong><br />
pistons. If you cut them 8 mm the holes stretch as you are inserting the pistons into the tube and you can get a<br />
perfectly formed washer with an enlarged hole <strong>making</strong> it almost useless. Soak the leather <strong>washers</strong> in warm water<br />
for about half an hour before placing it on the piston and locking it in place with the nut. With this method you fit the<br />
soaked washer onto the piston with the rough side of the leather nearest the nut. The <strong>pump</strong> piston is fitted to the<br />
<strong>pump</strong> rod the WRONG way round. Pushing the piston into the tube shapes the leather and actually produces the<br />
best <strong>pump</strong> <strong>washers</strong> however you really need <strong>pump</strong> pistons with brass nuts or you get staining of the leather. Also it<br />
is better not to have the valve end on the <strong>pump</strong> tube so that the air can get at the washer. Screwing the <strong>pump</strong> lid to<br />
the tube helps keep the piston square in the tube. Once the washer has dried out the <strong>pump</strong> piston can be turned<br />
round the right way, oiled and inserted into the <strong>pump</strong> tube.<br />
Page 2<br />
30.09.2006 04:51:09
<strong>Classic</strong> <strong>Camp</strong> <strong>Stoves</strong> :: <strong>View</strong> <strong>topic</strong> - <strong>making</strong> <strong>pump</strong> <strong>washers</strong><br />
http://spiritburner.com/forum/view<strong>topic</strong>.php?t=4782<br />
I cannot remember whether I have used the <strong>pump</strong> tube of a tank to make the <strong>washers</strong> but theoretically there is no<br />
reason why it cannot be done but it will take longer to dry out than using a <strong>pump</strong> tube out of the stove.<br />
MORE ADVANCED METHODS<br />
Photo by George Linekar<br />
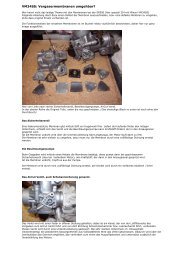
This is a slighty more advanced method of <strong>making</strong> the <strong>washers</strong> using short lengths of <strong>pump</strong> tube. The tubes need<br />
cutting with pipe cutters to get square cut ends. This leaves a burr inside the tube which must be removed. The<br />
entries into the tubes are slightly tapered to ease entry of the wet blank washer and the arrows are to make sure<br />
that it faces in the right direction. The holes in the blanks are 4 mm diameter and fit on the pin of the former. This is<br />
to help prevent the blank going crookedly into the mould. The operative word is help. The blanks seem to take on a<br />
mind of their own and it can be difficult to get them to go in straight.<br />
The formers are made from the stems and handles of old taps. Their diameters are the same as the pistons of the<br />
two common sizes of <strong>pump</strong>s.<br />
Place the soaked washer over the former pin with the rough side towards the mould. Place the mould on a flat<br />
surface and push the soaked washer into the mould with the former until it hits the flat surface. Remove the<br />
former. This is easier if it is turned at the same time as as you are pulling out. Put the mould on its side so that the<br />
air can get to both sides and allow the washer to dry. When dry push out of the moulds and cut an 8 mm diameter<br />
hole in the centre of the bottom of each washer. The reason that this is left till last is because the leather can<br />
stretch when you push it into the mould. Cutting it before it had dried could mean that the hole was too big for the<br />
piston.<br />
Page 3<br />
30.09.2006 04:51:09
<strong>Classic</strong> <strong>Camp</strong> <strong>Stoves</strong> :: <strong>View</strong> <strong>topic</strong> - <strong>making</strong> <strong>pump</strong> <strong>washers</strong><br />
Photo by George Linnekar<br />
http://spiritburner.com/forum/view<strong>topic</strong>.php?t=4782<br />
Basically this is just a progression of the last method. The tubes have been brazed to a plate to keep them<br />
together. There is a hole at the bottom of each tube to allow the formed washer to be pushed out of the mould and<br />
to allow it to dry out quicker<br />
These are a selection of the <strong>pump</strong> washer <strong>making</strong> tools that I have made to date. You do not need tubes to act as<br />
moulds. A flat plate with the correct sized holes drilled in it works as well. The smaller sized <strong>pump</strong> tubes are 14 mm<br />
diameter and the bigger ones are 18 mm diameter. The idea with the plastic back plate was to see if I could make<br />
the angle between the bottom and side less rounded. It made no diffference at all. The clear back plate let me<br />
know that I had not improved it quite quickly. The idea was that the plate stayed in position whilst forcing the blanks<br />
into the mould and then was hinged round to help stand the mould on edge to quicken drying. Whilst it does act as<br />
a stand it does nothing to improve the washer shape. The mould was made out of polycarbonate.<br />
FINISHED WASHERS<br />
Generally I try to get a square open end to the washer but do not worry if it is slightly out of square or slightly<br />
uneven. The <strong>washers</strong> work just as well as the square ended commercial ones and probably get distorted in the<br />
<strong>pump</strong> tube when they are fitted to the tank. I have been surprised at how often notched and damaged <strong>pump</strong><br />
<strong>washers</strong> were still functioning in some of the stoves that I have bought and if those misshapes work it seems<br />
pedantic to try to produce a perfect washer which is out of sight.<br />
ECONOMIC STOVE RESTORATION<br />
If you are interested in restoring stoves at economic prices some of these other posts might interest you.<br />
http://www.spiritburner.com/forum/view<strong>topic</strong>.php?t=2837&highlight=washer+<strong>making</strong><br />
http://www.spiritburner.com/forum/view<strong>topic</strong>.php?t=2847&highlight=washer+<strong>making</strong><br />
http://www.spiritburner.com/forum/view<strong>topic</strong>.php?t=2428&highlight=washer+<strong>making</strong><br />
http://www.spiritburner.com/forum/view<strong>topic</strong>.php?t=2451&highlight=<br />
SPECIALS<br />
If you are interested in <strong>making</strong> specials there are some of my specials part of the way down this post. They are<br />
baseed on 96 and 00 tanks<br />
http://www.spiritburner.com/forum/view<strong>topic</strong>.php?t=2418&highlight=specials<br />
REPLIES<br />
PLEASE DELAY ALL REPLIES UNTIL DOUG WEISE HAS ADDED HIS PIECE TO THIS POST. THAT WILL<br />
ALLOW READERS TO GET THE FULL PICTURE OF THE CURRENT SITUATION WITH WASHER MAKING<br />
WITHOUT SHORT REPLIES BREAKING COMING BETWEEN THE TWO ITEMS<br />
Page 4<br />
30.09.2006 04:51:09
<strong>Classic</strong> <strong>Camp</strong> <strong>Stoves</strong> :: <strong>View</strong> <strong>topic</strong> - <strong>making</strong> <strong>pump</strong> <strong>washers</strong><br />
Back to top<br />
exeter_yak<br />
Joined: 03 Mar 2006<br />
Posts: 20<br />
Location: Massachusetts, USA<br />
Regards Bryan Miller<br />
_________________<br />
Bryan Miller<br />
http://spiritburner.com/forum/view<strong>topic</strong>.php?t=4782<br />
Posted: Fri Sep 08, 2006 6:55 pm Post subject:<br />
Hello, and thanks Bryan and George,<br />
My <strong>pump</strong> leather <strong>making</strong> started after receiving beneficial help from Bryan Miller and George Linekar a number of<br />
years ago.<br />
My background and some available materials in my shop allowed me to learn from Bryan and George, then<br />
experiment using plastic I had on hand. I made single devices first, then after a few tests I made some larger scale<br />
blocks to allow <strong>making</strong> multiple leather cups for the <strong>pump</strong>s on my stoves that needed them. I am restricting photos<br />
and method description just to the larger size because they are easier to make to start, but the process is the same<br />
for the smaller ones.<br />
I found some leather punches on ebay for cutting the disks but there are some other ways to perform the work also.<br />
I like the looks of Bryan's set up but could not find that type of punches. My leather shown here is just under 2mm<br />
in thickness. An arch punch is shown and to preserve the punch I use a plastic faced hammer to drive it.<br />
[img]<br />
[/img]<br />
It is best to do punching over the end grain of a piece of wood, stood up on end or placed in a vise.<br />
Here is another way. This is a standard compass with an exacto knife and blade installed. Align the blade so that it<br />
is on track or leading outward. Whilst this looks awkward and appears like it would be a real chore, with a good<br />
blade it takes two turns and you are through the leather. A disk cut with the method is shown.<br />
Page 5<br />
30.09.2006 04:51:09
<strong>Classic</strong> <strong>Camp</strong> <strong>Stoves</strong> :: <strong>View</strong> <strong>topic</strong> - <strong>making</strong> <strong>pump</strong> <strong>washers</strong><br />
[img][/img]<br />
[img][/img]<br />
http://spiritburner.com/forum/view<strong>topic</strong>.php?t=4782<br />
I use a machined block of UHMW plastic with radius on the top corner of each hole, and a push tool made from<br />
Delrin rod. There are many other materials that could be used, including metal as in Bryan's original post.<br />
[img]<br />
[/img]<br />
After soaking leather disks in water overnight, I push them into my plastic block (fuzzy side out) using the push tool,<br />
then remove the push tool with a rotating wiggle of sorts so that it does not remove the leather cup, and then press<br />
in another wet disk in the next hole in the block of plastic. I usually make about 8 at a time to start, but there are<br />
usually one or two that are unruly and come out badly. They are still useable usually, but when <strong>making</strong> a lot of them<br />
you can afford to be fussy if you like. It takes another 8 hours or possibly less for them to dry in the block. After<br />
drying most of the parts just fall out of the plastic block. Using a brass rod with a flat bottomed hole I push each<br />
dried cup into it in turn, using the same push tool and trim with an exacto knife, then pull out the push tool and<br />
extract the cup. This can be done by hand, including the 45 degree feather on the edge of the cup by rolling the bar<br />
Page 6<br />
30.09.2006 04:51:09
<strong>Classic</strong> <strong>Camp</strong> <strong>Stoves</strong> :: <strong>View</strong> <strong>topic</strong> - <strong>making</strong> <strong>pump</strong> <strong>washers</strong><br />
http://spiritburner.com/forum/view<strong>topic</strong>.php?t=4782<br />
whilst cutting carefully with the blade. I'm lazy though and use a lathe at low speed to do the cutting using the same<br />
tools as shown. After the cup is trimmed, I then cut the center hole which eliminates the stretching of the center<br />
hole issue.<br />
[img]<br />
[/img]<br />
Here is a closeup so that the feathered edge of the leather cup can be seen. The leather cups will also work<br />
without the feather (beveled edge) and they do not need to be perfect and pretty to work. You may as I did,<br />
eventually get the right process down where your parts are nearly indistinguishable from originals. I think it is all<br />
part of the fun, including the saving money part.<br />
[img]<br />
[/img]<br />
Here is a completed part mounted and oiled on the <strong>pump</strong> shaft from an Optuimus 5R stove, with an unoiled<br />
sample next to it. Also shown far right in the photo is a home made punch which could be made with something as<br />
simple as sharpened steel tubing.<br />
Page 7<br />
30.09.2006 04:51:09
<strong>Classic</strong> <strong>Camp</strong> <strong>Stoves</strong> :: <strong>View</strong> <strong>topic</strong> - <strong>making</strong> <strong>pump</strong> <strong>washers</strong><br />
Back to top<br />
kerophile<br />
Joined: 23 Sep 2004<br />
Posts: 138<br />
Location: Scotland<br />
Back to top<br />
nzmike<br />
Joined: 15 Dec 2005<br />
Posts: 430<br />
Location: Napier, New Zealand<br />
Back to top<br />
fyldefox<br />
Joined: 30 May 2005<br />
Posts: 1165<br />
Location: St Annes on Sea,<br />
Lancashire, England<br />
Back to top<br />
[img]<br />
[/img]<br />
Regards,<br />
Doug<br />
_________________<br />
So many stoves, so little time..........<br />
http://spiritburner.com/forum/view<strong>topic</strong>.php?t=4782<br />
Posted: Fri Sep 08, 2006 8:05 pm Post subject: Leather <strong>pump</strong> <strong>washers</strong>.<br />
Hi, I would just like to thank Bryan and Doug for taking the time to tell us how they make high quality <strong>pump</strong><br />
<strong>washers</strong>. Really good informative posts!<br />
Like all professionals they make it look easy! However, we all know that a lot of thought, work, and trials went into<br />
the development of these tools and the associated techniques.<br />
Thank you for sharing your hard-won experience.<br />
Best Regards,<br />
Kerophile.<br />
Posted: Fri Sep 08, 2006 11:10 pm Post subject:<br />
Lovely stuff! I have a couple of stoves that need new leathers (about 6 or 8 actually) ) and undoubtedly will<br />
need more in the future. I love the low tech approach to just about anything and this reeally does it for me<br />
_________________<br />
I say we dust off and nuke the whole site from orbit, it's the only way to be sure.<br />
Posted: Sat Sep 09, 2006 1:01 am Post subject:<br />
Great thread Gents !<br />
More kit to get<br />
_________________<br />
Keith<br />
Tempus omnia revelat<br />
Page 8<br />
30.09.2006 04:51:09
<strong>Classic</strong> <strong>Camp</strong> <strong>Stoves</strong> :: <strong>View</strong> <strong>topic</strong> - <strong>making</strong> <strong>pump</strong> <strong>washers</strong><br />
lobey_d<br />
Joined: 02 Aug 2004<br />
Posts: 152<br />
Location: Scotland<br />
Back to top<br />
kerophile<br />
Joined: 23 Sep 2004<br />
Posts: 138<br />
Location: Scotland<br />
Back to top<br />
Ian<br />
Site Admin/Moderator<br />
Joined: 26 Jul 2004<br />
Posts: 2484<br />
Location: West Yorkshire<br />
Back to top<br />
exeter_yak<br />
Joined: 03 Mar 2006<br />
Posts: 20<br />
Location: Massachusetts, USA<br />
Back to top<br />
http://spiritburner.com/forum/view<strong>topic</strong>.php?t=4782<br />
Posted: Sun Sep 10, 2006 6:45 pm Post subject:<br />
Masterclass<br />
Bryan (and others), I've been searching for leather sources also and emailed this ebay seller who suggests the<br />
sample shown may be suitable. A lot of <strong>washers</strong> from 11sq ft . What do you think - possible?<br />
_________________<br />
Jim<br />
O wad some Power the giftie gie us, to see oursels as ithers see us!<br />
Robert Burns 1786<br />
Posted: Sun Sep 10, 2006 7:36 pm Post subject: Pump leathers<br />
Hi Lobey d.<br />
Looks good! I believe the 1.4 to 1.6 mm thickness is the stuff for small stoves and the 1.6 to 1.8mm for the larger<br />
stoves. BUT.... It is an awful lot of leather if we have got it wrong!<br />
I would be willing to run some trials if we were able to get a small sample from him. The fact that it is natural<br />
unfinished leather is an advantage for our application.<br />
We need an opinion from Bryan and Doug.<br />
Regards,<br />
Kerophile.<br />
Last edited by kerophile on Mon Sep 11, 2006 6:01 am; edited 1 time in total<br />
Posted: Sun Sep 10, 2006 8:01 pm Post subject:<br />
If 4 or more go for it the cost to each individual is hardly likely to break the bank.<br />
_________________<br />
Ian<br />
Let he who has not singed cast the first stove.<br />
Posted: Mon Sep 11, 2006 1:08 am Post subject:<br />
Hello all,<br />
For the larger <strong>pump</strong> <strong>washers</strong> I have been using 2 mm thickness . It is a bit on the thick side, but I had purchased<br />
about 6 square feet a year or two ago. I have to do a little fancy finger work to get the disks pushed in, and it<br />
sometimes takes a couple tries at getting it into the mould centered, but it works. 1.8-1.9 mm would probably be<br />
better for me but I have not found leather of that thickness yet. With 2mm I am just able to do it, and now with all<br />
this recent experimenting I have a lot of them made and ready in the spares box.<br />
This morning I completed some tests using some 1.5 mm leather for small <strong>pump</strong> <strong>washers</strong>. It is a little softer than<br />
my 2 mm thick material but the finished parts work very well in a stove (Opt 96). I have only a small amount of the<br />
1.5 mm size leather so I am looking for a more substantial piece still. The softer leather was much easier to get into<br />
the mould on each first try. I will eventually go after a larger piece of 1.5 mm thick leather and will specifiy medium<br />
stiffness .<br />
I am still using a leather disk size of 1.125 inch diameter ( 28.6 mm) for larger <strong>pump</strong> cups, and have revised my<br />
leather disk diameterfor the smaller size to 1.0 inch (25.4 mm) as I was having some trimming issues with not<br />
having enough material unless the molding of wet disks was nearly perfectly centered. I also made some edits to<br />
the brass part with square bottom round holes that I use for final trimming. It is double ended now and can be used<br />
for either size <strong>pump</strong> washer depending on which end you use. I think my set up is now complete.<br />
Good luck with finding suitable leather for purchase for those who are pursuing the method. I think that finding the<br />
right thickness of leather is the more difficult part of this process.<br />
Regards,<br />
Doug<br />
_________________<br />
So many stoves, so little time..........<br />
Page 9<br />
30.09.2006 04:51:09
<strong>Classic</strong> <strong>Camp</strong> <strong>Stoves</strong> :: <strong>View</strong> <strong>topic</strong> - <strong>making</strong> <strong>pump</strong> <strong>washers</strong><br />
kaw550red<br />
Joined: 22 Aug 2004<br />
Posts: 190<br />
Location: Durham North East<br />
England<br />
Back to top<br />
David Shouksmith<br />
Joined: 28 Jul 2004<br />
Posts: 1633<br />
Location: Great Lumley -<br />
cultural capital of N.E. England<br />
Back to top<br />
lobey_d<br />
Joined: 02 Aug 2004<br />
Posts: 152<br />
Location: Scotland<br />
Back to top<br />
http://spiritburner.com/forum/view<strong>topic</strong>.php?t=4782<br />
Posted: Mon Sep 11, 2006 9:37 am Post subject: Leather suitability<br />
Hi Jim<br />
lobey_d wrote:<br />
Masterclass<br />
I've been searching for leather sources also and emailed this ebay seller who suggests the sample shown<br />
may be suitable. A lot of <strong>washers</strong> from 11sq ft . What do you think - possible?<br />
Thanks for that link. From the description it sounds ideal. The leather for tool holders is similar to the leather that I<br />
have been using. I have taken the plunge and bought one sheet. I have ordered the 1.8/2.0 mm thickness in the<br />
hope that it will be nearer 1.8 mm than 2.00 mm<br />
Your searches seem to be more effective than mine. I had previously bought some leather off ebay which<br />
consisted of assorted offcuts. Whilst it did make <strong>washers</strong> they were not as good as those made from the pigskin<br />
like leather.<br />
I have always assumed that the commercially made <strong>pump</strong> <strong>washers</strong> were stiff because they were made out of a<br />
stiff leather but it has just ocurred to me that they may be stiff because the leather is compressed a lot during<br />
<strong>making</strong>.<br />
Once the leather comes I will try it out and if it is suitable for <strong>washers</strong> sell parts of it to reduce my outlay.<br />
I will let you know what happens<br />
I have heard that the uppers of old leather shoes make reasonable <strong>pump</strong> <strong>washers</strong> but have never tried it. I used to<br />
have a pigskin briefcase and that leather would have been ideal. Naturally I threw it out a long time ago. You may<br />
have disguarded leather items around the house tthat would provide free materials for <strong>making</strong> the <strong>washers</strong>.<br />
Regards Bryan<br />
_________________<br />
Bryan Miller<br />
Posted: Mon Sep 11, 2006 12:13 pm Post subject: Re: Leather suitability<br />
kaw550red wrote:<br />
Once the leather comes I will try it out and if it is suitable for <strong>washers</strong> sell parts of it to reduce my outlay.<br />
I'm in, Bryan...<br />
_________________<br />
Post Tenebras Lux<br />
Posted: Mon Sep 11, 2006 12:32 pm Post subject: Re: Leather suitability<br />
kaw550red wrote:<br />
Your searches seem to be more effective than mine. I had previously bought some leather off ebay which<br />
consisted of assorted offcuts.<br />
Yes Bryan, I found the offcuts too. Then I tried searches with "hide" and "skin" and found this type.<br />
kaw550red wrote:<br />
Once the leather comes I will try it out and if it is suitable for <strong>washers</strong> sell parts of it to reduce my outlay.<br />
I'm in too, please.<br />
_________________<br />
Jim<br />
O wad some Power the giftie gie us, to see oursels as ithers see us!<br />
Robert Burns 1786<br />
Page 10<br />
30.09.2006 04:51:09
<strong>Classic</strong> <strong>Camp</strong> <strong>Stoves</strong> :: <strong>View</strong> <strong>topic</strong> - <strong>making</strong> <strong>pump</strong> <strong>washers</strong><br />
fyldefox<br />
Joined: 30 May 2005<br />
Posts: 1165<br />
Location: St Annes on Sea,<br />
Lancashire, England<br />
Back to top<br />
David Shouksmith<br />
Joined: 28 Jul 2004<br />
Posts: 1633<br />
Location: Great Lumley -<br />
cultural capital of N.E. England<br />
Back to top<br />
oops56<br />
Joined: 23 Oct 2005<br />
Posts: 654<br />
Location: proctor vt<br />
Back to top<br />
Page 1 of 3<br />
http://spiritburner.com/forum/view<strong>topic</strong>.php?t=4782<br />
Posted: Mon Sep 11, 2006 2:14 pm Post subject:<br />
Me too !<br />
Cheers<br />
_________________<br />
Keith<br />
Tempus omnia revelat<br />
Posted: Mon Sep 11, 2006 2:19 pm Post subject:<br />
...and Trevor (shagratork) will definitely be interested...<br />
_________________<br />
Post Tenebras Lux<br />
Posted: Mon Sep 11, 2006 3:15 pm Post subject: leather<br />
me too hurry<br />
_________________<br />
Robert 63{oops56]<br />
Display posts from previous: All Posts Oldest First Go<br />
<strong>Classic</strong> <strong>Camp</strong> <strong>Stoves</strong> Forum Index -> Fettling Forum<br />
All times are GMT + 1 Hour<br />
Goto page 1, 2, 3 Next<br />
Jump to: Fettling Forum Go<br />
PoweredbyphpBB ©2001, 2002phpBB Group<br />
© R. Mellows 2000-2006<br />
Articles & Images are property & copyright of Ross Mellows or original contributor.<br />
All printed material reproduced with permission where applicable.<br />
It is the aim of this website to provide & share information but please do not take items or articles<br />
from this site for publication elsewhere without permission.<br />
You cannot post new <strong>topic</strong>s in this forum<br />
You cannot reply to <strong>topic</strong>s in this forum<br />
You cannot edit your posts in this forum<br />
You cannot delete your posts in this forum<br />
You cannot vote in polls in this forum<br />
Page 11<br />
30.09.2006 04:51:09