Classic Camp Stoves :: View topic - making pump washers
Classic Camp Stoves :: View topic - making pump washers
Classic Camp Stoves :: View topic - making pump washers

You also want an ePaper? Increase the reach of your titles
YUMPU automatically turns print PDFs into web optimized ePapers that Google loves.
<strong>Classic</strong> <strong>Camp</strong> <strong>Stoves</strong> :: <strong>View</strong> <strong>topic</strong> - <strong>making</strong> <strong>pump</strong> <strong>washers</strong><br />
http://spiritburner.com/forum/view<strong>topic</strong>.php?t=4782<br />
I cannot remember whether I have used the <strong>pump</strong> tube of a tank to make the <strong>washers</strong> but theoretically there is no<br />
reason why it cannot be done but it will take longer to dry out than using a <strong>pump</strong> tube out of the stove.<br />
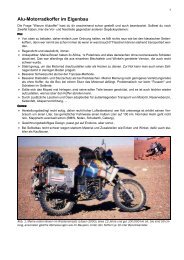
MORE ADVANCED METHODS<br />
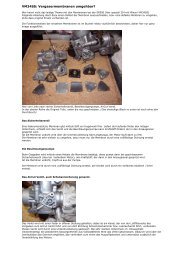
Photo by George Linekar<br />
This is a slighty more advanced method of <strong>making</strong> the <strong>washers</strong> using short lengths of <strong>pump</strong> tube. The tubes need<br />
cutting with pipe cutters to get square cut ends. This leaves a burr inside the tube which must be removed. The<br />
entries into the tubes are slightly tapered to ease entry of the wet blank washer and the arrows are to make sure<br />
that it faces in the right direction. The holes in the blanks are 4 mm diameter and fit on the pin of the former. This is<br />
to help prevent the blank going crookedly into the mould. The operative word is help. The blanks seem to take on a<br />
mind of their own and it can be difficult to get them to go in straight.<br />
The formers are made from the stems and handles of old taps. Their diameters are the same as the pistons of the<br />
two common sizes of <strong>pump</strong>s.<br />
Place the soaked washer over the former pin with the rough side towards the mould. Place the mould on a flat<br />
surface and push the soaked washer into the mould with the former until it hits the flat surface. Remove the<br />
former. This is easier if it is turned at the same time as as you are pulling out. Put the mould on its side so that the<br />
air can get to both sides and allow the washer to dry. When dry push out of the moulds and cut an 8 mm diameter<br />
hole in the centre of the bottom of each washer. The reason that this is left till last is because the leather can<br />
stretch when you push it into the mould. Cutting it before it had dried could mean that the hole was too big for the<br />
piston.<br />
Page 3<br />
30.09.2006 04:51:09