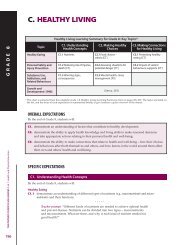
1st class lever 2nd class lever 3rd class lever
1st class lever 2nd class lever 3rd class lever
1st class lever 2nd class lever 3rd class lever

Create successful ePaper yourself
Turn your PDF publications into a flip-book with our unique Google optimized e-Paper software.
Structures and Mechanisms – Systems in Action<br />
– <strong>1st</strong> Class Levers –<br />
Description: During this subtask, the students will review the three <strong>class</strong>es of <strong>lever</strong>s. They students will have the opportunity to<br />
observe, discover, and investigate <strong>lever</strong>s and their practical applications and to apply their previous knowledge to practical<br />
applications and situations. The students will investigate ways of linking different <strong>class</strong>es <strong>lever</strong>s to a system, as a way of<br />
improving the performance of that system<br />
Activity 1 - First Class Levers<br />
Part #1 (Qualitative)<br />
1. Place the <strong>lever</strong> on the fulcrum so the fulcrum is in the centre groove. (BLM 3.0 - Diagram 1)<br />
2. Place the brick (resistance/load) on one end of the <strong>lever</strong>. Move the <strong>lever</strong> so the fulcrum is close to the resistance.<br />
3. Have the students push down on the other end of the <strong>lever</strong> using their hands as the effort force.<br />
4. Record these observations on the chart. (Blackline master BLM 3.1)<br />
5. Repeat this procedure by moving the fulcrum to the centre of the load, then closer to the effort. Record observations<br />
each time.<br />
Part #2 (Quantitative)<br />
1. Place the <strong>lever</strong> on the fulcrum so the fulcrum is in the centre groove. The effort arm should be overhanging the desk<br />
(BLM 3.0 - Diagram 2)<br />
2. Place a measured resistance, 200 g weight, on one end of the <strong>lever</strong>. Position the <strong>lever</strong> so the fulcrum is close to the<br />
resistance.<br />
3. Hook a Newton spring scale over the end of the <strong>lever</strong>. (Note: AN eye hook may be placed under the end of the <strong>lever</strong><br />
to anchor the spring scale.)<br />
4. Record the effort needed to lift the resistance. (see blackline master BLM 3.2a)<br />
5. Repeat the procedure by moving the fulcrum to the centre of <strong>lever</strong> and the close to the effort. The fulcrum is moving<br />
away from the resistance and closer to the effort. Again, record the force (effort) necessary to move the resistance.<br />
6. Have the students calculate the mechanical advantage of a first <strong>class</strong> <strong>lever</strong> by altering the resistance arm and the effort<br />
arm using two 200 g weights. Students will change the distance of the arms four times and calculate the resulting<br />
Mechanical Advantage.<br />
7. Record the measurement of distances of each arm in the appropriate box on table BLM 3.2b. Then have students<br />
calculate Mechanical Advantage and write in the correct response in the corresponding box on table BLM 3.2b.<br />
Note: The students should notice that during this activity there is a change in direction of the forces.