Lang Electric Half Size Computerized Convection Oven - Parts Town
Lang Electric Half Size Computerized Convection Oven - Parts Town
Lang Electric Half Size Computerized Convection Oven - Parts Town

You also want an ePaper? Increase the reach of your titles
YUMPU automatically turns print PDFs into web optimized ePapers that Google loves.
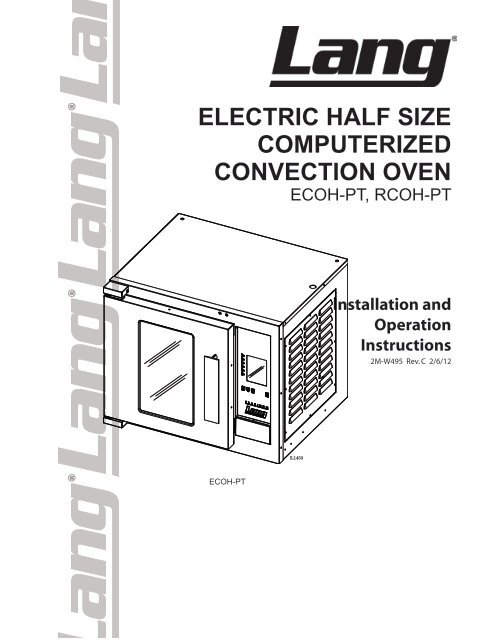
ELECTRIC HALF SIZE<br />
COMPUTERIZED<br />
CONVECTION OVEN<br />
ECOH-PT, RCOH-PT<br />
ECOH-PT<br />
IL1453<br />
Installation and<br />
Operation<br />
Instructions<br />
2M-W495 Rev. C 2/6/12
SAFETY SYMBOL<br />
These symbols are intended to alert the user to the presence of<br />
important operating and maintenance instructions in the manual<br />
accompanying the appliance.<br />
FOR YOUR SAFTEY<br />
DO NOT STORE OR USE GASOLINE OR OTHER FLAMMABLE VAPORS AND LIQUIDS IN<br />
THE VICINTIY OF THIS OR ANY OTHER APPLIANCE.<br />
POST IN PROMINENT LOCATION<br />
INSTRUCTIONS TO BE FOLLOWED IN THE EVENT USER SMELLS GAS. THIS<br />
INFORMATION SHALL BE OBTAINED BY CONSULTING YOUR LOCAL GAS SUPPLIER.<br />
AS A MINIMUM, TURN OFF THE GAS AND CALL YOUR GAS COMPANY AND YOUR<br />
AUTHORIZED SERVICE AGENT. EVACUATE ALL PERSONNEL FROM THE AREA.<br />
WARNING<br />
IMPROPER INSTALLATION, ADJUSTMENT, ALTERATION, SERVICE OR MAINTENANCE<br />
CAN CAUSE PROPERTY DAMAGE, INJURY OR DEATH. READ THE INSTALLATION,<br />
OPERATION & MAINTENANCE INSTRUCTIONS THOROUGHLY BEFORE INSTALLING OR<br />
SERVICING THIS EQUIPMENT.<br />
WARNING<br />
RISK OF FIRE OR ELECTRIC SHOCK<br />
DO NOT OPEN<br />
WARNING, TO REDUCE THE RISK OF ELECTRICAL SHOCK, DO NOT REMOVE<br />
CONTROL PANEL. NO USER-SERVICABLE PARTS INSIDE.<br />
REPAIRS SHOULD BE DONE BY AUTHORIZED SERVICE PERSONNEL ONLY.<br />
NOTICE<br />
Using any part other than genuine <strong>Lang</strong> factory supplied parts relieves the manufacturer of all<br />
liability.<br />
<strong>Lang</strong> reserves the right to change specifications and product design without notice. Such<br />
revisions do not entitle the buyer to corresponding changes, improvements, additions or<br />
replacements for previously purchased equipment.<br />
Due to periodic changes in designs, methods, procedures, policies and regulations,<br />
the specifications contained in this sheet are subject to change without notice. While<br />
<strong>Lang</strong> exercises good faith efforts to provide information that is accurate, we are not<br />
responsible for errors or omissions in information provided or conclusions reached as a<br />
result of using the specifications. By using the information provided, the user assumes all risks<br />
in connection with such use.<br />
MAINTENANCE AND REPAIRS<br />
Contact your local dealer for service or required maintenance. Please record the model number, serial<br />
number, voltage and purchase & Installation Information in the area below and have it ready when you<br />
call to ensure a faster service.<br />
Model No.:<br />
Serial No.:<br />
Voltage:<br />
-Phase or 3 Phase:<br />
Purchased From:<br />
Location:<br />
Purchase Date:<br />
Installed Date:
PROBLEMS, QUESTIONS or CONCERNS<br />
Before you proceed consult you authorized <strong>Lang</strong> service agent directory<br />
or<br />
Call the <strong>Lang</strong> Technical Service & <strong>Parts</strong> Department at 314-678-6315.<br />
TABLE OF CONTENTS<br />
Specifications . . . . . . . . . . . . . . . . . . . . . . . . . . . . . . . . . . . . . . . . . . . . . . . . .4<br />
Equipment Description . . . . . . . . . . . . . . . . . . . . . . . . . . . . . . . . . . . . . . . . . .5<br />
Unpacking. . . . . . . . . . . . . . . . . . . . . . . . . . . . . . . . . . . . . . . . . . . . . . . . . . . . 6<br />
Installation<br />
Leg Installation . . . . . . . . . . . . . . . . . . . . . . . . . . . . . . . . . . . . . . . . . . . . . . . . 7<br />
Stacking the <strong>Oven</strong>. . . . . . . . . . . . . . . . . . . . . . . . . . . . . . . . . . . . . . . . . . . . . .7<br />
Vent Cap Installation . . . . . . . . . . . . . . . . . . . . . . . . . . . . . . . . . . . . . . . . . . . .8<br />
Ventilation & Clearance. . . . . . . . . . . . . . . . . . . . . . . . . . . . . . . . . . . . . . . . . .9<br />
<strong>Electric</strong>al Connection. . . . . . . . . . . . . . . . . . . . . . . . . . . . . . . . . . . . . . . . . . . .9<br />
<strong>Oven</strong> Voltage. . . . . . . . . . . . . . . . . . . . . . . . . . . . . . . . . . . . . . . . . . . . . . . . . . 9<br />
Reversing the door . . . . . . . . . . . . . . . . . . . . . . . . . . . . . . . . . . . . . . . . . . . . 0<br />
Initial Start-Up<br />
Pre-Power On. . . . . . . . . . . . . . . . . . . . . . . . . . . . . . . . . . . . . . . . . . . . . . . . .<br />
Power On . . . . . . . . . . . . . . . . . . . . . . . . . . . . . . . . . . . . . . . . . . . . . . . . . . . .<br />
General Operation & Programming<br />
Control Panel. . . . . . . . . . . . . . . . . . . . . . . . . . . . . . . . . . . . . . . . . . . . . . . . .<br />
Status Display. . . . . . . . . . . . . . . . . . . . . . . . . . . . . . . . . . . . . . . . . . . . . . . . . 3<br />
Control Panel Buttons. . . . . . . . . . . . . . . . . . . . . . . . . . . . . . . . . . . . . . . . . . . 3<br />
Loading. . . . . . . . . . . . . . . . . . . . . . . . . . . . . . . . . . . . . . . . . . . . . . . . . . . . . . 3<br />
Pace Timers. . . . . . . . . . . . . . . . . . . . . . . . . . . . . . . . . . . . . . . . . . . . . . . . . . 4<br />
Program Enable Buttons . . . . . . . . . . . . . . . . . . . . . . . . . . . . . . . . . . . . . . . . 4<br />
Shelf Position Buttons. . . . . . . . . . . . . . . . . . . . . . . . . . . . . . . . . . . . . . . . . . 4<br />
Cleaning. . . . . . . . . . . . . . . . . . . . . . . . . . . . . . . . . . . . . . . . . . . . . . . . . . . . . 4<br />
Troubleshooting<br />
Symptoms & Possible Causes . . . . . . . . . . . . . . . . . . . . . . . . . . . . . . . . . . . 5<br />
Wiring Diagram. . . . . . . . . . . . . . . . . . . . . . . . . . . . . . . . . . . . . . . . . . . . . 0 - 3<br />
Exploded View & <strong>Parts</strong> List . . . . . . . . . . . . . . . . . . . . . . . . . . . . . . . . . . . . 4 - 9<br />
NOTICE Service on this or any other <strong>Lang</strong> appliance must be performed by qualified<br />
personnel only. Consult your <strong>Lang</strong> Authorized Service Agent Directory. You<br />
can call our toll free number 314-678-6315 or visit our website<br />
www.langworld.com for the service agent nearest you.<br />
3
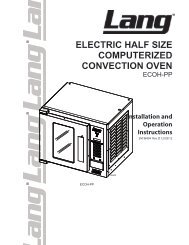
SPECIFICATIONS<br />
Model Height x Width x Depth Clearance from Weight<br />
(without optional stand) combustible surface Installed Shipping Freight Class<br />
ECOH 5.3” x 30. ” x 5.3” Side:6”, Back: 6”, Floor: 6” 85 lbs. 5lbs 85<br />
64 mm x 766mm x 643mm (84 kg) ( 0 kg)<br />
30.2”<br />
766mm<br />
STAND OPTIONAL<br />
25.3”<br />
642mm<br />
28.0”<br />
711mm<br />
53.3”<br />
1353mm<br />
25.3”<br />
643mm<br />
25.3”<br />
642mm<br />
28.0”<br />
711mm<br />
3.0”<br />
76mm<br />
<strong>Electric</strong>al<br />
Connection<br />
25.3”<br />
642mm<br />
30.2”<br />
766mm<br />
Front Side View Right Side View<br />
Top View<br />
<strong>Lang</strong> Model<br />
VOLTS<br />
AC Hz.<br />
ELECTRICAL SPECIFICATIONS<br />
MOTOR<br />
AMPS PHASE<br />
AMPS 3PH/<br />
NEUT. KW TOT.<br />
ECOH-PT208PR 208 60 3.3 1/3 7.8 38 8 23 21 23 10<br />
ECOH-PT208RF 208 60 3.3 1/3 7.8 38 8 23 21 23 10<br />
ECOH-PT208SZ 208 60 3.3 1/3 7.8 38 8 23 21 23 10<br />
ECOH-PT-208V 208 60 3.3 1/3 7.8 38 8 23 21 23 10<br />
ECOH-PT208V7 208 60 3.3 1/3 7.8 38 8 23 21 23 10<br />
ECOH-PT208WA 208 60 3.3 1/3 7.8 38 8 23 21 23 10<br />
ECOH-PT208WD 208 60 3.3 1/3 7.8 38 8 23 21 23 10<br />
ECOH-PT240NT 240 60 2.6 1/3 7.8 33 8 20 18 20 12<br />
ECOH-PT240SZ 240 60 2.6 1/3 7.8 33 8 20 18 20 12<br />
ECOH-PT-240V 240 60 2.6 1/3 7.8 33 8 20 18 20 12<br />
ECOH-PT240WA 240 60 2.6 1/3 7.8 33 8 20 18 20 12<br />
ECOH-PT480CF 480 60 3.3 3 5.3 11 11 - 12<br />
ECOH-PT480MF 480 60 1 3 7.8 10 9 10 12<br />
ECOH-PT480NT 480 60 1.0 3 7.8 10 9 10 12<br />
ECOH-PT-480V 480 60 1 3 7.8 10 9 10 12<br />
RCOHPT-208CF 208 60 3.3 3 5.3 25.5 10 25.5 25.5 - 10<br />
RCOHPT-208V 208 60 3 1/3 7.8 37.5 8 22 20.7 22 12<br />
RCOHPT-240CF 240 60 2.6 1/3 5.3 22.1 10 22.1 22.1 - 10<br />
RCOHPT-440VM 440 60 1.4 3 6.6 8.8 8.3 8.8 12<br />
RCOHPT-480CF 480 60 3.3 3 5.3 11 11 - 12<br />
RCOHPT-480V 480 60 1.4 3 7.8 9.5 9 9.5 12<br />
4<br />
AMPS<br />
1 PH<br />
WIRE<br />
1 PH L1 L2 L3<br />
ECOH-PT2/3NT 220/380 50/60 3.3 3 1.3 6.6 10.9 9.5 9.5 12<br />
ECOH-PT2/3MF 220/380 50/60 3.3 3 1.3 6.6 10.9 9.5 9.5 12<br />
ECOHPT208CF 208 60 3.3 3 5.3 25.5 10 25.5 25.5 - 10<br />
ECOH-PT208CF 208 60 3.3 3 5.3 25.5 10 25.5 25.5 - 10<br />
ECOHPT208CFC 208 60 3.3 3 5.3 25.5 10 25.5 25.5 - 10<br />
ECOHPT208CFR 208 60 3.3 3 5.3 25.5 10 25.5 25.5 - 10<br />
ECOH-PT208MF 208 60 3.3 1/3 7.8 38 8 23 21 23 10<br />
ECOH-PT208NT 208 60 3.3 1/3 7.8 38 8 23 21 23 10<br />
ECOH-PT208PC 208 60 3.3 1/3 7.8 38 8 23 21 23 10<br />
20.8”<br />
529m<br />
WIRE<br />
3 PH<br />
IL1454
NOTICE<br />
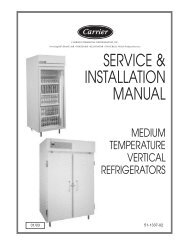
EQUIPMENT DESCRIPTION<br />
Exterior Construction<br />
The Top, Front, Back, and Sides are constructed of stainless steel with an aluminized bottom.<br />
The oven exterior dimensions are:<br />
30” (76. cm) Wide,<br />
Controls<br />
5. 5” (74.3 cm) High,<br />
6.5” (67.3 cm) Deep.<br />
Door Handle<br />
The oven door comes standard<br />
with a high temperature<br />
insulated window equipped with<br />
a polycarbonate handle.<br />
The oven cavity is insulated<br />
with high temperature insulation<br />
for efficiency and reduced heat<br />
loss.<br />
Interior Construction<br />
The oven is designed for five<br />
shelves and comes with five<br />
IL1455<br />
Chrome Plated Racks.<br />
The interior cooking chamber<br />
is constructed of stainless steel<br />
with dimensions of:<br />
5” (38. cm) Wide,<br />
Back-Up Controls<br />
0” (50.84 cm) High,<br />
” (53.38 cm) Deep.<br />
Operation<br />
The ECOH oven is a forced air convection oven with a vented oven cavity.<br />
The air is driven by a /3 HP fan motor.<br />
Controls<br />
Pre-Programmable Product Selections<br />
Independent Shelf Timers for each Shelf.<br />
Shelf Compensation Timing for uniform baking.<br />
Technical<br />
<strong>Oven</strong> operates as shipped 08V or 40V (single or three phase), or 480V (three phase).<br />
The oven can be shipped with a Power Cord and Plug attached, but must be specified upon ordering<br />
(part number is listed in the <strong>Parts</strong> portion of this manual).<br />
Floor space required is 4 ” ( 06.68cm) Wide, 3 .5” (8 .55cm) Deep.<br />
The oven weighs approximately 5 lb. ( 0 .5 Kilograms).<br />
The ovens are stackable, stacking kit available upon request.<br />
The data plate is on the back side of the oven above the power cord.<br />
The oven voltage, wattage, serial number, wire size, and clearance<br />
specifications are on the data plate. This information should be carefully read<br />
and understood before proceeding with the installation.<br />
5<br />
Width<br />
Depth<br />
Motor Cover<br />
Height
CAUTION<br />
UNPACKING<br />
Receiving the <strong>Oven</strong><br />
Upon receipt, check for freight damage, both visible and concealed.<br />
Visible damage should be noted on the freight bill at the time of delivery and<br />
signed by the carrier’s agent. Concealed loss or damage means it does not<br />
become apparent until the merchandise has been unpacked. If concealed<br />
loss or damage is discovered upon unpacking, make a written request for<br />
inspection by the carrier’s agent within 5 days of delivery. All packing material<br />
should be kept for inspection. Do not return damaged merchandise to<br />
Star Manufacturing Company. File your claim with the carrier.<br />
Location<br />
Prior to un-crating, move the oven as near to its intended location as practical. The crating will help<br />
protect the unit from the physical damage normally associated with moving it through hallways and<br />
doorways.<br />
Un-crating<br />
The oven will arrive completely assembled inside a wood frame and strapped to a skid. Cut the<br />
straps and remove the wood frame.<br />
The oven can now be removed from the skid.<br />
THE UNIT IS EXTREMELY HEAVY. FOR SAFE HANDLING, INSTALLER SHOULD<br />
OBTAIN HELP AS NEEDED, OR EMPLOY APPROPRIATE MATERIALS<br />
HANDLING EQUIPMENT (SUCH AS A FORKLIFT, DOLLY, OR PALLET JACK) TO<br />
REMOVE THE UNIT FROM THE SKID AND MOVE IT TO THE PLACE OF<br />
INSTALLATION.<br />
ANY STAND, COUNTER OR OTHER DEVICE ON WHICH OVEN WILL BE<br />
LOCATED MUST BE DESIGNED TO SUPPORT THE WEIGHT OF THE OVEN.<br />
SHIPPING STRAPS ARE UNDER TENSION AND CAN SNAP BACK WHEN CUT.<br />
6
Leg<br />
Mounting Hole<br />
4” Leg<br />
INSTALLATION<br />
16” or 28”<br />
Stand<br />
Stacking the <strong>Oven</strong>s<br />
Two alignment pins (pn: C- 0 08- ) are<br />
needed if you intend on stacking two ECOH<br />
on each other as shown. These pins must be<br />
requested at the time of purchase, or call your<br />
<strong>Lang</strong> authorized service agent, or <strong>Lang</strong> parts<br />
department at 3 4-678-63 5, or a <strong>Lang</strong> Service<br />
Agent near you.<br />
Having completed the previous step remove<br />
any and all button plugs from the lower unit, so<br />
the upper unit will lay properly.<br />
Lay the upper unit on its back and screw the<br />
alignment pins into the two rear holes.<br />
With assistance lift the upper unit onto the lower<br />
unit, being certain that the alignment pins go<br />
into the alignment holes, as shown here.<br />
NOTE: Each unit must have separate<br />
electrical connections<br />
7<br />
Cardboard<br />
IL1430<br />
Leg Installation<br />
4” legs are available for single<br />
countertop installations. Single and<br />
double deck installations require<br />
6” or 8” stand installation, casters<br />
may also be used in certain<br />
situations.<br />
To install the 4” legs, place some<br />
cardboard on the floor and gently tip<br />
the unit onto its back. Fasten the<br />
four, 4” legs into the threaded holes<br />
located on the bottom of the unit.<br />
Gently lift the oven into its operating<br />
position.<br />
6” & 8” stand installation, after<br />
following the assembly<br />
instructions that were provided with<br />
the stand, gently lower unit on to<br />
some cardboard as shown here.<br />
Align the stand with the bottom of<br />
the unit and secure with the<br />
hardware provided. With the<br />
assistance of carefully raise the unit<br />
to its vertical position.<br />
IL1431<br />
Alignment Pins<br />
pn: 2C-20108-11<br />
Alignment Hole
INSTALLATION continued<br />
Ventilation and Clearances<br />
Standard minimum clearance from combustible construction is as follows.<br />
4” from side<br />
4” from back<br />
6” from floor<br />
• These ovens may be set directly, without legs, on a curbed base or non-combustible floor.<br />
• If the oven is set without legs on a non-combustible floor or a curbed base, maintain a 4-inch back<br />
clearance.<br />
• If the oven is set directly against a non-combustible back wall, maintain a 6-inch clearance to the floor.<br />
• Do not install the oven closer than inches from an uncontrolled heat source (char broiler etc.) on<br />
the right side.<br />
• Keep the area free & clear of combustible material, and do not obstruct the flow of combustion or<br />
ventilation air.<br />
• The installation of any components such as a vent hood, grease extractors, and/or fire extinguisher<br />
systems, must conform to the applicable nationally recognized installation standards.<br />
NOTICE The installation of any components such as a vent hood, grease<br />
extractors, fire extinguisher systems, must conform to their<br />
applicable National, State and locally recognized installation<br />
standards.<br />
<strong>Electric</strong>al Connection<br />
The electrical connection must be made in accordance with local codes or in the absence of local codes<br />
with NFPA No. 70 latest edition (in Canada use: CSA STD. C . ).<br />
The electrical service entrance is provided by a /4-inch knockout at the oven back directly behind the<br />
control compartment. A grounding lug is provided at the rear service entrance.<br />
Certain units are provided with or can be purchased with a Cord & Plug kit<br />
(Part number 9Q-ECOH-CK). This kit includes a 48” cord with a NEMA L 5-30P plug and is for 3 Phase<br />
units ONLY. In stacked situations each units needs to have separate cord & plug assemblies.<br />
<strong>Oven</strong> Voltage<br />
The <strong>Lang</strong> Model ECOH ovens can be operated on 08, 40-volt (single or three phase), or 480-volt<br />
(three phase only) source. The Amp draw, KW rating, and phasing can be found in specification section<br />
of this manual.<br />
THIS APPLIANCE MUST BE GROUNDED AT THE TERMINAL PRO-<br />
VIDED. FAILURE TO GROUND THE APPLIANCE COULD RESULT IN<br />
WARNING<br />
ELECTROCUTION AND DEATH.<br />
I NSTALLATION OF THE UNIT MUST BE DONE BY PERSONNEL QUAL-<br />
IFIED TO WORK WITH ELECTRICITY AND PLUMBING. IMPROPER<br />
INSTALLATION CAN CAUSE INJURY TO PERSONNEL AND/OR DAM-<br />
WARNING<br />
AGE TO EQUIPMENT. UNIT MUST BE INSTALLED IN ACCORDANCE<br />
WITH ALL APPLICABLE CODES.<br />
8
REVERSING THE DOOR<br />
. Disconnect oven from power.<br />
. Remove the top and bottom door hinge covers (4) by removing the two 0-3 Phillip head<br />
screws (8).<br />
3. Remove the top door hinge bracket ( ) from the oven by removing the two ¼- 0 Phillip head<br />
screws (7). The hinge should now slide off of the door pin (this will now be your right hand<br />
lower hinge)<br />
4. Lift the door off the bottom pin and set aside.<br />
5. Remove the bottom door hinge bracket ( ) by removing the two ¼- 0 Phillip head screws (7)<br />
(this will now be your upper right hand hinge).<br />
6. Remove the lower hinge mounting plate (9) by pulling it from behind the leg pad adapter on the<br />
bottom of the oven.<br />
7. Remove the two Phillips head screws in the bottom right corner of the oven, where the new<br />
hinge will be placed.<br />
8. Slide the hinge mounting plate (9) into place and mount the hinge bracket (this should be your<br />
old upper hinge) using two ¼- 0 (7) Phillips head screws.<br />
9. Remove the two Phillips head screws in the upper right corner of the oven where the new hinge<br />
will be placed.<br />
0. Rotate the door 80° and slide the door pin into the bottom hinge bracket.<br />
. Slide the upper door hinge ( ) onto the upper door pin and then screw into place using<br />
two ¼- 0 Phillip head screws.<br />
. Place the top and bottom door hinge covers (4) back on the oven using two 0-3 Phillip head<br />
screws (8).<br />
8<br />
7<br />
7<br />
5<br />
6<br />
6<br />
5<br />
4<br />
8<br />
8<br />
4<br />
8<br />
1<br />
8<br />
IL1426<br />
1<br />
9<br />
12<br />
11<br />
10<br />
8<br />
8<br />
ECOH HINGE RELPACEMENT KIT<br />
pn: Q9-50313-030<br />
ITEM NO. QTY. PART NO. DESCRIPTION<br />
3<br />
4<br />
5<br />
6<br />
7<br />
8<br />
9<br />
10<br />
11<br />
12<br />
2<br />
2<br />
2<br />
2<br />
2<br />
8<br />
1<br />
1<br />
1<br />
50313-031 HINGE PIN WELDMENT<br />
EH-267 EH HINGE COVER<br />
70201-19<br />
70201-01<br />
20109-43<br />
20109-15<br />
eh-198-1 BOTTOM HINGE PLATE ASSY<br />
CR30-148 UPPER HINGE COVER FOR EH<br />
EH-265-1 EH HINGE - TOP - FOR SVC KIT<br />
1 EH-266-1 EH HINGE - BOTTOM - FOR SVC KIT<br />
9<br />
INSERT BEARINGS (ITEMS "5") INTO THE HINGES<br />
(ITEMS "1" & "2") AS SHOWN THEN REAM WITH A<br />
.508 REAMER.
NOTICE<br />
INITIAL START UP<br />
Pre-Power On<br />
After the oven is installed and connected to power, prior to turning on, verify the following<br />
• The door opens and closes freely<br />
• All racks are in the oven correctly<br />
• All packing materials have been removed from the inside of the oven<br />
Power On<br />
Once the oven has been turned<br />
on verify that the blower wheel<br />
is spinning freely in a clockwise<br />
position and that the elements<br />
are heating properly.<br />
Switch the back-up controls on<br />
and make certain it can run the<br />
unit,<br />
Confirm that the thermostat<br />
knob in the back-up controls is<br />
move freely.<br />
IL1456<br />
During the first few<br />
hours of operation you<br />
may notice a small<br />
amount of smoke coming from the oven, and a faint odor from the smoke.<br />
This is normal for a new unit and will disappear after the first few hours of use.<br />
0<br />
Blower Wheel<br />
Back-Up Controls
GENERAL OPERATION & PROGRAMMING<br />
<strong>Convection</strong> ovens constantly circulate air over and around the product. This strips away the thin layer of moisture<br />
and cool air from around the product allowing heat to penetrate more quickly.<br />
Always weigh your product. This will give you a more consistent size, color and quality.<br />
To convert standard deck oven recipes, reduce the temperature 50 degrees and the time by 5%. Make minor<br />
adjustments as necessary.<br />
The lower the oven temperature the more even the bake.<br />
Check the product near the end of the initial cooking.<br />
Do not open the oven door during baking, as this will change the baking characteristics of the oven and make it<br />
difficult to determine a final program.<br />
If the product is overdone on the outside and underdone on the inside, reduce the baking temperature.<br />
If the product is pulling away from the edge of the pan, the temperature is too high or the cooking time too long.<br />
A convection oven is a mechanical piece of equipment. The same control settings will always give the same results.<br />
If the results vary, problems may be because of changes in the product preparation.<br />
ECOH-PT Control Panel<br />
The control panel consists of the following items.<br />
Detailed operational descriptions are given later this<br />
section.<br />
Power Switch: Turns the oven on and off<br />
Function Keys: Keys are active when a program<br />
option is displayed on the display adjacent to that<br />
key.<br />
Up & Down Buttons: Allows you to scroll through<br />
the programming selections.<br />
Cancel: When scrolling through menus this will allow<br />
you to back up to the previous menu. In program<br />
mode this will allow you to back up to the previous<br />
step.<br />
Alpha Numeric Display: Visual interface.<br />
Typical Operation Sequence<br />
ACTION RESULT<br />
Control panel comes on; display says<br />
Press the on switch. “LANG, Run <strong>Oven</strong>, Time Date<br />
Program".<br />
Select “Run <strong>Oven</strong>”.<br />
Select Product button next to<br />
Icon desired.<br />
Display will show a list of product to<br />
choose.<br />
Display says “Preheating to<br />
XXXF”.<br />
Beeper sounds briefly. Display says "Ready"<br />
Select Product to start.<br />
Display shows possible product<br />
selection for that temperature.<br />
Select Product to start.. Display says, “Select shelf”<br />
Press Product button next to Display will show icon chosen and<br />
desired shelf.<br />
begin to count down.<br />
Beeper sounds continuously.<br />
<strong>Oven</strong> is ready for another<br />
product.<br />
Display shows “DONE”, press button<br />
and remove product from that shelf.<br />
AlphaNumeric<br />
Display<br />
Function Keys<br />
Up & Down Button<br />
Cancel Button<br />
Power Switch<br />
IL1476
GENERAL OPERATION & PROGRAMMING CONT.<br />
Loading<br />
Here are some things to remember when loading your oven.<br />
• When loading and unloading the oven, stage products and racks so the oven door is opened for the least amount<br />
of time.<br />
• Be sure that racks are level within the oven.<br />
• Bent or warped pans can greatly affect the evenness of the cook or bake.<br />
• If using baker’s parchment, be sure the parchment does not blow over the product. That will create an uneven<br />
bake.<br />
• Load each shelf evenly. Spaces should be maintained equally between the pan and oven walls, front and back.<br />
• Do not overload pan’s this will create an uneven bake.<br />
• For best baking results, load the oven from the center out during random loading.<br />
CAUTION<br />
ALWAYS KEEP THE AREA NEAR THE APPLIANCE FREE FROM<br />
COMBUSTIBLE MATERIALS.<br />
KEEP FLOOR IN FRONT OF EQUIPMENT CLEAN AND DRY. IF SPILLS OCCUR,<br />
CLEAN IMMEDIATELY, TO AVOID THE DANGER OF SLIPS OR FALLS.
Appetizer A<br />
Appetizer B<br />
3 Appetizer C<br />
4 Appetizer C, Option<br />
5 Apple<br />
6 Bagel A<br />
7 Bagel B<br />
8 Bagel C<br />
9 Baked Potato<br />
0 Banana<br />
Biscuit<br />
Bread French<br />
3 Bread French Option<br />
4 Bread Loaf<br />
5 Bread Sourdough Round<br />
6 Bread Stick<br />
7 Brownies<br />
8 Cake A Chocolate<br />
9 Cake B White<br />
0 Calzone<br />
Casserole<br />
Cheese Stick<br />
3 Cheese Cake<br />
4 Cheery<br />
5 Chicken<br />
6 Chicken Strips<br />
7 Cinnamon Roll<br />
8 Cinnamon Roll, Option<br />
9 Cookie A<br />
30 Cookie A, Option<br />
3 Cookie B<br />
3 Cookie C<br />
33 Cookie Chocolate Chip<br />
34 Cookie D<br />
35 Cornbread<br />
36 Doughnut<br />
37 Doughnut, Option<br />
38 Egg Dish<br />
39 Egg Roll<br />
40 Fish<br />
4 Fish, Option<br />
4 Flag<br />
43 French Fries<br />
44 Ham<br />
45 Hash browns<br />
46 Hash browns, Option<br />
47 Hoagie<br />
48 Hot Dog<br />
49 Lasagna<br />
50 Lemon<br />
51 Muffin A<br />
52 Muffin B<br />
53 Muffin C<br />
54 Onion Rings<br />
55 Onion Rings, Option<br />
56 Pastry<br />
57 Peanut<br />
58 Pear<br />
59 Pie A<br />
60 Pie B<br />
6 Pie C<br />
6 Pie D<br />
63 Pie Cherry<br />
64 Pizza A<br />
65 Pizza B<br />
66 Pizza Cheese<br />
67 Pizza Pepperoni<br />
68 Pork Chop<br />
69 Pot Pie<br />
70 Potatoes<br />
7 Pretzel<br />
7 Quiche<br />
73 Quiche, Option<br />
74 Ribs<br />
75 Roast Beef<br />
76 Roll<br />
77 Roll, Option<br />
78 Sandwich A<br />
79 Sandwich on Hoagie<br />
80 Sandwich on Hoagie,<br />
Option<br />
8 Sausage<br />
8 Scone<br />
83 Seafood<br />
84 Square<br />
85 Star<br />
86 Triangle<br />
87 Vegetable<br />
88<br />
89 Vegetable<br />
90 Birthday Cake<br />
Icon<br />
No. Description<br />
Icon<br />
No. Description<br />
Icon<br />
No. Description<br />
Icon<br />
No. Description<br />
Icon<br />
No. Description<br />
Product Icons: This list shows the icons available for your menu programs, they appear in the same order as shown here.<br />
3<br />
Tier 1 Tier 2 Tier 3<br />
Cooking Cooking Cooking<br />
Pulse Cooking Cooking Cooking Fan<br />
Cooking Cooking Cooking<br />
Product Name Icon No. Temp Time Curve Fan Speed Rate Temp Time Curve Speed Pulse Rate Temp Time Curve Fan Speed<br />
ex: Biscuits 325°F 12:30 50% HI 100%<br />
Pulse<br />
Rate<br />
Record Your Menus Here Before Entering Your Program.<br />
Record your specific menu items using the table below, prior to entering them<br />
into your units program. Keep for your records.
Platinum PROGRAMING<br />
When using the Platinum Control Panel follow<br />
these simple steps.<br />
Function Keys: Are active when selecting an option<br />
that is displayed on the LCD Screen.<br />
Function Buttons:<br />
Cancel: During Program Mode it will take you to<br />
the next step, otherwise it will take you back to<br />
the<br />
previous menu.<br />
Up & Down: Will move you through the selections/settings<br />
displayed on the LCD Screen<br />
which will be used when programming your<br />
specific<br />
requirements. (Example: access codes,<br />
temperature settings, cooking time, curve , fan<br />
speed etc.)<br />
On/Off: Main Power Switch<br />
Programming Step Contents:<br />
Step 7 Select Product Icon,<br />
Step 8 Select Product Name,<br />
Step 9 Select Product Temperature,<br />
Step 10 Select Tier Cook Time,<br />
Step 11 Select Cooking Curve,<br />
Step 12 Select Fan Speed,<br />
Step 15 Continue To Next Tier<br />
4<br />
Function<br />
Keys<br />
Function<br />
Buttons<br />
Platinum PROGRAMMING<br />
LCD Screen<br />
Cancel Up Down Light On/Off<br />
Cooking Curve: Cooking curve is a programmable function<br />
that adjusts the cooking time to compensate for planned<br />
times when the oven temperature would be lower than the<br />
programmed temperature.<br />
(i.e. temperature loses during loading and unloading).<br />
Cooking Curve 40%, is the most commonly used. Cooking<br />
Curve settings from 0% (no time adjustment) to 00% (max<br />
time adjustment) are available. As a general rule the longer<br />
the cooking time the lower the cooking curve, the shorter the<br />
cooking time the higher the cooking curve.<br />
Pulse Fan Function: A Fan Pulse Rate setting allows the fan to<br />
be programmed to cycle on and off at regular intervals during<br />
the period in the cooking cycle when there is no heat applied.<br />
(The computer will not allow the fan to be OFF whenever the<br />
heat is ON).<br />
Tier Cooking: “Tiered” programming is the ability to change the<br />
cooking temperature or fan function while cooking. (i.e. some<br />
products may require high heat and the fan to be LO for the<br />
first half of the cooking cycle. Tier 1 would be programmed<br />
with the Heat up and the fan LO and Tier 2 would then be<br />
programmed with the heat lowered and the fan HI for the<br />
remainder of the cycle.)<br />
Multiple shelf baking function is disabled when using Tier<br />
Baking programs.<br />
IL1477
Platinum PROGRAMMING<br />
◄ MANUAL MODE<br />
◄ RECIPE MODE<br />
◄ PROGRAMMING<br />
TIME DATE TEMP STATUS<br />
:00 0 /0 /0 3 5 STANDBY<br />
Cancel Up Down Light On/Off<br />
Step 1. Turn power switch on. If the oven<br />
is on, press cancel until the above<br />
screen is displayed.<br />
Step 2. Select PROGRAMMING<br />
◄ PROGRAM PRODUCT<br />
◄ EDIT ACCESS CODE<br />
◄ CONFIGURE TIME OF DAY<br />
◄ CONFIGURE OVEN OPERATION<br />
Cancel Up Down Light On/Off<br />
Step 5 Select PROGRAM PRODUCTS<br />
then<br />
Step 6 Select<br />
CREATE NEW PRODUCTS<br />
®<br />
Step 3<br />
◄ DISPLAY PRODUCT<br />
◄ TIMER ONLY<br />
◄ SET TIME / DATE<br />
◄ PROGRAM COMPUTER<br />
TIME DATE TEMP STATUS<br />
:00 0 /0 /0 3 5 STANDBY<br />
Cancel Up Down Light On/Off<br />
Select PROGRAM COMPUTER<br />
5<br />
SELECT PRODUCT ICON<br />
USE ▲▼ KEYS TO SELECT<br />
THEN PRESS<br />
ENTER TO ACCEPT<br />
◄ ENTER<br />
PIE A<br />
Cancel Up Down Light On/Off<br />
Step 7 Select Product Icon,<br />
This is the first screen in creating a<br />
product program. Press ▲▼ until<br />
you find a icon which resembles<br />
your product.<br />
Select ENTER to accept the icon<br />
and move to the next screen.<br />
Note: Refer to the Chart on page 13 for a<br />
selection of icons available.<br />
ENTER ACCESS CODE<br />
Cancel Up Down Light On/Off<br />
A<br />
USE ▲▼ KEYS TO SELECT<br />
THEN PRESS ENTER<br />
◄ ENTER<br />
PRESS CANCEL TO QUIT<br />
Step 4 Using the ▲▼ arrows, enter<br />
access code “A B C D E F”<br />
hitting ENTER after each letter.<br />
SELECT PRODUCT NAME<br />
APPETIZER A<br />
USE ▲▼ KEYS TO SELECT<br />
◄ ACCEPT<br />
◄ ENTER<br />
PIE A<br />
Cancel Up Down Light On/Off<br />
Step 8 Select Product Name,<br />
This is where you enter the name<br />
of the product into the computer.<br />
Using the ▲▼ keys type over the<br />
default name, blank space is before<br />
the A and after the 9.<br />
Select ACCEPT to continue.<br />
Note: Curser must be moved past the last<br />
digit to save the entire entry.
TIER<br />
SELECT PRODUCT TEMP<br />
00<br />
USE ▲▼ KEYS TO SELECT<br />
◄ ACCEPT<br />
◄ ENTER<br />
PIE A<br />
Cancel Up Down Light On/Off<br />
Step 9 Select Product Temperature,<br />
Press the ▲▼ to select the first<br />
digit, then press ENTER to move<br />
to the next digit. It will<br />
automatically move to the next<br />
screen after the third digit.<br />
SELECT FAN SPEED<br />
HIGH LOW<br />
USE ▲▼ KEYS TO SELECT<br />
PIE A<br />
TIER<br />
TEMP: 3 0°F TIME: 00:45:00<br />
COOKING CURVE: 80%<br />
◄ ACCEPT<br />
◄ ENTER<br />
Cancel Up Down Light On/Off<br />
Step 12 Select Fan Speed,<br />
Press the ▲▼ to move the curser<br />
between the HIGH and LO<br />
settings.<br />
Press ENTER to make your<br />
selection and move to the next<br />
screen.<br />
SELECT TIER COOK TIME<br />
00:45:00<br />
USE ▲▼ KEYS TO SELECT<br />
TIER<br />
TEMP: 3 0°F<br />
◄ ACCEPT<br />
◄ ENTER<br />
PIE A<br />
Cancel Up Down Light On/Off<br />
Step 10 Select Tier Cook Time,<br />
Time is entered in<br />
hours:minutes:seconds.<br />
The maximum is 12:59:59.<br />
Select ENTER to move the cursor<br />
to the place you want to enter the<br />
number.<br />
Select ACCEPT to continue.<br />
CORRECT?<br />
YES NO<br />
USE ▲▼ KEYS TO SELECT<br />
PIE A<br />
TIER<br />
TEMP: 3 0°F TIME: 00:45:00<br />
FAN: HI RATE: 00%<br />
CCURVE: 80%<br />
◄ ACCEPT<br />
◄ ENTER<br />
Cancel Up Down Light On/Off<br />
Step 13 Correct<br />
The computer is asking if the<br />
display is correct. If any part of<br />
the program is incorrect press ▲▼<br />
NO, and you will be taken back to<br />
Step 7.<br />
Selecting YES will advance the<br />
screen.<br />
6<br />
Platinum PROGRAMMING<br />
SELECT COOKING CURVE<br />
000%<br />
USE ▲▼ KEYS TO SELECT<br />
PIE A<br />
TIER<br />
TEMP: 3 0°F TIME: 00:45:00<br />
◄ ACCEPT<br />
◄ ENTER<br />
Cancel Up Down Light On/Off<br />
Step 11 Select Cooking Curve,<br />
press ▲▼ to select the numbers,<br />
press the ENTER to move the<br />
cursor to the next space.<br />
Cooking Curve may be any<br />
number between 0% and 100%.<br />
Select ACCEPT to continue.
Platinum PROGRAMMING<br />
CONTINUE TO NEXT TIER<br />
YES NO<br />
USE ▲▼ KEYS TO SELECT<br />
PIE A<br />
TIER<br />
TEMP: 3 0°F TIME: 00:45:00<br />
FAN: HI RATE: 00%<br />
CCURVE: 80%<br />
◄ ACCEPT<br />
◄ ENTER<br />
Cancel Up Down Light On/Off<br />
Step 15 Continue To Next Tier<br />
The cursor automatically appears<br />
on NO. Select ENTER or<br />
ACCEPT to end programming<br />
or<br />
move the curser ▲▼ to YES.<br />
This will allow your to enter another<br />
tier to this program, repeating<br />
steps 6 - 14 to program second<br />
tier.<br />
◄ CREATE NEW PROGRAM<br />
◄ EDIT PRODUCT<br />
◄ DELETE PROGRAM<br />
Cancel Up Down Light On/Off<br />
Step 16 After programing the last tier, the<br />
computer will automatically advance<br />
the screen to program more<br />
products. If no other products<br />
need to be programmed, select<br />
CANCEL three times to advance<br />
screen to the boot up screen.<br />
7<br />
◄ MANUAL MODE<br />
◄ RECIPE MODE<br />
◄ PROGRAMMING<br />
TIME DATE TEMP STATUS<br />
:00 0 /0 /0 3 5 STANDBY<br />
Cancel Up Down Light On/Off<br />
Step 17 Boot-up Screen<br />
You may now preheat the oven<br />
for any product you have programmed.<br />
Step 18 Select MANUAL or RECIPE<br />
MODE to run oven<br />
®
MAINTENANCE<br />
• <strong>Oven</strong> interiors should be wiped down daily and thoroughly cleaned weekly using warm water and mild detergent.<br />
DO NOT use caustic cleaners.<br />
• The appliance should be thoroughly checked at six-monthly intervals by a qualified<br />
technician (heating unit, mechanical stability, corrosion...) with particular emphasis on all control and safety<br />
devices.<br />
CLEANING<br />
• Always start with a cold oven.<br />
• The stainless exterior can easily be cleaned using stainless steel cleaner.<br />
• Always follow the cleaner manufacturer’s instructions when using any cleaner.<br />
• Care should be taken to prevent caustic cleaning compounds from coming in contact with the fan wheel.<br />
• The oven racks, rack slides, may be cleaned outside the oven cavity using oven cleaner.<br />
• Using any harsh chemicals will result in the removal of the ETC coating and etching of the<br />
porcelain below it. The oven interior should only be cleaned using a mild soap and a non metal scouring pad.<br />
DO NOT use caustic cleaners.<br />
• Always apply stainless steel cleaners when the oven is cold and rub in the direction of the metal’s grain.<br />
WARNING<br />
CAUTION<br />
KEEP WATER AND SOLUTIONS OUT OF CONTROLS. NEVER SPRAY OR<br />
HOSE CONTROL CONSOLE, ELECTRICAL CONNECTIONS, ETC.<br />
MOST CLEANERS ARE HARMFUL TO THE SKIN, EYES, MUCOUS<br />
MEMBRANES AND CLOTHING. PRECAUTIONS SHOULD BE TAKEN TO<br />
WEAR RUBBER GLOVES, GOGGLES OR FACE SHIELD AND PROTECTIVE<br />
CLOTHING.<br />
CAREFULLY READ THE WARNING AND FOLLOW THE DIRECTIONS ON THE<br />
LABEL OF THE CLEANER TO BE USED.<br />
NEVER LEAVE A CHLORINE SANITIZER IN CONTACT WITH STAINLESS<br />
STEEL SURFACES LONGER THAN 10 MINUTES. LONGER CONTACT CAN<br />
CAUSE<br />
CORROSION.<br />
8
Troubleshooting<br />
Symptoms & Possible Causes<br />
The following are charts of Symptoms and Possible Causes to aid in diagnosing faults with your unit.<br />
Refer to the symptoms column to locate the type of failure then to the Possible Cause for the items to be checked.<br />
To test for a possible cause refer to test to identify test procedures. Test indicated with an “*” should be done by a<br />
<strong>Lang</strong> factory authorized service representative.<br />
Symptoms Possible Cause<br />
No power to cord outlet<br />
<strong>Oven</strong> unplugged from outlet<br />
Power indicator is<br />
Failed Power cord or plug<br />
not lit<br />
Failed power switch<br />
Failed indicator light<br />
Power Switch is not “ON”<br />
Failed Transformer<br />
Failed Probe<br />
<strong>Oven</strong> will not heat Failed Circuit board<br />
Failed Contactor<br />
Failed Over-temperature Thermostat<br />
Failed Element<br />
Power Switch is not “ON”<br />
<strong>Oven</strong> motor will not Failed Transformer<br />
run<br />
Failed Contactor<br />
Failed Motor<br />
Product is cooked too long<br />
Product burning Failed Probe<br />
Failed Circuit board<br />
Product is not cooked long enough<br />
Product is under<br />
Failed Probe<br />
done<br />
Failed Circuit board<br />
9<br />
Possible Cause Test<br />
Product is cooked too<br />
long<br />
No test available, operational<br />
condition<br />
Failed Probe Check probe for proper resistance*<br />
Confirm that Circuit board is getting<br />
Failed Circuit board correct voltage and putting out<br />
correct voltage*<br />
Check both Primary and Secondary<br />
Failed Transformer<br />
coils for correct voltage*<br />
Remove the wires from the<br />
contactor coil and check for<br />
continuity across the contactor coil<br />
Failed Contactor<br />
connection*<br />
Ensure the contactor moveable<br />
points move freely up and down*<br />
Confirm that motor is getting correct<br />
Failed Motor<br />
voltage*<br />
Failed or disconnected<br />
safety thermostat<br />
Failed Element<br />
Check across the thermostat<br />
connectors for continuity*<br />
Confirm that Elements are getting<br />
correct voltage and have continuity*<br />
NOTICE If an item on the list is followed by an asterisk (*), the work should be done by<br />
a <strong>Lang</strong> factory authorized service representative.<br />
USE OF ANY REPLACEMENT PARTS OTHER THAN THOSE SUPPLIED BY<br />
LANG OR THEIR AUTHORIZED DISTRIBUTORS CAN CAUSE BODILY INJURY<br />
CAUTION TO THE OPERATOR AND DAMAGE TO THE EQUIPMENT AND WILL VOID ALL<br />
WARRANTIES.<br />
NOTICE Service on this or any other <strong>Lang</strong> appliance must be performed by qualified<br />
personnel only. Consult your <strong>Lang</strong> Authorized Service Agent Directory. You<br />
can call our toll free number 314-678-6315 or visit our website<br />
www.langworld.com for the service agent nearest you.<br />
BOTH HIGH AND LOW VOLTAGES ARE PRESENT INSIDE THIS APPLIANCE<br />
WHEN THE UNIT IS PLUGGED/WIRED INTO A LIVE RECEPTACLE. BEFORE<br />
REPLACING ANY PARTS, DISCONNECT THE UNIT FROM THE ELECTRIC<br />
WARNING<br />
POWER SUPPLY.
1<br />
6<br />
7<br />
8<br />
9<br />
H<br />
1<br />
2<br />
4<br />
3<br />
5<br />
4<br />
3<br />
2<br />
TOP ARRANGEMENT TOP SECTION WIRE DIAGRAMS<br />
SEC-1 SEC-2<br />
6000W<br />
1<br />
1667<br />
1<br />
1667 1667<br />
MODEL DESIGNATION<br />
CCR30-A & CMR30-A S S<br />
CCR30-B & CMR30-B H S<br />
B<br />
T7-T4<br />
H<br />
M<br />
T9<br />
P1<br />
BLUE<br />
12<br />
11<br />
10<br />
REVISIONS<br />
REV. DATE/ECO DESCRIPTION OF CHANGE DR<br />
WIRE TO DOOR SWITCH NO WAS NC;<br />
B 1/17/2008 UPDATED MODEL DESIG. TO STAR JMM<br />
5/6/2009 ADDED CONTACTOR #2, REVISED WIRING,<br />
C<br />
ECO 7946 CHANGE QTY OF CIRCUIT BREAKERS DJS<br />
B<br />
9<br />
3<br />
4<br />
2<br />
1<br />
CCR30-D & CMR30-D G S<br />
CCR30-C & CMR30-C H H<br />
CCR30-E & CMR30-E G H<br />
DISC-STAT<br />
HI LIMIT<br />
RED<br />
CONTACTOR #1<br />
FROM<br />
480<br />
240<br />
G<br />
5<br />
5<br />
G<br />
2 1 3 4<br />
2 1 3 4<br />
3<br />
FROM<br />
CONTACTOR #1<br />
2<br />
2<br />
HEAT ELEMENT<br />
THERMOSTAT<br />
6 HEAT SWITCH<br />
MOTOR<br />
PILOT LAMP<br />
CONTACTOR<br />
POWER SWITCH<br />
SPEED UNIT<br />
MICRO SWITCH<br />
1<br />
2<br />
3<br />
4<br />
5<br />
6<br />
7<br />
9<br />
10<br />
BLACK<br />
MOTOR<br />
HI<br />
NO<br />
A<br />
MOTOR<br />
LO<br />
NO<br />
B<br />
B<br />
24<br />
240<br />
C<br />
C<br />
C<br />
A<br />
NC<br />
NC<br />
B<br />
24VAC<br />
HI<br />
24VAC<br />
LOW<br />
208<br />
240<br />
A<br />
5 6<br />
3 4<br />
F<br />
BACKUP<br />
SWITCH<br />
F<br />
TO BREAKER<br />
TO BREAKER<br />
12/24<br />
GROUND<br />
LUG<br />
D<br />
G 18" GRIDDLE H HOT TOP S SPEED UNITS<br />
SOLENOID<br />
STEAM VALVE<br />
24VAC (WHEN PRESENT)<br />
IMPORTANT<br />
"STEAM"<br />
FROM<br />
CONTROL<br />
RANGE TOP WIRES MUST BE<br />
CONNECTED IN OVEN CONTROL<br />
AREA.<br />
D<br />
"HEAT"<br />
FROM<br />
CONTROL<br />
E<br />
E<br />
THREE PHASE<br />
L1 L2 L3<br />
B<br />
1 2 3<br />
BACKUP<br />
TSTAT<br />
C<br />
240V<br />
XFMR<br />
MOTOR<br />
XFMR<br />
MOTOR<br />
0<br />
3<br />
2<br />
1<br />
1<br />
BACKUP<br />
RELAY<br />
C<br />
BR2 BR3<br />
BR1<br />
2<br />
NC<br />
B<br />
DOOR<br />
SWITCH<br />
NC NO C<br />
NO<br />
D<br />
D<br />
L<br />
24VAC<br />
C<br />
6<br />
3<br />
5<br />
4<br />
D<br />
CONTACTOR<br />
#1<br />
STEAM<br />
BACK-UP<br />
SWITCH<br />
JP5 JP6 JP7 JP8 JP9<br />
JP35 JP36 JP37 JP38 JP39 JP40<br />
JP30 JP31 JP32 JP33 JP34<br />
RS232<br />
JP20<br />
BLUE<br />
WHITE<br />
RED<br />
C<br />
JP41<br />
OVEN CONTROL<br />
JP11 JP12 JP13 JP14 JP15 JP16 JP17 JP18 JP19<br />
C<br />
C<br />
L<br />
24VAC<br />
CONTACTOR<br />
#2<br />
C<br />
JP4 JP3 JP24 JP23<br />
JP22 JP21 26 27<br />
JP1<br />
JP2<br />
RED<br />
WHITE<br />
BLUE<br />
7.5 KW<br />
7.5 KW<br />
RTD<br />
7.5 KW<br />
A<br />
B<br />
B<br />
CONVECTION OVEN/RANGE ELECTRICAL DATA<br />
MODEL KW PER PHASE C<br />
AMPS C<br />
NUMBER<br />
L1-L2 L2-L3 L1-L3 TOTAL L1 L2 L3<br />
***- A 7.8 5.2 5.2 18.2 23.6 23.6 18.8<br />
***- B 7.8 5.2 5.0 18.0 23.3 23.6 18.4<br />
***- C 7.8 5.0 5.0 17.8 23.3 23.3 19.9<br />
***- D 7.8 5.2 6.0 16.5 23.6 25.0 20.2<br />
***- E 7.8 5.0 6.0 18.8 25.0 23.3 19.9<br />
***- F 7.8 5.5 5.5 18.8 25.0 25.0 21.7<br />
***- G 7.8 6.0 5.2 19.0 25.0 23.6 20.2<br />
CONTROL FRONT<br />
AND DISPLAY<br />
D<br />
C<br />
B<br />
A<br />
CHK. DATE :<br />
A<br />
A<br />
JP11=HEAT<br />
JP12=HI SP MOTOR<br />
JP13=LO SP MOTOR<br />
JP14=OPT STEAM<br />
JP21=RTD<br />
JP35=DOOR SW<br />
JP37=ON-OFF<br />
GP3=CHASSIS GROUND<br />
GP4=CHASSIS GROUND<br />
JP41=RS232 CONNECTOR<br />
COMMUNICATIONS<br />
CONNECTION<br />
BACK FIREWALL<br />
OPTIONAL<br />
TO RS232<br />
CONNECTION<br />
ON CPU BOARD<br />
24VAC<br />
NC<br />
C<br />
NO<br />
D<br />
B<br />
DWN. BY : DWN. DATE :<br />
REV. BY : REV. DATE :<br />
CHK. BY :<br />
24 POLE TERMINAL BLOCK<br />
DESCRIPTION:CONV OVEN 7500 WATT-PT CONTROLS-RT3O RANGE TOP-480V<br />
CAD FILE : FROM ACAD<br />
1 REV: C<br />
1<br />
2<br />
3<br />
4<br />
5<br />
6<br />
7<br />
DWG. NO: 2M-61127-10<br />
SHEET 1 OF<br />
10<br />
9<br />
8<br />
11<br />
Manufacturing<br />
Company<br />
12
M<br />
U<br />
N<br />
I<br />
T<br />
A<br />
L<br />
P<br />
V<br />
0<br />
4<br />
H<br />
T<br />
O<br />
B<br />
T<br />
C<br />
E<br />
N<br />
N<br />
O<br />
C<br />
T<br />
O<br />
N<br />
O<br />
D<br />
H<br />
T<br />
O<br />
B<br />
T<br />
C<br />
E<br />
N<br />
N<br />
O<br />
C<br />
T<br />
O<br />
N<br />
O<br />
D<br />
S<br />
T<br />
L<br />
O<br />
V<br />
8<br />
0<br />
R<br />
O<br />
F<br />
D<br />
E<br />
R<br />
I<br />
W<br />
R<br />
M<br />
F<br />
X<br />
V<br />
0<br />
4<br />
O<br />
T<br />
E<br />
G<br />
N<br />
A<br />
H<br />
C<br />
O<br />
T<br />
D<br />
A<br />
E<br />
L<br />
8<br />
0<br />
D<br />
E<br />
R<br />
T<br />
C<br />
E<br />
N<br />
N<br />
O<br />
C<br />
S<br />
I<br />
D<br />
D<br />
A<br />
E<br />
L<br />
0<br />
4<br />
E<br />
U<br />
L<br />
B<br />
T<br />
C<br />
E<br />
N<br />
N<br />
O<br />
C<br />
&<br />
K<br />
C<br />
O<br />
L<br />
B<br />
.<br />
M<br />
R<br />
E<br />
T<br />
O<br />
T<br />
S<br />
T<br />
L<br />
O<br />
V<br />
8<br />
0<br />
R<br />
O<br />
F<br />
D<br />
E<br />
R<br />
I<br />
W<br />
R<br />
M<br />
F<br />
X<br />
V<br />
0<br />
4<br />
O<br />
T<br />
E<br />
G<br />
N<br />
A<br />
H<br />
C<br />
O<br />
T<br />
D<br />
A<br />
E<br />
L<br />
8<br />
0<br />
D<br />
E<br />
R<br />
T<br />
C<br />
E<br />
N<br />
N<br />
O<br />
C<br />
S<br />
I<br />
D<br />
D<br />
A<br />
E<br />
L<br />
0<br />
4<br />
E<br />
G<br />
N<br />
A<br />
R<br />
O<br />
T<br />
C<br />
E<br />
N<br />
N<br />
O<br />
C<br />
&<br />
K<br />
C<br />
O<br />
L<br />
B<br />
.<br />
M<br />
R<br />
E<br />
T<br />
O<br />
T<br />
E<br />
L<br />
O<br />
P<br />
4<br />
K<br />
C<br />
O<br />
L<br />
B<br />
L<br />
A<br />
N<br />
I<br />
M<br />
R<br />
E<br />
T<br />
D<br />
C<br />
C<br />
A<br />
V<br />
4<br />
R<br />
O<br />
T<br />
C<br />
A<br />
T<br />
N<br />
O<br />
C<br />
#<br />
G<br />
U<br />
L<br />
D<br />
N<br />
U<br />
O<br />
R<br />
G<br />
B<br />
4<br />
P<br />
J<br />
0<br />
4<br />
8<br />
0 B<br />
L<br />
O<br />
R<br />
T<br />
N<br />
O<br />
C<br />
T<br />
N<br />
O<br />
R<br />
F<br />
Y<br />
A<br />
L<br />
P<br />
S<br />
I<br />
D<br />
&<br />
L<br />
O<br />
R<br />
T<br />
N<br />
O<br />
C<br />
N<br />
E<br />
V<br />
O<br />
M<br />
A<br />
E<br />
T<br />
S<br />
P<br />
U<br />
K<br />
C<br />
A<br />
B<br />
H<br />
C<br />
T<br />
I<br />
W<br />
S<br />
C<br />
B<br />
A<br />
C<br />
O<br />
N<br />
D<br />
T<br />
R<br />
P<br />
U<br />
K<br />
C<br />
A<br />
B<br />
H<br />
C<br />
T<br />
I<br />
W<br />
S<br />
P<br />
U<br />
K<br />
C<br />
A<br />
B<br />
T<br />
A<br />
T<br />
S<br />
T<br />
P<br />
U<br />
K<br />
C<br />
A<br />
B<br />
Y<br />
A<br />
L<br />
E<br />
R<br />
C<br />
N<br />
4<br />
/<br />
4<br />
0<br />
4<br />
A<br />
C<br />
H<br />
C<br />
T<br />
I<br />
W<br />
S<br />
R<br />
O<br />
O<br />
D<br />
C C<br />
N<br />
O<br />
N<br />
A<br />
B<br />
D<br />
L<br />
8<br />
0<br />
A<br />
C<br />
O<br />
N<br />
K<br />
C<br />
A<br />
L<br />
B<br />
R<br />
O<br />
T<br />
C<br />
A<br />
T<br />
N<br />
O<br />
C<br />
L<br />
A<br />
M<br />
R<br />
O<br />
N<br />
S<br />
A<br />
E<br />
U<br />
L<br />
B<br />
D<br />
E<br />
R<br />
R<br />
O<br />
T<br />
C<br />
A<br />
T<br />
N<br />
O<br />
C<br />
I<br />
H R<br />
O<br />
T<br />
O<br />
M<br />
4<br />
-<br />
T<br />
7<br />
-<br />
T<br />
-<br />
P<br />
9<br />
-<br />
T<br />
O PTI<br />
O NAL<br />
F<br />
U<br />
S<br />
E<br />
F<br />
U<br />
S<br />
E<br />
D<br />
M<br />
O<br />
R<br />
F<br />
#<br />
R<br />
O<br />
T<br />
C<br />
A<br />
T<br />
N<br />
O<br />
C<br />
D<br />
B<br />
D<br />
4 C<br />
A<br />
V<br />
"<br />
M<br />
A<br />
E<br />
T<br />
S<br />
"<br />
M<br />
O<br />
R<br />
F<br />
L<br />
O<br />
R<br />
T<br />
N<br />
O<br />
C<br />
D<br />
I<br />
O<br />
N<br />
E<br />
L<br />
O<br />
S<br />
E<br />
V<br />
L<br />
A<br />
V<br />
M<br />
A<br />
E<br />
T<br />
S<br />
)<br />
T<br />
N<br />
E<br />
S<br />
E<br />
R<br />
P<br />
N<br />
E<br />
H<br />
W<br />
(<br />
5<br />
6<br />
W<br />
0<br />
0<br />
5<br />
K<br />
C<br />
A<br />
L<br />
B<br />
D<br />
E<br />
R<br />
E<br />
U<br />
L<br />
B<br />
W<br />
0<br />
0<br />
5<br />
M<br />
O<br />
R<br />
F<br />
#<br />
R<br />
O<br />
T<br />
C<br />
A<br />
T<br />
N<br />
O<br />
C<br />
R<br />
O<br />
T<br />
O<br />
M<br />
O<br />
L<br />
R<br />
O<br />
T<br />
O<br />
M I<br />
H<br />
C<br />
A<br />
V<br />
4<br />
I<br />
H<br />
C<br />
A<br />
V<br />
4<br />
O<br />
L<br />
C<br />
C<br />
N O<br />
N<br />
O<br />
N<br />
C<br />
C<br />
N<br />
R<br />
O<br />
T<br />
O<br />
M<br />
R<br />
M<br />
F<br />
X<br />
M<br />
L<br />
A<br />
N<br />
I<br />
M<br />
R<br />
E<br />
T<br />
K<br />
C<br />
O<br />
L<br />
B<br />
T<br />
I<br />
M<br />
I<br />
L<br />
-<br />
I<br />
H<br />
T<br />
A<br />
T<br />
S<br />
C<br />
S<br />
I<br />
D<br />
C<br />
A<br />
V<br />
4<br />
R<br />
O<br />
T<br />
C<br />
A<br />
T<br />
N<br />
O<br />
C<br />
#<br />
R<br />
O<br />
T<br />
O<br />
M<br />
R<br />
M<br />
F<br />
X<br />
3<br />
3<br />
L<br />
"<br />
T<br />
A<br />
E<br />
H<br />
"<br />
M<br />
O<br />
R<br />
F<br />
L<br />
O<br />
R<br />
T<br />
N<br />
O<br />
C<br />
P<br />
9<br />
T<br />
4<br />
T<br />
-<br />
7<br />
T<br />
D<br />
E<br />
R<br />
E<br />
U<br />
L<br />
B<br />
E<br />
U<br />
L<br />
B<br />
D<br />
E<br />
R<br />
B<br />
A<br />
C<br />
D<br />
8<br />
P<br />
J 9<br />
P<br />
J<br />
6<br />
P<br />
J<br />
5<br />
P<br />
J 7<br />
P<br />
J 3<br />
3<br />
P<br />
J<br />
3<br />
P<br />
J 3<br />
P<br />
J 4<br />
3<br />
P<br />
J<br />
0<br />
3<br />
P<br />
J 0<br />
4<br />
P<br />
J<br />
5<br />
3<br />
P<br />
J 6<br />
3<br />
P<br />
J 7<br />
3<br />
P<br />
J 8<br />
3<br />
P<br />
J 9<br />
3<br />
P<br />
J<br />
7<br />
6<br />
P<br />
J<br />
P<br />
J<br />
3<br />
P<br />
J<br />
4<br />
P<br />
J<br />
3<br />
P<br />
J<br />
4<br />
P<br />
J P<br />
J P<br />
J<br />
0<br />
P<br />
J<br />
9<br />
P<br />
J<br />
8<br />
P<br />
J<br />
7<br />
P<br />
J<br />
6<br />
P<br />
J<br />
5<br />
P<br />
J<br />
4<br />
P<br />
J<br />
3<br />
P<br />
J<br />
P<br />
J<br />
P<br />
J<br />
R<br />
O<br />
T<br />
C<br />
E<br />
N<br />
N<br />
O<br />
C<br />
3<br />
S<br />
R<br />
=<br />
4<br />
P<br />
J<br />
D<br />
N<br />
U<br />
O<br />
R<br />
G<br />
S<br />
I<br />
S<br />
S<br />
A<br />
H<br />
C<br />
=<br />
4<br />
P<br />
G<br />
D<br />
N<br />
U<br />
O<br />
R<br />
G<br />
S<br />
I<br />
S<br />
S<br />
A<br />
H<br />
C<br />
=<br />
3<br />
P<br />
G<br />
W<br />
S<br />
R<br />
O<br />
O<br />
D<br />
=<br />
5<br />
3<br />
P<br />
J<br />
D<br />
T<br />
R<br />
=<br />
P<br />
J<br />
M<br />
A<br />
E<br />
T<br />
S<br />
T<br />
P<br />
O<br />
=<br />
4<br />
P<br />
J<br />
R<br />
O<br />
T<br />
O<br />
M<br />
P<br />
S<br />
O<br />
L<br />
=<br />
3<br />
P<br />
J<br />
R<br />
O<br />
T<br />
O<br />
M<br />
P<br />
S<br />
I<br />
H<br />
=<br />
P<br />
J<br />
T<br />
A<br />
E<br />
H<br />
=<br />
P<br />
J<br />
y<br />
n<br />
a<br />
p<br />
m<br />
o<br />
C<br />
g<br />
n<br />
i<br />
r<br />
u<br />
t<br />
c<br />
a<br />
f<br />
u<br />
n<br />
a<br />
M<br />
1<br />
1<br />
R<br />
T<br />
M<br />
D<br />
P<br />
S<br />
2<br />
/<br />
W<br />
W<br />
K<br />
5<br />
,<br />
C<br />
A<br />
V<br />
0<br />
4<br />
2<br />
/<br />
8<br />
0<br />
2<br />
T<br />
P<br />
H<br />
E<br />
D<br />
/<br />
W<br />
:<br />
N<br />
O<br />
I<br />
T<br />
P<br />
I<br />
R<br />
C<br />
S<br />
E<br />
D<br />
:<br />
E<br />
T<br />
A<br />
D<br />
.<br />
N<br />
W<br />
D<br />
:<br />
Y<br />
B<br />
.<br />
N<br />
W<br />
D :<br />
Y<br />
B<br />
.<br />
K<br />
H<br />
C<br />
:<br />
E<br />
L<br />
I<br />
F<br />
D<br />
A<br />
C<br />
:<br />
E<br />
T<br />
A<br />
D<br />
.<br />
K<br />
H<br />
C<br />
:<br />
Y<br />
B<br />
.<br />
V<br />
E<br />
R :<br />
E<br />
T<br />
A<br />
D<br />
.<br />
V<br />
E<br />
R<br />
T<br />
E<br />
E<br />
H<br />
S<br />
:<br />
O<br />
N<br />
.<br />
G<br />
W<br />
D F<br />
O :<br />
V<br />
E<br />
R<br />
A<br />
B<br />
C<br />
D<br />
1<br />
E<br />
F<br />
G<br />
H<br />
H<br />
G<br />
F<br />
E<br />
D<br />
C<br />
B<br />
A<br />
2<br />
3<br />
4<br />
5<br />
6<br />
7<br />
8<br />
9<br />
0<br />
1<br />
1<br />
1<br />
2<br />
1<br />
1<br />
2<br />
3<br />
4<br />
5<br />
6<br />
7<br />
8<br />
9<br />
0<br />
1<br />
1<br />
1<br />
2<br />
1<br />
O<br />
C<br />
E .<br />
V<br />
E<br />
R N<br />
O<br />
I<br />
T<br />
P<br />
I<br />
R<br />
C<br />
S<br />
E<br />
D E<br />
T<br />
A<br />
D D<br />
E<br />
V<br />
O<br />
R<br />
P<br />
P<br />
A<br />
G<br />
L<br />
D<br />
D<br />
A<br />
C<br />
A<br />
M<br />
O<br />
R<br />
F -<br />
8<br />
7<br />
1<br />
W<br />
-<br />
1<br />
1<br />
1<br />
1<br />
6<br />
-<br />
M<br />
2<br />
C<br />
N<br />
C<br />
O<br />
N<br />
C<br />
A<br />
V<br />
4<br />
3<br />
0<br />
-<br />
8<br />
-<br />
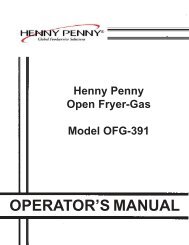
Wiring Diagram for: ECOH-PT208CF
4<br />
3<br />
2<br />
1<br />
ECO REV. DESCRIPTION DATE APPROVED<br />
5<br />
6<br />
7<br />
8<br />
9<br />
10<br />
11<br />
12<br />
6485 D WIRE TO POWER SWITCH NC WAS NO 1/17/2008 JMM<br />
H<br />
ADDED CONTACTOR #2, REVISED JP1 BOARD WIRING<br />
TO MATCH PRODUCTION<br />
H<br />
4/2/2009 DJS<br />
7806 E<br />
5/20/2009 DJS<br />
ADDED SNUBBER TO CONTACTOR #2, CHANGE XFMR<br />
WIRING, ADD XFMR NOTE, REV KW & AMP VALUES<br />
7947 F<br />
BACKUP<br />
RELAY<br />
NO C<br />
STEAM<br />
BACKUP<br />
SWITCH<br />
NC<br />
B<br />
240V<br />
NO<br />
G<br />
XFMR WIRED FOR 208VOLTS<br />
TO CHANGE TO 240V<br />
DISCONNECT RED 208 LEAD<br />
& CONNECT ORANGE 240 LEAD<br />
TO TERM. BLOCK A<br />
DO NOT CONNECT BOTH<br />
G<br />
JP11 = HEAT<br />
JP12 = HI SP MOTOR<br />
JP13 = LO SP MOTOR<br />
JP14 = OPT STEAM<br />
JP21 = RTD<br />
JP35 = DOOR SW<br />
GP3 = CHASSIS GROUND<br />
GP4 = CHASSIS GROUND<br />
JP41 = RS232 CONNECTOR<br />
A<br />
C<br />
B<br />
BACKUP<br />
SWITCH<br />
C<br />
NC<br />
A<br />
24VAC<br />
A<br />
D<br />
B<br />
208<br />
240<br />
12/24<br />
208 B<br />
E<br />
240<br />
GROUND LUG<br />
24<br />
D<br />
C<br />
OVEN CONTROL<br />
CONTROL<br />
FRONT<br />
& DISPLAY<br />
D<br />
C<br />
B<br />
A<br />
XFMR WIRED FOR 208VOLTS<br />
TO CHANGE TO 240V<br />
DISCONNECT RED 208 LEAD<br />
& CONNECT BLUE 240 LEAD<br />
TO TERM. BLOCK B<br />
DO NOT CONNECT BOTH<br />
BACKUP<br />
TSTAT<br />
D<br />
DOOR SWITCH<br />
JP5 JP6 JP7 JP8 JP9 JP30 JP31 JP32 JP33 JP34 JP35 JP36 JP37 JP38 JP39 JP40<br />
JP20<br />
JP19<br />
JP18<br />
JP17<br />
JP16<br />
JP15<br />
JP14<br />
JP13<br />
JP12<br />
JP11<br />
F<br />
F<br />
FROM<br />
CONTACTOR #1<br />
JP41<br />
JP4 JP3 JP24 JP23 JP22 JP21 26 27<br />
JP1 JP2<br />
E<br />
E<br />
C NC<br />
NO<br />
24 POLE<br />
TERMINAL BLOCK<br />
RTD<br />
D<br />
D<br />
BLUE<br />
2500W<br />
AS NORMAL<br />
"STEAM"<br />
FROM<br />
CONTROL<br />
CONTACTOR<br />
#1<br />
2500W<br />
O PTI<br />
XFMR<br />
MOTOR<br />
2500W<br />
T-9<br />
MOTOR<br />
LO<br />
NO<br />
C<br />
NC<br />
24VAC<br />
LO<br />
24<br />
VAC<br />
"HEAT"<br />
FROM<br />
CONTROL<br />
XFMR<br />
MOTOR<br />
RED<br />
HI<br />
MOTOR C<br />
BLACK<br />
NO<br />
T-7<br />
T-4<br />
P-1<br />
O NAL<br />
BLUE<br />
SOLENOID<br />
STEAM VALVE<br />
(WHEN PRESENT)<br />
D<br />
24VAC<br />
C<br />
F<br />
U<br />
S<br />
E<br />
F<br />
U<br />
S<br />
E<br />
WHT<br />
WHT<br />
C<br />
L<br />
D<br />
RED<br />
RED<br />
BLUE<br />
MOTOR<br />
HI<br />
NC C NO<br />
24VAC<br />
HI<br />
D<br />
1<br />
1<br />
1<br />
4<br />
CONTACTOR<br />
CONTACTOR<br />
RED<br />
2<br />
2<br />
5<br />
2<br />
BLUE<br />
3<br />
3<br />
3<br />
6<br />
T9<br />
PLATINUM<br />
BLACK<br />
TERMINAL<br />
BLOCK<br />
B<br />
B<br />
T7-T4<br />
P1<br />
24VAC<br />
M<br />
C<br />
L F<br />
CONTACTOR<br />
#2<br />
E<br />
HI-LIMIT<br />
DISC STAT<br />
FROM<br />
CONTACTOR #1<br />
F F<br />
CHK. DATE :<br />
DWN. BY : DWN. DATE : 11-18-03 REV. BY : REV. DATE :<br />
DLG<br />
CHK. BY :<br />
A<br />
A<br />
DESCRIPTION:W/D EH PT WITH 2 SPEED MOTOR 208-240VAC<br />
1 REV: F<br />
DWG. NO: 2M-61111-148<br />
SHEET 1 OF<br />
10<br />
9<br />
8<br />
CAD FILE : FROM ACAD<br />
1<br />
2<br />
3<br />
4<br />
5<br />
6<br />
7<br />
11<br />
Manufacturing<br />
Company<br />
12
4<br />
3<br />
2<br />
1<br />
ECO REV. DESCRIPTION DATE APPROVED<br />
5<br />
6<br />
7<br />
8<br />
9<br />
10<br />
11<br />
12<br />
H<br />
H<br />
BACKUP<br />
RELAY<br />
STEAM<br />
BACKUP<br />
SWITCH<br />
C<br />
NO<br />
NC<br />
B<br />
240V<br />
NO<br />
G<br />
XFMR WIRED FOR 208VOLTS<br />
TO CHANGE TO 240V<br />
DISCONNECT RED 208 LEAD<br />
& CONNECT ORANGE 240 LEAD<br />
TO TERM. BLOCK<br />
A<br />
DO NOT CONNECT BOTH<br />
G<br />
JP11 = HEAT<br />
JP12 = HI SP MOTOR<br />
JP13 = LO SP MOTOR<br />
JP14 = OPT STEAM<br />
JP21 = RTD<br />
JP35 = DOOR SW<br />
GP3 = CHASSIS GROUND<br />
GP4 = CHASSIS GROUND<br />
JP41 = RS232 CONNECTOR<br />
A<br />
C<br />
B<br />
BACKUP<br />
SWITCH<br />
C<br />
NC<br />
A<br />
24VAC<br />
A<br />
D<br />
B<br />
208<br />
240<br />
JP20<br />
JP19<br />
JP18<br />
JP17<br />
JP16<br />
JP15<br />
JP14<br />
JP13<br />
JP12<br />
JP11<br />
F<br />
12/24<br />
208 B<br />
240<br />
GROUND LUG<br />
24<br />
D<br />
C<br />
OVEN CONTROL<br />
D<br />
C<br />
B<br />
A<br />
DOOR SWITCH<br />
JP5 JP6 JP7 JP8 JP9 JP30 JP31 JP32 JP33 JP34 JP35 JP36 JP37 JP38 JP39 JP40<br />
F<br />
E<br />
3<br />
JP41<br />
JP4 JP3 JP24 JP23 JP22 JP21 26 27<br />
JP1 JP2<br />
CONTROL<br />
FRONT<br />
& DISPLAY<br />
FROM<br />
CONTACTOR #1 AND #2<br />
BACKUP<br />
TSTAT<br />
E<br />
E<br />
D<br />
B<br />
XFMR WIRED FOR 208VOLTS<br />
TO CHANGE TO 240V<br />
DISCONNECT RED 208 LEAD<br />
& CONNECT BLUE 240 LEAD<br />
TO TERM. BLOCK<br />
DO NOT CONNECT BOTH<br />
C NC<br />
NO<br />
24 POLE<br />
TERMINAL BLOCK<br />
RTD<br />
D<br />
D<br />
BLUE<br />
2500W<br />
AS NORMAL<br />
"STEAM"<br />
FROM<br />
CONTROL<br />
CONTACTOR<br />
#1<br />
2500W<br />
O PTI<br />
XFMR<br />
MOTOR<br />
2500W<br />
T-9<br />
MOTOR<br />
LO<br />
NO<br />
C<br />
NC<br />
24VAC<br />
LO<br />
24<br />
VAC<br />
"HEAT"<br />
FROM<br />
CONTROL<br />
RED<br />
BLACK<br />
C<br />
HI<br />
MOTOR<br />
NO<br />
T-7<br />
T-4<br />
P-1<br />
ONAL<br />
BLUE<br />
SOLENOID<br />
STEAM VALVE<br />
(WHEN PRESENT)<br />
D<br />
24VAC<br />
C<br />
WHT<br />
WHT<br />
C<br />
F<br />
U<br />
S<br />
E<br />
F<br />
U<br />
S<br />
E<br />
L<br />
D<br />
RED<br />
RED<br />
NC C NO<br />
D<br />
1<br />
CONTACTOR<br />
CONTACTOR<br />
RED<br />
5<br />
3<br />
4<br />
T9<br />
2<br />
BLACK<br />
TERMINAL<br />
BLOCK<br />
1<br />
1<br />
2<br />
2<br />
3<br />
3<br />
N N<br />
BLUE<br />
MOTOR<br />
HI<br />
24VAC<br />
HI<br />
BLUE<br />
PLATINUM<br />
B<br />
B<br />
T7-T4<br />
P1<br />
6<br />
XFMR M<br />
MOTOR<br />
24VAC<br />
Three Phase<br />
C<br />
HI-LIMIT<br />
DISC STAT<br />
L<br />
CONTACTOR<br />
#2<br />
KW<br />
VOLTS<br />
L1<br />
FROM<br />
CONTACTOR #1 AND #2<br />
CHK. DATE :<br />
DWN. BY : DWN. DATE : 11-18-03<br />
REV. BY : REV. DATE :<br />
DLG<br />
CHK. BY :<br />
A<br />
A<br />
AMPS<br />
L2 L3 N<br />
9.5 9.5 1.3<br />
10.4 10.4 1.3<br />
L1 L2 L3 N<br />
10.9<br />
2.1 2.1 .4<br />
220/380<br />
11.7<br />
2.5 2.5 .4<br />
2.4<br />
2.8<br />
240/415<br />
DESCRIPTION: W/D EH PT WITH 2 SPEED MOTOR 220/380, 240/415 VAC<br />
1 REV: -<br />
DWG. NO: 2M-61111-148-1<br />
SHEET 1 OF<br />
10<br />
9<br />
8<br />
CAD FILE : FROM ACAD<br />
1<br />
2<br />
3<br />
4<br />
5<br />
6<br />
7<br />
11<br />
Manufacturing<br />
Company<br />
12
31<br />
30<br />
See<br />
Door Assembly<br />
25<br />
28<br />
29<br />
27<br />
See<br />
Panel Assembly<br />
ECOH Complete Assembly<br />
26 19<br />
20<br />
21<br />
24<br />
23<br />
22<br />
17<br />
1<br />
See Body Assembly<br />
18<br />
2<br />
16<br />
3<br />
4<br />
See<br />
Controller<br />
Assembly<br />
5<br />
14<br />
13<br />
SK2320 Rev. B 6/1/2009<br />
6<br />
7<br />
8<br />
12<br />
10<br />
11<br />
15<br />
9
PARTS LIST June 17, 2010, Rev C<br />
Model No: ECOH & RCOH, AP, PP & PT CONTROLS<br />
Commercial & Marine <strong>Half</strong> <strong>Size</strong> Economy <strong>Convection</strong> <strong>Oven</strong><br />
Fig No PART NO Qty DESCRIPTION Application<br />
2N-11090-20<br />
ELMNT EHS 208V 7.5KW 208V/208VM<br />
1<br />
2N-11090-21<br />
2N-11090-22<br />
1<br />
ELMNT EHS 240V 7.5KW<br />
ELMNT EHS OVEN 480VAC 7.5KW<br />
240V, ECOH-AP208FA, ECOH-AP2/3FA<br />
440VM, 480V, 480VM<br />
2N-11090-23 ELMNT EHS OVEN 208VAC 5.0 KW RCOHAP-208KR, RCOHRAP208KR, RCOHPT-208CF<br />
2E-30500-07<br />
TRM BLOCK 3PLELRGE 125AMP ECOHPT208CFR, RCOHPT-208CF, RCOHPT-240CF<br />
2<br />
2E-30500-09<br />
1<br />
TRM BLOCK 3 POLE SMALL 95<br />
ECOH-AP-208V/208M/240V/208DR, ECOH-AP-480V480/M, RCOHAP-<br />
208V/VM, RCOHAP-240VM, RCOHAP-440VM, RCOHAP-480V/VM,<br />
RCOHAP-480V/480M, RCOHRAP-480V/480M, RCOHPT-440VM<br />
ECOH-AP-208V/VM, 240V/VM, 440M, 480V/VM, ECOH-AP2/3FA,<br />
3 3E-30700-06 1 CONTC3POLE35A, 24VAC<br />
ECOH-AP208CF, ECOH-AP208DR, ECOH-PP208/240V, ECOH-PT-<br />
208/240V<br />
4 2C-20102-08 2 SCRW PHD ST 8-32X.375<br />
ECOH-AP-208V/VM, 240V/VM, 440M, 480V/VM, ECOH-AP2/3FA,<br />
ECOH-AP208CF, ECOH-AP208DR,<br />
Q9-60101-767<br />
PANEL EH 208/240V ECOH-AP-208, 208M, 240V, 208DR<br />
Q9-EHPAP-GFA PANEL EH 220/380V ACCU-PLUS FA ECOH-AP208FA, ECOH-AP2/3FA<br />
Q9-EHPAPRT-C PANEL EH 208/240V AP W/RT30 RCOHAP-208KR, RCOHAP-208V, RCOHRAP208KR<br />
5<br />
Q9-EHPAP-U PANEL EH 480 VOLT ACCU-PLUS ECOH-AP-480M, 480V, RCOHAP-480V, 480VM, RCOHRAP-480M, 480V<br />
Q9-EHPPP-C<br />
1<br />
PANEL EH 208/240V PURPLE w/COOLING FAN<br />
ASSY<br />
ECOH-PP-208V, 208BK, 208WB, 240BK, 240WB (Before 6-01-2009)<br />
Q9-EHPPP-C-W1 PANEL EH 208/240V PP ECOH-PP-208V, 208BK, 208WB, 240BK, 240WB, (After 6-01-2009)<br />
Q9-EHPPP-C-S<br />
PANEL EH 208/240V PURPLE w/o COOLING FAN<br />
ASSY<br />
ECOH-PP-208V, 208BK, 208WB, 240BK, 240WB<br />
Q9-EHPPT-C PNEL ASSY EHS-PT 208/240/480V ECOH-PT, RCOHPT (Before 6-01-2009)<br />
Q9-EHPPT-C-W1 PANEL EH 208/240V PT ECOH-PT, RCOHPT (After 6-01-20090<br />
6 2U-71500-06 1 BLOWER WHEEL EHS OVEN ALL<br />
ECOH-AP-480V, ECOH-AP-480M, ECOH-PT-480V, ECOH-PT480CF,<br />
2U-30200-16<br />
MOTOR 1/3HP 460V/1/60HZ 2SP<br />
ECOH-PT480MF, RCOHAP-480V, RCOHAP-480M, RCOHRAP-480M,<br />
RCOHRAP-480V, RCOHPT-440VM, RCOHPT-480CF<br />
7<br />
1<br />
2U-30200-17 MTR 1/3HP208/240V1PH2SPD<br />
ECOH-AP-208M, ECOHAP-208V, ECOH-AP-240V, ECOH-AP208DR,<br />
ECOH-PP-208V, ECOH-PP208BK, ECOH-PP208WB, ECOH-PP240BK,<br />
ECOH-PP240WB, ECOH-PT-208V, ECOH-PT-240V, ECOH-PT208CF,<br />
ECOH-PT208MF, ECOH-PT208NT, ECOH-PT208RF, ECOH-PT208SZ,<br />
ECOH-PT208V7, ECOH-PT208WA, ECOH-PT208WD, ECOH-PT240SZ,<br />
ECOH-PT240WD, ECOHPT208CF, ECOHPT208CFC, ECOHPT208CFR,<br />
RCOHAP-208KR, RCOHAP-208V, RCOHPT-208CF, RCOHPT-208V,<br />
RCOHPT-240CF, RCOHRAP208KR, ECOH-AP208FA, ECOH-AP2/3FA<br />
8 2E-41100-12 1 SENSOR EHS OVEN 450 DEG ALL<br />
9 Q9-EH-268 AR EH COOLING FAN ASSY<br />
ECOH-PP-208/240V, ECOH-PT-208/240/480V, RCOHPT-208/240CF/<br />
480CF<br />
10 Q9-EH-268-2 1 AIR DUCT BACK<br />
11 Q9-EH-268-1 1 AIR DUCT FRONT<br />
12 2C-20103-02 6 SCRW SM PLT 10 X .5 PHLSL<br />
13 2U-30200-46 1 MTR W/FAN AXIAL 220VAC70C<br />
ECOH-PP-208/240V, ECOH-PT-208/240/480V, RCOHPT-208/240CF/<br />
480CF<br />
ECOH-PP-208/240V, ECOH-PT-208/240/480V, RCOHPT-208/240CF/<br />
480CF<br />
ECOH-PP-208/240V, ECOH-PT-208/240/480V, RCOHPT-208/240CF/<br />
480CF<br />
ECOH-PP-208/240V, ECOH-PT-208/240/480V, RCOHPT-208/240CF/<br />
480CF<br />
IMPORTANT: WHEN ORDERING, SPECIFY VOLTAGE OR TYPE GAS DESIRED PAGE<br />
INCLUDE MODEL AND SERIAL NUMBER OF<br />
Some items are included for illustrative purposes only and in certain instances may not be available.<br />
1<br />
2
PARTS LIST May 11, 2011, Rev C<br />
Model No: ECOH & RCOH, AP, PP & PT CONTROLS<br />
Commercial & Marine <strong>Half</strong> <strong>Size</strong> Economy <strong>Convection</strong> <strong>Oven</strong><br />
Fig No PART NO Qty DESCRIPTION Application<br />
14 2C-20109-31 4 SCRW S/S 8-32 X 1-3/4 T/H PHIL<br />
ECOH-PP-208/240V, ECOH-PT-208/240/480V, RCOHPT-208/240CF/<br />
480CF<br />
15 Q9-60102-1368 MOTOR COVER EH (EH-141) & HRDW ALL<br />
16<br />
2A-72500-02<br />
LEG 4 SS MM ECOH-AP208DR, ECOH-PT208V7<br />
2A-72500-05<br />
4<br />
LEG 4 W/BOLT DOWN ADJ ECOH-AP-208M, RCOHAP-440/480VM, RCOHRAP-480M<br />
9Q-ECOH-C4<br />
1<br />
Q9-EHS-4C CASTERS (SET OF 4)<br />
CASTERS (SET OF 4) sold as an accessory with most units<br />
RCOHAP-208KR, RCOHAP-208V, RCOHAP-480V, RCOHPT-208CF,<br />
RCOHPT-208V, RCOHPT=240CF, RCOHPT-480CF<br />
17 2P-72901-17 2 CSRT SWVL W/BRK 35/16TRD RCOHAP-208KR, RCOHAP-480V, RCOHPT-208CF<br />
18 2P-72900-04 2 CSTER RIGID 3,5/16WTRD RCOHAP-208KR, RCOHAP-480V, RCOHPT-208CF<br />
19 2C-20301-10 2 NUT HEX 6-32 PLTD ECOH, RCOH<br />
20 2C-20101-65 2 SCRW MS PLT 10-32 X .25 THD ECOH, RCOH<br />
21 Q9-EH-356 1 SWITCH BRACKET ECOH, RCOH<br />
22 2C-20101-17 2 SCRW RND MS 6-32X1 PLTD ECOH, RCOH<br />
23<br />
2E-30301-17<br />
Q9-EH-363<br />
1<br />
SWT MICRO PLUNGER XLH<br />
SWITCH ARM, MICRO<br />
V-27971 & W-48418,<br />
ECOH, RCOH<br />
24 2P-51001-12 1 SPRING COMPRSN.665ID X 1.4 LONG ECOH, RCOH<br />
25 Q9-EH-250 1 WELD SWITCH ARM ECOH, RCOH<br />
26 Q9-EH-350-W1 1 SWITCH PLUNGER - ASSY ECOH, RCOH<br />
27 Y9-70701-18 1 KNOB ASSY 450° ECOH-AP, ECOH-PT, ECOH-PP, RCOH-AP, RCOH-PT<br />
28 Q9-60102-112 1 SWITCH DOOR - ASSY EH 9Q-ECOH-PP-208V<br />
29<br />
Q9-60101-765<br />
Q9-60101-766<br />
1<br />
ECOH-PT / EHS-PT CONTROL FRONT<br />
ECOH-PP / EHS-PP CONTROL FRONT<br />
ECOH-PT, RCOH-PT<br />
ECOH-PP<br />
30<br />
Q9-51100-53<br />
Q9-F6-423<br />
1<br />
COMPLETE DOOR ASSY EHS/GHS WINDOW<br />
ASSEMBLY DOOR, W/OUT WINDWO<br />
ALL<br />
OPTIONAL<br />
31 2B-50200-83 2 RACK SLIDE EHS ECOH-AP, ECOH-PT, ECOH-PP, RCOH-AP, RCOH-PT<br />
NI 2B-50200-34 5 RACK HALF SIZE OVENS ECOH-AP, ECOH-PT, ECOH-PP, RCOH-AP, RCOH-PT<br />
NI 2C-20108-01 2 STACKING PINS ALL<br />
NI 2E-31200-02 1 LUG GROUNDING UL APPROVED ALL<br />
NI 2E-31800-01 6 CB 250V50A 1 POLE CRLNGSW RCOHAP-208KR, RCOHAP-208V, RCOHPT-208CF<br />
NI 2E-31800-04 2 CB 480V 50A 3 POLE RCOHAP-480V<br />
NI 2E-31800-04 1 CB 480V 50A 3 POLE RCOHPT-440VM<br />
NI 2E-60101-75 1 EHS CORD KIT BK/DENNY’S ECOH-PP208BK, ECOH-PT208PC<br />
NI 2K-70801-03 1 SNAP BUSH 3/8 SB375-4 BLK ECOH-PP-208V<br />
NI 2K-70801-04 AR SNAP BUSH 3/4 SB750-10 ECOH<br />
NI 2M-61111-135 1 WD EHS-AP 208V-240VAC ECOH-AP-208V<br />
NI 2M-61111-148 1 WD EHS-PP 208-240VAC 2SPD ECOH-PP-208V<br />
NI 2M-61111-163 1 WD EHS-AP 480V ECOH-AP-480M<br />
NI Q9-60102-97 1 DOOR SEAL EH w/ mounting hardware<br />
NI Q9-EH-550 1 WIRING HARNESS, ELEMENT ALL<br />
NI Q9-EH-551 1 WIRING HARNESS, HIGH VOLT ALL<br />
NI Q9-EH-553 1 WIRING HARNESS, LOW VOLT ALL<br />
NI Q9-EH-554 1 WIRING HARNESS, POWER SWITCH ALL<br />
IMPORTANT: WHEN ORDERING, SPECIFY VOLTAGE OR TYPE GAS DESIRED PAGE<br />
INCLUDE MODEL AND SERIAL NUMBER OF<br />
Some items are included for illustrative purposes only and in certain instances may not be available.<br />
2<br />
2
17<br />
18<br />
19<br />
ECOH Body Assembly<br />
16<br />
15<br />
1<br />
2<br />
3<br />
10<br />
11<br />
12<br />
13<br />
14<br />
SK2325 Rev. A 1/9/2008<br />
4<br />
5<br />
9<br />
6<br />
8<br />
7
PARTS LIST JUNE 12, 2010, Rev C<br />
Key<br />
Number<br />
Model No: ECOH & RCOH, AP, PP & PT BODY PANELS<br />
Commercial & Marine <strong>Half</strong> <strong>Size</strong> Economy <strong>Convection</strong> <strong>Oven</strong><br />
Part<br />
Number<br />
Qty<br />
Per<br />
Description<br />
1 Q9-60102-136 1 BODY TOP EH & HRDW ALL<br />
2 Q9-60102-1361 1 BODY BACK EH & HRDW ALL<br />
3 Q9-EH-119-2 1 FIREWALL - ASSY ALL<br />
4 Q9-EH-135 1 SAFETY STAT BOX ALL<br />
5 2T-30401-09 1 STAT FXD 500° DEG OPEN ALL<br />
6 Q9-EH-136 1 SAFETY STAT COVER ALL<br />
7 2K-70801-04 1 SNAP BUSH 3/4 SB750-10 BLK ALL<br />
8 2C-20103-02 2 SCRW SM PLT 10 X .5 PHLSL ALL<br />
9 Q9-60102-1364 1 BODY R/H SIDE EH & HRDW ALL<br />
10 2C-20104-41 4 SCRW MACH 1/4-20X5/8 H/H ALL<br />
11 Q9-EH-209 1 MOTOR MOUNT ALL<br />
12 2C-20202-08 4 WSHR PLT 5/16 LOCK SPLIT ALL<br />
13 2C-20201-09 4 WSHR PLT 5/16 FLAT SAE ALL<br />
14 2C-20301-06 4 NUT HEX 5/16-18 PLTD ALL<br />
15 Q9-EH-104-2 1 BOTTOM SPOT WELD ALL<br />
16 Q9-EH-215-2 1 FRONT - ASSY REVERSIBLE ALL<br />
17 Q9-EH-452-2 1 BAFFLE STD ALL<br />
17 Q9-EH-452-3 1 BAFFLE ASSY STEAM STEAM<br />
18 Q9-EH-374-3 1 CAN ASSY STD -[NEW RACK ALL<br />
19 Q9-60102-1365 1 BODY L/H SIDE EH & HRDW ALL<br />
IMPORTANT: WHEN ORDERING, SPECIFY VOLTAGE OR TYPE GAS DESIRED PAGE<br />
INCLUDE MODEL AND SERIAL NUMBER OF<br />
Some items are included for illustrative purposes only and in certain instances may not be available.<br />
1<br />
1
12<br />
MARINE APPLICATION<br />
1<br />
ECOH, RCOH Door Assembly<br />
2<br />
3<br />
5<br />
10<br />
11<br />
11<br />
8<br />
10<br />
4<br />
9<br />
8<br />
7<br />
6<br />
5<br />
SK2321 Rev 10/2/2007
PARTS LIST June 17, 2010, Rev C<br />
Key<br />
Number<br />
Model No: ECOH & RCOH, AP, PP & PT DOOR ASSEMBLY<br />
Commercial & Marine <strong>Half</strong> <strong>Size</strong> Economy <strong>Convection</strong> <strong>Oven</strong><br />
Part<br />
Number<br />
Qty<br />
Per<br />
Description<br />
1 2R-50800-12 1 DOOR T HANDLE 11 1/2 LNG ALL<br />
2 Q9-60102-1362 1 OUTER DOOR EH NO/LOGO ALL<br />
3 2Q-71301-04 1 WINDOW ASSY 9-5/8X16-5/8 ALL<br />
4 2H-60106-17 1 INSULATION KIT EHS DOOR - ALL<br />
5 Q9-EH-267 2 HINGE COVER ALL<br />
6 Q9-EH-266 1 HINGE BOTTOM ALL<br />
7 2C-20109-15 4 SCRW PHD MS SS 10-32X1/2 ALL<br />
8 2P-70201-01 2 BRNZBR.505IDX.8750DX.175 ALL<br />
9 Q9-EH-265 1 HINGE TOP ALL<br />
10 2P-70201-19 2 BRNZBRFLN1/2IDX5/8ODX3/8 ALL<br />
11 Q9-50313-031 2 HINGE PIN - WELD ALL<br />
12 Q9-60102-370 1 DOOR LATCH ASSY MARINE MODELS<br />
COMPLETE DOOR ASSY<br />
Q9-51100-53 1 COMPLETE DOOR ASSY W/WINDOW ALL<br />
Q9-F6-423 1 COMPLETE DOOR ASSY W/OUT WINDOW<br />
IMPORTANT: WHEN ORDERING, SPECIFY VOLTAGE OR TYPE GAS DESIRED PAGE<br />
INCLUDE MODEL AND SERIAL NUMBER OF<br />
Some items are included for illustrative purposes only and in certain instances may not be available.<br />
1<br />
1
8<br />
ECOH-PT & RCOH-PT<br />
Platinum Controller<br />
8<br />
1<br />
10<br />
2<br />
1<br />
9<br />
3<br />
10<br />
2<br />
11<br />
ECOH-PP<br />
Purple Plus Controller<br />
11 12<br />
5<br />
6<br />
7<br />
3<br />
4<br />
SK2324 Rev. A 6/21/2010<br />
5<br />
6<br />
7
PARTS LIST June 21, 2010, Rev C<br />
Key<br />
Number<br />
Model No: ECOH & RCOH, PP & PT CONTROL ASSEMBLY<br />
Commercial & Marine <strong>Half</strong> <strong>Size</strong> Economy <strong>Convection</strong> <strong>Oven</strong><br />
Part<br />
Number<br />
Qty<br />
Per<br />
Description<br />
1 2M-60301-117 1 SWITCH LBL EH 4X20 ECOH-PP<br />
2M-60301-118 1 SWITCH LBL EH PLATINUM ECOH-PT, RCOHPT<br />
2 Q9-60101-7665 1 ECOH-PP / EHS-PP CNTRL FRNT W/PROTO ECOH-PP<br />
Q9-EH-516-1 1 CONTORL PANEL - EH-PT ECOH-PT-208V<br />
3 2A-20504-01 4 SPACER NYLON #6 1/4 X 7/8 ECOH-PP<br />
2A-20504-02 4 SPACER NYLON #6 1/4 X 1” ECOH-PT, RCOH-PT<br />
4 2E-30303-06 1 SWT TOG ON-ON DPDT BLK ECOH-PP, ECOH-PT, RCOH-PT<br />
5 2J-40102-24 1 DSPLY 4X20 MDL.DA170-001 ECOH-PP<br />
2J-40102-25 1 DSPLY 320X240 DB170-001 ECOH-PT, RCOH-PT<br />
6 2C-20205-02 4 .140#6IDX.2500DX.032 ALL<br />
7 2C-20301-10 2 NUT HEX 6-32 PLTD ECOH-PP<br />
2C-20301-10 4 NUT HEX 6-32 PLTD ECOH-PT, RCOH-PT<br />
8 2C-20103-02 4 SCRW SM PLT 10 X .5 PHLSL TP A ALL<br />
9 Q9-EH-519 1 COMPUTER STRIP HOLDER ECOH-PP<br />
10 Q9-60101-7661 1 ECOH-PP / EHS-PP FRNT W/LABEL ECOH-PP<br />
Q9-60101-7662 1 ECOH-PT / EHS-PT FRNT W/LABEL ECOH-PT, RCOH-PT<br />
11 Q9-60101-765 1 ECOH-PT / EHS-PT CONTROL FRONT ECOH-PT, RCOH-PT<br />
Q9-60101-766 1 ECOH-PP / EHS-PP CONTROL FRONT ECOH-PP<br />
12 2J-31110-13 1 CABLE ASSY - RIBBON 12 PT ECOH-PP, ECOH-PT, RCOH-PT<br />
NI 2M-60301-128 1 PRODUCT STRIP PURP COMP ECOH-PP<br />
2M-60301-W128 1 PRODUCT STRIP PURP BK ECOH-PP208BK, ECOH-PP240BK<br />
NI OB-60301-46 1 OBS PRDCT STRIP-BLU/PURP COMPH ECOH-PP<br />
IMPORTANT: WHEN ORDERING, SPECIFY VOLTAGE OR TYPE GAS DESIRED PAGE<br />
INCLUDE MODEL AND SERIAL NUMBER OF<br />
Some items are included for illustrative purposes only and in certain instances may not be available.<br />
1<br />
1
14<br />
9<br />
13<br />
18<br />
20<br />
19<br />
15<br />
12<br />
ECOH PP/PT Controller Panel<br />
11<br />
5<br />
16<br />
8<br />
7<br />
6<br />
10<br />
17<br />
9<br />
21<br />
22<br />
1<br />
SK2323 Rev. A 7/6/2010<br />
3<br />
4<br />
2
PARTS LIST June 16, 2011, Rev C<br />
Key<br />
Number<br />
Model No: ECOH & RCOH, PP & PT CONTROL PANEL ASSEMBLY<br />
Commercial & Marine <strong>Half</strong> <strong>Size</strong> Economy <strong>Convection</strong> <strong>Oven</strong><br />
Part<br />
Number<br />
Qty<br />
Per<br />
Description<br />
1 Q9-EH-495 1 COMPUTER CONTROL SLIDE ECOH-PP, ECOH-PT, RCOH-PT<br />
2 Q9-EH-495-1 1 SLIDE CLIP A ECOH-PP, ECOH-PT, RCOH-PT<br />
3 Q9-EH-505 1 COMPONENT MOUNT C,P,PP ECOH-PP, ECOH-PT, RCOH-PT<br />
4 2E-30700-06 1 CONTC3POLE35A24VAC50/60HZ ECOH-PP, ECOH-PT, RCOH-PT<br />
5 2J-31110-W1 1 USB PNL MNT CABLE TO SOCKET<br />
6 2E-31400-07 1 XFORMR120-208-240/24V40VA ECOH-PP, ECOH-PT, RCOH-PT<br />
7 Q9-EH-507 1 TERMINAL BLOCK MOUNT ECOH-PP, ECOH-PT, RCOH-PT<br />
8 2E-30503-01 1 TRM BLOCK 24 POS QK CON ECOH-PP, ECOH-PT, RCOH-PT<br />
9 2E-30701-05 3 CONTC 2POLE 30A 24VAC P & ECOH-PP, ECOH-PT, RCOH-PT<br />
2E-30701-05 4 CONTC 2POLE 30A 24VAC P & ECOH-PP2/4BK<br />
10 2E-30600-02 1 RELAY 240VAC 3FORMC FLNG ECOH-PP, ECOH-PT, RCOH-PT<br />
2E-30600-07 1 RELAY 240VAC FLANGE MNT ECOH-PP2/4BK<br />
11 2E-30303-06 2 SWT TOG ON-ON DPDT BLK ECOH-PP, ECOH-PT, RCOH-PT<br />
2E-30303-19 2 SWT TOG ON-ON DPDT BLK ECOH-PP2/4BK<br />
12 2T-30402-27 1 STAT ADJ 450 DEG 48 PILOT ECOH-PP, ECOH-PT, RCOH-PT<br />
13 Q9-EH-509 1 SWITCH BRACKET ECOH-PP, ECOH-PT, RCOH-PT<br />
14 PS-40102-W26 1 MAIN BOARD, MDL.CA170-001 ECOH-PP, ECOH-PT, RCOH-PT<br />
15 Q9-50307-47 1 CPU MOUNT ECOH-PP, ECOH-PT, RCOH-PT<br />
16 2A-20501-01 5 SPCR FBR 1/4 OD #8 ID 3/8 ECOH-PP, ECOH-PT, RCOH-PT<br />
17 2C-20301-10 2 NUT HEX 6-32 PLTD ECOH-PP, ECOH-PT, RCOH-PT<br />
18 Y9-31400-26-1 1 XFORMR 208-240/24-12 40VA ECOH-PP, ECOH-PT, RCOH-PT<br />
2E-31400-28 2 XFORMR208-240/24VCT 40VA ECOH-PP2/4BK<br />
19 2E-41800-02 2 PCB GUIDE 6.675 LG EHPPP-C, EHPPT-C,<br />
20 Q9-EH-513 1 24V TANSFORMER SHIELD ECOH-PP, ECOH-PT, RCOH-PT<br />
21 2C-20306-03 4 AVK CAD 10-32 1ST GRP ECOH-PP, ECOH-PT, RCOH-PT<br />
22 Q9-EH-495-2 1 SLIDE CLIP B ECOH-PP, ECOH-PT, RCOH-PT<br />
NI Q9-40102-51-1 1 FILTER BOARD PHANTOM -<br />
NI Q9-ECCOPPP-C 1 PANEL ECCO 208/240V ECOH-PP<br />
NI Q9-ECCOPPT-C 1 PANEL ECCO 208/240V ECOH-PT<br />
NI Q9-ECCOPPT-U 1 PANEL ECCO 480V PLATINUM ECOH-PT<br />
NI 2E-30303-05 1 SWT PLATE ON/OFF<br />
NI 2E-30500-15 1 TRM BLOCK 4 POLE 115AMP ECOH-PP2/4BK, ECOH-PT2/3NT<br />
NI 2E-30702-02 1 CONTC 4POLE 24V 25FLA CE ECOH-PP2/4BK<br />
NI Q9-40705-03 VARIES SNUB-ALL-LO VOLT (PUSH) ON<br />
IMPORTANT: WHEN ORDERING, SPECIFY VOLTAGE OR TYPE GAS DESIRED PAGE<br />
INCLUDE MODEL AND SERIAL NUMBER OF<br />
Some items are included for illustrative purposes only and in certain instances may not be available.<br />
1<br />
1
STAR INTERNATIONAL HOLDINGS INC. COMPANY<br />
Star - Holman - <strong>Lang</strong> - Wells - Bloomfield - Toastmaster<br />
10 Sunnen Drive, St. Louis, MO 63143 U.S.A.<br />
(314) 678-6303<br />
www.star-mfg.com