Burris SpeedBead Benelli R1 Installation ... - OpticsPlanet.com
Burris SpeedBead Benelli R1 Installation ... - OpticsPlanet.com
Burris SpeedBead Benelli R1 Installation ... - OpticsPlanet.com

You also want an ePaper? Increase the reach of your titles
YUMPU automatically turns print PDFs into web optimized ePapers that Google loves.
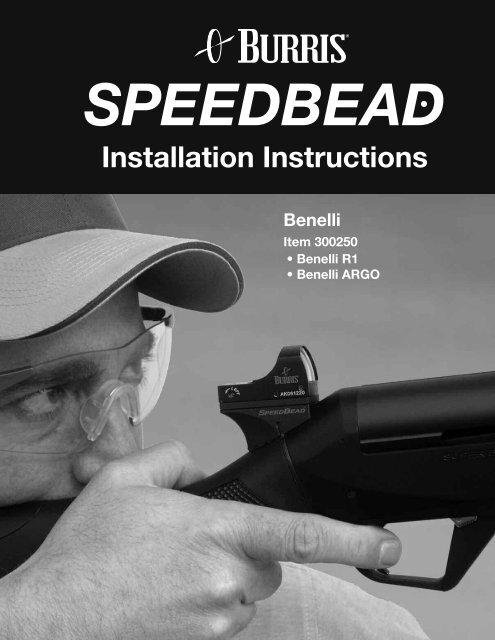
SPEEDBEAD•<br />
<strong>Installation</strong> Instructions<br />
<strong>Benelli</strong><br />
Item 300250<br />
• <strong>Benelli</strong> <strong>R1</strong><br />
• <strong>Benelli</strong> ARGO
<strong>SpeedBead</strong> - <strong>Benelli</strong><br />
- <strong>R1</strong><br />
- ARGO<br />
It is best if you adjust the stock fit<br />
(cast and drop) before mounting the<br />
<strong>SpeedBead</strong>. Your shotgun owners manual<br />
has excellent instructions for this.<br />
1. Remove the recoil pad.<br />
2. Remove the stock from the receiver. Between the<br />
receiver and the stock are one or more Drop &<br />
Cast spacers. The drop spacer has molded-on pins and is<br />
the one in front. Put the Drop & Cast spacers against the<br />
rear surface of the <strong>SpeedBead</strong> plate in the same orientation<br />
as they were prior to disassembly.<br />
3. Slide the <strong>SpeedBead</strong> mount on to the front of the stock.<br />
You will need to <strong>com</strong>press the foam padding in order to<br />
insert the pins in the stock holes. Be sure the pins enter<br />
the holes in the front of the stock.<br />
4. Remount the stock on the receiver. Be sure the <strong>SpeedBead</strong><br />
pins engaged the receiver holes as the stock bolt is tightened.<br />
Tighten enough to squeeze all the gaps out from between<br />
the rear of the receiver, the Plate, Drop & Cast spacers,<br />
and the stock.<br />
5. Reinstall the recoil pad.<br />
6. <strong>SpeedBead</strong> Base Alignment<br />
Using the hex wrench, tighten the Wedge<br />
Screw. Slightly snug is plenty tight and<br />
will prevent scarring of the stock beneath<br />
the <strong>SpeedBead</strong> mount.<br />
Position the soft gasket on top of the<br />
mounting block or optional riser, aligning<br />
the holes to the pins.<br />
Put the FastFire Sight with battery<br />
installed on the <strong>SpeedBead</strong> Base and hold the sight firmly down against<br />
the base. Turn on the FastFire sight. Shoulder the shotgun. The Red Dot<br />
should appear somewhere close to the front bead or sight of the shotgun.<br />
If the Red Dot is way above or below the bead, remove the FastFire<br />
sight from the <strong>SpeedBead</strong> base and tighten or loosen the Wedge<br />
Screw (tighten to lower the Red Dot, loosen to raise the Red Dot.) Hold<br />
the FastFire on the <strong>SpeedBead</strong> base and re-check for approximate<br />
alignment. Once you are satisfied with the alignment, (more precision<br />
final sighting is to be done with the FastFire windage and elevation<br />
adjustments) fasten the FastFire sight to the base with the provided screws.
7. FastFire Sight Adjustments<br />
Use the provided screwdriver to FIRST<br />
loosen the FastFire lock screws, THEN,<br />
using the windage & elevation screws,<br />
adjust the Red Dot to be directly "on"<br />
the barrel bead. Look down the barrel<br />
rib as if you were shooting the shotgun<br />
when making adjustments. The <strong>SpeedBead</strong> system is designed such<br />
that the Red Dot is either right on the face of the shotgun’s bead or just<br />
slightly above the bead. If you choose to utilize the provided spacers,<br />
the red dot should be aligned approximately the same distance above<br />
the shotgun's bead as the thickness of the spacer. Tighten the lock<br />
screws. Finish zeroing at the range. For additional information about<br />
the FastFire sight, see the included FastFire II booklet.<br />
8. Risers and longer screws are provided with your <strong>SpeedBead</strong>. The<br />
advantages of <strong>SpeedBead</strong> are increased with the <strong>SpeedBead</strong> window<br />
a little higher than the front bead because it allows you to see and lead<br />
rising targets faster and to engage them accurately without covering<br />
them up. Choose either the 1/8" thick or 1/4" thick riser (or you can<br />
use both for 3/8") and install on top of the <strong>SpeedBead</strong> mount.<br />
Note: If you are using risers place the soft gasket on top of the riser<br />
before installing the FastFire.<br />
9. Insert the battery into the bottom of the FastFire Sight. Mount the<br />
FastFire sight to the <strong>SpeedBead</strong> mount using the provided short<br />
screws and lock washers when NOT using the risers, or the long<br />
screws and lock washers when using the riser(s).<br />
Operating Notes:<br />
The <strong>SpeedBead</strong> system is virtually parallax free. Once sighted-in, no<br />
matter where in the window the Red Dot appears, wherever the Red Dot<br />
is pointed is where the shot pattern will go. Do not be concerned if the<br />
Red Dot is not in the center of the window when shooting. Just get the<br />
Red Dot where you want it in relation to the target and take the shot.<br />
INSTR-1096