Logging into the Portal - graduate studies at assumption college
Logging into the Portal - graduate studies at assumption college
Logging into the Portal - graduate studies at assumption college

Create successful ePaper yourself
Turn your PDF publications into a flip-book with our unique Google optimized e-Paper software.
<strong>Logging</strong> <strong>into</strong> <strong>the</strong> My.Assumption <strong>Portal</strong><br />
There are two ways to get <strong>into</strong> <strong>the</strong> My.Assumption portal; you can choose <strong>the</strong> way th<strong>at</strong> best works for you.<br />
1. Type https://my.<strong>assumption</strong>.edu in any Web browser address bar. Save it as a favorite or as a shortcut on your<br />
desktop OR<br />
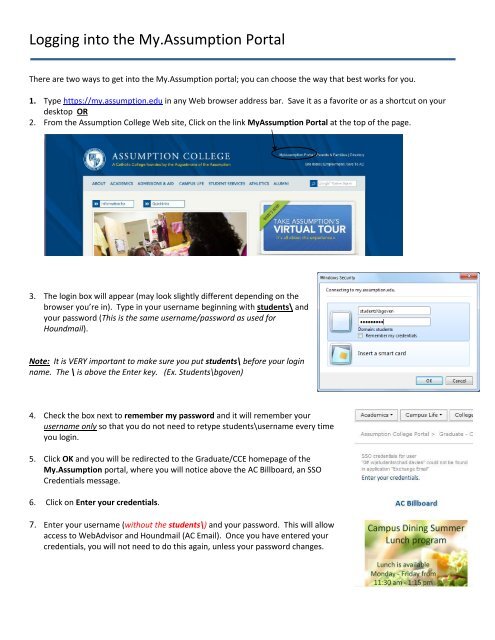
2. From <strong>the</strong> Assumption College Web site, Click on <strong>the</strong> link MyAssumption <strong>Portal</strong> <strong>at</strong> <strong>the</strong> top of <strong>the</strong> page.<br />
3. The login box will appear (may look slightly different depending on <strong>the</strong><br />
browser you’re in). Type in your username beginning with students\ and<br />
your password (This is <strong>the</strong> same username/password as used for<br />
Houndmail).<br />
Note: It is VERY important to make sure you put students\ before your login<br />
name. The \ is above <strong>the</strong> Enter key. (Ex. Students\bgoven)<br />
4. Check <strong>the</strong> box next to remember my password and it will remember your<br />
username only so th<strong>at</strong> you do not need to retype students\username every time<br />
you login.<br />
5. Click OK and you will be redirected to <strong>the</strong> Gradu<strong>at</strong>e/CCE homepage of <strong>the</strong><br />
My.Assumption portal, where you will notice above <strong>the</strong> AC Billboard, an SSO<br />
Credentials message.<br />
6. Click on Enter your credentials.<br />
7. Enter your username (without <strong>the</strong> students\) and your password. This will allow<br />
access to WebAdvisor and Houndmail (AC Email). Once you have entered your<br />
credentials, you will not need to do this again, unless your password changes.
Getting your class schedule<br />
Once you are logged <strong>into</strong> <strong>the</strong> portal and your credentials are set, you will be able to<br />
view your schedule, check out wh<strong>at</strong>’s happening around campus, check class<br />
cancell<strong>at</strong>ions among o<strong>the</strong>r things. The portal will be your g<strong>at</strong>eway to everything<br />
Assumption!<br />
1. To get your schedule, you will need to go to <strong>the</strong> section titled WebAdvisor. This is<br />
loc<strong>at</strong>ed above <strong>the</strong> Gradu<strong>at</strong>e-CCE Links Tab on <strong>the</strong> right.<br />
2. Click WedAdvisor for Students,<br />
3. Click Academic Profile - this will give you a list of options (some may differ depending<br />
on your security).<br />
4. Click My Class Schedule to view <strong>the</strong> list of classes for which you are registered or<br />
waitlisted.<br />
5. You will get a security warning which is a normal Microsoft warning,<br />
always click No when you are in <strong>the</strong> portal.<br />
6. Select a term from <strong>the</strong> Term drop-down list to show your classes for th<strong>at</strong> semester.<br />
7. Click Submit to get your class schedule.<br />
Note: Students on a waitlist for a course section will have a section appear <strong>at</strong> <strong>the</strong> bottom of<br />
<strong>the</strong> schedule under <strong>the</strong> heading “You are on <strong>the</strong> following waitlist(s).”
8. Click on a course in <strong>the</strong> Course Name and Title column to view additional inform<strong>at</strong>ion. The Section Inform<strong>at</strong>ion tab<br />
will open next to <strong>the</strong> Schedule tab.<br />
Student Name
Getting your Grades<br />
Obtaining your grades is very similar to viewing your class schedule and is ano<strong>the</strong>r option<br />
under Academic Profile.<br />
1. To get your grades, you will need to go to <strong>the</strong> section titled WebAdvisor. This is<br />
loc<strong>at</strong>ed above <strong>the</strong> Gradu<strong>at</strong>e-CCE Links Tab on <strong>the</strong> right.<br />
2. Click WebAdvisor for Students<br />
3. Click Academic Profile this will give you <strong>the</strong> following list of options. Depending<br />
on your security, you may not see all <strong>the</strong>se options .<br />
4. Grades allows students to view <strong>the</strong>ir grades by semester.<br />
5. Click on <strong>the</strong> semester you wish to view and click submit.<br />
6. You will <strong>the</strong>n be able to see your grades<br />
and your term GPA for th<strong>at</strong> semester.<br />
Click OK when you are done viewing.<br />
Student Name
Checking your Financial Aid<br />
The newest fe<strong>at</strong>ure of WebAdvisor is being able to view your Financial Aid online. There are<br />
more fe<strong>at</strong>ures coming, and we will be sure to let you know as <strong>the</strong>y are rolled out!<br />
1. To see your financial aid, you will need to go to <strong>the</strong> section titled WebAdvisor. This is<br />
loc<strong>at</strong>ed above <strong>the</strong> Gradu<strong>at</strong>e-CCE Links Tab on <strong>the</strong> right.<br />
2. Click WebAdvisor for Students<br />
3. Click Financial Aid, this will give you a list of options. You can select your financial aid<br />
by year or term and also view your award letter.<br />
4. To view by year, click th<strong>at</strong> selection and enter <strong>the</strong> award year<br />
via <strong>the</strong> pull-down and click Submit.<br />
*Notice th<strong>at</strong> you can also click on <strong>the</strong> Financial Aid by Term and<br />
Financial Aid Letter from this point.<br />
5. Once you click submit, you will get a screen showing your<br />
awarded aid and its st<strong>at</strong>us/action.<br />
6. You would complete <strong>the</strong> same process to view by term or view<br />
your award letter.<br />
If you have questions regarding your aid amounts or <strong>the</strong> action, please contact someone in <strong>the</strong> Financial Aid office x<br />
7158.
Getting to your team site<br />
The Gradu<strong>at</strong>e Programs are introducing team sites in 2013. Team sites are a way for you to communic<strong>at</strong>e with <strong>the</strong> o<strong>the</strong>r<br />
members of your program and a way for <strong>the</strong> program admins & directors to relay program specific inform<strong>at</strong>ion to you.<br />
You will be receiving inform<strong>at</strong>ion via your <strong>assumption</strong> email account, so please make sure you are checking this on a<br />
regular basis!<br />
Your team site resides within <strong>the</strong> Navig<strong>at</strong>ion bar <strong>at</strong> <strong>the</strong> top of <strong>the</strong> screen. You will not see all <strong>the</strong> teams sites listed<br />
below, only <strong>the</strong> teams th<strong>at</strong> you are a member of. Many of you will just have one.<br />
1. Move (hover) your mouse over Team Sites on <strong>the</strong> Navig<strong>at</strong>ion Bar. When <strong>the</strong> pull-down appears click on <strong>the</strong><br />
team site you want to get to.<br />
This will bring you <strong>into</strong> your team site. This is a resource for you to get inform<strong>at</strong>ion regarding your program. A brief<br />
description of each of <strong>the</strong> sections is below:
Announcements – These are important inform<strong>at</strong>ional notices sent by <strong>the</strong> Program Administr<strong>at</strong>ors or Program<br />
Directors. These will come to you in your <strong>assumption</strong> houndmail account addressed from My.Assumption.<br />
These could include things like school closings, registr<strong>at</strong>ion paperwork inform<strong>at</strong>ion, etc.<br />
Events – These are things going on th<strong>at</strong> are specific to your program like registr<strong>at</strong>ion d<strong>at</strong>es, etc.<br />
Team Discussions – Here you can post a discussion th<strong>at</strong> will be sent to <strong>the</strong> entire program and people in return<br />
can respond to <strong>the</strong> thread. This is a good way to have a convers<strong>at</strong>ion with <strong>the</strong> o<strong>the</strong>rs in your program about a<br />
question or concern.<br />
Shared Documents – This is where <strong>the</strong> Program Administr<strong>at</strong>or or Program Director will put document<strong>at</strong>ion th<strong>at</strong><br />
pertains to your program. Things like <strong>the</strong> Viewbook, Course Schedule changes, Insurance forms, etc.<br />
Links – Each team site will have links to various things of value for <strong>the</strong> program. Class Cancell<strong>at</strong>ions will be<br />
added to each team site so th<strong>at</strong> you can check during bad wea<strong>the</strong>r if your class is cancelled.<br />
O<strong>the</strong>r parts may be added if <strong>the</strong> program administr<strong>at</strong>or decides th<strong>at</strong> it is of value to <strong>the</strong> program, we will let you know if<br />
any changes occur on your team site.<br />
If you should have problems with <strong>the</strong> portal or any WebAdvisor function, please contact <strong>the</strong> HUB x 7060.