Blast 2.indd - OpticsPlanet.com
Blast 2.indd - OpticsPlanet.com
Blast 2.indd - OpticsPlanet.com

Create successful ePaper yourself
Turn your PDF publications into a flip-book with our unique Google optimized e-Paper software.
BLAST 2 uses high pressure xenon lamps or high intensity LED illuminators that will<br />
produce a considerable amount of light and heat. Please observe the following<br />
precautions:<br />
1. Never set an operating BLAST 2 face down on a table or flat surface. It will<br />
possibly create a fire hazard.<br />
2. Operate the BLAST 2 light for fairly short periods of time. Turn off the light if it<br />
be<strong>com</strong>es too hot to hold <strong>com</strong>fortably in your hands. If improperly handled, batteries<br />
may leak, explode or cause personal injury.<br />
3. Remove the batteries prior to storing or transporting the BLAST 2. The lithium<br />
batteries supplied with the light may pose a fire and/or burn hazard if they overheat.<br />
Do not expose lithium batteries to water or dispose of batteries by burning. Also, do<br />
not disassemble batteries, attempt to recharge, or mix a lithium battery with other<br />
battery types. If improperly handled, batteries may leak, explode or cause personal<br />
injury.<br />
ACCESSORIES<br />
85022<br />
85019<br />
Full size reflector head<br />
BLAST 2 high intensity LED flashlight head<br />
6 volt lamp assembly for full size reflector<br />
6 volt lamp assembly for <strong>com</strong>pact head<br />
3 volt lithium batteries (123A)<br />
Red filter for <strong>com</strong>pact head<br />
Green filter for <strong>com</strong>pact head<br />
WARNING<br />
Part # Part #<br />
2210156<br />
2210157<br />
85019<br />
85022<br />
30114-2<br />
39100<br />
39102<br />
2210157<br />
2210156<br />
39100 39102 39101 39103<br />
41131 Call 41177<br />
30114-2<br />
Blue filter for <strong>com</strong>pact head<br />
Infrared filter for <strong>com</strong>pact head<br />
Safariland BLAST 2 holsters<br />
Blackhawk dual belt carrier<br />
Blackhawk single belt carrier<br />
Nylon pouch<br />
39101<br />
39103<br />
Call<br />
41131<br />
41132<br />
41177<br />
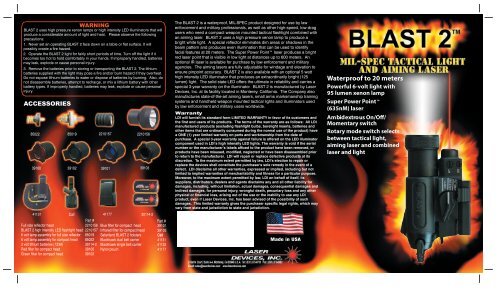
The BLAST 2 is a waterproof, MIL-SPEC product designed for use by law<br />
enforcement and military professionals, as well as other high-speed, low-drag<br />
users who need a <strong>com</strong>pact weapon mounted tactical flashlight <strong>com</strong>bined with<br />
an aiming laser. BLAST 2 uses a high pressure xenon lamp to produce a<br />
bright white light. A special reflector eliminates dim areas or shadows in the<br />
beam pattern and produces even illumination that can be used to identify<br />
facial features at 20 meters. The Super Power Point laser produces a bright<br />
red laser point that is visible in low light at distances up to 600 meters. An<br />
optional IR laser is available for purchase by law enforcement and military<br />
agencies. The aiming lasers are fully adjustable for windage and elevation to<br />
ensure pinpoint accuracy. BLAST 2 is also available with an optional 5 watt<br />
high intensity LED illuminator that produces an extraordinarily bright (125<br />
lumen) light. The solid state LED offers the ultimate in reliability and carries a<br />
special 3-year warranty on the illuminator. BLAST 2 is manufactured by Laser<br />
Devices, Inc. at its facility located in Monterey, California. The Company also<br />
manufactures state-of-the-art aiming lasers, small arms marksmanship training<br />
systems and handheld weapon mounted tactical lights and illuminators used<br />
by law enforcement and military users worldwide.<br />
Warranty<br />
LDI will furnish its standard form LIMITED WARRANTY in favor of its customers and<br />
the first end users of its products. The terms of the warranty are as follows: All LDI<br />
manufactured products (excluding flashlight bulbs, borelight inserts, batteries and<br />
other items that are ordinarily consumed during the normal use of the product) have<br />
a ONE (1) year limited warranty on parts and workmanship from the date of<br />
purchase. A special 3-year warranty against failure is offered on the LED illuminator<br />
<strong>com</strong>ponent used in LDI’s high intensity LED lights. The warranty is void if the serial<br />
number or the manufacturer’s labels affixed to the product have been removed, or<br />
products have been misused, modified, neglected or have been disassembled prior<br />
to return to the manufacturer. LDI will repair or replace defective products at its<br />
discretion. To the maximum extent permitted by law, LDI’s election to repair or<br />
replace the devices shall constitute the purchaser's sole remedy in the event of a<br />
defect. LDI disclaims all other warranties, expressed or implied, including but not<br />
limited to implied warranties of merchantability and fitness for a particular purpose.<br />
Moreover, to the maximum extent permitted by law, LDI on behalf of itself, its<br />
suppliers, distributors, dealers and agents disclaims any and all other liability for<br />
damages, including, without limitation, actual damages, consequential damages and<br />
indirect damages, for personal injury, wrongful death, pecuniary loss and any other<br />
physical or financial loss, arising out of the use or the inability to use any LDI<br />
product, even if Laser Devices, Inc. has been advised of the possibility of such<br />
damages. This limited warranty gives the purchaser specific legal rights, which may<br />
vary from state and jurisdiction to state and jurisdiction.<br />
Made in USA
THE COMMANDMENTS OF FIREARMS SAFETY<br />
ALWAYS keep the gun pointed in a safe direction.<br />
ALWAYS keep your finger off the trigger until ready to shoot.<br />
ALWAYS keep the gun unloaded until ready to use.<br />
ALWAYS be sure the gun is safe to operate and the barrel is clear of any obstruction.<br />
ALWAYS use the proper factory made ammunition for your particular gun.<br />
ALWAYS know your target and what is beyond it.<br />
ALWAYS wear eye and ear protection when shooting.<br />
ALWAYS store guns and ammunition in separate locked containers so they are secure and not<br />
accessible to children or unauthorized persons.<br />
ALWAYS treat every gun as if it were loaded.<br />
NEVER use alcohol or drugs while handling a gun.<br />
NEVER bring a loaded firearm into a building.<br />
NEVER transport a loaded firearm.<br />
LOCATION OF MAJOR PARTS (See Figure 1)<br />
3<br />
1 10 7<br />
1.<br />
2.<br />
Quick Release Tab<br />
Flashlight Head Assembly<br />
N/A<br />
221016 9<br />
5<br />
3. Windage & Elevation<br />
Adjustment Screws<br />
N/A<br />
4. Battery (two 3 volt lithium) 30114-2<br />
5. Battery Compartment Door<br />
Latch<br />
N/A<br />
6.<br />
7.<br />
BLAST 2 Housing<br />
Quick Release Mounting<br />
Bracket<br />
N/A<br />
N/A<br />
2 6<br />
4 11<br />
8<br />
8. Activation Switch Lever N/A<br />
9. Laser Front Cap<br />
10. Laser/Flashlight Selector<br />
Switch<br />
F2482B<br />
N/A<br />
Figure 1<br />
11. Rear Switch Housing N/A<br />
INSTALLATION OF BLAST 2<br />
Step 1. Unload your pistol.<br />
Step 2. Slide the BLAST 2 housing onto the<br />
accessory rail in front of the trigger guard<br />
until the quick release tab engages the rail on<br />
the weapon. See Figure 2. Make sure the<br />
BLAST 2 slides all the way back on the rail.<br />
If necessary, pull down on the quick release tab<br />
on each side of the BLAST 2 housing as you<br />
slide the laser onto the rail. See Figure 3.<br />
Step 3. Push forward on the BLAST 2 to make<br />
sure it is locked in place.<br />
ACTIVATION OF THE BLAST 2<br />
The BLAST 2 features ambidextrous<br />
switches located on each side of the trigger<br />
guard. Activate the unit in a momentary<br />
fashion by pulling down on the switch on either<br />
side of the trigger guard. Push up on the switch<br />
Figure 2<br />
to lock the BLAST 2 in the On position. See Figure 4. Figure 3<br />
LAMP REPLACEMENT<br />
The BLAST 2 xenon lamp, like all light bulbs,<br />
will need to be replaced from time to time.<br />
Always keep a spare lamp assembly on<br />
hand and replace regularly as follows:<br />
Step 1. Confirm that your weapon is<br />
unloaded.<br />
Step 2. Remove the BLAST 2 from your<br />
weapon. Make sure the switch is in the Off<br />
position.<br />
Step 3. Unscrew the light head in a<br />
counter-clockwise direction and remove the<br />
lamp. See Figure 5.<br />
Step 4. Install the replacement lamp. Take<br />
care not to touch the glass bulb with your<br />
fingers. See Figure 6. If you accidentally<br />
touch the glass bulb, use an oil free cloth<br />
and rubbing alcohol to clean the lamp.<br />
Step 5. Re-install the tactical light head on<br />
the BLAST 2 housing. Caution: Make sure<br />
the switch is in the Off position and take<br />
care not to cross-thread the light module<br />
as it may permanently damage the<br />
housing.<br />
ADJUSTING WINDAGE & ELEVATION<br />
Step 1. Activate the BLAST 2 laser and place<br />
the laser point on the center of the target and<br />
carefully fire three rounds from the weapon.<br />
Check the target for the impact point.<br />
Step 2. If the bullet holes are clustered to one<br />
side or the other, adjust the windage. If the<br />
bullet holes are grouped above or below the<br />
target, adjust the elevation. See Figure 8.<br />
Step 3. Unload your pistol.<br />
Step 4. Adjust the windage or elevation<br />
screws using the supplied tool. Turn the<br />
Elevation<br />
screws by no more than one-quarter (1/4)<br />
turn. Windage: Turning the windage screw<br />
clockwise will move the laser point to the<br />
right, and turning the screw counter-clockwise<br />
will move it to the left. Elevation: Turning the<br />
elevation screw clockwise will move the laser<br />
point up, and turning it counter-clockwise will<br />
move it down.<br />
ALWAYS ADJUST THE LASER TOWARDS THE<br />
IMPACT POINT ON THE TARGET.<br />
Figure 4<br />
Figure 5<br />
Figure 6<br />
Figure 7<br />
Windage<br />
Laser Point of Aim<br />
Bullet Holes Point<br />
of Impact<br />
Move Laser Down<br />
Use Elevation<br />
REPLACEMENT OF BATTERIES<br />
The two 3 volt (123A) batteries provide 48 hours of<br />
laser activation and 60 minutes of flashlight<br />
illumination. Replace the batteries as follows:<br />
Step 1. Confirm that your pistol is unloaded and<br />
turn the BLAST 2 off.<br />
Step 2. Remove the BLAST 2 from weapon.<br />
Step 3. Push down on battery <strong>com</strong>partment latch to<br />
open the battery <strong>com</strong>partment. See Figure 9.<br />
Step 4. Remove the used batteries.<br />
Step 5. Re-install the new batteries as indicated on<br />
the inside of the battery <strong>com</strong>partment door.<br />
Step 6. Close the battery <strong>com</strong>partment and press<br />
down firmly on the front of the battery <strong>com</strong>partment<br />
door latch until it snaps in place. See Figure 10.<br />
Step 7. Test the unit to confirm proper operation.<br />
Figure 9<br />
TROUBLESHOOTING BLAST 2<br />
Figure 10<br />
In the event the BLAST 2 fails to operate or appears to operate at low power,<br />
please check the following prior to contacting the manufacturer for repair.<br />
Fails to Operate - Replace the batteries (see instructions). Check the battery<br />
installation to make sure the batteries were installed properly.<br />
Laser is Weak or Dim - Check the laser front cap to make sure that it is not<br />
covered with dirt or powder residue. If the front lens is dirty, clean it with a<br />
cotton swab or clean cloth moistened with glass cleaner, taking care not to<br />
scratch the lens.<br />
SERVICE AND REPAIR<br />
The BLAST 2 is manufactured to provide years of rugged and dependable use.<br />
In the event the BLAST 2 ever needs to be repaired, please contact<br />
Laser Devices, Inc. or its European Service Center for a return authorization<br />
number. Once you obtain a return authorization number, package the product<br />
securely and return it postage paid. In the event the product is not covered by<br />
the warranty, you will be notified as to the nature and the cost of the repair.<br />
USA: Laser Devices, Inc<br />
Europe:<br />
2 Harris Court, A-4<br />
Monterey, CA USA 93940<br />
Tel: (831) 373-0701<br />
Fax: (831) 373-0903<br />
Email: sales@laserdevices.<strong>com</strong><br />
Move Laser to Right<br />
Use Windage<br />
Laser Point of Aim<br />
Bullet Holes Point<br />
of Impact<br />
Figure 8<br />
Technik Partner GmbH<br />
Herrenlandstrasse 72<br />
D-78315 Radolfzell, GERMANY<br />
Tel: (0049) 0 77 32 / 98 80 75<br />
Fax: (0049) 077 32 / 56 53 8<br />
Email: LDI-Service@technik-partner.<strong>com</strong>