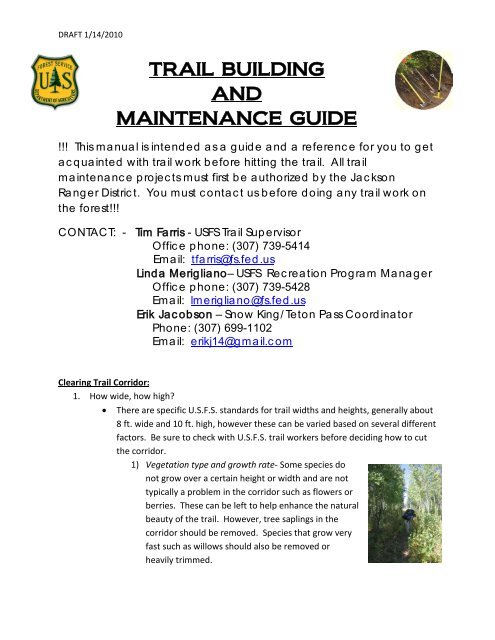
TRAIL BUILDING AND MAINTENANCE GUIDE - USDA Forest Service
TRAIL BUILDING AND MAINTENANCE GUIDE - USDA Forest Service
TRAIL BUILDING AND MAINTENANCE GUIDE - USDA Forest Service

You also want an ePaper? Increase the reach of your titles
YUMPU automatically turns print PDFs into web optimized ePapers that Google loves.
DRAFT 1/14/2010<br />
<strong>TRAIL</strong> <strong>BUILDING</strong><br />
<strong>AND</strong><br />
<strong>MAINTENANCE</strong> <strong>GUIDE</strong><br />
!!! This manual is intended a s a guide and a reference for you to get<br />
a c q ua inted with tra il work b efore hitting the tra il. All tra il<br />
maintenance projects must first be authorized by the Jackson<br />
Ra ng e r Distric t. You must contact us before doing any trail work on<br />
the forest!!!<br />
C O NTA C T: - Tim Farris - USFS Tra il Sup ervisor<br />
Offic e p hone: (307) 739-5414<br />
Ema il: tfarris@fs.fed.us<br />
Linda Merigliano– USFS Rec rea tion Prog ra m Mana g er<br />
Offic e p hone: (307) 739-5428<br />
Ema il: lmerig lia no@fs.fed.us<br />
Erik Jacobson – Snow King/Teton Pass Coordinator<br />
Phone: (307) 699-1102<br />
Ema il: erikj14@gma il.c om<br />
Clearing Trail Corridor:<br />
1. How wide, how high?<br />
• There are specific U.S.F.S. standards for trail widths and heights, generally about<br />
8 ft. wide and 10 ft. high, however these can be varied based on several different<br />
factors. Be sure to check with U.S.F.S. trail workers before deciding how to cut<br />
the corridor.<br />
1) Vegetation type and growth rate- Some species do<br />
not grow over a certain height or width and are not<br />
typically a problem in the corridor such as flowers or<br />
berries. These can be left to help enhance the natural<br />
beauty of the trail. However, tree saplings in the<br />
corridor should be removed. Species that grow very<br />
fast such as willows should also be removed or<br />
heavily trimmed.
DRAFT 1/14/2010<br />
2) Type of Users- Consider who is using the trail. Equestrians need a wider<br />
corridor and more importantly a higher trail ceiling, usually at least 10 ft.<br />
high. Hikers do no not need as high or as wide of a corridor so if it is<br />
exclusively a hiking trail, the corridor can be tighter. Mountain bike trails<br />
lie somewhere in between as they need good sight distance around<br />
corners and room to maneuver around obstacles.<br />
3) Speed of Users- This mostly applies to mountain bikers. A tighter corridor<br />
will slow bikers while an open corridor will invite more speed.<br />
4) Number of Users- Trails with high amounts of traffic need a larger<br />
corridor to allow for passing and visibility around corners.<br />
5) Maintenance frequency- If this trail typically only gets brushed once every<br />
few years cut the corridor wider and higher to allow room for growth. If<br />
it gets brushed every year, cut the corridor to the exact parameters.<br />
2. Trimming and cutting branches<br />
• Be sure to use the proper tool when cutting brush and limbs. If the vegetation is<br />
clearly too thick for loppers, use a pruning saw. Conversely, use loppers for<br />
small brush rather than trying to mow it down<br />
with a pruning saw.<br />
• The thickened section of bark just outside the spot<br />
where a branch joins the tree is called the “bark<br />
collar”. When cutting branches, always cut just to<br />
the outside of this. Make sure it is cut flat and not<br />
pointed in any way as this could injure other<br />
passing users.<br />
• When cutting large branches, make a partial cut underneath before cutting down<br />
from the top. This will ensure that the cut is clean and doesn’t strip away bark<br />
when it falls.<br />
• Place all cut brush as far away as possible from the trail corridor, at least out of<br />
sight, with the butt end facing away from the trail.<br />
Rock Work<br />
1. Do I remove the rock or leave it?<br />
• It depends. On bench cut trail on side hills, remove the rocks from the inside<br />
edges. These will only push users to the outside edge of the trail and cause the<br />
tread to creep downhill. Placing rocks at random places on the outside of the<br />
tread however can serve to keep users in the center of the tread. Be sure to dig
DRAFT 1/14/2010<br />
these in well and make sure they are large enough to stay in place. Do not line<br />
the outside edge with rocks as this will cause water to get trapped on the tread.<br />
• If you are on a horse trail, rocks that are too large can cause a slipping hazard for<br />
horses and should be removed and filled with gravel and dirt. Sharp, pointy<br />
rocks should also be removed as they tend to force users off the trail.<br />
• If a rock is loose, it should be removed.<br />
2. Transporting rocks for structures<br />
• Find the appropriate rock for the appropriate spot. Take measurement s if<br />
necessary to ensure that you do not waste your energy moving a rock that<br />
doesn’t fit.<br />
• If you are retrieving a rock for a rock wall or to help support a structure, ask for<br />
help and go big. When building with rock we want these structures to last<br />
forever so find a big, solid rock that won’t move even if kicked or stepped on.<br />
3. Building rock walls<br />
1) Choose your rock- Go big! The sheer weight of a larger rock lends greater<br />
strength to the structure. If you can lift it by yourself it is probably not big<br />
enough. Also be sure not to grab weak or crumbly rock such as decomposed<br />
granite. This type of rock will only break down and most likely fall apart<br />
while being transported to the structure. Look for rocks that are angular<br />
rather than round.<br />
2) Excavate a footing- This may be the most important part of your wall. A<br />
poorly excavated footing will only fail under the weight of the wall. Look for<br />
natural objects on the slope to anchor in to such as an already existing<br />
boulder. Be sure your footing is<br />
actual solid ground and not just<br />
excavated fill. Very Important!!<br />
3) Lay a foundation course- This should<br />
consist of some of your largest rocks<br />
as the whole wall will be supported<br />
by them. Spend time getting them to<br />
fit together and minimize the gaps<br />
between them. Make sure the rocks<br />
do not wobble or shift at all.<br />
4) Building the wall- While laying your courses, concentrate on splitting the<br />
gaps or breaking the joints. This means laying your next rock directly above<br />
where the two rocks below it meet. Think of a brick wall. Take your time and<br />
find the rock that fits without any teetering. Move the rocks around and if it<br />
isn’t working, start over and try different combinations. A little patience now
DRAFT 1/14/2010<br />
will make the difference in your wall lasting a year or a hundred years. Use<br />
smaller angular rocks to fill any gaps as you go. Do not rely on smaller rocks<br />
to keep a larger rock in place.<br />
5) Anchors or header stones- In each layer of your<br />
wall, place a longer rock perpendicular to the<br />
wall itself so that it extends into the bank<br />
behind the wall itself. This serves as an anchor<br />
into the hillside and will help the stability of<br />
the wall.<br />
6) Inslope your wall/batter- While building, be<br />
sure to try to match the slope of the hill you are working on. A wall that is<br />
too vertical will be pushed over eventually by gravity and pressure from the<br />
trail. This angle is referred to as batter. The batter should never be<br />
shallower than 4:1, which means an inward tilt of 1 foot for every 4 feet of<br />
height. A batter of 2:1 is better in most cases.<br />
7) Backfill- After each layer that you add, fill in the space behind the rocks with<br />
gravel and mineral soil. Compact the gravel by tamping it with the bottom of<br />
your pick or Pulaski. Be sure to keep any organic material out of the backfill.<br />
8) Capstones- Find the best large, flat rocks for the top layer of the wall. The<br />
heavier the better as their weight will help hold everything together and<br />
ensure that they will not be kicked off the trail. Fill in behind the rocks with<br />
backfill and finally a layer of dirt to serve as the tread surface. Fill any<br />
remaining holes in the wall with smaller angular rocks.<br />
Water bars/ Reinforced Grade Dips<br />
1. Location, location, location!<br />
• Look at the lay of the land. Look for places where water would exit the trail<br />
naturally if it had an outlet. Go out on the trail during or just after a rainstorm<br />
and it will be evident where the water wants to drain.<br />
2. Reinforced grade dips<br />
• Water bars themselves are the most failed structure on trails. By design, the<br />
water hits the bar and is turned, which slows it down. This causes sediment to<br />
be dropped in the drain, clogging it and rendering the bar useless. This is why<br />
we have gone more to building reinforced grade dips.<br />
3. Ideal log waterbar/reinforced grade dip anatomy<br />
• Essentially a log reinforced drain dip. A constructed grade reversal in an existing<br />
trail, not a log barrier!
DRAFT 1/14/2010<br />
Checkdams<br />
• Log should be green, 10-12” in diameter and peeled. FS personnel only will fall<br />
trees for bars.<br />
• Bar is buried completely, at least 36” down trail from the bottom of the drain dip.<br />
• Set bar at 45 degrees, less or more to match the force of the water.<br />
• Use well tamped soil or crushed small rocks to reinforce the log.<br />
• The top of the bar should be level with the original surface of the tread on the<br />
downhill side.<br />
• Build broad gradual ramps, 15-30 ft in and out.<br />
• The ramp and backramp should form a well out sloped broad apron, not a ditch,<br />
that sheds water well before the bar.<br />
• Dig a 24” wide outfall ditch that carries water to a point 12” below trail grade.<br />
• Mound and tamp dirt on both sides of the bar to help reinforce it.<br />
• Place guide rocks or logs at the ends of the bar to keep users from going around.<br />
• Checkdams are wood or rock structures buried<br />
perpendicular to the trail in order to trap soil<br />
being washed down the tread surface. They<br />
should be installed in conjunction with water bars<br />
in order to stop a trail gully from deepening.<br />
• Checkdams should be long enough to extend into<br />
the banks at least 1 foot and are similar to water<br />
bar installation. Dig an appropriate size hole and<br />
make sure it is deep and wide enough so that the<br />
log sits flush with the ground.
DRAFT 1/14/2010<br />
• Fill the gaps next to the log with small rocks, and use<br />
another rock or the butt end of a tool to hammer rocks<br />
into the spaces. Fill in and tamp with the excavated<br />
dirt from the hole.<br />
• Anchor the ends of the checkdam with either wooden<br />
spikes or large rocks.<br />
• Be sure to leave at least two inches exposed above the<br />
ground on the uphill side to slow or stop water coming<br />
down the trail.<br />
Digging Bench and Switchbacks<br />
• A full bench trail is constructed by cutting the full<br />
width of the tread into the hillside, which is about<br />
one Pulaski length. The entire tread is dug down<br />
to compacted mineral soil.<br />
• Full bench is preferable in almost all cases as it is<br />
far more sustainable in the long term.<br />
• On flat ground, full bench construction is not<br />
needed and more of a partial cut can be done.<br />
1. Clear debris and mark tread line<br />
• Before digging, be sure to ask FS employees how the tread has been flagged as<br />
this can differ. Sometimes the top of the cut is flagged, sometimes the<br />
centerline, or sometimes the bottom edge of the tread.<br />
• Scratch a line between flags to help serve as a guide and then clear away topsoil<br />
and any organic material down to the mineral soil. Broadcast organic material as<br />
far as possible down the slope.<br />
2. Cut the backslope<br />
• The backslope is the uphill side of<br />
the tread where it blends into<br />
the slope above the trail. It is<br />
very important to match the<br />
backslope of your tread to the<br />
existing slope of the land.<br />
• Use a grubbing tool to dig into<br />
the slope and broadcast all<br />
material as you dig. Do not pile<br />
up dirt on the bottom side of<br />
your tread! This is not stable and will not last through the years of use!
DRAFT 1/14/2010<br />
• Pay attention as you dig! Following the flag line is very important as any<br />
deviation could affect the grade of the trail. Create a solid, slightly out-sloped<br />
tread.<br />
3. Disperse downhill debris<br />
• Use a shovel or mcleod to pull down all lose dirt and debris from the bottom<br />
edge off the trail. Disperse debris as far as possible so that underlying plants can<br />
come back.<br />
• After dispersing debris, re-check your bench and see just how wide and solid it is.<br />
Take the time to dig further if necessary and make it right!!<br />
Building Turnpikes<br />
1. FS personnel will fall trees and cut to length. Peel all<br />
bark off the logs using drawknives.<br />
2. Transport logs to the site using log carriers, webbing, or<br />
roll on small logs. If there is sufficient rock, use it<br />
instead of logs as it will last much longer.<br />
3. Dig ditches for logs to rest in, place logs and pin with spikes or rocks. Make sure logs<br />
match up and are stable.<br />
4. Dig drainage ditches on the uphill side above the turnpike, along the entire length of the<br />
logs. Make ditches at least 1 foot wide and deep enough to be below the level of the<br />
existing tread. It is important to lower the water table below the trail base in order for<br />
the turnpike to work. Ditches should lead into some sort of culvert (rock or wood)<br />
under the turnpike, and out the other side.<br />
5. Lay geotextile fabric in bottom of the turnpike and fill with rock. Start with larger rocks<br />
and move to smaller rocks as you go. Arrange them so as to minimize any gaps.<br />
6. Close geotextile fabric over the top like wrapping a burrito. Pin down with rocks and fill<br />
with good mineral soil from a nearby borrow pit. Bring in enough soil so that the tread<br />
is elevated above the tops of the guide logs and is capped to help with surface drainage.
DRAFT 1/14/2010