Broadband Network - MTNL Mumbai
Broadband Network - MTNL Mumbai
Broadband Network - MTNL Mumbai

Create successful ePaper yourself
Turn your PDF publications into a flip-book with our unique Google optimized e-Paper software.
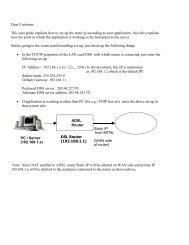
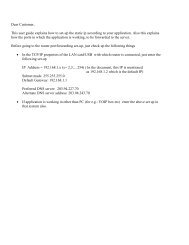
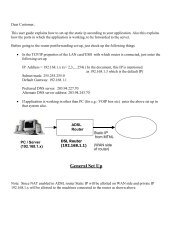
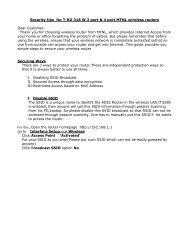
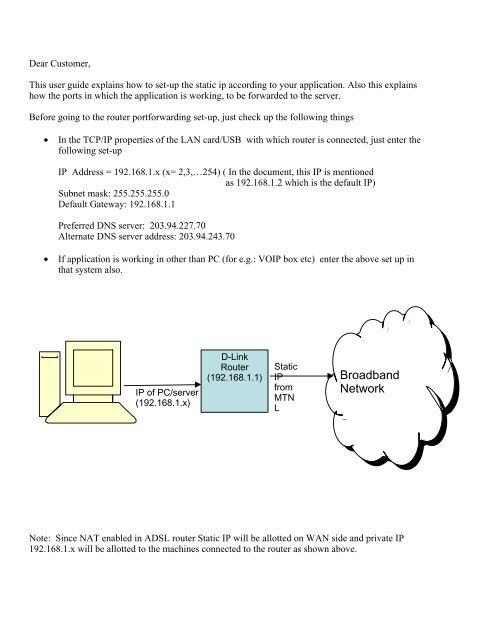
Dear Customer,<br />
This user guide explains how to set-up the static ip according to your application. Also this explains<br />
how the ports in which the application is working, to be forwarded to the server.<br />
Before going to the router portforwarding set-up, just check up the following things<br />
• In the TCP/IP properties of the LAN card/USB with which router is connected, just enter the<br />
following set-up<br />
IP Address = 192.168.1.x (x= 2,3,…254) ( In the document, this IP is mentioned<br />
as 192.168.1.2 which is the default IP)<br />
Subnet mask: 255.255.255.0<br />
Default Gateway: 192.168.1.1<br />
Preferred DNS server: 203.94.227.70<br />
Alternate DNS server address: 203.94.243.70<br />
• If application is working in other than PC (for e.g.: VOIP box etc) enter the above set up in<br />
that system also.<br />
IP of PC/server<br />
(192.168.1.x)<br />
D-Link<br />
Router<br />
(192.168.1.1)<br />
Static<br />
IP<br />
from<br />
MTN<br />
L<br />
<strong>Broadband</strong><br />
<strong>Network</strong><br />
Note: Since NAT enabled in ADSL router Static IP will be allotted on WAN side and private IP<br />
192.168.1.x will be allotted to the machines connected to the router as shown above.
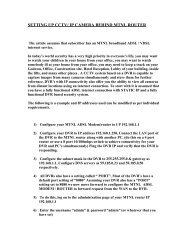
I. IP address verification<br />
1) For checking whether the router is connected to Internet with static IP,<br />
Open the internet explorer and type IP address of D-Link router (http://192.168.1.1/ )<br />
Put username admin and password admin Then the following window will appear<br />
2) Goto Status Under the heading WAN, Static IP allotted from <strong>MTNL</strong> will be displayed<br />
(59.X.X.X)
II. Port Forwarding<br />
1) Go to Advanced LAN Clients<br />
Enter the server IP address (LAN IP of the machine in which application is running)<br />
put subnetmask as hostname<br />
Click on Add Now information will be avalible under the heading static addresses<br />
Click on Apply<br />
For e.g.: Webserver is to be configured and application working on server whose LAN IP address<br />
192.168.1.2 . The setting will be as shown below
2)Go to Advanced ? Virtual server Now server IP will be displayed there.
3) click the server option . Select the application (ie: Webserver, FTP server, Telnet server<br />
etc) and click Add (on right side)so that this will be displayed under applied rules.<br />
Click Apply<br />
For eg: If webserver is to be configured, then add webserver and click on Apply as shown<br />
below.
Go to step 6<br />
4)) If your application (ie: particular port) is not mentioned in avalible rules, you can add the same by<br />
clicking on user and select Add (below the avalible rules).
5)) Now in the new window, mention the port start, end and map of your application. Then click on<br />
Apply.<br />
• Put rule name as the application name<br />
• Mention if the port is TCP/UDP or both from Protocol field<br />
• Type the port start,port end and port map of the application<br />
Click on Apply<br />
For an e.g.: of VOIP port 1100(TCP) 1101(UDP) is to be configured as shown below
Click on virtual server select user Now application name will be under the heading avalible<br />
rules. Click on Add (right side) so that this will be displayed under applied rules.<br />
Click on Apply
6) Click on Tools System Save & Reboot<br />
Now the configuration is over; just run the application and check