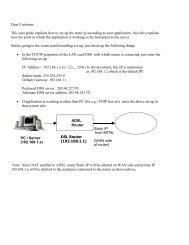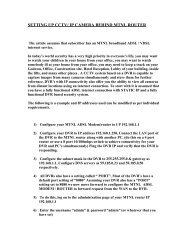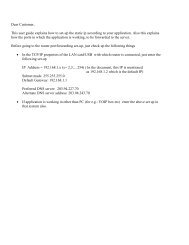
Configuration of Internet Mail - MTNL Mumbai
Configuration of Internet Mail - MTNL Mumbai
Configuration of Internet Mail - MTNL Mumbai

Create successful ePaper yourself
Turn your PDF publications into a flip-book with our unique Google optimized e-Paper software.
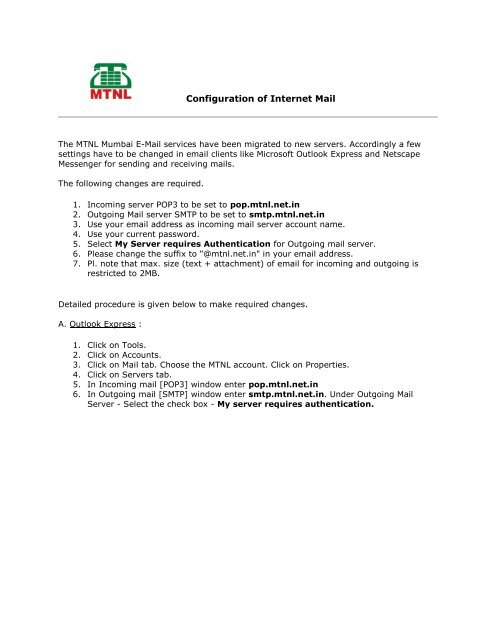
<strong>Configuration</strong> <strong>of</strong> <strong>Internet</strong> <strong>Mail</strong><br />
The <strong>MTNL</strong> <strong>Mumbai</strong> E-<strong>Mail</strong> services have been migrated to new servers. Accordingly a few<br />
settings have to be changed in email clients like Micros<strong>of</strong>t Outlook Express and Netscape<br />
Messenger for sending and receiving mails.<br />
The following changes are required.<br />
1. Incoming server POP3 to be set to pop.mtnl.net.in<br />
2. Outgoing <strong>Mail</strong> server SMTP to be set to smtp.mtnl.net.in<br />
3. Use your email address as incoming mail server account name.<br />
4. Use your current password.<br />
5. Select My Server requires Authentication for Outgoing mail server.<br />
6. Please change the suffix to "@mtnl.net.in" in your email address.<br />
7. Pl. note that max. size (text + attachment) <strong>of</strong> email for incoming and outgoing is<br />
restricted to 2MB.<br />
Detailed procedure is given below to make required changes.<br />
A. Outlook Express :<br />
1. Click on Tools.<br />
2. Click on Accounts.<br />
3. Click on <strong>Mail</strong> tab. Choose the <strong>MTNL</strong> account. Click on Properties.<br />
4. Click on Servers tab.<br />
5. In Incoming mail [POP3] window enter pop.mtnl.net.in<br />
6. In Outgoing mail [SMTP] window enter smtp.mtnl.net.in. Under Outgoing <strong>Mail</strong><br />
Server - Select the check box - My server requires authentication.
7. Click on Apply, Click on OK, Click on Close.<br />
Restart Outlook Express.<br />
B. For Netscape Messenger :<br />
Open Netscape.<br />
1. Click on Edit -> Preferences<br />
2. Click on + symbol adjacent to <strong>Mail</strong> & Newsgroups, Select Identity. Type the new<br />
email address in the space provided.<br />
3. Click on <strong>Mail</strong> Servers.<br />
In the Incoming <strong>Mail</strong> Servers box, Select the mtnl mail server and Click on Edit.<br />
4. Click on the General Tab.<br />
5. Change the Server Name to pop.mtnl.net.in. Leave server setting to POP3. Click on<br />
OK.<br />
6. In the Outgoing <strong>Mail</strong> Server box, Change the Outgoing mail (SMTP) server to<br />
smtp.mtnl.net.in. Click on OK.
C. Micros<strong>of</strong>t Outlook 2000: Procedure for configuration <strong>of</strong> Micros<strong>of</strong>t Outlook 2000 CLICK<br />
HERE<br />
Important:<br />
<strong>MTNL</strong> provides a limited free space to each user for storing mails. It is important that these<br />
mails are downloaded frequently to keep the server space free for new incoming mails. If<br />
you expect a large number <strong>of</strong> mails kindly downloaded them frequently. Please also make<br />
sure that the option for deleting mail messages on the server is selected. In outlook express<br />
this can be verified by checking the advanced properties <strong>of</strong> the mail account. (Select "Tools"<br />
"Accounts" "properties <strong>of</strong> the account" "advanced settings"). The option "Leave messages<br />
on the server" should not be selected . If you are having more than one mail accounts<br />
configured set the latest one as default.