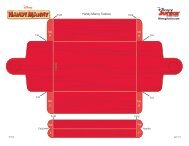
Mickey Mouse Clubhouse New Year Mickey's Top Hat
Mickey Mouse Clubhouse New Year Mickey's Top Hat
Mickey Mouse Clubhouse New Year Mickey's Top Hat

Create successful ePaper yourself
Turn your PDF publications into a flip-book with our unique Google optimized e-Paper software.
What You Will Need<br />
• Color printer<br />
• Heavyweight paper (we suggest 65 lb. paper)<br />
• Cutting tools<br />
• Glue<br />
• Tape<br />
• Note: Cutting intended for grown-ups only<br />
<strong>Mickey</strong> <strong>Mouse</strong> <strong>Clubhouse</strong> <strong>New</strong> <strong>Year</strong><br />
<strong>Mickey</strong>’s <strong>Top</strong> <strong>Hat</strong><br />
Instructions<br />
1. Print your pages. Set aside to dry. 2. Cut out the <strong>Hat</strong>, <strong>Top</strong> Rim, Bottom Rim, <strong>Hat</strong> Cover<br />
along the solid lines.<br />
© DISNEY
3. Glue the <strong>Top</strong> Rim and Bottom Rim together so that<br />
printed sides are facing out. Let dry.<br />
5. Crease the fl ap on the hat. Fold the <strong>Hat</strong> into a<br />
cylinder. Glue the fl ap to the inside of the <strong>Hat</strong>.<br />
<strong>Mickey</strong> <strong>Mouse</strong> <strong>Clubhouse</strong> <strong>New</strong> <strong>Year</strong><br />
<strong>Mickey</strong>’s <strong>Top</strong> <strong>Hat</strong><br />
4. Cut out the center of the Rim along the solid lines.<br />
6. Crease tabs on the Rim. Apply glue to the tabs on the<br />
Rim. Attach the Rim to the cylinder of the <strong>Hat</strong>.<br />
© DISNEY
<strong>Mickey</strong> <strong>Mouse</strong> <strong>Clubhouse</strong> <strong>New</strong> <strong>Year</strong><br />
<strong>Mickey</strong>’s <strong>Top</strong> <strong>Hat</strong><br />
7. Crease tabs on the <strong>Hat</strong> Cover. Apple glue to the tabs of the <strong>Hat</strong> Cover. Attach to the cylinder of the <strong>Hat</strong>.<br />
© DISNEY
<strong>Mickey</strong> <strong>Mouse</strong> <strong>Clubhouse</strong> <strong>New</strong> <strong>Year</strong><br />
<strong>Mickey</strong>’s <strong>Top</strong> <strong>Hat</strong><br />
© DISNEY<br />
© DISNEY 4
<strong>Mickey</strong> <strong>Mouse</strong> <strong>Clubhouse</strong> <strong>New</strong> <strong>Year</strong><br />
<strong>Mickey</strong>’s <strong>Top</strong> <strong>Hat</strong><br />
© DISNEY<br />
© DISNEY 5
<strong>Mickey</strong> <strong>Mouse</strong> <strong>Clubhouse</strong> <strong>New</strong> <strong>Year</strong><br />
<strong>Mickey</strong>’s <strong>Top</strong> <strong>Hat</strong><br />
© DISNEY 6
SM<br />
<strong>Mickey</strong>’s <strong>Top</strong> <strong>Hat</strong> & Bowtie<br />
PLAYHOUSEDISNEY.COM/CELEBRATIONCENTER<br />
© DISNEY<br />
© DISNEY 7
What You Will Need<br />
• Color printer<br />
• Heavyweight paper (we suggest 65 lb. paper)<br />
• Cutting tools<br />
• Double sided tape<br />
• Note: Cutting intended for grown-ups only<br />
<strong>Mickey</strong> <strong>Mouse</strong> <strong>Clubhouse</strong> <strong>New</strong> <strong>Year</strong><br />
Minnie & Daisy Tiaras<br />
Instructions<br />
1. Print your pages. Set aside to dry. 2. Cut out the shape of the tiara. Start along the side<br />
of the tiara cutting ONLY the solid lines.<br />
© DISNEY
3. Score and fold the tiara and backstrap. Afterwards,<br />
apply glue and stick them together.<br />
5. Place on your head!<br />
<strong>Mickey</strong> <strong>Mouse</strong> <strong>Clubhouse</strong> <strong>New</strong> <strong>Year</strong><br />
Minnie & Daisy Tiaras<br />
4. Place double sided tape at the edges of the strap<br />
and attach to the tiara.<br />
© DISNEY
© DISNEY<br />
SM<br />
© DISNEY<br />
PLAYHOUSEDISNEY.COM/CELEBRATIONCENTER<br />
© DISNEY
© DISNEY<br />
SM<br />
© DISNEY<br />
PLAYHOUSEDISNEY.COM/CELEBRATIONCENTER<br />
© DISNEY
What You Will Need<br />
• Color printer<br />
• Heavyweight paper (we suggest 65 lb. paper)<br />
• Cutting tools<br />
• Single hole puncher<br />
<strong>Mickey</strong> <strong>Mouse</strong> <strong>Clubhouse</strong> <strong>New</strong> <strong>Year</strong><br />
Streamer<br />
• Glue<br />
• String or twine<br />
• Note: Cutting intended for grown-ups only<br />
Instructions<br />
1. Print your pages. Set aside to dry. 2. Cut out the shape of the star. Start along the side<br />
of the star cutting ONLY the solid lines. Use a hole<br />
puncher to cut out the 2 white holes on each star<br />
shape.<br />
© DISNEY
<strong>Mickey</strong> <strong>Mouse</strong> <strong>Clubhouse</strong> <strong>New</strong> <strong>Year</strong><br />
Streamer<br />
3. Take a piece of string and begin to weave it through the holes at the top of the stars. Be sure to weave from the<br />
front of the star through to the back.<br />
© DISNEY
SM<br />
© DISNEY<br />
© DISNEY<br />
PLAYHOUSEDISNEY.COM/CELEBRATIONCENTER<br />
© DISNEY
SM<br />
© DISNEY<br />
© DISNEY<br />
PLAYHOUSEDISNEY.COM/CELEBRATIONCENTER<br />
© DISNEY
SM<br />
© DISNEY<br />
© DISNEY<br />
PLAYHOUSEDISNEY.COM/CELEBRATIONCENTER<br />
© DISNEY
SM<br />
© DISNEY<br />
© DISNEY<br />
PLAYHOUSEDISNEY.COM/CELEBRATIONCENTER<br />
© DISNEY
What You Will Need<br />
• Color printer<br />
• Heavyweight paper (we suggest 65 lb. paper)<br />
• Cutting tools<br />
• Tape<br />
• String or twine<br />
• Hole puncher<br />
• Note: Cutting intended for grown-ups only<br />
<strong>Mickey</strong> <strong>Mouse</strong> <strong>Clubhouse</strong> <strong>New</strong> <strong>Year</strong><br />
Mobile Centerpiece<br />
Instructions<br />
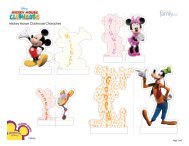
1. Print your pages. Set aside to dry. 2. Cut out the large center stars along the solid lines.<br />
Glue the two large stars together so that the printed<br />
sides are facing out. Let dry completely. When you are<br />
fi nished you will have two stars, one larger frame star<br />
and the inside star that says “Happy <strong>New</strong> <strong>Year</strong>!”<br />
© DISNEY
3. Cut out the smaller stars and Hooray along the solid<br />
lines.<br />
5. Glue the two halves together. Once dry, cut out the<br />
white space, leaving you with the dark blue frame and<br />
the inside “Hooray” box.<br />
<strong>Mickey</strong> <strong>Mouse</strong> <strong>Clubhouse</strong> <strong>New</strong> <strong>Year</strong><br />
Mobile Centerpiece<br />
4. Fold smaller stars in half along the dotted lines so<br />
that both printed sides are facing out. Glue the two sides<br />
together.<br />
6. Use a hole puncher to cut out the white holes on all<br />
the stars and the top of the Hooray piece.<br />
© DISNEY
7. Cut string or twine into the following:<br />
1 piece of 2” string<br />
2 pieces of 5.5” string<br />
4 pieces of 6.5” string<br />
1 piece of 8” string<br />
1 piece of 11” string<br />
9. Take the 8” piece of string and thread through the<br />
two holes shown here. Tape the string to the bottom<br />
hole with clear tape. Leave the extra string at the top<br />
to hang from the ceiling.<br />
<strong>Mickey</strong> <strong>Mouse</strong> <strong>Clubhouse</strong> <strong>New</strong> <strong>Year</strong><br />
Mobile Centerpiece<br />
8. To thread the two main stars together, take the 2”<br />
piece of string and thread through the top two holes<br />
shown here. Tape at both ends with clear tape.<br />
10. Take the four pieces of 6.5” string and thread<br />
through the holes on the smaller stars with <strong>Mickey</strong>,<br />
Donald, Goofy, and Pluto. Tape the string with clear<br />
tape. Take the two pieces of 5.5” string and thread<br />
through the holes on the smaller stars with Minnie and<br />
Daisy. Tape the string with clear tape.<br />
© DISNEY
11. Take the piece of 11” string and thread through the<br />
hole on the Horray piece. Tape the string with clear tape.<br />
<strong>Mickey</strong> <strong>Mouse</strong> <strong>Clubhouse</strong> <strong>New</strong> <strong>Year</strong><br />
Mobile Centerpiece<br />
12. Take the <strong>Mickey</strong> and Donald stars and thread<br />
through the holes as shown below.<br />
<strong>Mickey</strong> star Donald star<br />
13. Take the Minnie, Daisy, Goofy, and Pluto stars and thread through the holes as shown below. Take the piece of<br />
11” string and thread through the holes on the Hooray piece. Tape the string with clear tape. Now that the <strong>New</strong> <strong>Year</strong>’s<br />
Hanging Mobile Centerpiece is all put together, hang over your main seating and/or buffet table.<br />
Minnie star Daisy star<br />
Goofy star<br />
Pluto star<br />
© DISNEY
© DISNEY<br />
<strong>Mickey</strong> <strong>Mouse</strong> <strong>Clubhouse</strong> <strong>New</strong> <strong>Year</strong><br />
Mobile Centerpiece<br />
© DISNEY
<strong>Mickey</strong> <strong>Mouse</strong> <strong>Clubhouse</strong> <strong>New</strong> <strong>Year</strong><br />
Mobile Centerpiece<br />
© DISNEY
<strong>Mickey</strong> <strong>Mouse</strong> <strong>Clubhouse</strong> <strong>New</strong> <strong>Year</strong><br />
Mobile Centerpiece<br />
© DISNEY<br />
© DISNEY 7
<strong>Mickey</strong> <strong>Mouse</strong> <strong>Clubhouse</strong> <strong>New</strong> <strong>Year</strong><br />
Mobile Centerpiece<br />
© DISNEY<br />
© DISNEY
<strong>Mickey</strong> <strong>Mouse</strong> <strong>Clubhouse</strong> <strong>New</strong> <strong>Year</strong><br />
Mobile Centerpiece<br />
© DISNEY<br />
© DISNEY 9
<strong>Mickey</strong> <strong>Mouse</strong> <strong>Clubhouse</strong> <strong>New</strong> <strong>Year</strong><br />
Mobile Centerpiece<br />
© DISNEY<br />
© DISNEY 10
<strong>Mickey</strong> <strong>Mouse</strong> <strong>Clubhouse</strong> <strong>New</strong> <strong>Year</strong><br />
Mobile Centerpiece<br />
© DISNEY<br />
© DISNEY 11
<strong>Mickey</strong> <strong>Mouse</strong> <strong>Clubhouse</strong> <strong>New</strong> <strong>Year</strong><br />
Mobile Centerpiece<br />
© DISNEY<br />
© DISNEY 12
<strong>Mickey</strong> <strong>Mouse</strong> <strong>Clubhouse</strong> <strong>New</strong> <strong>Year</strong><br />
Mobile Centerpiece<br />
© DISNEY<br />
© DISNEY<br />
13
What You Will Need<br />
• Color printer<br />
• Inkjet/laser Vellum paper<br />
• Cutting tools<br />
• Glue and double sided tape<br />
• Straws<br />
• Note: Cutting intended for grown-ups only<br />
<strong>Mickey</strong> <strong>Mouse</strong> <strong>Clubhouse</strong> <strong>New</strong> <strong>Year</strong><br />
Goofy’s Party Blowers<br />
Instructions<br />
1. Print your pages. Set aside to dry. 2. Cut out the shape of the party blower. Start along<br />
the side of the rectangle cutting ONLY the solid lines.<br />
© DISNEY
3. Score and fold where along the dotted lines. 4. Apply glue to the smaller tab and glue the party<br />
blower together.<br />
5. Score and fold the edge of the party blower then<br />
glue together. Allow to dry.<br />
<strong>Mickey</strong> <strong>Mouse</strong> <strong>Clubhouse</strong> <strong>New</strong> <strong>Year</strong><br />
Goofy’s Party Blowers<br />
6. Use a pen or straw as a guide to roll the party<br />
blower up. Afterwards, wrap with a rubberband and<br />
allow to sit for one day before removing.<br />
© DISNEY
7. Apply double sided tape to the straw then Insert the<br />
straw into the opening of the party blower.<br />
<strong>Mickey</strong> <strong>Mouse</strong> <strong>Clubhouse</strong> <strong>New</strong> <strong>Year</strong><br />
Goofy’s Party Blowers<br />
9. Allow to dry. Once the party blower has dried, start blowing!<br />
8. Fold the left edge followed by the right edge and to<br />
seal the straw in.<br />
© DISNEY<br />
3
SM<br />
PLAYHOUSEDISNEY.COM/CELEBRATIONCENTER © DISNEY<br />
4<br />
© DISNEY
SM<br />
PLAYHOUSEDISNEY.COM/CELEBRATIONCENTER © DISNEY<br />
5<br />
© DISNEY
SM<br />
PLAYHOUSEDISNEY.COM/CELEBRATIONCENTER<br />
© DISNEY<br />
© DISNEY 6
What You Will Need<br />
• Color printer<br />
• Heavyweight paper (we suggest 65 lb. paper)<br />
• Cutting tools<br />
• Glue<br />
• Confetti<br />
<strong>Mickey</strong> <strong>Mouse</strong> <strong>Clubhouse</strong> <strong>New</strong> <strong>Year</strong><br />
Donald’s Confetti Tube<br />
• Paper towel tubes<br />
• Tissue paper<br />
• Ribbon<br />
• Note: Cutting intended for grown-ups only<br />
Instructions<br />
1. Print your pages. Set aside to dry. 2. Cut out the Confetti Tube wrapper. Start along the<br />
side of the rectangle cutting ONLY the solid lines.<br />
© DISNEY
3. Put glue on the back side of the paper towel tube<br />
printout and wrap onto the empty paper towel tube.<br />
5. Fill the paper towel tube with confetti.<br />
<strong>Mickey</strong> <strong>Mouse</strong> <strong>Clubhouse</strong> <strong>New</strong> <strong>Year</strong><br />
Donald’s Confetti Tube<br />
Glue<br />
4. Cover the top of the Confetti Tube with the<br />
tissue paper and tie a bow with the ribbon.<br />
6. Cover the other end of the tube with<br />
tissue paper and tie with ribbon to prevent the confetti<br />
from falling out.<br />
© DISNEY
SM<br />
<strong>Mickey</strong> <strong>Mouse</strong> <strong>Clubhouse</strong> <strong>New</strong> <strong>Year</strong><br />
Donald’s Confetti Tube<br />
PLAYHOUSEDISNEY.COM/CELEBRATIONCENTER<br />
© DISNEY<br />
© DISNEY