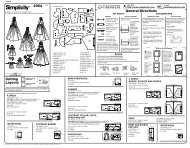
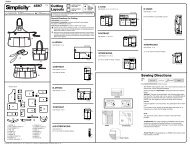
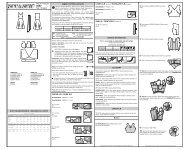
3680 Cutting Layouts General Directions - PrintSew
3680 Cutting Layouts General Directions - PrintSew
3680 Cutting Layouts General Directions - PrintSew

You also want an ePaper? Increase the reach of your titles
YUMPU automatically turns print PDFs into web optimized ePapers that Google loves.
English<br />
<strong>Cutting</strong><br />
<strong>Layouts</strong><br />
®<br />
pattern printed<br />
side down<br />
pattern printed<br />
side up<br />
<strong>3680</strong><br />
Thank you for purchasing this Simplicity pattern.<br />
We have made every effort to provide you with a high quality product.<br />
A<br />
A<br />
A,B,C,D&E<br />
A,B,C,&D<br />
A<br />
D<br />
© Copyright 2007—Simplicity Pattern Co., Inc. / Printed in U.S.A. / Simplicity is a registered trademark of Simplicity Pattern Co., Inc.<br />
★<br />
✻<br />
1 / 4<br />
See<br />
SPECIAL<br />
CUTTING<br />
NOTES<br />
POSITION OF PATTERN PIECES MAY VARY SLIGHTLY ACCORDING<br />
TO YOUR PATTERN SIZE<br />
A,B,C,D: PIECES 4 5 11 ARE CUT OF ELASTIC<br />
A COSTUME:<br />
BODICE, UPPER SKIRT<br />
AND HAT<br />
USE PIECES 1 2 3 6 12 13<br />
CUT ONE OF PIECE 12<br />
44" 45" OR 58" 60"<br />
(115CM OR 150CM)<br />
WITH NAP / ALL SIZES<br />
SELVAGE<br />
2<br />
1<br />
SEL.<br />
13<br />
6<br />
12<br />
FOLD<br />
MIDDLE SKIRT, BELT LOWER SKIRT AND<br />
AND HAT BAND PANTIES<br />
USE PIECES 7 9 14<br />
44" 45" OR 58" 60" (115CM OR 150CM)<br />
WITH NAP<br />
ALL SIZES<br />
SELVAGES<br />
✻<br />
DOUBLE THICKNESS<br />
9<br />
B<br />
7<br />
B<br />
E E<br />
7<br />
14<br />
SELVAGES<br />
C<br />
C<br />
E<br />
D<br />
E<br />
DOUBLE THICKNESS<br />
✻<br />
DOUBLE THICKNESS<br />
10<br />
3<br />
8<br />
SELVAGES<br />
6<br />
SELVAGES<br />
USE PIECES 8 10<br />
44" 45" OR 58" 60" (115CM OR 150CM)<br />
WITH NAP<br />
ALL SIZES<br />
SELVAGES<br />
✻<br />
19 pieces given<br />
1<br />
8<br />
3<br />
12<br />
15<br />
18<br />
11<br />
SELVAGES<br />
2<br />
5<br />
1-BODICE FRONT<br />
2-BODICE BACK<br />
3-SLEEVE -A,B<br />
4-ELASTIC GUIDE FOR NECK<br />
5-ELASTIC GUIDE FOR SLEEVE<br />
6-UPPER SKIRT -A,B,C /<br />
MIDDLE SKIRT -D /<br />
LOWER SKIRT -E<br />
7-MIDDLE SKIRT -A /<br />
LOWER SKIRT -B,D<br />
8-LOWER SKIRT -A,C<br />
9-BELT<br />
6<br />
7<br />
4<br />
13 14<br />
LINING<br />
USE PIECES 1 2 6 12 13<br />
CUT ONE OF PIECE 12<br />
44" 45" (115CM)<br />
WITH NAP<br />
ALL SIZES<br />
9<br />
16 17<br />
INTERFACING<br />
USE PIECES 9 12 13 14<br />
22" TO 25" (55CM TO 64CM) FUSIBLE<br />
WITH NAP<br />
ALL SIZES<br />
B COSTUME AND PANTIES<br />
USE PIECES 1 2 3 6 7 10<br />
CUT ONE OF PIECE 2, CUT ONE OF<br />
PIECE 1 UNDERNEATH IN POSITION SHOWN<br />
44" 45" OR 58" 60"<br />
(115CM OR 150CM)<br />
WITH NAP / ALL SIZES<br />
8<br />
10<br />
19<br />
10-PANTIES -A,B,C,D<br />
11-ELASTIC GUIDE FOR<br />
PANTIES LEG -A,B,C,D<br />
12-HAT CROWN -A<br />
13-HAT BRIM -A<br />
14-HAT BAND -A<br />
15-SLEEVE -C,D,E<br />
16-UPPER SKIRT -D,E<br />
17-BLOOMERS -E<br />
18-ELASTIC GUIDE FOR<br />
BLOOMERS LEG -E<br />
19-HEAD SCARF -E<br />
✻<br />
DOUBLE<br />
THICKNESS<br />
U.S. & Canada Toll-Free<br />
1-888-588-2700<br />
The Pattern<br />
SYMBOLS<br />
GRAIN LINE Place on<br />
straight grain of fabric<br />
parallel to selvage<br />
PLACE SOLID LINE on<br />
fold of fabric.<br />
CENTER FRONT OR<br />
BACK of garment.<br />
NOTCHES<br />
DOTS<br />
CUTTING LINE<br />
LENGTHEN OR<br />
SHORTEN LINES<br />
SEAM ALLOWANCE: 5/8" (1.5cm)<br />
unless otherwise stated is included but<br />
not printed on MULTI-SIZE PATTERNS.<br />
Mark your size with colored felt tip pen.<br />
See chart on tissue for how to use MULTI-<br />
SIZE PATTERNS.<br />
10<br />
Web Site<br />
http://www.simplicity.com<br />
<strong>General</strong> <strong>Directions</strong><br />
ADJUST IF NEEDED<br />
Make adjustments before placing<br />
pattern on fabric.<br />
TO LENGTHEN:<br />
Cut pattern<br />
between<br />
lengthen or<br />
shorten lines.<br />
Spread pattern<br />
evenly, the<br />
amount needed<br />
and tape to<br />
paper.<br />
TO SHORTEN:<br />
At lengthen or<br />
shorten lines,<br />
make an even<br />
pleat taking up<br />
amount needed.<br />
Tape in place.<br />
When lengthen or shorten lines are<br />
not given, make adjustments at<br />
lower edge of pattern.<br />
Sewing<br />
• SEW garment following Sewing <strong>Directions</strong>.<br />
• PIN or machine-baste seams matching notches.<br />
• STITCH 5/8" (1.5 cm) seams unless otherwise stated.<br />
• PRESS seams open unless otherwise indicated clipping when necessary so<br />
seams will lie flat.<br />
• TRIM seams to reduce bulk, as shown below.<br />
Trim enclosed<br />
seams into layers<br />
6<br />
SELVAGE<br />
1<br />
2<br />
FOLD<br />
7<br />
SEL.<br />
6<br />
✻<br />
DOUBLE THICKNESS<br />
SINGLE<br />
THICKNESS<br />
7<br />
Trim corners<br />
12<br />
SELVAGES<br />
6<br />
12 9<br />
6<br />
13<br />
SELVAGES<br />
SELVAGE<br />
13 14<br />
SELVAGE<br />
SELVAGES<br />
3<br />
2<br />
1<br />
SELVAGES<br />
Clip inner<br />
curves<br />
Notch outer<br />
curves<br />
BELT<br />
USE PIECE 9<br />
54" (140CM) VINYL<br />
ALL SIZES<br />
INTERFACING<br />
USE PIECE 9<br />
e<br />
E-mail<br />
info@simplicity.com<br />
<strong>Cutting</strong>/Marking<br />
BEFORE CUTTING:<br />
PRESS pattern pieces with a warm dry<br />
iron. PRE-SHRINK fabric by pre-washing<br />
washables or steam-pressing nonwashables.<br />
CIRCLE your cutting layout.<br />
PIN pattern to fabric as shown in <strong>Cutting</strong><br />
<strong>Layouts</strong>.<br />
• FOR DOUBLE THICKNESS: Fold<br />
fabric with RIGHT sides together.<br />
• FOR SINGLE THICKNESS: Place<br />
fabric RIGHT side up.<br />
• FOR PILE, SHADED OR ONE WAY<br />
DESIGN FABRICS: Use “with nap”<br />
layouts<br />
★ If layout<br />
shows a piece<br />
extending past<br />
fold, cut out all<br />
pieces except<br />
piece that<br />
extends.<br />
Open out<br />
fabric to single<br />
thickness. Cut<br />
extending<br />
piece on<br />
RIGHT side of<br />
fabric in<br />
position<br />
shown.<br />
22" TO 25" (55CM TO 64CM) FUSIBLE<br />
ALL SIZES<br />
C COSTUME:<br />
BODICE, LOWER SKIRT<br />
AND PANTIES<br />
USE PIECES 1 2 8 10 15<br />
44" 45" OR 58" 60"<br />
(115CM OR 150CM)<br />
WITH NAP<br />
ALL SIZES<br />
AFTER CUTTING:<br />
Transfer markings to WRONG side<br />
of fabric before removing pattern.<br />
Use pin and chalk method or<br />
dressmaker’s tracing paper and<br />
wheel.<br />
To Quick Mark:<br />
• Snip edge of fabric to mark<br />
notches, ends of fold lines and<br />
center lines.<br />
• Pin mark dots.<br />
SPECIAL CUTTING NOTES<br />
✻ Mark small<br />
arrows along both<br />
selvages indicating<br />
direction of nap or<br />
design. Fold fabric<br />
crosswise with<br />
RIGHT sides<br />
together, and cut<br />
along fold (a).<br />
SELVAGE<br />
1<br />
2<br />
FOLD<br />
SEL.<br />
Turn one fabric<br />
layer around so<br />
arrows on both<br />
layers go in the<br />
same direction.<br />
Place RIGHT sides<br />
together (b).<br />
✻<br />
DOUBLE THICKNESS<br />
10<br />
15<br />
SINGLE<br />
THICKNESS<br />
a.<br />
CROSSWISE FOLD<br />
✁<br />
8<br />
b.<br />
SELVAGE<br />
SELVAGE<br />
SELVAGES<br />
SELVAGE<br />
SELVAGES<br />
DOUBLE<br />
THICKNESS<br />
EDGES<br />
✻<br />
EDGES<br />
SELVAGE<br />
9<br />
SELVAGE<br />
SELVAGES<br />
8<br />
SELVAGES<br />
9
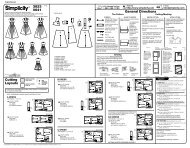
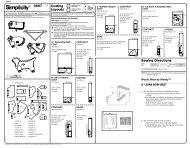
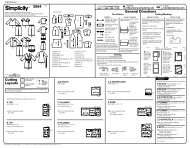
English<br />
<strong>3680</strong><br />
USE PIECES 6 7<br />
44" 45" OR 58" 60"<br />
(115CM OR 150CM)<br />
WITH NAP<br />
ALL SIZES<br />
2 / 4<br />
UPPER SKIRT AND BELT<br />
USE PIECES 6 9<br />
44" 45" OR 58" 60"<br />
(115CM OR 150CM)<br />
WITH NAP<br />
ALL SIZES<br />
INTERFACING<br />
USE PIECE 9<br />
22" TO 25" (55CM TO 64CM) FUSIBLE<br />
ALL SIZES<br />
D COSTUME:<br />
BODICE AND UPPER SKIRT<br />
USE PIECES 1 2 15 16<br />
44" 45" OR 58" 60" (115CM OR 150CM)<br />
WITH NAP<br />
ALL SIZES<br />
MIDDLE AND LOWER SKIRT<br />
TWO THREAD<br />
OVERLOCK<br />
DOUBLE STITCHED SEAM<br />
THREE THREAD<br />
OVERLOCK<br />
© Copyright 2007—Simplicity Pattern Co., Inc. / Printed in U.S.A. / Simplicity is a registered trademark of Simplicity Pattern Co., Inc.<br />
1<br />
✻<br />
DOUBLE THICKNESS<br />
FRENCH SEAM<br />
SELVAGE<br />
2<br />
FOLD<br />
7<br />
SEL.<br />
✻<br />
DOUBLE THICKNESS<br />
SINGLE<br />
THICKNESS<br />
✻<br />
DOUBLE THICKNESS<br />
6<br />
9<br />
15<br />
6<br />
SELVAGES<br />
6<br />
SELVAGES<br />
Sewing <strong>Directions</strong><br />
FABRIC<br />
KEY<br />
Read <strong>General</strong> <strong>Directions</strong> on page 1 before you begin.<br />
SIMPLY THE BEST SEAM FINISHES FOR<br />
SHEER FABRICS<br />
Seams can be finished with one of the three methods mentioned<br />
below, choose which one you would like to use.<br />
OVERLOCK/SERGE - Overlock over raw edges of seam, using<br />
an overlock/serger machine.<br />
OR<br />
DOUBLE STITCHED SEAM- stitch seam again 1/8"(3mm) from<br />
first stitching. Trim close to stitching. Press seam to one side.<br />
OR<br />
7<br />
6<br />
SELVAGES<br />
SELVAGE<br />
9<br />
SELVAGE<br />
SELVAGES<br />
16<br />
16<br />
SELVAGES<br />
SELVAGES<br />
LINING AND PANTIES<br />
USE PIECES 1 2 7 10<br />
44" 45" (115CM)<br />
WITH NAP<br />
ALL SIZES<br />
BELT<br />
USE PIECE 9<br />
44" 45" (115CM) WITH NAP<br />
ALL SIZES<br />
INTERFACING<br />
USE PIECE 9<br />
22" TO 25" (55CM TO 64CM)<br />
FUSIBLE<br />
ALL SIZES THICKNESS<br />
E COSTUME:<br />
BODICE<br />
USE PIECES 1 2 15<br />
PIECES 4 5 ARE CUT OF ELASTIC<br />
44" 45" OR 58" 60"<br />
(115CM OR 150CM)<br />
WITH NAP / ALL SIZES<br />
RIGHT SIDE WRONG SIDE INTERFACING LINING<br />
FRENCH SEAM- To make French seam, stitch first seam on<br />
OUTSIDE, a scant 1/4" (6mm) from seam line; trim close to<br />
stitching.<br />
Turn to INSIDE and stitch through seam allowance, encasing first<br />
seam.<br />
✻<br />
DOUBLE THICKNESS<br />
10<br />
SINGLE<br />
1<br />
SEL.<br />
7<br />
SELVAGE<br />
1<br />
FOLD<br />
SELVAGES<br />
15<br />
7<br />
SELVAGES<br />
1<br />
✻<br />
DOUBLE<br />
THICKNESS<br />
9<br />
2<br />
SELVAGE<br />
15<br />
2<br />
SELS.<br />
SELVAGE<br />
SELVAGE<br />
FOLD<br />
9<br />
SELS.<br />
SEL.<br />
NARROW HEM<br />
UPPER SKIRT<br />
USE PIECE 16<br />
44" 45" OR 58" 60"<br />
(115CM OR 150CM)<br />
WITH NAP<br />
ALL SIZES<br />
LOWER SKIRT AND BELT<br />
USE PIECES 6 9<br />
44" 45" OR 58" 60"<br />
(115CM OR 150CM)<br />
WITH NAP<br />
ALL SIZES<br />
HEAD SCARF<br />
AND BLOOMERS<br />
USE PIECES 17 19<br />
PIECE 18 IS CUT OF ELASTIC<br />
44" 45" OR 58" 60"<br />
(115CM OR 150CM)<br />
WITH NAP<br />
ALL SIZES<br />
INTERFACING<br />
USE PIECE 9<br />
✻<br />
22" TO 25" (55CM TO 64CM)<br />
FUSIBLE<br />
ALL SIZES THICKNESS<br />
SELVAGES<br />
Sewing procedures ITALICIZED in Sewing <strong>Directions</strong> are<br />
defined below:<br />
NARROW HEM - Press under hem allowance.<br />
To form narrow hem, tuck under raw edge to meet crease.<br />
Press.<br />
Stitch hem in place.<br />
COSTUME AND BELT A, B, C, D,<br />
E<br />
1. To form casing on INSIDE, pin single fold bias tape to<br />
sleeves, placing lower edge of tape along casing line. Stitch<br />
close to both long edges of tape.<br />
DOUBLE THICKNESS<br />
✻<br />
DOUBLE THICKNESS<br />
17<br />
19<br />
SINGLE<br />
9<br />
16<br />
16<br />
SELVAGES<br />
SELVAGES<br />
6<br />
SELVAGE<br />
9<br />
6<br />
SELVAGES<br />
SELVAGE<br />
17<br />
FOLD<br />
SELVAGE<br />
SEL.
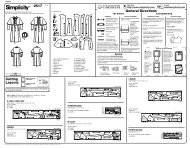
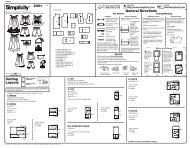
English<br />
<strong>3680</strong><br />
6<br />
8<br />
3<br />
2<br />
10<br />
12<br />
13<br />
5<br />
4<br />
3 / 4<br />
9<br />
7<br />
11<br />
© Copyright 2007—Simplicity Pattern Co., Inc. / Printed in U.S.A. / Simplicity is a registered trademark of Simplicity Pattern Co., Inc.<br />
2. Cut a piece of elastic for each sleeve the length of elastic<br />
guide for sleeve.<br />
Insert elastic through casing using a safety pin. Stitch across<br />
ends of casing, catching in elastic.<br />
3. Stitch underarm seam.<br />
4. NARROW HEM lower edge of sleeves.<br />
5. FOR VIEWS A, D- Pin WRONG side of bodice front and back<br />
overlay to RIGHT side of corresponding lining pieces. Baste<br />
close to raw edges.<br />
CONTINUE AS FOLLOWS FOR VIEWS A, B, C, D, E<br />
6. Stitch bodice front to bodice back at side seams.<br />
7. With RIGHT sides together, pin sleeve to armhole edge of<br />
garment, matching notches and seams. Stitch. Stitch again<br />
1/8” (3mm) from first stitching. Trim seam close to second<br />
stitching. Press seam toward sleeve.<br />
8. NARROW HEM upper edge of bodice.<br />
To form casing, on INSIDE pin 1/2" (1.3cm) wide single fold<br />
bias tape to bodice, placing lower edge of tape along casing<br />
line, turning under and lapping one end at center back, as<br />
shown. Stitch close to both long edges of tape, leaving an<br />
opening on lower edge large enough to insert elastic.<br />
9. Cut a piece of 1/4" (6mm) wide elastic the length of elastic<br />
guide for neck. Insert elastic through casing using a safety<br />
pin. Stitch ends of elastic together securely. Stitch opening<br />
closed.<br />
10. FOR VIEW A- Pin WRONG side of upper skirt to RIGHT side<br />
of corresponding lining pieces. Baste close to raw edges.<br />
11. FOR VIEW D- Pin WRONG side of lower skirt to RIGHT side<br />
of corresponding lining pieces. Baste close to raw edges.<br />
CONTINUE AS FOLLOWS FOR VIEWS A, B, C, D, E<br />
12. Stitch two upper skirt sections together along center front<br />
seam for Views A, B, C. Stitch two upper skirt sections<br />
together along one notched edge for Views D, E.<br />
Stitch two upper skirt back sections together same as for<br />
front.<br />
Stitch upper skirt front to upper skirt back at side seams.<br />
NARROW HEM lower edge of skirt.<br />
13. Stitch two middle skirt sections A, D together along one<br />
notched edge for front.<br />
Stitch two middle skirt sections together along one notched<br />
edge for back same as for front.<br />
Stitch middle skirt front to middle skirt back at side seams.<br />
NARROW HEM lower edge of skirt.<br />
Stitch two lower skirt sections together along center front<br />
seam for Views A, C, E. Stitch two lower skirt sections<br />
together along one notched edge for Views B, D.<br />
Stitch center back seam of lower skirt sections same as for<br />
front. Stitch two lower skirt sections together along one<br />
notched edge for Views B, D.<br />
Stitch lower skirt front to lower skirt back at side seams.<br />
NARROW HEM lower edge of skirt.<br />
14<br />
17<br />
19<br />
22<br />
21<br />
16<br />
15<br />
20<br />
18<br />
14. TRIM VIEW C- On OUTSIDE, pin straight edge of loopy<br />
fringe trim along hem stitching on upper skirt having ends<br />
meet at one side seam. Pin straight edge of trim along hem<br />
stitching on lower skirt having ends meet at one side seam.<br />
Stitch close to both long edges of trim.<br />
CONTINUE AS FOLLOWS FOR VIEWS A, B, C, D, E<br />
15. Pin WRONG side of upper skirt to RIGHT side of middle/<br />
lower skirt matching small dots. Baste.<br />
16. With RIGHT sides together, stitch skirt to bodice at waistline<br />
seam, matching centers, small dots and side seams.<br />
17. To form casing, open out one edge of 7/8" (2.2cm) single fold<br />
bias tape. On INSIDE, pin tape to waistline seam, placing<br />
crease along stitching and turning under ends so that they<br />
meet at one side seam. Stitch along crease. Trim garment<br />
seam allowance even with edge of tape.<br />
18. Press seam and tape toward bodice.To form casing, stitch<br />
remaining long edge of tape to bodice.<br />
19. Cut a piece of elastic to fit waist, plus 1" (2.5cm). Insert<br />
elastic through opening in casing.<br />
Overlap ends and hold with a safety pin.<br />
Try on garment and adjust to fit.<br />
20. Stitch ends of elastic together securely.<br />
Distribute fullness evenly.<br />
BELT<br />
21. Pin fusible interfacing to WRONG side of belt. Cut diagonally<br />
across corners that will be enclosed with seams. Fuse<br />
interfacing in place following manufacturers directions.<br />
22. With RIGHT sides together, pin belt to facing. Stitch seam,<br />
leaving an opening at lower edge to turn.<br />
Turn belt; press. Slip-stitch opening edges together. Apply<br />
eyelets to belt at small dots following manufacturers<br />
directions. Thread ribbon or cord through upper eyelets,<br />
having ends extend evenly. Criss-cross trim and insert<br />
through next set of eyelets. Continue threading trim through<br />
remaining eyelets in same manner, having ends extend<br />
evenly. Tie in a bow. Trim ends evenly.
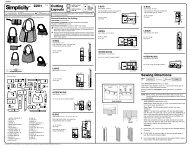
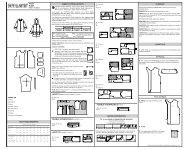
English<br />
<strong>3680</strong><br />
1<br />
3<br />
5<br />
3<br />
4<br />
4 / 4<br />
1 2<br />
7<br />
2<br />
4<br />
© Copyright 2007—Simplicity Pattern Co., Inc. / Printed in U.S.A. / Simplicity is a registered trademark of Simplicity Pattern Co., Inc.<br />
6<br />
PANTIES A, B, C, D<br />
1. With RIGHT sides together, stitch center front and back<br />
seams.<br />
To reinforce seam, stitch over first stitching; clip curves.<br />
2. Stitch crotch seam.<br />
3. To form waistline casing, press 1" (2.5cm) on upper edge to<br />
INSIDE. To form leg casings, press 3/4" (2cm) on lower<br />
edges to INSIDE. Press under 1/4" (6mm) on raw edges.<br />
Stitch close to inner edges of casings, leaving an opening on<br />
each casing to insert elastic.<br />
4. Cut a piece of elastic to fit waist, plus 1" (2.5cm).<br />
Cut two pieces of elastic the measurement of elastic guide for<br />
panties leg.<br />
Insert elastic through casings; adjust to fit.<br />
Stitch ends of elastic together securely.<br />
Stitch opening closed.<br />
HAT A<br />
NOTE: All seams are 3/8" (1cm).<br />
1. Apply fusible interfacing to WRONG side of hat crown lining<br />
following manufacturers directions.<br />
Pin WRONG side of hat crown overlay to RIGHT side of hat<br />
crown lining. Baste close to raw edges.<br />
2. Stitch center back seam of hat crown.<br />
3. Apply fusible interfacing to WRONG side of hat brim lining<br />
following manufacturers directions. Pin WRONG side of hat<br />
brim overlay to RIGHT side of hat brim lining sections. Pin<br />
WRONG side of remaining hat brim overlay to RIGHT side of<br />
remaining hat brim lining forming facing. Baste close to outer<br />
raw edges.<br />
4. Stitch center back seam of hat brim. Stitch center back seam<br />
of brim facing. With RIGHT sides together, pin brim facing to<br />
hat brim matching centers. Stitch outer curved edge. Trim<br />
seam; clip curves.<br />
5. Turn brim RIGHT side out. Press. Machine-baste inner edges<br />
together. Clip to stitching.<br />
6. With RIGHT sides together, pin brim to the crown matching<br />
centers and small dots. Baste. Stitch brim seam. Press seam<br />
toward crown<br />
Make hat band same as for belt, see steps 21 and 22.<br />
7. Pin hat band to hat crown matching centers back. On<br />
INSIDE, tack hat band to hat crown.<br />
1<br />
2<br />
6<br />
3<br />
4<br />
5<br />
BLOOMERS AND HEAD SCARF<br />
E<br />
1. NARROW HEM leg edges.<br />
To form leg casing, on INSIDE, pin bias fold tape to garment,<br />
placing lower edge along casing line.<br />
Stitch close to both edges of casing.<br />
2. Stitch center front and center back seams.<br />
To reinforce seams, stitch again over first stitching. Clip<br />
curves.<br />
3. Press 1" (2.5cm) on upper edge to INSIDE, forming casing.<br />
Press under 1/4" (6mm) on raw edge.<br />
Stitch close to inner edge of casing, leaving an opening to<br />
insert elastic.<br />
4. Cut a piece of elastic to fit waist, plus 1" (2.5cm).<br />
Insert elastic through waistline casing; adjust to fit. Stitch<br />
ends of elastic together securely.<br />
Stitch opening.<br />
Cut a piece of elastic the measurement of elastic guide for<br />
bloomers leg.<br />
Insert elastic through leg casings; adjust to fit.<br />
Stitch across ends of casings, catching in elastic.<br />
5. Stitch crotch seam.<br />
HEAD SCARF<br />
6. NARROW HEM outer edges of scarf. Wrap scarf around<br />
head as shown on front of envelope.