Download - Oticon
Download - Oticon
Download - Oticon

Create successful ePaper yourself
Turn your PDF publications into a flip-book with our unique Google optimized e-Paper software.
F I T T I N G I N F O R M A T I O N<br />
S W I F T 1 2 0 +<br />
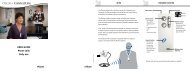
User operation<br />
1 Battery drawer and<br />
built-in on-off switch<br />
2 Telecoil switch<br />
3 Volume control<br />
4 Microphone opening<br />
5 Click hook<br />
6 Number plate<br />
7 Right (red) and<br />
Left (blue) identification<br />
6<br />
7<br />
5<br />
M MT T<br />
Dispenser operation<br />
Swift 120+ is programmed using the Genie 2.0<br />
fitting software compatible with NOAH 2.0-3.0 or<br />
the EasyFit II programmer. The cables used are<br />
the same for either programming device.<br />
Programming shoe . . . . . . . . . . no. 390-01-320-04<br />
HI-PRO cable # 3 Right (Red). . no. 384-20-014-00<br />
HI-PRO cable # 3 Left (Blue). . . no. 384-20-015-01<br />
Connecting the Programming shoe<br />
1 Open the battery drawer on Swift 120+ and<br />
slide the programming shoe into the guide as<br />
shown. Insert battery.<br />
M MT T<br />
2 Close the battery drawer and attach the<br />
programming cable ensuring that the red dot<br />
on the plug matches the red dot on the shoe.<br />
Do not twist the plug!<br />
During programming, the instrument must be<br />
switched on, and in M-position.<br />
4<br />
3<br />
2<br />
1<br />
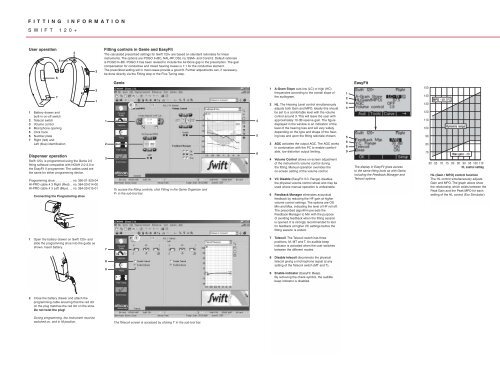
Fitting controls in Genie and EasyFit<br />
The calculated prescribed settings for Swift 120+ are based on standard rationales for linear<br />
instruments. The options are POGO II+BC, NAL-RP, DSL i/o, SSM+ and Corell-2. Default rationale<br />
is POGO II+BC. POGO II has been revised to include the Air-Bone gap in the prescription. The gain<br />
compensation for conductive and mixed hearing losses is 1:1 for the conductive element.<br />
The prescribed setting will in most cases provide a good fit. Further adjustments can, if necessary,<br />
be done directly via the Fitting step or the Fine Tuning step.<br />
1<br />
2<br />
3<br />
7<br />
8<br />
9<br />
Genie<br />
To access the fitting controls, click Fitting in the Genie Organizer and<br />
P1 in the sub-tool bar.<br />
The Telecoil screen is accessed by clicking T in the sub-tool bar.<br />
4<br />
5<br />
6<br />
1 A-Gram Slope cuts low (LC) or high (HC)<br />
frequencies according to the overall slope of<br />
the audiogram.<br />
2 HL. The Hearing Level control simultaneously<br />
adjusts both Gain and MPO. Ideally this should<br />
be set to a comfortable level with the volume<br />
control around 3. This will leave the user with<br />
approximately 10 dB reserve gain. The figure<br />
displayed in the window is an indication of the<br />
level of the hearing loss and will vary widely<br />
depending on the type and shape of the hearing<br />
loss and upon the fitting rationale chosen.<br />
3 AGC activates the output AGC. The AGC works<br />
in combination with the PC to enable comfortable,<br />
low distortion output limiting.<br />
4 Volume Control allows on-screen adjustment<br />
of the instrument's volume control during<br />
the fitting. Manual operation overrides the<br />
on-screen setting of the volume control.<br />
5 VC Disable (EasyFit: V.C. Range) disables<br />
the physical volume control wheel and may be<br />
used where manual operation is undesirable.<br />
6 Feedback Manager eliminates acoustical<br />
feedback by reducing the HF gain at higher<br />
volume control settings. The options are Off,<br />
Min and Max, indicating the level of HF roll off.<br />
The prescribed algorithm pre-sets the<br />
Feedback Manager to Min with the purpose<br />
of avoiding feedback when the fitting session<br />
is opened. It is strongly recommended to test<br />
for feedback at higher VC settings before the<br />
fitting session is ended.<br />
7 Telecoil. The Telecoil switch has three<br />
positions, M, MT and T. An audible beep<br />
indicator is activated when the user switches<br />
between the different modes.<br />
8 Disable telecoil disconnects the physical<br />
telecoil giving a michrophone signal at any<br />
setting of the Telecoil switch (MT and T).<br />
9 Enable indicator (EasyFit: Beep).<br />
By removing the check symbol, the audible<br />
beep indicator is disabled.<br />
1<br />
2<br />
3<br />
4<br />
5<br />
6<br />
8<br />
9<br />
EasyFit<br />
The display in EasyFit gives access<br />
to the same fitting tools as with Genie,<br />
including the Feedback Manager and<br />
Telecoil options.<br />
150<br />
140<br />
130<br />
120<br />
110<br />
100<br />
90<br />
80<br />
70<br />
MPO - dB SPL<br />
Dynamic range<br />
Max gain - dB<br />
60 65 70 75 80 85 90 95 100 110<br />
HL control setting<br />
HL (Gain / MPO) control function<br />
The HL control simultaneously adjusts<br />
Gain and MPO. The graph above show<br />
the relationship which exists between the<br />
Peak Gain and the Peak MPO for each<br />
setting of the HL control (Ear Simulator).