Operating instructions Touchtronic Premier Plus - Miele.ca
Operating instructions Touchtronic Premier Plus - Miele.ca
Operating instructions Touchtronic Premier Plus - Miele.ca

You also want an ePaper? Increase the reach of your titles
YUMPU automatically turns print PDFs into web optimized ePapers that Google loves.
<strong>Operating</strong> <strong>instructions</strong><br />
<strong>Touchtronic</strong> <strong>Premier</strong> <strong>Plus</strong><br />
UV<br />
To prevent accidents<br />
and machine damage,<br />
read these <strong>instructions</strong><br />
before<br />
installation or use. M.-Nr. 05 431 300
IMPORTANT SAFETY INSTRUCTIONS<br />
Contents<br />
MESURES DE SÉCURITÉ IMPORTANTES<br />
Caring for the environment<br />
Energy saving washing . . . . . . . . . . . . . . . . . . . . . . . . . . . . . . . . . . . . . . . . . . . . . . 9<br />
Guide to the dishwasher<br />
Wash <strong>ca</strong>binet . . . . . . . . . . . . . . . . . . . . . . . . . . . . . . . . . . . . . . . . . . . . . . . . . . . . . 10<br />
Control panel . . . . . . . . . . . . . . . . . . . . . . . . . . . . . . . . . . . . . . . . . . . . . . . . . . . . . 11<br />
Before using for the first time<br />
To open the door . . . . . . . . . . . . . . . . . . . . . . . . . . . . . . . . . . . . . . . . . . . . . . . . . . 12<br />
To close the door . . . . . . . . . . . . . . . . . . . . . . . . . . . . . . . . . . . . . . . . . . . . . . . . . . 12<br />
Child Safety Lock. . . . . . . . . . . . . . . . . . . . . . . . . . . . . . . . . . . . . . . . . . . . . . . . . . 12<br />
Water softener . . . . . . . . . . . . . . . . . . . . . . . . . . . . . . . . . . . . . . . . . . . . . . . . . . . . 13<br />
Salt indi<strong>ca</strong>tor . . . . . . . . . . . . . . . . . . . . . . . . . . . . . . . . . . . . . . . . . . . . . . . . . . . . . 15<br />
Rinse aid . . . . . . . . . . . . . . . . . . . . . . . . . . . . . . . . . . . . . . . . . . . . . . . . . . . . . . . . 16<br />
Adding rinse aid . . . . . . . . . . . . . . . . . . . . . . . . . . . . . . . . . . . . . . . . . . . . . . . . . . 16<br />
Adjusting the dosage. . . . . . . . . . . . . . . . . . . . . . . . . . . . . . . . . . . . . . . . . . . . . . . 17<br />
Rinse aid indi<strong>ca</strong>tor . . . . . . . . . . . . . . . . . . . . . . . . . . . . . . . . . . . . . . . . . . . . . . . . . 17<br />
Loading the dishwasher<br />
Items not recommended for dishwashing . . . . . . . . . . . . . . . . . . . . . . . . . . . . . . . 19<br />
Cutlery tray (SC units) . . . . . . . . . . . . . . . . . . . . . . . . . . . . . . . . . . . . . . . . . . . . . . 20<br />
Upper basket . . . . . . . . . . . . . . . . . . . . . . . . . . . . . . . . . . . . . . . . . . . . . . . . . . . . . 21<br />
Adjusting the upper basket . . . . . . . . . . . . . . . . . . . . . . . . . . . . . . . . . . . . . . . 21<br />
Adjustable cup racks . . . . . . . . . . . . . . . . . . . . . . . . . . . . . . . . . . . . . . . . . . . . 22<br />
Coffee bar . . . . . . . . . . . . . . . . . . . . . . . . . . . . . . . . . . . . . . . . . . . . . . . . . . . . . 22<br />
Lower basket . . . . . . . . . . . . . . . . . . . . . . . . . . . . . . . . . . . . . . . . . . . . . . . . . . . . . 23<br />
Lower basket inserts<br />
Removing an insert. . . . . . . . . . . . . . . . . . . . . . . . . . . . . . . . . . . . . . . . . . . . . . 24<br />
Inserting an insert . . . . . . . . . . . . . . . . . . . . . . . . . . . . . . . . . . . . . . . . . . . . . . . 24<br />
Foldable spike insert. . . . . . . . . . . . . . . . . . . . . . . . . . . . . . . . . . . . . . . . . . . . . 25<br />
StemGuard . . . . . . . . . . . . . . . . . . . . . . . . . . . . . . . . . . . . . . . . . . . . . . . . . . . . 26<br />
Glassware insert . . . . . . . . . . . . . . . . . . . . . . . . . . . . . . . . . . . . . . . . . . . . . . . . 27<br />
Bottle holder . . . . . . . . . . . . . . . . . . . . . . . . . . . . . . . . . . . . . . . . . . . . . . . . . . . 27<br />
Basket accessories<br />
3
Contents<br />
Operation<br />
Adding detergent. . . . . . . . . . . . . . . . . . . . . . . . . . . . . . . . . . . . . . . . . . . . . . . . . . 29<br />
Running the dishwasher . . . . . . . . . . . . . . . . . . . . . . . . . . . . . . . . . . . . . . . . . . . . 30<br />
Program sequence indi<strong>ca</strong>tor (14) . . . . . . . . . . . . . . . . . . . . . . . . . . . . . . . . . . . . . 31<br />
Time display (18) . . . . . . . . . . . . . . . . . . . . . . . . . . . . . . . . . . . . . . . . . . . . . . . . . . 31<br />
At the end of a program. . . . . . . . . . . . . . . . . . . . . . . . . . . . . . . . . . . . . . . . . . . . . 31<br />
Interrupting a program. . . . . . . . . . . . . . . . . . . . . . . . . . . . . . . . . . . . . . . . . . . . . . 32<br />
Changing a program . . . . . . . . . . . . . . . . . . . . . . . . . . . . . . . . . . . . . . . . . . . . . . . 32<br />
Program guide . . . . . . . . . . . . . . . . . . . . . . . . . . . . . . . . . . . . . . . . . . . . . . . . . . . . 33<br />
Additional features. . . . . . . . . . . . . . . . . . . . . . . . . . . . . . . . . . . . . . . . . . . . . . . . . 34<br />
"Top Solo" (20). . . . . . . . . . . . . . . . . . . . . . . . . . . . . . . . . . . . . . . . . . . . . . . . . . 34<br />
Delay Start (19). . . . . . . . . . . . . . . . . . . . . . . . . . . . . . . . . . . . . . . . . . . . . . . . . 35<br />
Extended drying . . . . . . . . . . . . . . . . . . . . . . . . . . . . . . . . . . . . . . . . . . . . . . . . 37<br />
Frequently asked questions<br />
After sales service<br />
Transport<br />
User Maintenance Instructions<br />
"Filter" indi<strong>ca</strong>tor light . . . . . . . . . . . . . . . . . . . . . . . . . . . . . . . . . . . . . . . . . . . . . . . 48<br />
Cleaning the filter in the wash <strong>ca</strong>binet. . . . . . . . . . . . . . . . . . . . . . . . . . . . . . . . . . 48<br />
Cleaning the spray arms . . . . . . . . . . . . . . . . . . . . . . . . . . . . . . . . . . . . . . . . . . . . 50<br />
Cleaning the wash <strong>ca</strong>binet . . . . . . . . . . . . . . . . . . . . . . . . . . . . . . . . . . . . . . . . . . 51<br />
Cleaning the door and door seal . . . . . . . . . . . . . . . . . . . . . . . . . . . . . . . . . . . . . . 51<br />
Cleaning the exterior . . . . . . . . . . . . . . . . . . . . . . . . . . . . . . . . . . . . . . . . . . . . . . . 51<br />
Cleaning the water inlet filter . . . . . . . . . . . . . . . . . . . . . . . . . . . . . . . . . . . . . . . . . 52<br />
Cleaning the drain pump and non-return valve. . . . . . . . . . . . . . . . . . . . . . . . . . . 53<br />
4
WARNING –<br />
When using your dishwasher, follow<br />
basic pre<strong>ca</strong>utions, including the following:<br />
Read all <strong>instructions</strong> before installation<br />
or use of the dishwasher to prevent<br />
injury and machine damage.<br />
The manufacturer <strong>ca</strong>nnot be held responsible<br />
for damage or injury<br />
<strong>ca</strong>used by improper use of this appliance.<br />
Use the dishwasher only for its intended<br />
purpose. This appliance is<br />
intended for residential use only.<br />
Keep these operating <strong>instructions</strong> in<br />
a safe place and pass them on to<br />
any future user.<br />
Electri<strong>ca</strong>l safety<br />
IMPORTANT SAFETY INSTRUCTIONS<br />
Before installation make sure that<br />
the voltage and frequency listed on<br />
the data plate correspond with the<br />
household electri<strong>ca</strong>l supply. This data<br />
must correspond to prevent injury and<br />
machine damage. Consult a qualified<br />
electrician if in doubt.<br />
Before installation or service, disconnect<br />
the power supply to the<br />
work area by unplugging the unit, “tripping”<br />
the circuit breaker or removing<br />
the fuse.<br />
Do not use an extension cord to<br />
connect this appliance to electricity.<br />
Extension cords do not guarantee<br />
the required safety of the appliance<br />
(e.g. danger of overheating).<br />
Be certain your appliance is properly<br />
installed and grounded by a<br />
qualified technician. To guarantee the<br />
electri<strong>ca</strong>l safety of this appliance, continuity<br />
must exist between the appliance<br />
and an effective grounding system. It is<br />
imperative that this basic safety requirement<br />
be met. If there is any doubt, have<br />
the electri<strong>ca</strong>l system of the house<br />
checked by a qualified electrician. The<br />
manufacturer <strong>ca</strong>nnot be held responsible<br />
for damages <strong>ca</strong>used by the lack, or<br />
inadequacy of, an effective grounding<br />
system.<br />
Installation<br />
Installation and repair work should<br />
be by a <strong>Miele</strong> authorized service<br />
technician. Work by unqualified persons<br />
could be dangerous and could<br />
void the warranty.<br />
This equipment is not designed for<br />
maritime use or for use in mobile<br />
installations such as <strong>ca</strong>ravans or aircraft.<br />
However, under certain conditions<br />
it may be possible for an installation in<br />
these appli<strong>ca</strong>tions. Please contact the<br />
nearest <strong>Miele</strong> dealer or the <strong>Miele</strong> Techni<strong>ca</strong>l<br />
Service Department with specific<br />
requirements.<br />
Inspect the dishwasher for shipping<br />
damage. Do not install or operate<br />
a damaged unit. Contact the<br />
place of purchase.<br />
5
IMPORTANT SAFETY INSTRUCTIONS<br />
Ensure that any plastic wrappings,<br />
bags etc. are disposed of safely<br />
and kept out of the reach of babies and<br />
young children. Danger of suffo<strong>ca</strong>tion!<br />
This dishwasher should only be installed<br />
under a continuous<br />
countertop secured to adjacent<br />
<strong>ca</strong>binetry.<br />
Do not install this dishwasher beneath<br />
a cooking surface or oven.<br />
Do not, under any circumstances<br />
cut the intake hose or submerge in<br />
liquid. This hose contains electri<strong>ca</strong>l<br />
components that could <strong>ca</strong>use injury or<br />
property damage if cut or submerged.<br />
Use<br />
Only use the dishwasher if all panels<br />
are properly in place.<br />
Do not tamper with the controls.<br />
To reduce the risk of injury, do not<br />
allow children to play in, on, or<br />
near the dishwasher.<br />
Do not abuse, sit, or stand on the<br />
door or baskets of the dishwasher.<br />
Under certain conditions, hydrogen<br />
gas may be produced in a hot<br />
water system that has not been used<br />
for two weeks or more. HYDROGEN<br />
GAS IS EXPLOSIVE. If the hot water<br />
system has not been used for such a<br />
period, turn on all hot water faucets and<br />
let water flow from each for several minutes<br />
before using the dishwasher. This<br />
will release any accumulated hydrogen<br />
gas. Do not smoke or use an open<br />
flame during this time.<br />
6<br />
Do not wash plastic items unless<br />
they are labeled "dishwasher safe"<br />
or the equivalent. For items not labeled,<br />
check the manufacturer’s recommendations.<br />
When loading tableware, place<br />
sharp items away from the door<br />
seal to prevent damage to the seal.<br />
Load knives pointing downwards to<br />
prevent injuries.<br />
Only use detergents and rinse aids<br />
recommended for residential dishwashers.<br />
Keep all detergents and rinse<br />
aids out of the reach of children.<br />
Do not drink water from the dishwasher!<br />
Harmful residues could be<br />
present.<br />
For dishwashers with visible heating<br />
element<br />
Do not touch the heating element<br />
during or immediately after use.<br />
Disposal of an appliance<br />
If the appliance is removed from its<br />
installation and will not be used,<br />
the door to the wash <strong>ca</strong>binet should be<br />
removed to prevent children from being<br />
locked in the machine. When dis<strong>ca</strong>rding<br />
an old dishwasher, unplug it from<br />
the power outlet, remove the door to the<br />
wash <strong>ca</strong>binet and cut off the power<br />
cord.<br />
SAVE THESE<br />
INSTRUCTIONS
MESURES DE SÉCURITÉ IMPORTANTES<br />
AVERTISSEMENT –<br />
Au moment d’utiliser votre<br />
lave-vaisselle, veuillez observer<br />
toutes les mesures de sécurité de<br />
base.<br />
Cet appareil électroménager est conforme<br />
à tous les règlements et codes<br />
sur la sécurité. Pour éviter de vous<br />
blesser et d’endommager l’appareil,<br />
veuillez lire soigneusement les <strong>instructions</strong><br />
sur l’utilisation.<br />
N’utilisez le lave vaiselle que pour<br />
laver la vaiselle.<br />
Le fabri<strong>ca</strong>nt ne peut être tenu<br />
responsable des dommages ou<br />
blessures <strong>ca</strong>usés par une utilisation<br />
inadéquate ou par des utilisations<br />
autres que celles auxquelles<br />
l’appareil est destiné.<br />
Les réparations doivent être effectuées<br />
uniquement par une personne<br />
compétente. Débrancher l’appareil<br />
de la prise de courant avant d’en<br />
faire l’entretien (enlever la fiche de la<br />
prise ou fermer le disjoncteur).<br />
Installer uniquement ce lave-vaisselle<br />
sous un comptoir continu qui<br />
est fixé à des meubles adjacents.<br />
Vous devez mettre le lave-vaisselle<br />
à la terre. Installer le lave-vaisselle<br />
en observant les <strong>instructions</strong> pour l’installation<br />
ci-jointes.<br />
Utiliser des détersifs pour les<br />
lave-vaiselle ménagers seulement.<br />
Utiliser uniquement des détersifs et des<br />
produits de rinçage recommandés pour<br />
les lave-vaisselle.<br />
Ne pas utiliser votre lave-vaisselle<br />
à moins que tous les panneaux<br />
soient bien en place.<br />
Ne pas permettre aux enfants de<br />
jouer dans ou sur le lave-vaisselle.<br />
Ranger tous les détersifs et produits<br />
de rinçage hors de la portée<br />
des enfants.<br />
Ne pas modifier<br />
les commandes.<br />
Ne pas boire l’eau du meuble de<br />
lavage.<br />
7
MESURES DE SÉCURITÉ IMPORTANTES<br />
Au moment de remplir le lave-vaisselle<br />
:<br />
– Mettre les articles pointus de<br />
manière à ce qu’ils n’endommagent<br />
pas le seau étanche de la porte.<br />
– Mettre le tranchant des couteaux<br />
vers le bas afin de réduir les risques<br />
de blessure.<br />
Ne pas laver les articles en plastique<br />
à moins qu’ils n’indiquent "Va<br />
au lave-vaisselle" ou l’équivalent. Vérifier<br />
les recommandations du fabri<strong>ca</strong>nt<br />
poir les articles non étiquetés.<br />
Dans certaines conditions, un système<br />
d’eau chaude qui n’a pas été<br />
utilisé pendant plus de deux semaines,<br />
peut dégager de l’azote.<br />
L’AZOTE EST EXPLOSIF. Si le système<br />
d’eau chaude n’a pas été utilisé pendant<br />
une telle période de temps, ouvrir<br />
tous les robinets d’eau chaude et laisser<br />
l’eau couler pendant plusieurs minutes<br />
avant d’utiliser le lave-vaisselle.<br />
Ceci dissipera tout l’azote accumulé.<br />
Ne pas fumer ni utiliser une flamme nue<br />
durant ce temps.<br />
8<br />
Ne pas abuser et ne pas vous asseoir<br />
ni vous tenir sur la porte ou<br />
sur les paniers du lave-vaisselle.<br />
Enlever la porte et couper le cordon<br />
du lave-vaisselle avant de l’enlever<br />
aux déchets afin d’empêcher les<br />
enfants de se blesser ou de s’enfermer<br />
dans l’appareil par accident.<br />
Lave-vaiselle avec l’élément<br />
chauffant<br />
Ne touchez pas l’élément chauffant<br />
pendant le fonctionnement de l’appareil<br />
ou immédiatement après.<br />
CONSERVER CES<br />
INSTRUCTIONS
Energy saving washing<br />
This dishwasher is exceptionally economi<strong>ca</strong>l<br />
in the use of water and electricity.<br />
For best results follow these tips:<br />
^ For lowest energy consumption and<br />
the gentlest washing of china and<br />
crystal, connect the dishwasher to a<br />
cold water source.<br />
^ For fastest possible wash times, yet<br />
higher energy consumption, connect<br />
the dishwasher to a hot water source.<br />
^ Make full use of the baskets without<br />
overloading for the most economi<strong>ca</strong>l<br />
washing.<br />
^ Choose a program that best suits the<br />
degree of soiling and the type of<br />
dishes being washed.<br />
^ For small loads:<br />
Select the "Top Solo" feature (see<br />
"Additional features").<br />
^ If baskets are only half full, select the<br />
"Economy" program.<br />
^ Use the correct amounts of detergent<br />
and rinse aid.<br />
Caring for the environment<br />
9
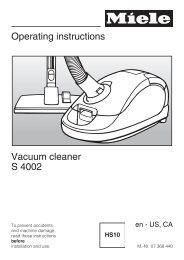
Guide to the dishwasher<br />
Wash <strong>ca</strong>binet<br />
1 Upper spray arm (not visible)<br />
2 Cutlery tray<br />
3 Upper basket<br />
4 Water feed for<br />
the middle spray arm<br />
5 Middle spray arm<br />
6 Lower spray arm<br />
10<br />
7 Four height adjustable feet<br />
8 Triple Filter System<br />
9 Salt reservoir<br />
10 Detergent dispenser<br />
11 Rinse aid reservoir<br />
(with dosage selector)<br />
12 Data plate
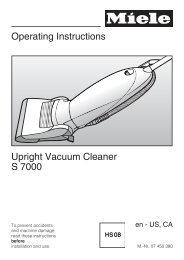
Control panel<br />
13 Check/Refill indi<strong>ca</strong>tors<br />
14 Program sequence display<br />
15 "On/Off" button<br />
16 Program list / indi<strong>ca</strong>tors<br />
17 "Time left"/"Delay Start" indi<strong>ca</strong>tors<br />
18 Time display<br />
Guide to the dishwasher<br />
19 <strong>Plus</strong> / Minus time buttons<br />
20 "Top solo" button<br />
21 "Start/Stop" button<br />
22 Child Safety Lock<br />
23 Door release<br />
24 Drying vent<br />
Every dishwasher is tested before leaving the factory. Any water remaining in<br />
the machine is from these tests and does not indi<strong>ca</strong>te that the machine has<br />
been used.<br />
11
Before using for the first time<br />
To open the door<br />
^ Press the release <strong>ca</strong>tch inside the<br />
door grip.<br />
If the door is opened during operation,<br />
the dishwasher will stop running. Once<br />
the door is closed the program will restart.<br />
To close the door<br />
^ Push the baskets in.<br />
^ Lift the door and push until it clicks<br />
into position.<br />
12<br />
Child Safety Lock<br />
The yellow key for the Child Safety<br />
Lock is shipped on one of the spikes<br />
at the front of the upper basket. Remove<br />
the key before using the dishwasher.<br />
The Child Safety Lock is designed to<br />
prevent children from opening the dishwasher.<br />
^ Use the provided key to lock or unlock<br />
the dishwasher.<br />
Horizontal:<br />
the door is locked<br />
Verti<strong>ca</strong>l:<br />
the door <strong>ca</strong>n be opened
Water softener<br />
To achieve good cleaning results, the<br />
dishwasher needs soft water. Hard<br />
water results in <strong>ca</strong>lcium deposits on<br />
dishware and in the dishwasher.<br />
If your tap water hardness is above<br />
8 gr/gal (140 ppm), the water should be<br />
softened. This takes place automati<strong>ca</strong>lly<br />
in the unit’s integrated water softener.<br />
– Your lo<strong>ca</strong>l water authority will be able<br />
to advise you of the water hardness<br />
level in your area.<br />
– The water softener must be filled with<br />
dishwasher salt for reactivation.<br />
If your water hardness is lower than<br />
8 gr/gal (140 ppm), you do not need to<br />
add dishwasher salt.<br />
If there is a fault, it will help the service<br />
technician to know the hardness of your<br />
lo<strong>ca</strong>l water supply.<br />
^ Enter the water hardness below:<br />
gr/gal (ppm)<br />
Before using for the first time<br />
Settings<br />
gr/gal* ppm Value shown in<br />
the time display<br />
1<br />
2<br />
3<br />
4**<br />
5<br />
6<br />
7<br />
8<br />
9<br />
10<br />
11<br />
12<br />
13<br />
14<br />
15<br />
16<br />
17<br />
18<br />
19<br />
20<br />
21<br />
22<br />
23<br />
24<br />
25<br />
26<br />
27<br />
28<br />
29<br />
30<br />
31<br />
32<br />
33<br />
34<br />
35<br />
36-70<br />
20<br />
40<br />
50<br />
70<br />
90<br />
110<br />
130<br />
140<br />
160<br />
180<br />
200<br />
220<br />
230<br />
250<br />
270<br />
290<br />
310<br />
320<br />
340<br />
360<br />
380<br />
400<br />
410<br />
430<br />
450<br />
470<br />
490<br />
500<br />
520<br />
540<br />
560<br />
580<br />
590<br />
610<br />
630<br />
650-1260<br />
1<br />
2<br />
3<br />
4<br />
5<br />
6<br />
7<br />
8<br />
9<br />
10<br />
11<br />
12<br />
13<br />
14<br />
15<br />
16<br />
17<br />
18<br />
19<br />
20<br />
21<br />
22<br />
23<br />
24<br />
25<br />
26<br />
27<br />
28<br />
29<br />
30<br />
31<br />
32<br />
33<br />
34<br />
35<br />
36<br />
* US gallons<br />
** 4 gr/gal (70 ppm) is factory preset<br />
13
Before using for the first time<br />
Filling the salt reservoir<br />
If your water hardness level is greater<br />
than 8 gr/gal, the salt reservoir should<br />
be filled before the first use and when<br />
the "Salt" indi<strong>ca</strong>tor lights.<br />
Only use water softener salt (1 - 4 mm)<br />
grain size; other salts may contain insoluble<br />
additives which <strong>ca</strong>n impair the<br />
water softener.<br />
14<br />
,Inadvertently filling the salt<br />
reservoir with dishwashing detergent<br />
will damage the water softener.<br />
To fill the salt reservoir:<br />
^ Remove the lower basket.<br />
^ Unscrew and remove the salt reservoir<br />
<strong>ca</strong>p.<br />
^ Place the provided funnel over the<br />
salt reservoir.<br />
Only before adding salt for the first<br />
time, fill the reservoir with approximately<br />
2 quarts (2 l) of water.<br />
^ Carefully fill with salt, grain size of<br />
1 - 4 mm. The salt reservoir holds approximately<br />
4.5 lbs (2 kg) of salt. As it<br />
is filled, water will run out.<br />
^ Clean any excess salt from the<br />
threads of the reservoir opening.<br />
^ Screw the <strong>ca</strong>p on firmly.<br />
^ If the dishwasher will not be used immediately,<br />
run the "Rinse & Hold" program.<br />
This will remove any traces of<br />
salt from inside the wash <strong>ca</strong>binet.
Salt indi<strong>ca</strong>tor<br />
When the salt reservoir is empty, the<br />
"Salt-PC" indi<strong>ca</strong>tor will light, indi<strong>ca</strong>ting<br />
that it should be refilled with reactivation<br />
salt.<br />
After the reservoir has been filled, the<br />
water softener is automati<strong>ca</strong>lly reactivated<br />
the next time the dishwasher is<br />
started. The "Salt" indi<strong>ca</strong>tor will light<br />
during this process.<br />
Before using for the first time<br />
Bypassing the salt indi<strong>ca</strong>tor<br />
If your water is soft (below 8 gr/gal) the<br />
salt reservoir should not be filled with<br />
salt. The indi<strong>ca</strong>tor will remain lit and<br />
should be disregarded or bypassed.<br />
^ Remove the salt reservoir <strong>ca</strong>p.<br />
Looking into the salt reservoir, you will<br />
see the top of the float chamber on the<br />
right hand side, a.<br />
^ Using a screwdriver, <strong>ca</strong>refully pivot<br />
the float chamber towards the center<br />
of the reservoir.<br />
^ Using needle nose pliers, first pull the<br />
<strong>ca</strong>p, b, off of the float chamber, then<br />
remove the float, c.<br />
^ Replace the float chamber <strong>ca</strong>p, push<br />
the chamber back into its upright position,<br />
and replace the salt reservoir<br />
<strong>ca</strong>p. The indi<strong>ca</strong>tor should not light.<br />
15
Before using for the first time<br />
Rinse aid<br />
Rinse aid is recommended to prevent<br />
spotting on dishes and glassware.<br />
,Filling the rinse aid reservoir with<br />
detergent will damage the reservoir.<br />
Only pour rinse aid formulated for<br />
residential dishwashers into the<br />
reservoir.<br />
Adding rinse aid<br />
^ Add rinse aid before the first use and<br />
whenever the "Rise aid" indi<strong>ca</strong>tor<br />
lights.<br />
^ Press the button in the direction of<br />
the arrow until the flap springs open.<br />
16<br />
^ Pour liquid rinse aid into the reservoir<br />
until it is visible on the surface of the<br />
screen.<br />
^ Press on the flap until you hear it<br />
click shut. Failure to close it all the<br />
way will allow water to enter the reservoir<br />
during the wash program.<br />
^ Wipe up any spilled rinse aid. The<br />
flap will remain closed during normal<br />
operation.
Adjusting the dosage<br />
The dosage selector is preset to 3. This<br />
dispenses approximately 3 ml of rinse<br />
aid per program. It <strong>ca</strong>n be adjusted<br />
from 1 to 6.<br />
^ Use a higher setting if spots appear<br />
on dry glassware.<br />
^ Use a lower setting if streaking appears<br />
on dishes or glasses.<br />
Before using for the first time<br />
Rinse aid indi<strong>ca</strong>tor<br />
The rinse aid indi<strong>ca</strong>tor on the control<br />
panel will light when the rinse aid reservoir<br />
needs refilling.<br />
When the indi<strong>ca</strong>tor first comes on, there<br />
will be enough rinse aid left for 2 - 3<br />
washes.<br />
17
Loading the dishwasher<br />
,Do not wash items soiled with<br />
ash, sand, wax, grease or paint in<br />
the dishwasher.<br />
Ash and sand do not dissolve and<br />
will be distributed through out the inside<br />
of the dishwasher.<br />
Wax, grease and paint will <strong>ca</strong>use<br />
permanent discoloration or damage<br />
to the dishwasher.<br />
^ Scrape food from dishes before placing<br />
in the dishwasher.<br />
Do not rinse dishes.<br />
^ Load dishes so that water <strong>ca</strong>n reach<br />
all surfaces. Do not place dishes and<br />
cutlery inside other pieces.<br />
^ Hollow items such as cups and<br />
glasses should be placed upside<br />
down in the upper basket.<br />
^ Con<strong>ca</strong>ve based items, such as mugs<br />
or bowls, should be placed at an angle<br />
on top of the coffee bar, so that<br />
water does not pool.<br />
^ To ensure good water coverage tall,<br />
narrow, hollow pieces, such as a<br />
vase, should be placed in the center<br />
of the basket, rather than in the corners.<br />
^ Small cups and glasses should be<br />
placed on the cup racks. Taller mugs<br />
and glasses <strong>ca</strong>n be placed beneath<br />
the rack.<br />
^ Place very small items in the cutlery<br />
tray or basket so they do not fall to<br />
the bottom of the wash <strong>ca</strong>binet.<br />
18<br />
^ The spray arms must not be blocked<br />
by items that are too tall or hang<br />
through the baskets. Check clearance<br />
by manually rotating the spray<br />
arms.<br />
^ Food residue and spilt liquids should<br />
be cleaned from the sides of the<br />
dishwasher door. These are outside<br />
of the wash <strong>ca</strong>binet and are not<br />
cleaned by water from the spray<br />
arms.
Items not recommended for<br />
dishwashing<br />
– Cutlery with wooden handles.<br />
– Wooden cutting boards.<br />
– Glued items such as old knives with<br />
handles glued together around the<br />
shank of the blade.<br />
– Hand made craft items, antique,<br />
metal trimmed or decorative glassware.<br />
– Lead crystal.<br />
– Copper, brass, tin or pewter.<br />
– Plastic items that are not heat resistant.<br />
– Dishes with color painted over the<br />
glaze. These dishes may fade over<br />
time.<br />
– Cast iron pots and pans.<br />
Loading the dishwasher<br />
Glassware:<br />
– There are no standard guidelines for<br />
washing glassware but, when in<br />
doubt wash by hand.<br />
– Wash deli<strong>ca</strong>te glassware with a low<br />
temperature program and without the<br />
extended drying feature to reduce<br />
the risk of clouding. See the "Program<br />
guide".<br />
– If crystal or deli<strong>ca</strong>te glasses will be<br />
washed frequently, connect the dishwasher<br />
to cold, rather than hot water.<br />
– Clouding or etching may occur on<br />
glasses after frequent washing.<br />
– When purchasing new dishes,<br />
glasses and cutlery, make sure they<br />
are dishwasher safe.<br />
Silver and aluminum:<br />
– Silver or aluminum items may tarnish.<br />
– Silverware previously cleaned with a<br />
silver polish may be damp or spotted<br />
at the end of a program where water<br />
has adhered to the polish. This <strong>ca</strong>n<br />
be rubbed off with a soft, dry cloth.<br />
Silver that has been cleaned in an<br />
immersion dip is usually dry at the<br />
end of a program, but may tarnish.<br />
– If left to dry, foods containing sulfur<br />
<strong>ca</strong>n discolor silver. These include<br />
egg yolk, onions, mayonnaise, mustard,<br />
legumes, fish, fish brine and<br />
marinades.<br />
– Silverware may tarnish or pit if<br />
washed next to stainless steel.<br />
Leave space between these metals.<br />
19
Loading the dishwasher<br />
Cutlery tray (SC units)<br />
The removable cutlery tray makes unloading<br />
flatware easy. Simply <strong>ca</strong>rry the<br />
cutlery tray to where the flatware is<br />
stored and put the entire basket away<br />
in one trip.<br />
For easier unloading cutlery should be<br />
grouped in zones, one for knives, one<br />
for forks, one for spoons, etc.<br />
Place knives with the cutting edge and<br />
forks with the prongs between the holders.<br />
Spoons should be placed in the<br />
opposite direction with the handles<br />
between the holders.<br />
Longer items such as soup ladles, <strong>ca</strong>ke<br />
slices, mixing spoons and long knives<br />
should be placed lengthwise in the indentation<br />
of the cutlery tray.<br />
20<br />
Spoon heads should be placed in contact<br />
with at least one of the serrated retainers<br />
of the cutlery tray to ensure that<br />
water runs off freely.<br />
Spoons with thick handles may have to<br />
be placed as knives and forks with their<br />
heads in the holders.
Upper basket<br />
Adjusting the upper basket<br />
On select models, the upper basket<br />
<strong>ca</strong>n be raised or lowered to accommodate<br />
tall items.<br />
^ Slide out the upper basket.<br />
^ Pull up the levers at the sides of the<br />
upper basket and adjust the basket<br />
height.<br />
^ Release the levers and the basket will<br />
lock in place.<br />
The basket <strong>ca</strong>n also be angled to fit tall<br />
items in both, the lower and upper baskets.<br />
The angles should not be set to<br />
opposite extremes. This will block the<br />
middle spray arm. Take <strong>ca</strong>re when sliding<br />
the basket in and out in this position.<br />
Loading the dishwasher<br />
Load the upper basket with small, lightweight,<br />
or deli<strong>ca</strong>te items such as cups,<br />
saucers, glasses, dessert bowls and<br />
flat pans.<br />
Long items such as soup ladles, mixing<br />
spoons and knives <strong>ca</strong>n be set across<br />
the front of the upper basket.<br />
21
Loading the dishwasher<br />
Adjustable cup racks<br />
Raise the rack to make room for tall<br />
glasses. Lower it to double stack<br />
smaller pieces.<br />
22<br />
Coffee bar<br />
To allow water to run off the bottom of<br />
coffee mugs, place slanted on top of<br />
the coffee bar. The bar <strong>ca</strong>n also be<br />
used to separate two rows of glasses.<br />
To stack wide items, flip the bar to the<br />
right.
Lower basket<br />
For larger and heavier items such as<br />
plates, serving platters, sauce pans,<br />
bowls.<br />
Stemmed glassware <strong>ca</strong>n also be<br />
placed in the lower basket when secured<br />
with the StemGuard.<br />
Loading the dishwasher<br />
Height limit<br />
The guide at the front of the upper basket<br />
determines the maximum height for<br />
items placed in the lower basket so that<br />
the middle spray arm is not blocked.<br />
23
Lower basket inserts<br />
Various removable inserts are available for the lower basket to accomodate special<br />
items to be washed.<br />
Removing an insert<br />
^ To remove an insert, gently pull up on<br />
the handle.<br />
Inserting an insert<br />
^ Slid the hitches of the insert under<br />
the verti<strong>ca</strong>l struts of the lower basket.<br />
24
Foldable spike insert<br />
A highly flexible design holds tableware<br />
securely. It <strong>ca</strong>n be folded out of the way<br />
for pots, pans and other large items.<br />
This insert secures plates and platters.<br />
Foldable spikes<br />
Two rows of spikes <strong>ca</strong>n be folded down<br />
to create more room for larger dishware<br />
e.g. pots, pans and bowls.<br />
^ Press on the yellow levers, a, to fold<br />
down the spikes, b.<br />
^ Hook the foldable spike insert into the<br />
back right corner of the lower basket,<br />
the area marked in white.<br />
Lower basket inserts<br />
25
Lower basket inserts<br />
StemGuard<br />
This special insert cradles deli<strong>ca</strong>te<br />
stemware. It <strong>ca</strong>n also hold teacups.<br />
^ Place stems of glasses into the slots.<br />
Cups <strong>ca</strong>n be placed on top of the<br />
StemGuard. Never place items on<br />
top of glassware.<br />
^ Raise the rack to make room for tall<br />
items.<br />
^ Hook the StemGuard insert into the<br />
left half of the lower basket, the area<br />
marked in white.<br />
26
Glassware insert<br />
(select models)<br />
This insert for tall glasses holds glasses<br />
securely with the verti<strong>ca</strong>l supports.<br />
^ Hook the glassware insert into the left<br />
or right rear of the lower basket, the<br />
areas marked in white.<br />
Bottle holder<br />
The bottle holder e.g. for milk or baby<br />
bottles, <strong>ca</strong>n be inserted into the bottom<br />
basket in more than one place. Position<br />
in any area marked white in the illustration.<br />
Do not place the insert in the corners<br />
of the lower basket, water <strong>ca</strong>nnot<br />
properly cover bottles in these areas.<br />
Lower basket inserts<br />
27
Basket accessories<br />
Additional inserts for the upper and lower baskets may be purchased from your<br />
<strong>Miele</strong> dealer or the <strong>Miele</strong> Techni<strong>ca</strong>l Service Department.<br />
28<br />
Bottle holder<br />
part # 03 857 850<br />
Glassware insert<br />
for the lower basket<br />
part # 01 145 642<br />
Glassware insert<br />
for the upper basket<br />
part # 03 636 034<br />
PlateGuard insert<br />
part # 02 244 870<br />
Small cutlery basket<br />
for the lower basket<br />
part # 02 372 335<br />
to wash milk or baby bottles<br />
to wash a large number of glasses<br />
to wash long stemmed glassware<br />
to wash plates with a diameter<br />
up to 12 1 / 2" (32 cm)<br />
to wash additional cutlery
Adding detergent<br />
,Dishwasher detergents contain<br />
irritant and corrosive ingredients.<br />
Keep children away from detergent.<br />
Do not fill the detergent dispenser<br />
until you are ready to start the dishwasher.<br />
Only use powder detergents or tablets<br />
formulated for residential dishwashers.<br />
The use of gel or liquid detergent<br />
is not recommended.<br />
Never fill the detergent dispenser to<br />
<strong>ca</strong>pacity.<br />
Do not use more than the recommended<br />
amount of detergent. Continued<br />
use of too much detergent<br />
may <strong>ca</strong>use machine damage.<br />
^ To open, press the latch on the detergent<br />
dispenser.<br />
Operation<br />
The horizontal marks in Compartment II<br />
indi<strong>ca</strong>te levels of approximately 1 1 / 4,<br />
1 3 / 4 and 2 tablespoons (20, 25 and<br />
30 ml) respectively.<br />
^ With the dishwasher door fully open<br />
fill compartment II with 2 tablespoon<br />
(30 ml) of powder detergent, or one<br />
detergent tablet.<br />
^ Close the cover. The cover will always<br />
open at the end of a wash program<br />
except in "Rinse & Hold".<br />
2 tablespoon (30 ml) of detergent is<br />
enough for most normally soiled loads.<br />
For heavily soiled loads, or if food has<br />
dried on the dishes, a program containing<br />
a prewash cycle should be selected.<br />
Add an extra tablespoon (15 ml)<br />
of detergent to compartment I.<br />
Less detergent is needed in homes with<br />
very soft water and when washing<br />
lightly soiled dishes.<br />
29
Operation<br />
Running the dishwasher<br />
^ Make sure the spray arms are not<br />
blocked.<br />
^ Close the door.<br />
^ Turn on the dishwasher.<br />
All progam indi<strong>ca</strong>tors will light and the<br />
"Start/Stop" indi<strong>ca</strong>tor will flash.<br />
^ Select a wash program using the program<br />
selection buttons (16). The selected<br />
program indi<strong>ca</strong>tor will light<br />
and the "Start/Stop" indi<strong>ca</strong>tor will<br />
flash.<br />
^ Refer to the "Program guide" for details.<br />
30<br />
The run time of the program selected<br />
will appear in the time display (18) in<br />
hours and minutes. The "Time left" indi<strong>ca</strong>tor<br />
will light.<br />
^ Select "Delay Start" or "Top Solo" if<br />
desired. See "Additional features".<br />
^ Press the "Start/Stop" button (21).<br />
The wash program will begin.<br />
Do not end a program prematurely!<br />
Important program steps could be<br />
omitted (e. g. reactivating the water<br />
softener).
Waterproof System<br />
All <strong>Miele</strong> dishwashers are specially designed<br />
to shut off the water intake and<br />
drain the wash <strong>ca</strong>binet in the rare event<br />
of an internal water valve failure.<br />
For this feature to be active, the machine<br />
must be "On" (not necessarily<br />
running), and the door must be closed.<br />
Program sequence indi<strong>ca</strong>tor<br />
(14)<br />
The current step of a wash program is<br />
indi<strong>ca</strong>ted by a program sequence indi<strong>ca</strong>tor<br />
(14).<br />
Time display (18)<br />
The run time of a program is shown in<br />
hours and minutes in the time display<br />
before a program starts. The "Time left"<br />
indi<strong>ca</strong>tor will be lit.<br />
The time displayed may vary with the<br />
same program. This is due to the water<br />
inlet temperature at each intake, the<br />
load size and degree of soiling of<br />
dishware being washed.<br />
Each time a program is selected the<br />
electronic unit takes into account the<br />
new conditions and <strong>ca</strong>lculates the time<br />
required. This figure is shown in the<br />
time display.<br />
At the end of a program<br />
Operation<br />
The "End" indi<strong>ca</strong>tor will light and 0 will<br />
appear in the time display (18).<br />
^ Turn off the dishwasher.<br />
^ Open the dishwasher door slightly to<br />
allow the dishes to cool before unloading.<br />
It is advisable to turn off the water<br />
supply if the dishwasher will not be<br />
used for a period of time (e.g. while<br />
va<strong>ca</strong>tioning).<br />
31
Operation<br />
Interrupting a program<br />
A program is interrupted as soon as the<br />
door is opened.<br />
If the door is closed, the program will<br />
continue from where it was interrupted.<br />
32<br />
,Water in the dishwasher may be<br />
hot. There is a danger of being<br />
burned! Only open the door if absolutely<br />
necessary.<br />
Changing a program<br />
If the selected program has not yet<br />
started:<br />
^ Press the "Start/Stop" button (21) for<br />
at least one second.<br />
^ Press the program button (16) of the<br />
desired program.<br />
^ Select "Delay start" or "Top Solo" if<br />
needed (see "Additional features").<br />
^ Press the "Start/Stop" button (21).<br />
The new program will begin.<br />
If a program is already running, or if the<br />
selected delay start period has started<br />
counting down:<br />
^ Press the "Start/Stop" button (21) for<br />
at least one second.<br />
All program indi<strong>ca</strong>tors will light and the<br />
"Start/Stop" indi<strong>ca</strong>tor will flash.<br />
^ Press the program button (16) of the<br />
desired program.<br />
^ Select "Delay start" or "Top Solo" if<br />
needed (see "Additional features").<br />
^ Press the "Start/Stop" button (21).<br />
The new program will begin.
Program guide<br />
Program When to use Program cycle<br />
Pots & Pans for heavily soiled pots and pans with dried on food<br />
Main wash temperature 170 °F (75 °C)<br />
Run-time 128 min<br />
Sani Wash extended wash time, for sanitizing normally soiled<br />
dishware with dried on food<br />
Main wash temperature 150 °F (65 °C)<br />
Run-time 142 min<br />
Normal <strong>Plus</strong> higher wash temperature helps to clean<br />
normally soiled dishware with stubborn dried on<br />
food or greasy residues<br />
Main wash temperature 150 °F (65 °C)<br />
Run-time 135 min<br />
Normal 1)<br />
China &<br />
Crystal o<br />
for normal soiled dishware<br />
Main wash temperature 130 °F (55 °C)<br />
Run-time 130 min<br />
"Gentle program"<br />
for lightly soiled and heat sensitive tableware<br />
Main wash temperature 115 °F (45 °C)<br />
Run-time 72 min<br />
Light Wash shortened wash time, for light to normally soiled<br />
dishware without dried food<br />
Main wash temperature 130 °F (55 °C)<br />
Run-time 113 min<br />
Economy energy saving program, for normally soiled dishware<br />
Main wash temperature 130 °F (55 °C)<br />
Run-time 85 min<br />
Short "Quick program"<br />
for slightly soiled dishware, e.g. party dishware<br />
Main wash temperature 115 °F (45 °C)<br />
Run-time 34 min<br />
Energy Saver for light to normally soiled dishware,<br />
only use, if the dishwasher is connected to hot water<br />
Run-time 65 min<br />
Rinse & Hold for rinsing dishes when a complete cycle is not needed<br />
Run-time 11 min<br />
Prewash<br />
1 2<br />
Main Interim<br />
wash rinse<br />
1 2<br />
Final<br />
rinse<br />
Drying<br />
X X X X - X X<br />
- X X X X X X<br />
X X X X - X X<br />
X X X X - X X<br />
- X X X - X X<br />
X X - X X<br />
X X - X X<br />
X X - X<br />
X X X X - X X<br />
1) Standard for Energy Label<br />
When washing a full load in Pots & Pans, Sani Wash and the Normal programs use at least 2 tablespoons<br />
(30 ml) of detergent.<br />
For the Pots & Pans program add an additional teaspoon (5 ml) to compartment I.<br />
If "Top Solo" is selected, reduce the amount of detergent to 1 1 / 4 tablespoons (20 ml).<br />
Program times are based on a hot water connection. If the unit is connected to cold water, program<br />
times will increase by approximately 25 minutes.<br />
Usage: Electric 0.06 - 2.4 (kWh), Water 1.3 - 6.3 US gallons (5 - 24 L)<br />
- X<br />
Operation<br />
33
Operation<br />
Additional features<br />
"Top Solo" (20)<br />
Using "Top Solo" will save water and<br />
energy.<br />
This program is recommended when<br />
there is only a small load to clean. "Top<br />
Solo" <strong>ca</strong>n be selected with all programs.<br />
With this feature water is directed only<br />
to the top and middle spray arms in the<br />
dishwasher. This means that the water<br />
jets are only aimed at items in the upper<br />
basket and the cutlery tray.<br />
The middle spray arm also directs<br />
water downwards, so lightly soiled<br />
plates or platters <strong>ca</strong>n be placed in the<br />
lower basket.<br />
When using this program, do not place<br />
bowls or other hollow containers in the<br />
lower basket.<br />
Be<strong>ca</strong>use a smaller load is being<br />
washed the amount of detergent recommended<br />
<strong>ca</strong>n be reduced to 1 1 / 4<br />
tablespoons.<br />
34<br />
^ Turn the dishwasher on using the<br />
"On/Off" button (15).<br />
All program indi<strong>ca</strong>tors will light and the<br />
"Start/Stop" indi<strong>ca</strong>tor will flash.<br />
^ Select a program with the program<br />
selection buttons (16).<br />
The run time of the selected program<br />
will appear in the time display (18) in<br />
hours and minutes, and the "Time left"<br />
indi<strong>ca</strong>tor will light.<br />
^ Press the "Top Solo" (20) button.<br />
The "Top Solo" (20) indi<strong>ca</strong>tor will light.<br />
The run time shown in the time display<br />
(18) will be adjusted by the electronic.<br />
"Delay Start" <strong>ca</strong>n now be selected (see<br />
next page).<br />
^ Press the "Start/Stop" button (21).<br />
The wash program will begin.
Delay Start (19)<br />
The start time of a program <strong>ca</strong>n be delayed<br />
from 30 minutes to 24 hours.<br />
A delay start time between 30 minutes<br />
and 9 hours and 30 minutes is set in 30<br />
minute intervals. For 10 hours or more it<br />
is set in one hour periods.<br />
When using delay start, make sure<br />
the detergent compartment is dry<br />
before adding detergent. Wipe dry if<br />
necessary.<br />
Operation<br />
^ Turn on the dishwasher with the<br />
"On/Off" button (15).<br />
^ Select a program with the selection<br />
buttons (16).<br />
The indi<strong>ca</strong>tor of the selected program<br />
will light and the "Start/Stop" indi<strong>ca</strong>tor<br />
will flash.<br />
The run time of the selected program<br />
will appear in the time display (18).<br />
^ Press the & or $ (19) buttons until<br />
the desired delayed start time appears<br />
in the time display.<br />
The "Time left" and "Delay Start" indi<strong>ca</strong>tors<br />
will light and the "Start/Stop" indi<strong>ca</strong>tor<br />
will flash.<br />
The "Top Solo" feature may also be selected<br />
now (see previous page).<br />
^ Press the "Start/Stop" button (21).<br />
The "Start/Stop" indi<strong>ca</strong>tor will light.<br />
The delay time counts down: above 10<br />
hours in 1 hour steps, below 10 hours in<br />
minute-steps.<br />
35
Operation<br />
Once the "Delay start" period has<br />
elapsed, the selected program will begin<br />
automati<strong>ca</strong>lly. The time display<br />
shows the time left for a program to run,<br />
the "Delay start" indi<strong>ca</strong>tor goes out and<br />
the "Time left" indi<strong>ca</strong>tor will light.<br />
How the delay start time is displayed:<br />
up to 59 minutes<br />
example - 30 minutes = 30<br />
between 1 hour and 9 hours 30 minutes<br />
example - 5 hours = 5.00<br />
10 hours and over<br />
example 15 hours = 15^<br />
36<br />
To start a program before the delay<br />
start period has elapsed:<br />
^ Press the "Start/Stop" button (21) for<br />
at least one second.<br />
All program indi<strong>ca</strong>tors light and the<br />
"Start/Stop" indi<strong>ca</strong>tor flashes.<br />
^ Press the button of the desired program.<br />
^ Select "Top Solo", if needed.<br />
^ Press the "Start/Stop" button (21).<br />
The "Start/Stop" indi<strong>ca</strong>tor lights. The<br />
program starts.
Extended drying<br />
If desired drying results are not consistently<br />
achieved, the turbothermic cooling<br />
fan <strong>ca</strong>n be programmed to run an<br />
extra 14 minutes at the end of each<br />
program.<br />
The "Extended drying" feature <strong>ca</strong>n also<br />
be activated to prevent condensation<br />
from collecting on the steam deflector.<br />
Turning extended drying on/off<br />
^ Turn off the dishwasher.<br />
^ Press and hold the & (19) and<br />
"Start/Stop" (21) buttons and at the<br />
same time turn the dishwasher on using<br />
the "On/Off" button.<br />
Release all buttons.<br />
The time display will show P and two<br />
figures. The "Salt" indi<strong>ca</strong>tor will flash<br />
and the "Economy" and "Sani Wash" indi<strong>ca</strong>tors<br />
will light.<br />
If this is not the <strong>ca</strong>se, the above steps<br />
must be repeated.<br />
^ Press the "Economy" program button.<br />
Operation<br />
One of the following will appear in the<br />
time display:<br />
– 90: extended drying is off.<br />
– 91: extended drying is on.<br />
^ Press the "Top Solo" button to change<br />
the selection.<br />
^ Press the "Start/Stop" button.<br />
SP for "Save" will appear in the time display.<br />
^ Press the "Start/Stop" button again.<br />
The changed extended drying feature<br />
will be stored.<br />
All program indi<strong>ca</strong>tors will light and the<br />
"Start/Stop" indi<strong>ca</strong>tor will flash.<br />
^ Turn off the dishwasher.<br />
37
Frequently asked questions<br />
With the aid of the following guide, minor problems <strong>ca</strong>n be fixed without a service<br />
<strong>ca</strong>ll.<br />
,Repairs should only be <strong>ca</strong>rried out by a qualified and trained person in accordance<br />
with lo<strong>ca</strong>l and national safety regulations. Unauthorized repairs could<br />
<strong>ca</strong>use personal injury or machine damage.<br />
What if … Possible fault Fix<br />
the program does not<br />
start?<br />
the dishwasher stops<br />
during a program?<br />
the "Spray arm" indi<strong>ca</strong>tor<br />
light is flashing?<br />
38<br />
The door is not properly<br />
closed.<br />
The machine is not<br />
plugged in.<br />
The fuse is defective or<br />
the breaker has tripped.<br />
Close the door firmly.<br />
Insert the plug.<br />
Reset the circuit breaker.<br />
Make sure it is a 15 A<br />
breaker.<br />
The fuse has tripped. Reset the circuit breaker.<br />
Make sure it is a 15 A<br />
breaker.<br />
Something is blocking the<br />
middle spray arm.<br />
The middle spray arm jets<br />
are blocked.<br />
Interrupt the program, rearrange<br />
items blocking<br />
the spray arm.<br />
Turn off the dishwasher.<br />
Clean the spray arm.<br />
See maintenance <strong>instructions</strong>.
What if … Possible fault Fix<br />
the "Intake/Drain" indi<strong>ca</strong>tor<br />
is lit or flashing.<br />
The dishwasher may<br />
have stopped?<br />
the "Intake/Drain" indi<strong>ca</strong>tor<br />
lights during the<br />
"Energy Saver" program?<br />
The water valve is closed. Open the water valve.<br />
The filter in the water inlet<br />
is blocked.<br />
The flow pressure at the<br />
water inlet is less than<br />
4.5 psi (0.3 bar).<br />
The waterproof system has<br />
activated.<br />
The intake water has not<br />
reached the required temperature<br />
of 115 °F/45 °C,<br />
the hot water system may<br />
be overloaded, see "Program<br />
guide".<br />
Frequently asked questions<br />
See maintenance <strong>instructions</strong>.<br />
Contact a plumber.<br />
Call the <strong>Miele</strong> Techni<strong>ca</strong>l<br />
Service Department.<br />
– Start the program again.<br />
– If the indi<strong>ca</strong>tor light comes<br />
on again, select a<br />
different program.<br />
39
Frequently asked questions<br />
What if … Possible fault Fix<br />
the "Drain" indi<strong>ca</strong>tor<br />
flashes, the program<br />
stops?<br />
three horizontal bars<br />
- - - appear in the time<br />
display at the end of a<br />
program?<br />
40<br />
The triple filter in the wash<br />
<strong>ca</strong>binet is clogged.<br />
The drain pump or the<br />
non-return valve may be<br />
blocked.<br />
Clean the filter, see maintenance<br />
<strong>instructions</strong>.<br />
Clean the drain pump and<br />
the non-return valve, see<br />
maintenance <strong>instructions</strong>.<br />
The drain hose is kinked. Remove the kink.<br />
There may be a techni<strong>ca</strong>l<br />
fault.<br />
– Turn off the dishwasher.<br />
A few seconds later:<br />
– Turn on the dishwasher.<br />
– Select the program.<br />
– Press the "Start/Stop"<br />
button.<br />
If the horizontal bars appear<br />
again at the end of<br />
the program, there is a<br />
techni<strong>ca</strong>l problem.<br />
– Call the <strong>Miele</strong> Techni<strong>ca</strong>l<br />
Service Department.
What if … Possible fault Fix<br />
there is a knocking<br />
noise in the wash <strong>ca</strong>binet?<br />
The spray arm is hitting<br />
an item in the basket.<br />
there is a rattling noise? Items are not secure in<br />
the wash <strong>ca</strong>binet.<br />
there is a knocking<br />
noise in the water<br />
pipes?<br />
dishes are not dry,<br />
glasses and cutlery are<br />
spotted?<br />
This may be <strong>ca</strong>used by<br />
the installation or the diameter<br />
of pipe.<br />
The rinse aid setting may<br />
be too low, or the rinse aid<br />
reservoir is empty.<br />
Extended drying is not activated.<br />
Dishes were taken out too<br />
soon.<br />
dishes are not clean? The dishes were not<br />
loaded correctly.<br />
The program was not<br />
powerful enough.<br />
Not enough detergent<br />
was used.<br />
The spray arm jets are<br />
clogged.<br />
The triple filter is clogged<br />
or not correctly seated.<br />
The non-return valve is<br />
blocked while open.<br />
Water runs back into the<br />
wash <strong>ca</strong>binet.<br />
Frequently asked questions<br />
Interrupt the program, rearrange<br />
items blocking<br />
the spray arms.<br />
Interrupt the program and<br />
rearrange loose pieces.<br />
This has no effect on the<br />
dishwasher. If in doubt<br />
contact a plumber.<br />
Increase the dosage or<br />
refill the reservoir, see "Before<br />
using for the first<br />
time".<br />
Activate the Extended<br />
drying feature.<br />
Leave dishes in longer.<br />
See "Loading the dishwasher".<br />
Select a more intensive<br />
program see "Program<br />
guide".<br />
Use more detergent, see<br />
"Adding detergent".<br />
Clean the spray arm jets,<br />
see maintenance <strong>instructions</strong>.<br />
Clean and reseat the filter,<br />
see maintenance <strong>instructions</strong>.<br />
Clean the drain pump and<br />
the non-return valve, see<br />
maintenance <strong>instructions</strong>.<br />
41
Frequently asked questions<br />
What if … Possible fault Fix<br />
tea or lipstick stains<br />
have not been completely<br />
removed?<br />
white residue is visible<br />
on cutlery and dishes,<br />
clouding occurs on<br />
glassware and film <strong>ca</strong>n<br />
be wiped off?<br />
bluish sheen on the surface<br />
of glasses and film<br />
<strong>ca</strong>n be wiped off?<br />
glasses are dull and discolored<br />
and film <strong>ca</strong>nnot<br />
be wiped off?<br />
42<br />
The wash temperature of<br />
the selected program was<br />
too low.<br />
Not enough detergent<br />
was used.<br />
Not enough rinse aid was<br />
used.<br />
The salt reservoir is<br />
empty.<br />
The salt reservoir <strong>ca</strong>p was<br />
not correctly screwed on.<br />
The automatic water softener<br />
is faulty.<br />
The rinse aid dosage is<br />
set too high.<br />
Glasses are not dishwasher<br />
safe.<br />
Select a program with a<br />
higher temperature.<br />
Use more detergent.<br />
Increase the dosage,<br />
see "Before using for the<br />
first time".<br />
Add reactivation salt,<br />
see "Before using for the<br />
first time".<br />
Reseat it making sure it<br />
screws back on correctly.<br />
Call the <strong>Miele</strong> Techni<strong>ca</strong>l<br />
Service Department.<br />
Reduce the dosage, see<br />
"Before using for the first<br />
time".<br />
There is no remedy.<br />
Only wash dishwasher<br />
safe glasses.
What if … Possible fault Fix<br />
plastic items are discolored?<br />
there are rust stains<br />
on cutlery?<br />
detergent is left in the<br />
dispenser at the end<br />
of a program?<br />
the detergent dispenser<br />
lid <strong>ca</strong>n not be<br />
closed properly?<br />
water remains in the<br />
wash <strong>ca</strong>binet at the<br />
end of a program?<br />
Natural dyes e. g. from<br />
vegetables may be the<br />
<strong>ca</strong>use. Not enough detergent<br />
was used to break<br />
down natural dyes.<br />
The salt reservoir <strong>ca</strong>p was<br />
not screwed on properly.<br />
The affected items are not<br />
corrosion resistant.<br />
The dispenser was damp<br />
when detergent was<br />
added.<br />
Detergent residue is blocking<br />
the <strong>ca</strong>tch.<br />
The triple filter in the wash<br />
<strong>ca</strong>binet is clogged.<br />
The drain pump or the<br />
non-return valve may be<br />
blocked.<br />
Frequently asked questions<br />
Use more detergent, see<br />
"Adding detergent".<br />
Discoloration is permanent.<br />
Reseat and screw the <strong>ca</strong>p<br />
on firmly.<br />
There is no remedy.<br />
Only wash dishwasher safe<br />
cutlery.<br />
Dry the dispenser before<br />
adding detergent.<br />
Remove the residue.<br />
Clean the filters,<br />
see maintenance<br />
<strong>instructions</strong>.<br />
Clean the drain pump and<br />
the non-return valve,<br />
see maintenance<br />
<strong>instructions</strong>.<br />
The drain hose is kinked. Remove the kink.<br />
43
After sales service<br />
In the event of a fault which you <strong>ca</strong>nnot<br />
correct yourself please contact:<br />
– Your <strong>Miele</strong> Dealer<br />
or<br />
– The <strong>Miele</strong> Techni<strong>ca</strong>l Service Department.<br />
USA 1-800-999-1360<br />
techserv@mieleusa.com<br />
CDN1-800-565-6435<br />
service@miele.<strong>ca</strong><br />
When contacting the <strong>Miele</strong> Techni<strong>ca</strong>l<br />
Service Department, please quote the<br />
model and serial number of your appliance.<br />
These <strong>ca</strong>n be found on the data plate<br />
on the upper inside edge of the dishwasher<br />
door.<br />
44<br />
Program update function - PC<br />
The Program Correction (PC) allows a<br />
technician to update the dishwasher to<br />
make use of new technology.<br />
For example, if a detergent with good<br />
wash results using only cold water becomes<br />
available, the wash programs<br />
<strong>ca</strong>n be modified to take advantage of<br />
this.
To transport the dishwasher, e. g. when<br />
moving to a new home, note the following:<br />
– Empty the dishwasher.<br />
– Secure any loose parts, e. g. hoses,<br />
<strong>ca</strong>bles, cutlery baskets.<br />
– Transport the dishwasher in the upright<br />
position.<br />
If unavoidable it may be transported<br />
on its back.<br />
Do not transport it on its side or on<br />
the door. Residual water in the machine<br />
could leak and <strong>ca</strong>use electri<strong>ca</strong>l<br />
damage.<br />
Transport<br />
45
User Maintenance Instructions<br />
To prevent accidents<br />
and machine damage,<br />
read these <strong>instructions</strong><br />
before<br />
installation or use.
Triple filter system<br />
The triple filter system in the base of the<br />
wash <strong>ca</strong>binet prevents food from being<br />
redeposited on dishes. It also protects<br />
the circulation pump from damage<br />
<strong>ca</strong>used by foreign objects (e.g. broken<br />
glass, bones).<br />
The filter system must be cleaned every<br />
4 - 6 months or whenever a foreign objects<br />
is trapped.<br />
"Filter" indi<strong>ca</strong>tor light<br />
The "Filter" indi<strong>ca</strong>tor lights after every<br />
40 program cycles to remind you to<br />
check the filter.<br />
^ Clean the filter if needed.<br />
^ Press the "Start/Stop" button at least 1<br />
second to reset the filter timer. The<br />
"Filter" indi<strong>ca</strong>tor goes out.<br />
The "Filter" indi<strong>ca</strong>tor will also go out,<br />
when the dishwasher is turned off.<br />
48<br />
Cleaning the filter in the wash<br />
<strong>ca</strong>binet<br />
^ Turn off the dishwasher before cleaning.<br />
^ Turn the handle counterclockwise to<br />
release the triple filter system.<br />
^ Lift the filter out of the machine. Remove<br />
any solid particles. Rinse under<br />
running water. Scrub with a nylon<br />
brush if necessary.
To clean the underside of the filter, the<br />
flap must be opened:<br />
^ Pull back the yellow clip.<br />
^ Rinse all parts under running water.<br />
Scrub with a nylon brush if necessary.<br />
^ Close the flap so that the clip engages.<br />
^ Return the filter so that it lies flat in<br />
the base of the wash <strong>ca</strong>binet.<br />
^ Lock the filter by turning the handle<br />
clockwise.<br />
,The dishwasher must not be<br />
used without the filter in place. Make<br />
sure the filter is locked in place.<br />
Otherwise untrapped debris will redeposit<br />
on dishes.<br />
49
Cleaning the spray arms<br />
Sometimes particles of food get stuck<br />
in the spray arm jets. The spray arms<br />
should be inspected and cleaned every<br />
4 - 6 months.<br />
^ Turn off the dishwasher before cleaning.<br />
Remove the spray arms as follows:<br />
^ Remove the cutlery tray (if present).<br />
^ Press the top spray arm upwards to<br />
engage the inner ratchet and unscrew<br />
the spray arm.<br />
^ Lift up the middle spray arm, a, to<br />
engage the ratchet and unscrew the<br />
spray arm, b.<br />
50<br />
^ Remove the lower basket.<br />
^ Pull the lower spray arm firmly upwards<br />
to remove.<br />
^ Use a pointed object such as a toothpick<br />
to push food particles into the<br />
spray arm jets.<br />
^ Rinse thoroughly under running<br />
water.<br />
^ Return the spray arms and check<br />
that they rotate freely.
Cleaning the wash <strong>ca</strong>binet<br />
Generally, the wash <strong>ca</strong>binet is self<br />
cleaning if the correct amount of dishwasher<br />
detergent is used.<br />
The wash <strong>ca</strong>binet <strong>ca</strong>n be cleaned with<br />
a dishwasher cleaner such as Dis<br />
Cleaner available from your <strong>Miele</strong><br />
dealer or the <strong>Miele</strong> Techni<strong>ca</strong>l Service<br />
Department.<br />
Cleaning the door and door<br />
seal<br />
^ Wipe the door seal with a damp cloth<br />
to remove any food particles.<br />
^ Food residue and spilt liquids should<br />
be wiped from the sides of the dishwasher<br />
door. These are outside of the<br />
wash <strong>ca</strong>binet and are not cleaned by<br />
water from the spray arms.<br />
Cleaning the exterior<br />
,Never use abrasive cleaners,<br />
scouring pads, steel wool or <strong>ca</strong>ustic<br />
(oven) cleaners on the dishwasher.<br />
They will damage the surface.<br />
Plastic<br />
All plastic surfaces and the control<br />
panel <strong>ca</strong>n be cleaned with warm water<br />
and liquid dish soap applied with a soft<br />
sponge.<br />
Wipe dry using a soft cloth.<br />
,Do not use too much water when<br />
cleaning the controls. Water could<br />
penetrate into the electronics and<br />
<strong>ca</strong>use damage.<br />
Stainless steel<br />
Stainless steel surfaces <strong>ca</strong>n be cleaned<br />
using a non-abrasive stainless steel<br />
cleaner.<br />
To help prevent resoiling, a conditioner<br />
for stainless steel <strong>ca</strong>n also be used.<br />
Apply sparingly with even pressure.<br />
Stainless steel colored controls<br />
These controls may become discolored<br />
or damaged if not cleaned regularly.<br />
Do not use a stainless steel cleaner on<br />
the knobs or buttons.<br />
Wood<br />
Panels made from wood should be<br />
cleaned using a soft damp cloth and an<br />
appropriate wood cleaner.<br />
51
Cleaning the water inlet filter<br />
A filter is incorporated in the intake<br />
hose attached to the dishwasher’s shut<br />
off valve. If your water is hard, or the<br />
pipes contain sediment, this filter may<br />
clog and prevent enough water from<br />
entering the wash <strong>ca</strong>binet.<br />
Installing an in-line water filter<br />
^ If your water contains a large number<br />
of insoluble substances, a filter between<br />
the water valve and the intake<br />
hose connection is recommended.<br />
These filters <strong>ca</strong>n be purchased from<br />
<strong>Miele</strong>’s Techni<strong>ca</strong>l Service Department.<br />
52<br />
,The plastic valve housing on the<br />
intake hose contains electri<strong>ca</strong>l components<br />
and should not be immersed,<br />
or run through water.<br />
Cleaning the filter:<br />
^ Disconnect the dishwasher from<br />
electricity (unplug it or "trip" the circuit<br />
breaker).<br />
^ Turn off the water valve.<br />
^ Unscrew the intake hose.<br />
^ Carefully remove the rubber seal.<br />
^ Remove the filter using a needle nose<br />
plier and rinse under running water.<br />
^ Return the filter and seal. Make sure<br />
they are seated correctly.<br />
^ Screw the intake hose back on the<br />
water valve, checking that it is not<br />
cross-threaded.<br />
^ Slowly turn on the valve and test for<br />
leaks.
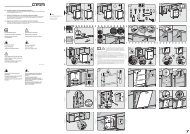
Cleaning the drain pump and<br />
non-return valve<br />
If the dishwasher is not completely<br />
drained at the end of a program, the<br />
drain pump or non-return valve may be<br />
blocked.<br />
^ Turn off the dishwasher.<br />
^ Remove the triple filter (see "Cleaning<br />
the filter in the wash <strong>ca</strong>binet").<br />
^ Use a jug or bowl to scoop water out<br />
of the wash <strong>ca</strong>binet.<br />
^ Tilt the locking clamp to the side.<br />
^ Pull out the non-return valve and<br />
rinse well under running water.<br />
The drain pump is beneath the non-return<br />
valve (see arrow).<br />
^ Before returning the non-return valve,<br />
check that the drain pump is not<br />
blocked. Spin the propeller several<br />
times in both directions to check for<br />
obstructions.<br />
^ Carefully refit the non-return valve<br />
and secure it with the locking clamp.<br />
^ Refit and lock the filter in place.<br />
53
Alterations rights reserved (G 698 / G 898 <strong>Plus</strong>) / 000 2501<br />
This bio-friendly paper was bleached without the use of chlorine.