
Create successful ePaper yourself
Turn your PDF publications into a flip-book with our unique Google optimized e-Paper software.
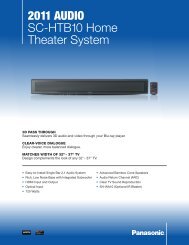
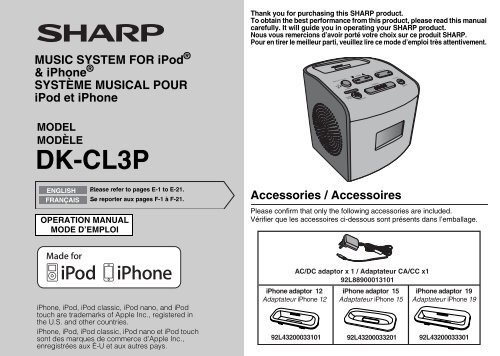
MUSIC SYSTEM FOR iPod ®<br />
& iPhone ®<br />
SYSTÈME MUSICAL POUR<br />
iPod et iPhone<br />
MODEL<br />
MODÈLE<br />
<strong>DK</strong>-<strong>CL3P</strong><br />
ENGLISH<br />
FRANÇAIS<br />
OPERATION MANUAL<br />
MODE D’EMPLOI<br />
Please refer to pages E-1 to E-21.<br />
Se reporter aux pages F-1 à F-21.<br />
iPhone, iPod, iPod classic, iPod nano, and iPod<br />
touch are trademarks of Apple Inc., registered in<br />
the U.S. and other countries.<br />
iPhone, iPod, iPod classic, iPod nano et iPod touch<br />
sont des marques de commerce d’Apple Inc.,<br />
enregistrées aux É-U et aux autres pays.<br />
Thank you for purchasing this SHARP product.<br />
To obtain the best performance from this product, please read this manual<br />
carefully. It will guide you in operating your SHARP product.<br />
Nous vous remercions d’avoir porté votre choix sur ce produit SHARP.<br />
Pour en tirer le meilleur parti, veuillez lire ce mode d’emploi très attentivement.<br />
Accessories / Accessoires<br />
Please confirm that only the following accessories are included.<br />
Vérifier que les accessoires ci-dessous sont présents dans l’emballage.<br />
AC/DC adaptor x 1 / Adaptateur CA/CC x1<br />
92L88900013101<br />
iPhone adaptor 12<br />
Adaptateur iPhone 12<br />
iPhone adaptor 15<br />
Adaptateur iPhone 15<br />
92L43200033101 92L43200033201 92L43200033301<br />
MEMORY<br />
iPhone adaptor 19<br />
Adaptateur iPhone 19
<strong>DK</strong>-<strong>CL3P</strong><br />
ENGLISH<br />
Important Instruction<br />
E-1<br />
SPECIAL NOTES<br />
ENGLISH<br />
CAUTION: TO REDUCE THE RISK OF ELECTRIC SHOCK,<br />
DO NOT REMOVE COVER (OR BACK).<br />
NO USER-SERVICEABLE PARTS INSIDE. REFER<br />
SERVICING TO QUALIFIED SERVICE PERSONNEL.<br />
WARNING : TO REDUCE THE RISK OF FIRE OR<br />
ELECTRIC SHOCK, DO NOT EXPOSE THIS APPLIANCE<br />
TO RAIN OR MOISTURE.<br />
“Made for iPod” and “Made for iPhone” mean that an electronic<br />
accessory has been designed to connect specifically to iPod or<br />
iPhone, respectively, and has been certified by the developer<br />
to meet Apple performance standards. Apple is not<br />
responsible for the operation of this device or its compliance<br />
with safety and regulatory standards. Please note that the use<br />
of this accessory with iPod or iPhone may affect wireless<br />
performance.<br />
NOTE<br />
This equipment has been tested and found to comply with the<br />
limits for a Class B digital device, pursuant to Part 15 of the FCC<br />
Rules. These limits are designed to provide reasonable<br />
protection against harmful interference in a residential<br />
installation. This equipment generates, uses, and can radiate<br />
radio frequency energy and, if not installed and used in<br />
accordance with the instructions, may cause harmful<br />
interference to radio communications. However, there is no<br />
guarantee that interference will not occur in a particular<br />
installation. If this equipment does cause harmful interference to<br />
radio or television reception, which can be determined by<br />
turning the equipment off and on, the user is encouraged to try<br />
to correct the interference by one or more of the following<br />
measures:<br />
Reorient or relocate the receiving antenna.<br />
Increase the separation between the equipment and receiver.<br />
Connect the equipment into an outlet on a circuit different<br />
from that to which the receiver is connected.<br />
Consult the dealer or an experienced radio/TV technician for<br />
help.<br />
WARNING<br />
FCC Regulations state that any unauthorized changes or<br />
modifications to this equipment not expressly approved by the<br />
manufacturer could void the user's authority to operate this<br />
equipment.<br />
FOR YOUR RECORDS<br />
For your assistance in reporting this unit in case of loss or<br />
theft, please record below the model number and serial<br />
number which are located on the rear of the unit. Please retain<br />
this information.<br />
Model number ..............................................<br />
Serial number ..............................................<br />
Date of purchase ..............................................<br />
Place of purchase ..............................................
IMPORTANT SAFETY INSTRUCTIONS<br />
Electricity is used to perform many useful functions, but it can<br />
also cause personal injuries and property damage if improperly<br />
handled. This product has been engineered and manufactured<br />
with the highest priority on safety. However, improper use can<br />
result in electric shock and/or fire. In order to prevent potential<br />
danger, please observe the following instructions when<br />
installing, operating and cleaning the product. To ensure your<br />
safety and prolong the service life of this product, please read<br />
the following precautions carefully before use.<br />
1) Read these instructions.<br />
2) Keep these instructions.<br />
3) Heed all warnings.<br />
4) Follow all instructions.<br />
5) Do not use this apparatus near water.<br />
6) Clean only with dry cloth.<br />
7) Do not block any ventilation openings. Install in accordance<br />
with the manufacturer's instructions.<br />
8) Do not install near any heat sources such as radiators, heat<br />
registers, stoves, or other apparatus (including amplifiers)<br />
that produce heat.<br />
9) Do not defeat the safety purpose of the polarized or<br />
grounding-type plug. A polarized plug has two blades with<br />
one wider than the other. A grounding type plug has two<br />
blades and a third grounding prong. The wide blade or the<br />
third prong are provided for your safety. If the provided plug<br />
does not fit into your outlet, consult an electrician for<br />
replacement of the obsolete outlet.<br />
10) Protect the power cord from being walked on or pinched<br />
particularly at plugs, convenience receptacles, and the point<br />
where they exit from the apparatus.<br />
11) Only use attachments/accessories specified by the<br />
manufacturer.<br />
12) Use only with the cart, stand, tripod, bracket,<br />
or table specified by the manufacturer, or sold<br />
with the apparatus. When a cart is used, use<br />
caution when moving the cart/apparatus<br />
combination to avoid injury from tip-over.<br />
13) Unplug this apparatus during lightning storms or when<br />
unused for long periods of time.<br />
14) Refer all servicing to qualified service personnel. Servicing<br />
is required when the apparatus has been damaged in any<br />
way, such as power-supply cord or plug is damaged, liquid<br />
has been spilled or objects have fallen into the apparatus,<br />
the apparatus has been exposed to rain or moisture, does<br />
not operate normally, or has been dropped.<br />
Additional Safety Information<br />
15) Power Sources - This product should be operated only from<br />
the type of power source indicated on the marking label. If<br />
you are not sure of the type of power supply to your home,<br />
consult your product dealer or local power company. For<br />
product intended to operate from battery power, or other<br />
sources, refer to the operating instructions.<br />
16) Overloading - Do not overload wall outlets, extension cords,<br />
or integral convenience receptacles as this can result in a<br />
risk of fire or electric shock.<br />
17) Object and Liquid Entry - Never push objects of any kind into<br />
this product through openings as they may touch dangerous<br />
voltage points or short-out parts that could result in a fire or<br />
electric shock. Never spill liquid of any kind on the product.<br />
<strong>DK</strong>-<strong>CL3P</strong><br />
ENGLISH<br />
Important Instruction<br />
E-2
<strong>DK</strong>-<strong>CL3P</strong><br />
ENGLISH<br />
Important Instruction<br />
E-3<br />
IMPORTANT SAFETY INSTRUCTIONS (continued)<br />
18) Damage Requiring Service - Unplug this product from the<br />
wall outlet and refer servicing to qualified service personnel<br />
under the following conditions:<br />
a) When the AC cord or plug is damaged,<br />
b) If liquid has been spilled, or objects have fallen into the<br />
product,<br />
c) If the product has been exposed to rain or water,<br />
d) If the product does not operate normally by following<br />
the operating instructions. Adjust only those controls<br />
that are covered by the operating instructions as an<br />
improper adjustment of other controls may result in<br />
damage and will often require extensive work by a<br />
qualified technician to restore the product to its normal<br />
operation,<br />
e) If the product has been dropped or damaged in any<br />
way, and<br />
f ) When the product exhibits a distinct change in<br />
performance - this indicates a need for service.<br />
19) Replacement Parts - When replacement parts are required,<br />
be sure the service technician has used replacement parts<br />
specified by the manufacturer or have the same<br />
characteristics as the original part. Unauthorized<br />
substitutions may result in fire, electric shock, or other<br />
hazards.<br />
20) Safety Check - Upon completion of any service or repairs to<br />
this product, ask the service technician to perform safety<br />
checks to determine that the product is in proper operating<br />
condition.<br />
21) Wall or ceiling mounting - When mounting the product on a<br />
wall or ceiling, be sure to install the product according to the<br />
method recommended by the manufacturer.<br />
22) Power Lines - An outside antenna system should not be<br />
located in the vicinity of overhead power lines or other<br />
electric light or power circuits, or where it can fall into such<br />
power lines or circuits. When installing an outside antenna<br />
system, extreme care should be taken to keep from touching<br />
such power lines or circuits as contact with them might be<br />
fatal.<br />
23) Protective Attachment Plug - The product is equipped with<br />
an attachment plug having overload protection. This is a<br />
safety feature. See Instruction <strong>Manual</strong> for replacement or<br />
resetting of protective device. If replacement of the plug is<br />
required, be sure the service technician has used a<br />
replacement plug specified by the manufacturer that has the<br />
same overload protection as the original plug.<br />
24) Stand - Do not place the product on an unstable cart, stand,<br />
tripod or table. Placing the product on an unstable base can<br />
cause the product to fall, resulting in serious personal<br />
injuries as well as damage to the product. Use only a cart,<br />
stand, tripod, bracket or table recommended by the<br />
manufacturer or sold with the product. When mounting the<br />
product on a wall, be sure to follow the manufacturer's<br />
instructions. Use only the mounting hardware<br />
recommended by the manufacturer.
SPECIAL NOTES Contents<br />
ENERGY STAR ® Program Information<br />
Products that have earned the<br />
ENERGY STAR ® are designed<br />
to protect the environment<br />
through superior energy<br />
efficiency.<br />
ENERGY STAR ® is a U.S. registered mark.<br />
Page<br />
■ General Information<br />
Precautions . . . . . . . . . . . . . . . . . . . . . . . . . . . . . . . 5<br />
Controls and indicators . . . . . . . . . . . . . . . . . . 6 - 7<br />
■ Preparation for Use<br />
System connections . . . . . . . . . . . . . . . . . . . . 8 - 9<br />
■ Basic <strong>Operation</strong><br />
General control . . . . . . . . . . . . . . . . . . . . . . . . . . . 10<br />
Setting the time and date . . . . . . . . . . . . . . . . . . . 11<br />
■ iPod and iPhone<br />
Listening to the iPod and iPhone . . . . . . . . 12 - 14<br />
■ Radio<br />
Listening to the radio . . . . . . . . . . . . . . . . . . 14 - 15<br />
■ Advanced Features<br />
Alarm operation . . . . . . . . . . . . . . . . . . . . . . 16 - 17<br />
Enhancing your system . . . . . . . . . . . . . . . . 17 - 18<br />
■ References<br />
Troubleshooting chart . . . . . . . . . . . . . . . . . 18 - 19<br />
Maintenance . . . . . . . . . . . . . . . . . . . . . . . . . . . . . 20<br />
Specifications . . . . . . . . . . . . . . . . . . . . . . . . . . . . 20<br />
CONSUMER LIMITED WARRANTY . . . . . . . 21 - 22<br />
<strong>DK</strong>-<strong>CL3P</strong><br />
ENGLISH<br />
General Information<br />
E-4
<strong>DK</strong>-<strong>CL3P</strong><br />
ENGLISH<br />
General Information<br />
E-5<br />
Precautions<br />
■ General<br />
● Please ensure that the equipment is<br />
positioned in a well-ventilated area 4" (10 cm)<br />
and ensure that there is at least<br />
4" (10 cm) of free space along the<br />
sides, top and back of the equipment.<br />
● Use the unit on a firm, level surface<br />
free from vibration.<br />
● Keep the unit away from direct<br />
sunlight, strong magnetic<br />
fields, excessive dust, humidity<br />
and electronic/electrical<br />
equipment (home computers,<br />
facsimiles, etc.) which<br />
generate electrical noise.<br />
4" (10 cm)<br />
● Do not place anything on top of the unit.<br />
● Do not expose the unit to moisture, to temperatures higher<br />
than 140°F (60°C) or to extremely low temperatures.<br />
● If your system does not work properly, disconnect the AC/DC<br />
adaptor from the AC outlet. Plug the AC/DC adaptor back in,<br />
and then turn on your system.<br />
● In case of an electrical storm,<br />
unplug the unit for safety.<br />
MEMORY<br />
MEMORY<br />
● Hold the AC/DC adaptor by the<br />
head when removing it from the<br />
AC outlet, as pulling the cord<br />
can damage internal wires.<br />
● The AC/DC adaptor is used as<br />
a disconnect device and shall<br />
always remain readily<br />
operable.<br />
● Do not remove the outer cover, as this may result in<br />
electric shock. Refer internal service to your local<br />
SHARP service facility.<br />
● This unit should only be used within the range of 41°F - 95°F<br />
(5°C - 35°C).<br />
● To prevent fire or shock hazard, do not expose this appliance<br />
to dripping or splashing. No object filled with liquids, such as<br />
vases shall be placed on the apparatus.<br />
Warning:<br />
The voltage used must be the same as that specified on this<br />
unit. Using this product with a higher voltage other than that<br />
which is specified is dangerous and may result in a fire or other<br />
type of accident causing damage. SHARP will not be held<br />
responsible for any damage resulting from use of this unit with a<br />
voltage other than that which is specified.<br />
■ Volume control<br />
The sound level at a given volume setting depends on speaker<br />
efficiency, location and various other factors. It is advisable to<br />
avoid exposure to high volume levels, which occurs while<br />
turning the unit on with the volume control setting up high, or<br />
while continually listening at high volumes.
Controls and indicators<br />
2<br />
3 7<br />
1<br />
1<br />
4<br />
MEMORY<br />
SUN MON TUE WED THU FRI SAT<br />
PM<br />
FM<br />
B BS<br />
MHz<br />
6 5 4 3 2<br />
5<br />
6<br />
■ Top panel<br />
Reference page<br />
1. iPod and iPhone Dock . . . . . . . . . . . . . . . . . . . . . . . 13<br />
2. DISPLAY (TV OUT)/ALARM Button . . . . . . . . . . . 8, 14<br />
3. ON/STAND-BY/Alarm Reset/<br />
FUNCTION Button . . . . . . . . . . . . 8, 10, 13, 14, 15, 18<br />
4. Snooze/Dimmer Button . . . . . . . . . . . . . . . . . . . . . . 10<br />
5. Previous/Next/Tuning Up/Down Button . . . 11, 14, 15<br />
6. Volume Up/Down Button . . . . . . . . . . . . . . . . . . . . . 10<br />
7. Clock/MEMORY/PLAY/PAUSE Button . . . . . . . . 11, 14<br />
■ Display<br />
Reference page<br />
1. Day Indicator . . . . . . . . . . . . . . . . . . . . . . . . . . . . . . . 11<br />
2. Snooze Indicator . . . . . . . . . . . . . . . . . . . . . . . . . . . . 17<br />
3. Alarm Indicator . . . . . . . . . . . . . . . . . . . . . . . . . . . . . 16<br />
4. Buzzer Indicator . . . . . . . . . . . . . . . . . . . . . . . . . . . . 16<br />
5. iPod/iPhone Indicator . . . . . . . . . . . . . . . . . . . . . . . . 16<br />
6. FM Tuner Indicator . . . . . . . . . . . . . . . . . . . . . . . . . . 15<br />
<strong>DK</strong>-<strong>CL3P</strong><br />
ENGLISH<br />
General Information<br />
E-6
<strong>DK</strong>-<strong>CL3P</strong><br />
ENGLISH<br />
General Information<br />
E-7<br />
Controls and indicators (continued)<br />
OPEN<br />
1<br />
■ Bottom view<br />
Reference page<br />
1. Battery Compartment . . . . . . . . . . . . . . . . . . . . . . . . 9<br />
1 2 3 4<br />
■ Rear panel<br />
Reference page<br />
1. AUDIO IN Jack . . . . . . . . . . . . . . . . . . . . . . . . . . . . . 17<br />
2. FM Antenna Wire (fixed). . . . . . . . . . . . . . . . . . . . . . 15<br />
3. Video Out Jack . . . . . . . . . . . . . . . . . . . . . . . . . . . . . . 8<br />
4. DC Input Jack . . . . . . . . . . . . . . . . . . . . . . . . . . . . . . . 8
System connection<br />
Make sure to unplug the AC/DC adaptor before making any connections.<br />
■ Connecting iPod or iPhone to TV<br />
Video files from iPod or iPhone can be viewed by connecting the system to TV/<br />
monitor.<br />
If the TV/monitor has a video input, connect it to the VIDEO OUT jack at the back<br />
of the unit and set the TV Out on the iPod or iPhone unit to “ON” position.<br />
VIDEO<br />
OUT<br />
Video cable<br />
(not supplied)<br />
To video input jack<br />
■ Watching videos on a TV connected to iPod<br />
1 Press the FUNCTION button on the main unit to select<br />
the iPod function.<br />
2 Enter the iPod or iPhone menu.<br />
Press and hold DISPLAY(TV OUT) button on main unit<br />
until ON appear on display.<br />
3 Select the desired video to be played.<br />
4 Press the ENTER button on the iPod unit to start playback.<br />
For iPod touch and iPhone, playback will automatically<br />
start once the desired file is selected.<br />
Notes:<br />
● To return to watch video on iPod or iPhone screen, return to<br />
the iPod menu. Press and hold the DISPLAY(TV OUT) on<br />
main unit until “OFF” appear on display.<br />
● During iPod video playback, pressing the DISPLAY(TV OUT)<br />
button until “OFF” appear on display will not toggle video out<br />
display between iPod and TV.<br />
TV<br />
● Please make sure to set iPod unit to either NTSC or PAL to<br />
match your TV signal. Please visit Apple’s home page for<br />
further information.<br />
● Customer should also refer iPod operation manual before<br />
making video out setting.<br />
■ AC/DC adaptor connection<br />
1 Plug the AC/DC adaptor cable into the DC IN jack on<br />
the unit.<br />
2 Plug the AC/DC adaptor into an AC outlet.<br />
1<br />
AC/DC Adaptor Cable<br />
DC IN Jack<br />
(DC 6V)<br />
AC Outlet<br />
(AC 100 - 240 V, 50/60 Hz)<br />
Notes:<br />
● Unplug the AC/DC adaptor from the AC outlet if the unit will<br />
not be used for a prolonged period of time.<br />
● Use only the supplied AC/DC adaptor. Using other AC/DC<br />
adaptor may cause an electric shock or fire.<br />
● During unit operational with batteries, iPod/iPhone attached<br />
can be used for playback only.<br />
CAUTION:<br />
TO PREVENT ELECTRIC SHOCK, MATCH WIDE BLADE OF<br />
PLUG TO WIDE SLOT, FULLY INSERT.<br />
2<br />
<strong>DK</strong>-<strong>CL3P</strong><br />
ENGLISH<br />
Preparation for Use<br />
E-8
<strong>DK</strong>-<strong>CL3P</strong><br />
ENGLISH<br />
Preparation for Use<br />
E-9<br />
System connections (continued)<br />
■ Install/Replace backup batteries<br />
Use 4 “AA” size batteries (UM/SUM-3, R6, HP-7 or similar).<br />
Batteries are not included.<br />
1 Open the battery cover.<br />
2 Insert the batteries according to the direction<br />
indicated in the battery compartment.<br />
When inserting or removing the batteries, push them<br />
towards the – battery terminal.<br />
3 Close the cover.<br />
OPEN<br />
OPEN<br />
Notes:<br />
● Backup battery system is use to provide continuous alarm<br />
operation and clock setting in event of a power failure. During<br />
battery replacement, please make sure the AC/DC adaptor is<br />
connected, otherwise all setting may be lost.<br />
● Remove the batteries if the unit will not be used for a long<br />
period of time to prevent battery leakage which may cause<br />
potential damage.<br />
● The first time the batteries is install, the clock will blinking on<br />
the display. Please set the time and date (refer page 11).<br />
OPEN<br />
Note:<br />
Battery life may vary depending on the temperature, battery<br />
types and usage conditions.<br />
Precautions for battery use:<br />
● Installing the batteries incorrectly may cause the unit to<br />
malfunction.<br />
● Insert the batteries according to the direction indicated in the<br />
battery compartment.<br />
● Replace all old batteries with new ones at the same time.<br />
● Do not mix old and new batteries.<br />
● Batteries (battery pack or batteries installed) shall not be<br />
exposed to excessive heat such as sunshine, fire or the like.<br />
Caution:<br />
Do not use rechargeable batteries (nickeI-cadmium battery, etc.).
General control<br />
MEMORY<br />
■ To turn the power on<br />
Press the ON/STAND-BY button to turn the power on.<br />
The first time power is supplied to the unit, the clock will be<br />
blinking on the display. Please set the time and date<br />
(refer page 11).<br />
After use:<br />
Press and hold the ON/STAND-BY button to enter the power<br />
stand-by mode.<br />
■ Display brightness control (DIMMER)<br />
<strong>DK</strong>-<strong>CL3P</strong><br />
ENGLISH<br />
Press the SNOOZE/DIMMER button to adjust the brightness of<br />
LCD display.<br />
Dimmer 1 (Display is dim)<br />
Dimmer 2 (Display gets dimmer)<br />
Dimmer off (Display is bright)<br />
Notes:<br />
● Setting dimmer to display in the brightest mode during battery<br />
operation will affect battery life.<br />
● During battery operation in standby mode, the brightness of<br />
the display will automatically go to the lowest mode (dim OFF)<br />
after 5 seconds.<br />
■ Volume auto set in<br />
If you turn off and on the main unit with the volume set to 17 or<br />
higher, the volume starts at 16.<br />
■ Volume control<br />
Press the VOLUME (+ or –) button<br />
to increase or decrease the volume.<br />
Volume indicator will be blinking<br />
when volume reaches maximum<br />
and minimum level.<br />
MON<br />
Basic <strong>Operation</strong><br />
E-10
<strong>DK</strong>-<strong>CL3P</strong><br />
ENGLISH<br />
Basic <strong>Operation</strong><br />
E-11<br />
Setting the time and date<br />
In this example, the clock is set for the 12-H (12 hour) display.<br />
1 In standby mode, press the CLOCK button for more<br />
than 2 seconds. The clock time display will blinking.<br />
MON MON<br />
MEMORY<br />
MEMORY<br />
Press the or button to select clock time display<br />
format and then press CLOCK button.<br />
2 Press the or button to adjust the hour and<br />
then press the CLOCK button.<br />
MON<br />
Press the or button once to advance the time by<br />
1 hour. Hold it down to advance continuously.<br />
“AM” or “PM” indicator will interchange after each 12 hour<br />
cyclic in 12-H clock format.<br />
3 Press the or button to adjust the minutes and<br />
then press the CLOCK button.<br />
MON<br />
Press the or button once to advance the time by<br />
1 minute. Hold it down for about 2 seconds to change the<br />
time in 5-minutes interval.<br />
4 Press the or button to adjust the day and then<br />
press the CLOCK button.<br />
MON THU<br />
“:” will be blinking to indicate time and date setting is<br />
completed.<br />
Note:<br />
During battery operations in standby mode, press the SNOOZE/<br />
DIMMER button to display the clock for about 5 seconds.
Listening to the iPod and iPhone<br />
iPod and iPhone operations<br />
Made for:<br />
● iPhone 4<br />
● iPhone 3GS<br />
● iPhone 3G<br />
● iPhone<br />
● iPod touch (3 rd generation)<br />
● iPod touch (2 nd generation)<br />
● iPod touch (1 st generation)<br />
● iPod classic<br />
● iPod with video<br />
● iPod nano (5 th generation)<br />
● iPod nano (4 th generation)<br />
● iPod nano (3 rd generation)<br />
● iPod nano (2 nd generation)<br />
● iPod nano (1 st generation)<br />
● iPod with colour display<br />
● iPod mini<br />
Caution:<br />
● Please update your iPod and iPhone unit to the latest<br />
software version before using it. Please visit Apple’s<br />
homepage to download the latest version for your iPod and<br />
iPhone.<br />
Notes:<br />
● Once the iPod or iPhone is connected to the unit it will begin<br />
charging.<br />
● If you have an iPod or iPhone that does not have an iPod 30<br />
Pin connector, you can use an auxillary cable to connect it<br />
to the AUDIO IN jack.<br />
● The message “This accessory is not made to work with<br />
iPhone” or similar, may appear on the iPhone screen when:<br />
- battery is low.<br />
- the iPhone is not properly docked (eg. slanting).<br />
If this occurs, remove and re-dock the iPhone.<br />
● The iPod or iPhone will not be charged while the main unit<br />
uses batteries as power supply.<br />
■ iPod and iPhone adaptor connection<br />
Note:<br />
You can use an audio cable to connect your iPod or iPhone to<br />
the AUDIO IN socket if:<br />
1. your iPod or iPhone adaptor does not fit into the dock on the<br />
main unit.<br />
2. you have an iPod or iPhone that does not have an iPod or<br />
iPhone adaptor.<br />
3. you have an iPod that does not have an iPod 30 pin<br />
connector.<br />
iPhone<br />
Adaptor No.<br />
iPhone Description Capacity<br />
12 iPhone 4GB & 8GB & 16GB<br />
15 iPhone 3G 8GB & 16GB<br />
15 iPhone 3GS 16GB & 32GB<br />
19 iPhone 4 16GB & 32GB<br />
<strong>DK</strong>-<strong>CL3P</strong><br />
ENGLISH<br />
iPod and iPhone<br />
E-12
<strong>DK</strong>-<strong>CL3P</strong><br />
ENGLISH<br />
iPod and iPhone<br />
E-13<br />
Listening to the iPod and iPhone (continued)<br />
■ To insert iPod or iPhone adaptor<br />
1. Insert the iPod or iPhone adaptor into unit and connect your<br />
iPod or iPhone.<br />
iPhone (bottom)<br />
Dock connector<br />
iPhone dock<br />
iPhone connector<br />
iPhone<br />
iPhone adaptor<br />
Caution:<br />
Unplug all accessories for the iPod or iPhone before inserting it<br />
into the dock.<br />
■ To remove iPod or<br />
iPhone adaptor<br />
Insert the tip of a screwdriver (“-”<br />
type, small) into the adaptor hole<br />
as shown and lift upward to remove.<br />
■ iPod or iPhone playback<br />
1 Press the ON/STAND-BY button to turn the power on.<br />
2 Press the FUNCTION button on main unit to select the<br />
iPod function.<br />
3 Insert iPod or iPhone unit in the dock of main unit.<br />
iPhone<br />
4 Press the / button on the iPod unit to start<br />
playback.<br />
For iPod touch and iPhone, playback will automatically<br />
start once the desired file is selected.<br />
■ To disconnect iPod or iPhone<br />
Simply remove the iPod or iPhone from the dock. It is safe to do<br />
so even during playback.
■ Various iPod or iPhone functions<br />
Function Main unit <strong>Operation</strong><br />
Play Press in the pause mode.<br />
MEMORY<br />
Pause Press in the playback mode.<br />
Track<br />
up/<br />
down<br />
Fast<br />
forward/<br />
reverse<br />
MEMORY<br />
Press in the playback or pause<br />
mode.<br />
If you press the button in the<br />
pause mode, press the /<br />
button to start the desired track.<br />
Press and hold down in the<br />
playback mode.<br />
Release the button to resume<br />
playback.<br />
TV OUT Press for more than 2 seconds<br />
to toggle the video out display<br />
between iPod or iPhone and TV.<br />
iPod and iPhone operation<br />
The operations described above depend on the generation iPod<br />
or iPhone you are using.<br />
Listening to the radio<br />
MEMORY<br />
■ Tuning<br />
1 Press the ON/STAND-BY button to turn the power on.<br />
2 Press the FUNCTION button to select the Tuner<br />
function.<br />
<strong>DK</strong>-<strong>CL3P</strong><br />
ENGLISH<br />
iPod and iPhone<br />
E-14
<strong>DK</strong>-<strong>CL3P</strong><br />
ENGLISH<br />
Radio<br />
E-15<br />
Listening to the radio (continued)<br />
3 Tune to the desired station.<br />
<strong>Manual</strong> tuning:<br />
Press the TUNING ( or ) button as many times as<br />
required to tune in to the desired station.<br />
Auto tuning:<br />
When the TUNING ( or ) button is pressed for more<br />
than 0.5 seconds, scanning will start automatically and the<br />
tuner will stop at the first receivable broadcast station.<br />
Notes:<br />
● After 5 seconds the tuner<br />
frequency will change to time<br />
display. To preview the tuner<br />
frequency, press DISPLAY(TV<br />
OUT) button.<br />
● When radio interference occurs,<br />
auto scan tuning may stop<br />
automatically at that point.<br />
● Auto scan tuning will skip weak signal stations.<br />
● To stop the auto tuning, press the TUNING ( or ) button<br />
again.<br />
Receiving an FM stereo transmission:<br />
● If the FM reception is weak, the reception will auto changes<br />
to monaural, and the sound becomes clearer.<br />
■ Programming a station<br />
You can store 20 FM stations in memory and recall them at the<br />
push of a button. (Preset tuning)<br />
1 Perform steps 1 - 3 in “Tuning” on pages 14 - 15.<br />
2 While the Tuner frequency is display, press the<br />
MEMORY button for more than 2 seconds on the main<br />
unit to enter the preset tuning saving mode.<br />
FM<br />
FM TUNER<br />
indicator<br />
MHz<br />
FM<br />
MHz<br />
3 Within 5 seconds, press the MEMORY button<br />
repeatedly to select the preset channel number.<br />
Store the stations in memory, in order, starting with preset<br />
channel 1.<br />
4 Within 5 seconds, press and hold the MEMORY button<br />
on main unit to store that station in memory.<br />
If the preset number indicators disappear before the<br />
station is programmed, repeat the operation from step 2.<br />
5 Repeat steps 1 - 4 to set other stations, or to change a<br />
preset station.<br />
When a new station is stored in memory, the station<br />
previously programmed for that preset channel number will<br />
be erased.<br />
Note:<br />
The backup batteries function protects the programmed stations<br />
should there be a power failure or the AC/DC adaptor becomes<br />
disconnected. If the backup batteries are drain off, the<br />
programmed stations will be erased.<br />
■ To recall a programmed station<br />
Press MEMORY button repeatedly to select the desired<br />
programmed station.<br />
FM<br />
MHz
Alarm operation<br />
■ Alarm<br />
The unit turns on and play desired source (iPod, iPhone or<br />
TUNER) or Buzzer sound for 1 hour alarm cycle.<br />
Before setting the alarm:<br />
1 Check that the clock is set to the correct time. (refer page 11)<br />
If it is not set, you cannot use the alarm function.<br />
2 For iPod playback: Insert iPod or iPhone to the unit. (refer<br />
page 13)<br />
3 For TUNER: Set preset memory. (refer page 15)<br />
Setting the alarms<br />
1 In standby mode, press and hold the ALARM button until the<br />
alarm time and alarm icon blinking.<br />
SUN MON TUE WED THU FRI SAT<br />
2 Press the or button to adjust the hour and press the<br />
ALARM button.<br />
SUN MON TUE WED THU FRI SAT<br />
Press the or button once to advance the time by<br />
1 hour. Hold it down to advance continuously. “AM” or “PM”<br />
indicator will interchange after each 12 hour cyclic.<br />
3 Press the or button to adjust the minutes and then<br />
press the ALARM button.<br />
Press the or button once to advance the time by<br />
1 minute. Hold it down to change the time in 5 minutes interval.<br />
4 Press the or button to select the day for the alarm<br />
and then press alarm button.<br />
Everyday: MON - SUN (Alarm activate daily)<br />
Weekday: MON - FRI (Alarm activate from Monday to Friday<br />
only)<br />
Weekend: SAT - SUN (Alarm activate from Saturday to<br />
Sunday only)<br />
5 Press the or button to select the wake up<br />
source and then press the ALARM button.<br />
Wake up source selection:<br />
SUN MON TUE WED THU FRI SAT<br />
SUN MON TUE WED THU FRI SAT<br />
MON TUE WED THU FRI<br />
BUZZER RADIO iPod<br />
Alarm icon “ ” will light up to indicate alarm setting is complete.<br />
B BS<br />
<strong>DK</strong>-<strong>CL3P</strong><br />
ENGLISH<br />
Advanced Features<br />
E-16
<strong>DK</strong>-<strong>CL3P</strong><br />
ENGLISH<br />
Advanced Features<br />
E-17<br />
Alarm operation (continued)<br />
Note:<br />
If wake up source is set to iPod, and iPod is not present, the<br />
alarm source will change to default Buzzer.<br />
■ Activate and deactivate the alarm<br />
1 During standby mode, press ALARM button to<br />
deactivate current alarm times and wake up source.<br />
2 Press ALARM button again to reactivate the last alarm<br />
function. When the alarm setting time is activated,<br />
alarm information will shown for 5 seconds and alarm<br />
icon ( ) will appear on display.<br />
SUN MON TUE WED THU FRI SAT<br />
3 When alarm has started, alarm icon ( ) will blinking on<br />
the display.<br />
Daily Alarm:<br />
● During alarm is function, press ALARM RESET button to stop<br />
alarm and it will come again on the next day.<br />
Sure Alarm:<br />
● When power failure, the alarm will function if the backup<br />
batteries are installed.<br />
■ Snooze function<br />
Once alarm has started, pressing the SNOOZE/DIMMER<br />
button will stop alarm for 9 minutes.<br />
During snooze, “ ” icon will light up and “ ” icon will blinking.<br />
Once the snooze time has expired, alarm will continue.<br />
The snooze function can be operated during 1 hour alarm cycle.<br />
B BS<br />
Enhancing your system<br />
The auxiliary cable is not included. Purchase a separate<br />
auxiliary cable as shown below.<br />
Portable audio player<br />
Computer<br />
To the line<br />
output jack<br />
Auxiliary cable<br />
(not supplied)
■ Listening to the audio/video sounds from<br />
portable audio player, computer etc.<br />
1 Use the auxiliary cable to connect the portable audio<br />
player, computer etc. to the AUDIO IN jack.<br />
When using video equipment, connect the audio output to<br />
this unit and the video output to a television.<br />
2 Press the ON/STAND-BY button to turn the power on.<br />
3 Press the FUNCTION button to select AUX function.<br />
4 Play the connected equipment.<br />
Note:<br />
To prevent noise interference, place the unit away from the<br />
television and do not make any auxilary playback while listening<br />
to the iPod or iPhone.<br />
Troubleshooting chart<br />
Many potential problems can be resolved by the owner without<br />
calling a service technician.<br />
If something is wrong with this product, check the following<br />
before calling your authorized SHARP dealer or service center.<br />
■ General<br />
■ Tuner<br />
Symptom Possible cause<br />
● The clock is not set to the<br />
correct time.<br />
● When a button is<br />
pressed, the unit does<br />
not respond.<br />
● Did a power failure occur?<br />
Reset the clock. (Refer to<br />
page 11)<br />
● Set the unit to the power<br />
stand-by mode and then turn<br />
it back on.<br />
● If the unit still malfunctions,<br />
reset it.<br />
(Refer to page 19)<br />
● No sound is heard. ● Is the volume level set to “0”?<br />
Symptom Possible cause<br />
● The radio makes unusual<br />
noises continuously.<br />
● Is the unit placed near the<br />
TV or computer?<br />
● Is the FM antenna placed<br />
properly? Move the antenna<br />
away from the AC/DC<br />
adaptor if it is located<br />
nearby.<br />
<strong>DK</strong>-<strong>CL3P</strong><br />
ENGLISH<br />
Advanced Features/Reference<br />
E-18
<strong>DK</strong>-<strong>CL3P</strong><br />
ENGLISH<br />
References<br />
E-19<br />
Troubleshooting chart (continued)<br />
■ iPod and iPhone ■ Condensation<br />
Symptom Possible cause<br />
● No sound is produced.<br />
No image appears on<br />
the TV/monitor.<br />
● iPod or iPhone will not<br />
charge.<br />
● “This accessory is not<br />
made to work with<br />
iPhone” or similar<br />
appears on iPhone<br />
screen.<br />
● The iPod or iPhone unit<br />
software version is not update<br />
to the latest version. Please<br />
visit Apple’s homepage.<br />
● The iPod or iPhone is not<br />
playing.<br />
● The iPod or iPhone is not<br />
properly connected to the unit.<br />
● Is the AC/DC adaptor of the<br />
unit plugged in?<br />
● The video cable is not properly<br />
connected.<br />
● The TV/monitor’s input<br />
selection is not properly set.<br />
● The iPod or iPhone is not<br />
making full contact with the<br />
connector.<br />
● Is the AC/DC adaptor of the<br />
unit plugged in?<br />
● Using iPod (3rd generation).<br />
● The main unit is using<br />
batteries as power supply.<br />
● The iPod or iPhone is not<br />
compatible. Refer page 12 for<br />
compatible models.<br />
● The iPhone battery is low.<br />
Please charge the iPhone.<br />
● iPhone not properly docked.<br />
Sudden temperature changes, storage or operation in an<br />
extremely humid environment may cause condensation inside<br />
the cabinet or on the transmitter on the remote control.<br />
Condensation can cause the unit to malfunction. If this happens,<br />
leave the power on until normal playback is possible (about 1<br />
hour). Wipe off any condensation on the transmitter with a soft<br />
cloth before operating the unit.<br />
■ If problem occurs<br />
When this product is subjected to strong external interference<br />
(mechanical shock, excessive static electricity, abnormal supply<br />
voltage due to lightning, etc.) or if it is operated incorrectly, it may<br />
malfunction.<br />
If such a problem occurs, do the following:<br />
1 Set the unit to the stand-by mode and turn the power on again.<br />
2 If the unit is not restored in the previous operation, unplug and<br />
plug in the unit, and then turn the power on.<br />
Note:<br />
If neither operation above restores the unit, remove the backup<br />
batteries.<br />
■ Clearing all the memory (reset)<br />
During standby mode, press and hold SNOOZE button for 5<br />
seconds. Display will become blank for awhile and main unit will<br />
reset.<br />
Caution:<br />
This operation will erase all data stored in memory including<br />
clock, alarm settings and tuner preset.<br />
■ Before transporting the unit<br />
Remove the iPod or iPhone from the unit. Then, set the unit to<br />
the power standby mode. Carrying the unit with iPod or iPhone<br />
left docked might damage both systems.
Maintenance<br />
■ Cleaning the unit<br />
Periodically wipe the unit with a clean soft cloth.<br />
Specifications<br />
As part of our policy of continuous improvement, SHARP<br />
reserves the right to make design and specification changes for<br />
product improvement without prior notice. The performance<br />
specification figures indicated are nominal values of production<br />
units. There may be some deviations from these values in<br />
individual units.<br />
■ General<br />
Power source DC IN 5.9V 2A: AC/DC adaptor<br />
(AC 100 - 240 V ~ 50/60 Hz)<br />
6V (UM-3/SUM-3, R6/AA) x 4<br />
Power<br />
consumption<br />
11 W<br />
Output power Front speakers:<br />
0.6 W watts minimum RMS per channel<br />
into 8 ohms from 100 Hz to 20 kHz, 10%<br />
total harmonic distortion.<br />
Caution:<br />
● Do not use chemicals for cleaning (gasoline, paint thinner,<br />
etc.). It may damage the unit finishing.<br />
● Do not apply oil to the inside of the unit. It may cause<br />
malfunctions.<br />
Speaker 1-way type speaker system<br />
2.5" (6.5 cm) Full Range<br />
Speaker maximum 1.2 W/Channel<br />
input power<br />
Speaker rated<br />
input power<br />
■ Tuner<br />
0.6 W/Channel<br />
Output terminals Video output: 1Vp-p<br />
Input terminals Auxiliary (audio signal):<br />
500 mV/47 k ohms<br />
Dimensions Width: 4" (100 mm)<br />
Height: 33/4" (96.2 mm)<br />
Depth: 45/14" (110 mm)<br />
Weight 0.77 lbs. (0.35 kg)<br />
Frequency range FM: 87.5 - 108.0 MHz<br />
<strong>DK</strong>-<strong>CL3P</strong><br />
ENGLISH<br />
References<br />
E-20
CONSUMER LIMITED WARRANTY<br />
SHARP ELECTRONICS CORPORATION warrants to the first consumer purchaser that this Sharp brand product (the “Product”), when ship in its original container,<br />
will be free from defective workmanship and materials, and agrees that it will, at its option, either repair the defect or replace the defective Product or part thereof with a<br />
new or remanufactured equivalent at no charge to the purchaser for parts or labor for the period(s) set forth below.<br />
This warranty does not apply to any appearance items of the Product nor to the additional excluded item(s) set forth below nor to any Product the exterior of which has<br />
been damaged or defaced, which has been subjected to improper voltage or other misuse, abnormal service or handling, or which has been altered or modified in<br />
design or construction.<br />
In order to enforce the rights under this limited warranty, the purchaser should follow the steps set forth below and provide proof of purchase to the servicer.<br />
The limited warranty described herein is in addition to whatever implied warranties may be granted to purchasers by law. ALL IMPLIED WARRANTIES INCLUDING<br />
THE WARRANTIES OF MERCHANTABILITY AND FITNESS FOR USE ARE LIMITED TO THE PERIOD(S) FROM THE DATE OF PURCHASE SET FORTH BELOW.<br />
Some states do not allow limitations on how long an implied warranty lasts, so the above limitation may not apply to you.<br />
Neither the sales personnel of the seller nor any other person is authorized to make any warranties other than those described herein, or to extend the duration of any<br />
warranties beyond the time period described herein on behalf of Sharp.<br />
The warranties described herein shall be the sole and exclusive warranties granted by Sharp and shall be the sole and exclusive remedy available to the purchaser.<br />
Correction of defects, in the manner and for the period of time described herein, shall constitute complete fulfillment of all liabilities and responsibilities of Sharp to the<br />
purchaser with respect to the Product, and shall constitute full satisfaction of all claims, whether based on contract, negligence, strict liability or otherwise. In no event<br />
shall Sharp be liable, or in any way responsible, for any damages or defects in the Product which were caused by repairs or attempted repairs performed by anyone<br />
other than an authorized servicer. Nor shall Sharp be liable or in any way responsible for any incidental or consequential economic or property damage. Some states<br />
do not allow the exclusion of incidental or consequential damages, so the above exclusion may not apply to you.<br />
THIS WARRANTY GIVES YOU SPECIFIC LEGAL RIGHTS. YOU MAY ALSO HAVE OTHER RIGHTS WHICH VARY FROM STATE TO STATE.<br />
Model Specific Section<br />
Your Product Model Number & Description:<br />
<strong>DK</strong>-<strong>CL3P</strong> MUSIC SYSTEM for iPod & iPhone<br />
(Be sure to have this information available when you need service for your Product.)<br />
Warranty Period for this Product: One (1) year parts and labor from the date of purchase.<br />
Additional Item(s) Excluded from Warranty Coverage (if any): Non-functional accessories, supplies, and consumable items.<br />
Where to Obtain Service: At a Sharp Authorized Servicer located in the United States.<br />
To find a location of the nearest Sharp Authorized Servicer, call Sharp toll free at 1-800-BE-SHARP.<br />
What to do to Obtain Service: Ship your Product prepaid to a Sharp Authorized Servicer<br />
Be sure to have Proof of Purchase available. If you ship the Product, be sure it is insured and<br />
packaged securely.<br />
E-21<br />
TO OBTAIN SUPPLY, ACCESSORY OR PRODUCT INFORMATION, CALL 1-800-BE-SHARP.<br />
SHARP ELECTRONICS CORPORATION<br />
Sharp Plaza, Mahwah, New Jersey 07495 - 1163
VALID IN CANADA ONLY<br />
LIMITED WARRANTY<br />
Consumer Electronics Products<br />
Congratulations on your purchase!<br />
Sharp Electronics of Canada Ltd. (hereinafter called “Sharp”) gives the following express warranty to the first consumer purchaser for this Sharp brand product, when<br />
shipped in its original container and sold or distributed in Canada by Sharp or by an Authorised Sharp Dealer:<br />
Sharp warrants that this product is free, under normal use and maintenance, from any defects in material and workmanship. If any such defects should be found in<br />
this product within the applicable warranty period, Sharp shall, at its option, repair or replace the product as specified herein.<br />
This warranty shall not apply to:<br />
(a) Any defects caused or repairs required as a result of abusive operation, negligence, accident, improper installation or inap s<br />
manual.<br />
s Authorised<br />
Servicing Dealers.<br />
(c) Damage caused or repairs required as a result of the use with items not specified or approved by Sharp, including but not li mited to head cleaning tapes and<br />
chemical cleaning agents.<br />
(d) Any replacement of accessories, glassware, consumable or peripheral items required through normal use of the product including but not limited to earphones,<br />
remote controls, AC adapters, batteries, temperature probe, stylus, trays, filters, belts, ribbons, cables and paper.<br />
(e) Any cosmetic damage to the surface or exterior that has been defaced or caused by normal wear and tear.<br />
(f) Any damage caused by external or environmental conditions, including but not limited to transmission line/power line voltage or liquid spillage.<br />
(g) Any product received without appropriate model, serial number and CSA/cUL markings.<br />
(h) Any products used for rental or commercial purposes.<br />
(i) Any installation, setup and/or programming charges.<br />
Should this Sharp product fail to operate during the warranty period, warranty service may be obtained upon delivery of the Sharp product together with proof of<br />
purchase<br />
and<br />
a copy<br />
of<br />
this<br />
LIMITED<br />
WARRANTY<br />
statement<br />
to<br />
an<br />
Authorised Sharp Service Centre or an Authorised Sharp Servicing Dealer.<br />
In<br />
home<br />
warranty<br />
s discretion on any Sharp television with the screen size of 27” or larger and on any Sharp Over The Range Microwave Oven.<br />
This warranty constitutes the entire express warranty granted by Sharp and no other dealer, service centre or their agent or employee<br />
is authorised to extend, enlarge<br />
or transfer this warranty on behalf of Sharp. To the extent the law permits, Sharp disclaims any and all liability for direct or indirect damages or losses or for any<br />
incidental, special or consequential damages or loss of profits resulting from a defect in material or workmanship relating to the product, including damages for the<br />
loss of time or use of this Sharp product or the loss of information. The purchaser will be responsible for any removal, reinst allation, transportation and insurance<br />
costs incurred. Correction of defects, in the manner and period of time described herein, constitute complete fulfilment of all<br />
obligations and responsibilities of Sharp<br />
to the purchaser with respect to the product and shall constitute full satisfaction of all claims, whether based on contract, negligence, strict liability or otherwise.<br />
WARRANTY PERIODS<br />
Colour Television 1 year (picture tube 1 additional year) LCD Projector 1 year (bulb 90 days)<br />
LCD<br />
TV<br />
1 year<br />
Video<br />
Cassette<br />
Recorder<br />
1 year<br />
Camcorder<br />
1 year<br />
TV/<br />
VCR<br />
Combo<br />
1 year<br />
( picture<br />
tube<br />
1 additional<br />
year)<br />
Audio<br />
Products<br />
1 year<br />
Microwave<br />
Oven<br />
2 years<br />
( magnetron<br />
3 additional<br />
years<br />
for<br />
part<br />
only)<br />
Vacuum<br />
Cleaner<br />
1 year<br />
DVD<br />
Player<br />
1 year<br />
To<br />
obtain<br />
the<br />
name<br />
and<br />
address<br />
of<br />
the<br />
nearest<br />
Authorised Sharp Service Centre or Dealer,<br />
please<br />
contact:<br />
SHARP ELECTRONICS OF CANADA LTD.<br />
SHARP ELECTRONICS OF CANADA LTD<br />
335 Britannia Road East<br />
Mississauga, Ontario<br />
L4Z 1W9<br />
(905) 568-7140 or 1-(877) SHARP-CC<br />
Web site: www.sharp.ca<br />
E-22
MEMO/MÉMORANDUM
MEMO/MÉMORANDUM
SHARP ELECTRONICS OF CANADA LTD.<br />
335 Britannia Road East, Mississauga,Ontario L4Z 1W9<br />
PRINTED IN CHINA<br />
IMPRIMÉ EN CHINE<br />
92L87500013101<br />
10K R KI 1