ATR2100-USB - Audio-Technica
ATR2100-USB - Audio-Technica
ATR2100-USB - Audio-Technica

You also want an ePaper? Increase the reach of your titles
YUMPU automatically turns print PDFs into web optimized ePapers that Google loves.
OFF<br />
ON<br />
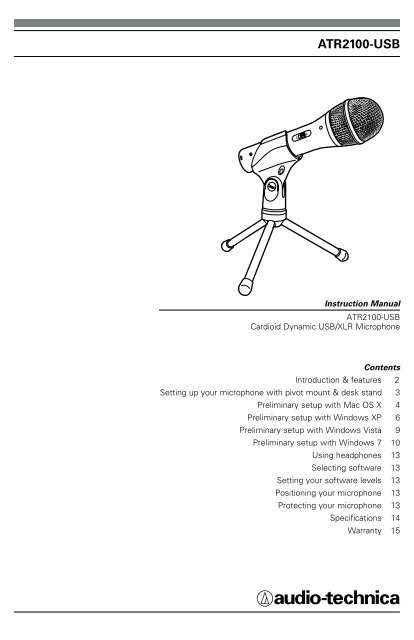
<strong>ATR2100</strong>-<strong>USB</strong><br />
Instruction Manual<br />
<strong>ATR2100</strong>-<strong>USB</strong><br />
Cardioid Dynamic <strong>USB</strong>/XLR Microphone<br />
Contents<br />
Introduction & features 2<br />
Setting up your microphone with pivot mount & desk stand 3<br />
Preliminary setup with Mac OS X 4<br />
Preliminary setup with Windows XP 6<br />
Preliminary setup with Windows Vista 9<br />
Preliminary setup with Windows 7 10<br />
Using headphones 13<br />
Selecting software 13<br />
Setting your software levels 13<br />
Positioning your microphone 13<br />
Protecting your microphone 13<br />
Specifications 14<br />
Warranty 15
Thank you for buying the <strong>Audio</strong>-<strong>Technica</strong> <strong>ATR2100</strong>-<strong>USB</strong> cardioid dynamic <strong>USB</strong>/XLR microphone.<br />
Equipped with both <strong>USB</strong> and an XLR outputs, this digital/analog mic is designed both for live<br />
performance and digitally capturing music or any acoustic audio source using your favorite recording<br />
software.<br />
The <strong>ATR2100</strong>-<strong>USB</strong> offers high-quality articulation and intelligibility perfect for home studio recording,<br />
field recording, podcasting, voiceover, and on-stage use. Its cardioid polar pattern reduces pickup of<br />
sounds from the sides and rear, improving isolation of desired sound source.<br />
The microphone also features a built-in headphone jack with volume control that allows you to directly<br />
monitor your microphone’s output during recording. The microphone’s focused pickup pattern delivers<br />
excellent off-axis rejection, while its A/D converter with a 16-bit, 44.1/48 kHz sampling rate ensures<br />
clear, articulate sound reproduction.<br />
<strong>Audio</strong>-<strong>Technica</strong>’s state-of-the-art design and manufacturing techniques ensure that the microphone<br />
complies with the company’s renowned consistency and reliability standards.<br />
Features<br />
• Handheld dynamic microphone with <strong>USB</strong> digital output and XLR analog output<br />
• <strong>USB</strong> output connects to your computer for digital recording, while the XLR output<br />
connects with your sound system’s conventional microphone input for use in live<br />
performance<br />
• Smooth, extended frequency response ideally suited for podcasting, home studio<br />
recording, field recording, voiceover, and on-stage use<br />
• Built-in headphone jack allows you to directly monitor your microphone’s output without<br />
audible delay<br />
• Adjust headphone volume with easy-to-use controls on the bottom of the microphone<br />
• High-quality A/D converter with 16-bit, 44.1/48 kHz sampling rate<br />
• Compatible with Windows and Mac<br />
• Low-mass diaphragm provides excellent frequency response<br />
• Cardioid polar pattern reduces pickup of sounds from the sides and rear, improving<br />
isolation of desired sound source<br />
• Tripod desk stand with folding legs for secure and easily portable tabletop use<br />
• Pivoting, threaded stand mount attaches securely to the supplied tripod or to a<br />
conventional microphone stand<br />
• <strong>USB</strong> and XLR cables included<br />
• Durable metal construction for long-lasting performance<br />
• On/off switch functions for both <strong>USB</strong> and analog operation<br />
2<br />
Compliance with FCC rules (USA only)<br />
This device complies with Part 15 of the FCC rules. Operation is subject to the following two<br />
conditions:(1) this device may not cause harmful interference, and (2) this device must accept<br />
any interference received, including interference that may cause undesired operation.<br />
FCC WARNING<br />
You are cautioned that any changes or modifications not expressly approved in this manual could<br />
void your authority to operate this equipment.<br />
Canada only<br />
This Class B digital apparatus complies with Canadian ICES-003.<br />
Cet appareil numérique de la classe B est conforme á la norme NMB -003 du Canada.
8<br />
6<br />
7<br />
9<br />
5<br />
OFF<br />
4<br />
ON<br />
3<br />
<strong>ATR2100</strong>-<strong>USB</strong><br />
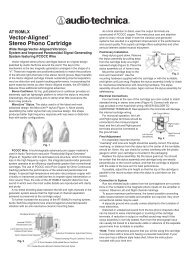
1. Windscreen–Multi-stage grille design offers excellent protection against plosives and sibilance<br />
without compromising high-frequency clarity<br />
2. Capsule–Dynamic microphone element with cardioid polar pattern<br />
3. Blue LED–Blue light shows mic is receiving <strong>USB</strong> power (Note: The blue LED is not affected<br />
by the on/off switch position)<br />
4. ON/OFF switch–Functions for both <strong>USB</strong> and analog operation<br />
5. Metal construction–Tough, durable, resilient design<br />
6. Headphone level control–Up/Down dial controls headphone volume<br />
7. XLR connector–XLR connector with analog output for connection to PA system’s conventional<br />
microphone input<br />
8. <strong>USB</strong>–<strong>USB</strong> connector for connection to your Mac or PC<br />
9. Headphone Jack– 1 /8-inch (3.5mm) stereo jack for connecting your headphones<br />
10. <strong>USB</strong> cable<br />
11. XLRM to XLRF cable<br />
Setting up your microphone with included pivot mount and tripod desk stand<br />
A. Screw the pivot mount microphone mount onto the threaded portion of the desk stand.<br />
B. Extend the tripod legs to provide a wide, secure base, and place the tripod desk stand on<br />
a flat surface.<br />
B. Install the <strong>ATR2100</strong>-<strong>USB</strong> microphone into the microphone mount, with ON/OFF switch up<br />
C. The top of the microphone should be facing the sound source.<br />
D. Use a screwdriver or coin to loosen and tighten the pivot screw for angle adjustment.<br />
E. Plug the provided <strong>USB</strong> cable into the <strong>USB</strong> output at the base of the microphone, or plug the<br />
provided XLR cable into the microphone input of your sound system.<br />
2<br />
Note: Many recording software programs are available online. Audacity is widely used free software<br />
for recording and editing sounds. It is available online at http://audacity.sourceforge.net/<br />
1<br />
11<br />
10<br />
3
Preliminary setup with Mac OS X<br />
1. Plug the free end of the provided <strong>USB</strong> cable into the <strong>USB</strong> port on your computer. The microphone’s<br />
blue LED will illuminate, indicating the microphone is receiving power.Your computer will<br />
automatically recognize the <strong>USB</strong> device and install a driver.<br />
2. To select the <strong>ATR2100</strong>-<strong>USB</strong> as your audio input, first, open your System Preferences.<br />
4
3. Next, click Sound to display the Sound preference pane.<br />
4. Click the Input tab and select the <strong>ATR2100</strong>-<strong>USB</strong> as the device for sound input.<br />
<strong>ATR2100</strong>-<strong>USB</strong> <strong>USB</strong><br />
Your preferences are now set to use the <strong>ATR2100</strong>-<strong>USB</strong> on your Mac with GarageBand or another<br />
recording program of your choice.<br />
5
Preliminary setup with Windows XP<br />
(Service Pack 2; other operating systems may vary slightly)<br />
1. Plug the free end of the <strong>USB</strong> cable into the <strong>USB</strong> port on your computer. The microphone’s blue<br />
LED will illuminate, indicating the mic is receiving power. Your computer will automatically<br />
recognize the <strong>USB</strong> device and install a driver.<br />
2. In the lower right portion of your screen you may see a message that new hardware was found;<br />
or you may see a driver software installation notice.<br />
3. To select the <strong>ATR2100</strong>-<strong>USB</strong> as your default recording device, begin at your Start menu.<br />
Select Control Panel.<br />
6
4. Select Sounds and <strong>Audio</strong> Devices.<br />
7
Preliminary setup with Windows XP (continued)<br />
5. Select the <strong>Audio</strong> tab, and choose <strong>ATR2100</strong>-<strong>USB</strong> as the default device.<br />
6. Adjust computer volume by clicking on the Volume button beneath Sound recording<br />
Default device.<br />
8<br />
<strong>ATR2100</strong>-<strong>USB</strong><br />
7. Through the Wave In window, you can set the computer volume or mute the microphone.<br />
<strong>ATR2100</strong>-<strong>USB</strong><br />
Your preferences are now set to use the <strong>ATR2100</strong>-<strong>USB</strong> with Windows XP with the recording<br />
program of your choice.
Microphone<br />
ATR <strong>USB</strong> Mic<br />
Working<br />
Preliminary setup with Windows Vista<br />
1. Plug the free end of the <strong>USB</strong> cable into the <strong>USB</strong> port on your computer. The microphone’s blue<br />
LED will illuminate, indicating the mic is receiving power. Your computer will automatically<br />
recognize the <strong>USB</strong> device and install a driver.<br />
2. In the lower right portion of your screen you may see a message that new hardware was found;<br />
or you may see a driver software installation notice.<br />
3. To select the <strong>ATR2100</strong>-<strong>USB</strong> as your default recording device, begin at your Start menu.<br />
Select Control Panel.<br />
4. Select (double-click) Sound.<br />
5. Select the Recording tab. Make sure that the AT2100-<strong>USB</strong> microphone is set as the default<br />
recording device. (You should see a green check mark beside the <strong>USB</strong> microphone icon.)<br />
Microphone<br />
SigmaTel C-Major <strong>Audio</strong><br />
Working<br />
Your preferences are now set to use the <strong>ATR2100</strong>-<strong>USB</strong> with Windows Vista with the recording<br />
program of your choice.<br />
9
Preliminary setup with Windows 7<br />
1. Plug the free end of the <strong>USB</strong> cable into the <strong>USB</strong> port on your computer. The microphone’s blue<br />
LED light will illuminate, indicating the mic is receiving power. Your computer will automatically<br />
recognize the <strong>USB</strong> device and install a driver.<br />
2. In the lower right portion of your screen you may get a message that new hardware was found;<br />
or you may see a driver software installation notice.<br />
3. Start menu > Control Panel > Sound<br />
To select the <strong>ATR2100</strong>-<strong>USB</strong> as your default recording device, begin at your Start menu.<br />
Select Control Panel.<br />
10
4. Select Sound.<br />
5. The following screen will pop up:<br />
11
Preliminary setup with Windows 7 (continued)<br />
6. Select the Recording tab, and choose ATR-<strong>USB</strong> Mic as the default device.<br />
7. Double click on the ATR-<strong>USB</strong>-Mic icon to open the Microphone Properties window. Select the<br />
levels tab to adjust microphone level (loudness). You may need to come back to this window to<br />
readjust the level after you begin recording.<br />
Your preferences are now set to use the <strong>ATR2100</strong>-<strong>USB</strong> with Windows 7 with the recording program<br />
of your choice.<br />
12<br />
Microphone<br />
ATR-<strong>USB</strong>-Mic<br />
Default Device
Additional Information<br />
Using headphones<br />
The 1 /8" (3.5 mm) headphone jack on the bottom of the microphone allows you to directly monitor<br />
your recording with a pair of headphones. When your preliminary setup is completed, and your <strong>USB</strong><br />
microphone is connected to your computer’s <strong>USB</strong> port (the microphone’s blue LED is illuminated), plug<br />
your headphones into the headphone jack on the bottom of the microphone. While talking into the<br />
microphone, you should hear yourself in the headphones. Adjust the volume up or down by rotating<br />
the the Up/ Down dial on the bottom of the microphone. Note: The Up/ Down dial only adjusts the<br />
volume of the mic’s headphone output; it does not adjust the microphone level.<br />
Selecting software<br />
You have many choices in recording software. Audacity, available for free online at<br />
http://audacity.sourceforge.net/, is a widely used software program that provides basic recording software.<br />
Setting your software levels<br />
Correct adjustment of microphone level is important for optimum performance. Ideally, the microphone<br />
level should be as high as possible without overloading the input of your computer. If you hear<br />
distortion, or if your recording program shows levels that are consistently overloaded (at peak levels),<br />
turn the microphone volume (or level) down, either through your control panel (or system preferences)<br />
settings, or through your recording software. If your recording program shows insufficient level, you<br />
can increase the microphone gain either from the control panel (or system preferences) settings or<br />
through your recording program.<br />
No further microphone level adjustments should be needed, as long as the acoustic input does not<br />
change significantly.<br />
Positioning your microphone<br />
It is important to position the microphone directly in line (on axis) with the person speaking/singing or<br />
instrument (or other sound source) to achieve the best frequency response of the microphone.<br />
For use in speaking/singing applications, the ideal placement for the microphone is directly in front of<br />
the person speaking/singing. The same placement is optimal when miking an instrument such as an<br />
acoustic guitar, drums or piano. Experiment with different mic placements to find the best sound for<br />
your particular setup.<br />
XLR operation<br />
For live-sound applications, connect the XLRF connector of the included XLR cable to the XLRM<br />
output on the bottom of the microphone; connect the cable’s XLRM connector to a standard XLRF<br />
microphone input on your mixer. Turn the microphone’s ON/OFF switch to the “ON” position. Set the<br />
microphone’s level by following the instructions included with your mixer. Note: The ON/OFF switch<br />
does not affect the LED.<br />
Protecting your microphone<br />
Take care to keep foreign particles from entering the windscreen. An accumulation of iron or steel<br />
filings on the diaphragm, and/or foreign material in the windscreen’s mesh surface, can degrade<br />
performance.<br />
13
<strong>ATR2100</strong>-<strong>USB</strong> Specifications †<br />
Element: Dynamic<br />
Polar Pattern: Cardioid<br />
Frequency Response: 50 – 15,000 Hz<br />
Power Requirements: <strong>USB</strong> Power (5V DC)<br />
Bit Depth: 16 bit<br />
Sample Rate: 44.1 kHz/48 kHz<br />
Controls: On/off switch; headphone volume control<br />
Weight: 268 g (9.5 oz)<br />
Dimensions: 183.0 mm (7.20") long, 51.0 mm (2.01") maximum body diameter<br />
Output Connector: <strong>USB</strong>-type/XLR-type<br />
Headphone Output Power: 10 mW @ 16 ohms<br />
Headphone Jack: 3.5 mm TRS (stereo)<br />
Accessories Included: Stand clamp for 5 /8"-27 threaded stands, tripod desk stand, 2 m (6.6') mini <strong>USB</strong><br />
cable, 3 m (9.8') XLRF-type to XLRM-type cable<br />
System Requirements: Macintosh: MAC OS X; <strong>USB</strong> 1.0 or 2.0; 64 MB RAM (minimum)<br />
Windows: XP/Vista/Windows 7; <strong>USB</strong> 1.0 or 2.0; 64 MB RAM (minimum)<br />
†In the interest of standards development, A.T.U.S. offers full details on its test methods to other industry professionals on request.<br />
Specifications are subject to change without notice.<br />
Frequency Response<br />
50 100 200 500 1k 2k 5k 10k 20k<br />
Frequency in Hertz<br />
10 dB<br />
LEGEND 12" or more on axis<br />
50 100 200 500 1k 2k 5k 10k 20k<br />
LEGEND 330˚<br />
Frequency in Hertz<br />
0˚<br />
12" or more 30˚ on axis<br />
Polar Pattern<br />
270˚<br />
300˚<br />
300˚<br />
240˚<br />
270˚<br />
210˚<br />
180˚<br />
150˚<br />
90˚<br />
SCALE IS 5 DECIBELS PER DIVISION<br />
240˚<br />
120˚<br />
14<br />
330˚<br />
0˚<br />
30˚<br />
60˚<br />
90˚<br />
60˚<br />
120˚<br />
210˚<br />
150˚<br />
180˚<br />
SCALE IS 5 DECIBELS PER DIVISION<br />
LEGEND<br />
200 Hz<br />
1 kHz<br />
5 kHz<br />
8 kHz<br />
LEGEND<br />
200 Hz<br />
1 kHz<br />
5 kHz<br />
8 kHz<br />
Response in dBResponse<br />
in dB<br />
10 dB
This product is warranted in the U.S.A. by <strong>Audio</strong>-<strong>Technica</strong> U.S., Inc. (A.T.U.S.) for the lifetime of the<br />
original purchaser. During the warranty period, A.T.U.S. will repair or replace these products, provided<br />
they are sent prepaid to the address below, with proof of original purchase and $15.00 for handling and<br />
return to a U.S. address. Check or money order required; no cash or stamps. A.T.U.S. reserves the right<br />
to replace any product with one of equal value.<br />
Except to the extent precluded by applicable state law, A.T.U.S. will have no liability for any<br />
consequential, incidental, or special damages; any warranty of merchantability or fitness for particular<br />
purpose expires when this warranty expires. This warranty gives you specific legal rights, and you may<br />
have other rights which vary from state to state.<br />
Outside the U.S.A., please contact your local dealer for warranty details.<br />
Register your product at audio-technica.com<br />
<strong>Audio</strong>-<strong>Technica</strong> U.S., Inc.<br />
1221 Commerce Drive, Stow, Ohio 44224 USA<br />
<strong>ATR2100</strong>-<strong>USB</strong> U.S. Lifetime Limited Warranty<br />
15
<strong>ATR2100</strong>-<strong>USB</strong><br />
To reduce the environmental impact of a multi-language printed document, product information is<br />
available online at www.audio-technica.com in a selection of languages.<br />
Afin de réduire l’impact sur l’environnement de l’impression de plusieurs, les informations concernant<br />
les produits sont disponibles sur le site www.audio-technica.com dans une large sélection de langue.<br />
Para reducir el impacto al medioambiente, y reducir la producción de documentos en varios leguajes,<br />
información de nuestros productos están disponibles en nuestra página del Internet:<br />
www.audio-technica.com.<br />
<strong>Audio</strong>-<strong>Technica</strong> U.S., Inc.<br />
1221 Commerce Drive, Stow, Ohio 44224 USA +1 (330) 686-2600<br />
©2011 <strong>Audio</strong>-<strong>Technica</strong> U.S., Inc. P52299