

ROTARY LAWN MOWER - Sears
ROTARY LAWN MOWER - Sears
ROTARY LAWN MOWER - Sears

You also want an ePaper? Increase the reach of your titles
YUMPU automatically turns print PDFs into web optimized ePapers that Google loves.
BEFORE STARTING ENGINE<br />
ADD OIL<br />
Your lawnmower is shipped without oil in<br />
the engine. For type and grade of oil to<br />
use, see “EN GINE” in the Maintenance<br />
section of this manual.<br />
CAUTION: DO NOT overfi ll engine with<br />
oil, or it will smoke heavily from the muffl er<br />
on startup.<br />
1. Be sure lawnmower is level.<br />
2. Remove oil dipstick from oil fi ll spout.<br />
3. You receive a container of oil with the<br />
unit. Slowly pour the entire container<br />
down the oil fi ll spout into the engine.<br />
NOTE: Initial oil fi ll requires only 18 oz.<br />
due to residual oil in engine from the<br />
manufacturers 100% quality testing. When<br />
changing oil you may need 20 oz.<br />
4. Insert and tighten dipstick.<br />
IMPORTANT:<br />
Check oil level before each use. Add oil<br />
if needed. Fill to full line on dipstick.<br />
Change the oil after every 25 hours of<br />
operation or each season. You may<br />
need to change the oil more often<br />
under dusty, dirty conditions. See “TO<br />
CHANGE ENGINE OIL” in the Maintenance<br />
section of this manual.<br />
ATTACH FUEL CAP CARTRIDGE<br />
Your mower is equipped with a special<br />
FRESH START TM fuel cap and continuous<br />
fuel preserver cartridge. See the information<br />
and instructions packed with the<br />
FRESH START TM cartridge.<br />
1. Snap cartridge into bottom of fuel cap.<br />
NOTE: Do not remove the silver foil seal<br />
on the side of cartridge that snaps into<br />
fuel cap.<br />
2. Grasp the white peel tab and pull to<br />
remove the entire seal.<br />
3. Screw fuel cap onto fuel tank after fi lling<br />
tank with gasoline.<br />
Replace cartridge when empty (about<br />
once a season). Check preserver level<br />
visually.<br />
DANGER: Cartridge fl uid is HARMFUL<br />
OR FATAL IF SWALLOWED. Avoid contact<br />
to eyes, skin, or clothing. Do not take<br />
internally. Do not inhale fl uid vapor. Keep<br />
out of reach of children. If swallowed, call<br />
a physician immediately.<br />
ADD GASOLINE<br />
Fill fuel tank to bottom of tank fi ller neck.<br />
Do not overfi ll. Use fresh, clean, regular<br />
unleaded gasoline with a minimum of<br />
87 octane. Do not mix oil with gasoline.<br />
Purchase fuel in quan ti ties that can be<br />
used within 30 days to assure fuel freshness.<br />
9<br />
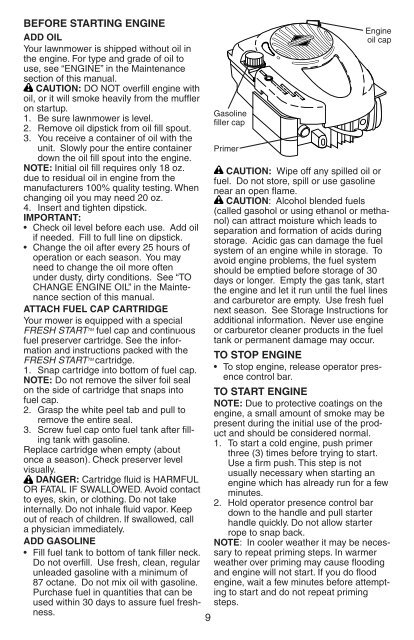
Gasoline<br />
fi ller cap<br />
Primer<br />
Engine<br />
oil cap<br />
CAUTION: Wipe off any spilled oil or<br />
fuel. Do not store, spill or use gasoline<br />
near an open fl ame.<br />
CAUTION: Alcohol blended fuels<br />
(called gasohol or using ethanol or methanol)<br />
can attract moisture which leads to<br />
separation and for ma tion of acids during<br />
storage. Acidic gas can damage the fuel<br />
system of an engine while in storage. To<br />
avoid engine problems, the fuel system<br />
should be emptied before stor age of 30<br />
days or longer. Empty the gas tank, start<br />
the engine and let it run until the fuel lines<br />
and carburetor are empty. Use fresh fuel<br />
next season. See Storage In struc tions for<br />
additional information. Never use engine<br />
or carburetor cleaner products in the fuel<br />
tank or permanent damage may occur.<br />
TO STOP ENGINE<br />
To stop engine, release operator presence<br />
con trol bar.<br />
TO START ENGINE<br />
NOTE: Due to protective coatings on the<br />
engine, a small amount of smoke may be<br />
present during the initial use of the product<br />
and should be considered normal.<br />
1. To start a cold engine, push primer<br />
three (3) times before trying to start.<br />
Use a fi rm push. This step is not<br />
usually necessary when starting an<br />
engine which has already run for a few<br />
minutes.<br />
2. Hold operator presence control bar<br />
down to the han dle and pull starter<br />
handle quickly. Do not allow starter<br />
rope to snap back.<br />
NOTE: In cooler weather it may be necessary<br />
to repeat priming steps. In warmer<br />
weather over priming may cause fl ooding<br />
and engine will not start. If you do fl ood<br />
engine, wait a few minutes before attempting<br />
to start and do not repeat priming<br />
steps.


