Create successful ePaper yourself
Turn your PDF publications into a flip-book with our unique Google optimized e-Paper software.
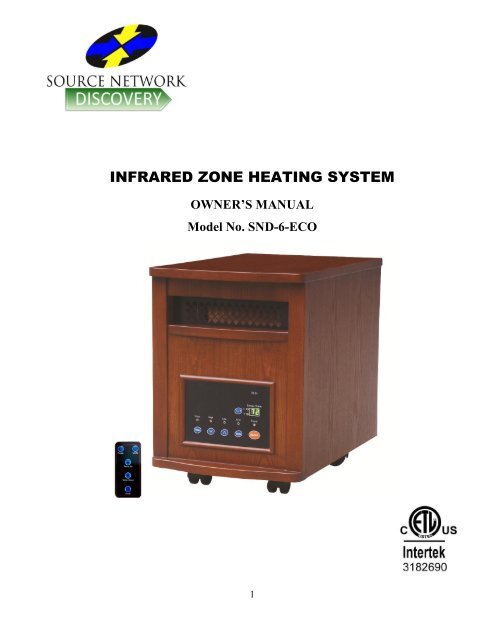
<strong>INFRARED</strong> <strong>ZONE</strong> <strong>HEATING</strong> <strong>SYSTEM</strong><br />
OWNER’S MANUAL<br />
Model No. SND-6-ECO<br />
1
WARNING: READ THIS ENTIRE OWNER’S MANUAL CAREFULLY BEFORE USE.<br />
Thank you for choosing an SND Infrared Zone Heating System. This owner’s manual will<br />
provide you with valuable information necessary for the proper care and maintenance of your<br />
new product. Please take a few moments to thoroughly read the instructions and familiarize<br />
yourself with all the operational aspects of your new heater.<br />
PLEASE SAVE THESE INSTRUCTIONS<br />
2
IMPORTANT SAFETY INSTRUCTIONS<br />
READ AND UNDERSTAND ALL INSTRUCTIONS, SAFETY WARNINGS,<br />
AND FAQ’s BEFORE USING THE HEATER<br />
WARNING!<br />
! POTENTIAL FOR ELECTRICAL HAZARD IF NOT ADHERED TO!<br />
When using electrical appliances, basic precautions should always be followed to reduce<br />
the risk of fire, electric shock, and injury to persons, including the following:<br />
1. This heater must be plugged into a 120V, 15 amp (or more) circuit of its own. Nothing<br />
else can be plugged into the same circuit. If unsure if your home meets this<br />
specification, consult a certified electrician prior to use. Risk of fire, overheat,<br />
malfunction, property damage, injury, or even death may result if not adhered<br />
to!<br />
2. Connect to a properly grounded, 3-prong outlet only. Do not connect the heater to<br />
extension cords, surge protectors, timers, direct breakers, or an outlet with other<br />
appliances connected to the same outlet. Risk of fire, overheat, malfunction,<br />
property damage, injury, or even death may result if not adhered to!<br />
3. This heater is hot when in use. To avoid burns, do not let bare skin touch hot<br />
surfaces. Use handles (certain models) or wheels to move this heater.<br />
4. Keep combustible materials, such as furniture, pillows, bedding, papers, clothes, and<br />
curtains at least 3 feet (0.9m) from the front of the heater and keep them away from<br />
the sides and rear of the heater.<br />
5. Extreme caution is necessary when any heater is used by or near children, invalids,<br />
pets, or when the heater is left operating unattended.<br />
6. Always unplug the heater when not in use.<br />
7. Do not operate any heater with a damaged cord or plug or after the heater<br />
malfunctions, has been dropped, or damaged in any manner. Contact the<br />
manufacturer for resolution options.<br />
8. Do not use outdoors. Exposure to outdoor elements such as rain, snow, sun, wind or<br />
extreme temperatures may cause the heater to become a safety hazard.<br />
3
9. This heater is not intended for use in bathrooms, laundry areas and similar indoor<br />
locations, nor any locations that use GFCI outlets.<br />
10. Never place heater where it may fall into a bathtub or other water receptacles.<br />
11. Do not run cord under carpet. Do not cover cord with throw rugs, runners, or similar<br />
coverings. Arrange cord away from traffic area and where it will not be tripped over.<br />
12. The heater must be plugged into a wall outlet that is a DEDICATED CIRCUIT, with a<br />
minimum 15 amp rating on that individual circuit.<br />
13. To disconnect the heater: FIRST, turn the power button to the “off” position, then<br />
remove plug from the wall outlet.<br />
14. Do not allow foreign objects to enter or block any ventilation or exhaust opening as<br />
this may cause an electric shock or fire, or damage the heater.<br />
15. Allow at least 3 feet of unobstructed space to the front and rear of the heater to allow<br />
for maximum heat, air, and ventilation flow.<br />
16. A heater has hot and arcing or sparking parts inside. Do not use it in areas where<br />
gasoline, paint, or flammable liquids are used or stored, nor use flammable solvents<br />
to clean the heater. Also, make sure to keep heater dry at all times.<br />
17. Use this heater only as described in this manual. Any other use not recommended by<br />
the manufacturer may cause fire, electric shock, or injury to persons.<br />
18. Do not use abrasive solvents to clean the heater as it may cause damage to the finish<br />
or casing.<br />
PLEASE REVIEW FREQUENTLY ASKED QUESTIONS ON THE NEXT<br />
FEW PAGES PRIOR TO USING YOUR HEATER.<br />
4
FREQUENTLY ASKED QUESTIONS (FAQ’S)<br />
My heater emits a “strange” odor when I first open the box/when I turn the heater on for the first time.<br />
Why?<br />
These are both normal. This heater is treated with a special heat safe/resistant coating. This<br />
odor will sometimes be present when the box is opened, and may be compared to a heaters<br />
version of “new car smell.” Also, similar to all hearth appliances (woodstoves, etc.), the coating,<br />
exposed to heat, will produce this particular odor during the first few hours of operation. This will<br />
dissipate after the break-in period. If you are sensitive to odors, you may want to pre-burn the<br />
unit in a garage with the door open until the initial odor dissipates.<br />
If my heater runs on approximately 1500 watts, how many BTU’s is that? Is that a lot of heat?<br />
At 1500 Watts, your heater will use approximately 5100 BTUs. 5100 BTUs, compared to your<br />
home furnace, is a very small amount of heat. It may take several minutes, to several hours to heat<br />
your area, depending on various factors (see Heater Placement).<br />
Can my heater really operate on less money per day? What are my operating costs?<br />
Most Definitely. If the heater is used as it is intended (as supplement/assist heat), it should cycle<br />
on and off, allowing for it to heat a total of approximately 8 out of the 24 hours of the day. Using the<br />
national average of approximately 10¢ per kWh (look at your bill for exact cost per kWh--will vary<br />
per state), your average heating cost (add a few cents just for having it plugged in) should be less<br />
per day compared to your main furnace. The costs will increase if it is used as the single source of<br />
heat, or if heat somehow escapes the room being heated, since the “on” cycle will run longer.<br />
The Formula: To determine the cost of this or ANY 1500 watt appliance, multiply 1.5 X your cost<br />
per Kilowatt Hour. You can find the cost per KWH for your state at:<br />
http://www.eia.doe.gov/fuelelectric.html<br />
What is the life expectancy for the Heating Elements? Can the heating elements be replaced?<br />
The life expectancy of the heating elements is typically 25,000 hours. Heating elements may be<br />
replaced by obtaining parts from SND Products, although it is not recommended (unless you are a<br />
certified heater technician or authorized directly by SND). All parts may be purchased through SND<br />
PRODUCTS if your product is out of warranty. Note: If you feel that the elements are definitely<br />
faulty right out of the box, contact SND Products Tech Support first (for troubleshooting). Contact<br />
your place of purchase second.<br />
Once I plug the unit in and turn it on, how long will it take to heat my room?<br />
Typically it takes about ½ hour to feel a temperature change. Please remember that with any type<br />
of heating process, there are many variables: Location (in the home), floor plan and size of the<br />
room, how well the room is insulated, how many doors/windows, how much bare concrete (acts as<br />
a heat sink with any type of heating), the opening and closing of an exterior door, long hallways,<br />
high ceilings, etc. Customers with smaller rooms experience quick heat changes. Others with<br />
larger and open floor plans can expect up to 24 hours to heat up.<br />
I don’t have a grounded outlet; can I use adapters, a 2-prong power strip, or remove the ground<br />
prong from the cord?<br />
Definitely NOT! If you don’t have a grounded outlet, contact a certified electrician for advice.<br />
Removing or altering any part of the heater’s original design or intent (including the power cord) will<br />
not only void the warranty, but will make you liable for any unexpected or hazardous results.<br />
5
Why doesn’t the temperature on my heater match the temperature display on my wall, or external<br />
thermostat?<br />
This is completely normal. The temperature display on your heater may vary from the<br />
temperature display on another thermostat (like the one mounted to your wall or a purchased<br />
external thermostat). The temperature sensor on your heater reads the temperature in, and<br />
around, the heater. The unit is near the cold floor (and heat rises), which in turn, will display a<br />
cooler temperature than elevated or external thermostats. The best way to operate your heater is<br />
just to set the unit on “High” and dial up to a temperature that feels comfortable to you. Then, leave<br />
it at that temperature, regardless of the mismatch. The heater will cycle off when the set<br />
temperature is met or exceeded slightly.<br />
My home is not insulated very well, will this heater help me? Can I use the heater if I have vaulted or<br />
cathedral ceilings? I live in a structure that is less than 1500 square feet. Will this heater help me? Can I<br />
use the heater to heat multiple rooms at the same time? Will I be able to use the heater in a basement or<br />
garage?<br />
The answer to these is the same. Yes. You will be able to use it, but keep in mind that<br />
rooms/structures with open floor plans, minimal insulation, adjacent rooms, or high ceilings will not<br />
retain the heat as efficiently, and may not feel pronounced heat changes. Also, the heater will stay<br />
on longer (delays the “off” cycle), and may increase your electric costs. Note that if you do use it in<br />
a garage or basement, the moisture levels must be very low and they must have dedicated circuits<br />
(15 amps minimum) with no GFCI outlets. If unsure what a GFCI outlet is, contact a certified<br />
electrician.<br />
Can I use more than one heater at a time? Can I use the heater and another appliance at the same time?<br />
Yes. But make sure they are not plugged into the same circuit. Each heater (heaters are<br />
considered appliances) requires its own minimum15 amp circuit (with no other items plugged<br />
into that circuit). If unsure your circuit meets these requirements, verify with a certified electrician.<br />
Risk of fire, damage to property, or injury may result if requirements are not met.<br />
Why does my heater’s fan continue to run even after the set temperature is reached or the power is turned<br />
off?<br />
This is normal. The heater’s fan will continue to run, even after the heater automatically cycles<br />
down. The fan continues to run so that every last bit of heat is blown out of the heat chamber, while<br />
allowing the unit to continue filtering your air. Once the internal box/components cool completely,<br />
the fan should then shut off on its own. In this case, allow up to ½ hour after the heat cycles off<br />
(with power on). The fan will shut off faster when the power is turned off.<br />
My fan seems to run at all times, even when the heat has cycled off. Why?<br />
This is normal. Although the heat cycles off, the fan stays on until the chamber is cool. If the<br />
temperature falls below the desired set temperature during the time the fan is cooling, the heating<br />
elements will cycle back on. This will not allow for the fan to completely cool off the chamber, and<br />
shut down. The fan seems to run continuously. It is a safety mechanism to prevent overheating. If<br />
you run into this issue, the solution is to simply increase the set temperature at least 5 degrees<br />
higher that the ambient temperature to make sure the temperature holds during the cool off period.<br />
6
Why doesn’t the fan speed increase when I change the setting from LO to HI?<br />
This is normal. The heater’s fan’s speed is not affected by the HI/LO settings. The fan is designed<br />
to vent the heat at one soft, comfortable, and energy efficient speed. What is affected by the HI<br />
setting is the heat output. In essence, in the HI mode, the heater produces “more” heat, rather than<br />
“faster” heat.<br />
I want to make sure my warranty is registered. What do I send to make sure it is registered?<br />
Where do I send it?<br />
The heater comes with an automatic 1 year limited manufacturer’s warranty at the time of<br />
purchase. Your receipt is considered your proof of purchase and registration. Keep it in a safe<br />
place. As long as it is legible, a copy may be used for any future warranty claims (if requested). If<br />
you have access to e-mail, and would like peace of mind, e-mail us to:<br />
Warranty @sourcenetworksam.com. In the body of the e-mail, include your full name, address,<br />
phone number, model, serial number, and scanned copy of your legible receipt.<br />
My heater does not perform as well as another brand heater that I purchased. Why Not?<br />
There are many brands of heaters on the market. Each brand is designed with different heat<br />
specifications, fan speeds, colors, material types, displays, and electrical components. They are<br />
manufactured this way for you, as the consumer to have choices, selection, and preferences. As<br />
long as the unit functions as specifications indicate, comparison to other brands will ultimately<br />
depend on individual consumer perception.<br />
I purchased my heater so that it could cut my heating costs, but my electric bill has gone up. Why?<br />
The compact SND heater can definitely save you on heating costs, when compared to the existing<br />
central heating system in place in your home, and when used as directed. Your heater is designed<br />
to give your main heat source a supplement “boost,” or allow for you to have extra heat (in the form<br />
of soft infrared waves) in locations where you would otherwise be short. It is meant to cycle on and<br />
off, and not specifically designed to be used as a single heat source, especially in larger homes. If<br />
you intend on using it as a single heat source (which you may), expect the heater to 1) take as<br />
much as 24 hours to heat the area, 2) stay on for longer periods of time (without cycling off) due to<br />
heat loss, and 3) increased use time, and electric costs.<br />
My heater’s display shows my ambient temperature to be in the 20’s, when I know it is warmer than that.<br />
Why?<br />
The heater’s display is defaulted to read the temperature as Fahrenheit. If your heater is definitely<br />
heating, but shows it is in the 20’s, you probably have the setting to read your temperature in<br />
Celsius, rather than Fahrenheit. See Users Guide to change.<br />
I don’t see my heater’s bulbs/elements light up when the heat is on. Why is that?<br />
If you feel heat coming from the heater, the elements are lit up. The reason you can not see<br />
them, is because they not only have a protective shield around each one of them (for safety<br />
reasons), they are also strategically placed within the heat chamber in the middle of the heater<br />
(also for safety reasons). They are not visible when looking at/through the grill.<br />
7
SPECIFICATIONS<br />
Voltage Rating 120 V (60Hz)<br />
Power Consumption 1000W/1500W<br />
Unit Size 12 4/5 in. (W) x 20 in. (D) x 17 4/5 in. (H)<br />
Unit Weight 38.8 lbs<br />
SAFETY FEATURES<br />
Tip-Over Safety Feature<br />
This heater is equipped with a tip-over safety feature. Once the heater is tipped over, an internal switch<br />
will automatically shut the heater off. Once the heater is restored to the upright position, the heater will<br />
reset. To continue operation, turn on the heater using the supplied remote control or the control panel<br />
on the heater.<br />
Overheat Safety Feature<br />
This heater is equipped with a overheat safety feature. When the heaters internal components reach a<br />
certain temperature that could cause overheat and possible fire, the heater will automatically shut off.<br />
WARNING: It is normal for the power cord to feel warm to the touch; however, a loose fit between the<br />
outlet and the plug may cause overheating of the plug. If this occurs, try inserting the plug into a different<br />
outlet. Contact a qualified electrician to inspect the original outlet for damage.<br />
8
IN THE BOX<br />
<strong>INFRARED</strong> <strong>ZONE</strong> <strong>HEATING</strong> <strong>SYSTEM</strong><br />
INSTRUCTION BOOKLET<br />
REMOTE CONTROL<br />
Wooden Cabinet<br />
Power<br />
Power<br />
Temp. Up<br />
Temp. Down<br />
Timer<br />
Temp. Up<br />
Temp. Down<br />
Timer<br />
Mode<br />
Mode<br />
Air Outlet<br />
PRODUCT DIAGRAM<br />
Control Panel<br />
Wheel<br />
Remote Control<br />
9<br />
REMOTE CONTROL BATTERY<br />
INSTRUCTION BOOKLET<br />
Control Panel (Ref Fig. 1 next page)<br />
1. Remote control signal sensor<br />
2. Digital display: Indicates set desired room temperature<br />
3. Power Indicator Light: Indicates that the heater is receiving power from outlet.<br />
4. ON/OFF button: Powers the display on and off<br />
5. Energy-saving mode indicator: Will be lit when energy-saving mode is engaged<br />
6. Mode button: To select between High, Low, and Eco modes<br />
7. Low Mode indicator light: Will be lit when Low Heat mode is engaged<br />
8. Temp up button: To increase desired temperature<br />
9. High Mode indicator light: Will be lit when High Heat mode is engaged<br />
10. Temp down button: To decrease desired temperature<br />
11. Timer indicator light: Will be lit when the Timer mode is engaged<br />
12. Timer button: Used to engage timer mode and to set hour value for the timer<br />
13. Fahrenheit indicator light: Will be lit when temperature displayed is in Fahrenheit<br />
14. ℃/℉ Button: Alternates between Fahrenheit and Celsius<br />
15. Celsius indicator light: Will be lit when temperature displayed is in Celsius<br />
Cord Clamp<br />
Air Intake
15<br />
14<br />
13<br />
12 11<br />
10 9<br />
8 7<br />
Fig. 1<br />
10<br />
6<br />
Remote Control<br />
Mode button: Used for mode selection<br />
ON/OFF button: Powers the display on and off<br />
Temp up button: To increase desired temperature<br />
Temp down button: To decrease desired temperature<br />
5<br />
Timer button: Used to engage timer mode and to set hour value for the timer<br />
1<br />
2<br />
3<br />
4
PREPARATION<br />
Place the heater on a firm, level surface and plug into a grounded 120V (15 amp minimum dedicated<br />
circuit) 60Hz power outlet. Only operate heater in upright position with caster wheels attached.<br />
When using remote control, please pull out the insulating film as the following steps.<br />
Remote control Insulating film Battery cover<br />
PULL<br />
11
OPERATING INSTRUCTIONS<br />
1. Power the Display On/Off and Select Desired Mode<br />
Or<br />
Or<br />
2. Setting Desired Temperature<br />
Or Or<br />
Or<br />
Or<br />
Turn the heater on by pressing the ON/OFF button on the<br />
control panel or by pressing the Power button on the<br />
supplied remote control.<br />
Turn the heater off by pressing the ON/OFF button on the<br />
control panel or by pressing the Power button on the<br />
supplied remote control.<br />
Note: Powering off the heater will stop the heating process<br />
only. The fan will continue to blow for approximately 3<br />
more minutes to allow for the interior components to cool.<br />
The fan will then turn off automatically.<br />
Select a heat Mode.<br />
Press the MODE button to toggle between the three heat<br />
settings.<br />
High Mode uses 1500W; Low Mode uses 1000W. ECO<br />
mode is an Economic Energy Saving Function. When ECO<br />
mode is chosen, the heater will set the temperature<br />
automatically to 68°F (20℃)under this mode<br />
Adjust the desired temperature by pressing the Up/Down<br />
arrows on the control panel or remote control.<br />
Desired temperature options vary from 59℉ to 86℉, or<br />
from 15℃ to 30℃. Once you have chosen the desired<br />
temperature, the heater will remain on until the room<br />
temperature increases to that temperature on the digital<br />
display. The heater will cycle on and off to maintain that<br />
desired room temperature.<br />
Press ℃/℉ button to change the display temperature<br />
between Fahrenheit and Celsius.<br />
The Fahrenheit indicator LED will light, when the<br />
temperature is displayed in Fahrenheit.<br />
The Celsius LED will light, when the temperature is<br />
displayed in Celsius.<br />
12
3. Setting the POWER-OFF TIMER Function<br />
Note: The Power-Off-Timer Function will allow for the heater to power OFF after a certain set time, and can<br />
only be set while the heater’s display is in the “On” position.<br />
Or<br />
4. Setting the POWER-ON TIMER Function<br />
Turn the heater to the “On” position. Press the Timer<br />
button on the heater’s control panel or the remote.<br />
The digital display changes from the “temperature” to the<br />
“hours” option for the timer. Continue to press the timer<br />
button to change the number of hours you would like the<br />
heater to run before powering itself off. The hour options<br />
for the timer are from 0 to 12 hrs. (in 1 hr increments).<br />
The selected hour increments will flash for a few seconds,<br />
then revert back to the set desired temperature. The Timer<br />
indicator light will remain lit as long as the Timer is set.<br />
The heater will power OFF when the internal heater clock<br />
counts down the hour increments you set.<br />
Note: The Power-ON-Timer Function will allow for the heater to power ON after a certain set time, and<br />
can only be set while the heater’s display is in the “Off” position.<br />
Or<br />
Turn the heater to the “OFF” position. Press the Timer<br />
button on the heater’s control panel or the remote.<br />
The digital display shows the “hours” option for the timer.<br />
Continue to press the timer button to change the number of<br />
hours you would like the heater’s internal clock to count<br />
down before powering itself on. The hour options for the<br />
timer are from 0 to 12 hrs. (in 1 hr increments).<br />
The Timer indicator light will remain lit as long as the<br />
Timer is set. The heater will power itself ON when the<br />
internal heater clock counts down the hour increments you<br />
set.<br />
13
5. Setting Electro Lock<br />
The Electro Lock can help avoid the heater from being accidentally engaged by children. The locking<br />
mechanism can be set in both the ON and OFF modes.<br />
And<br />
And<br />
Press Temp Up and Temp Down buttons at the same time<br />
for 3 seconds. Locking is complete when you hear a beep.<br />
When locked, the functions of the control panel and remote<br />
will be locked for use.<br />
When you need to unlock it, press Temp Up and Temp<br />
Down buttons at the same time for 3 seconds. You will hear<br />
a beep. The control panel and remote control will become<br />
functional again.<br />
14
MAINTENANCE<br />
1. Unplug the unit and let it cool completely.<br />
2. To keep the heater clean, the outer shell may be cleaned with a soft, damp cloth. You may use a<br />
mild detergent if necessary. After cleaning, dry the unit with a soft cloth. CAUTION: DO NOT<br />
let liquid enter the heater.<br />
3. DO NOT use alcohol, gasoline, abrasive powders, furniture polish, or rough brushes to clean the<br />
heater. This may cause damage or deterioration to the surface of the heater.<br />
4. DO NOT immerse the heater in water.<br />
5. Wait until the unit is completely dry before use.<br />
6. Air filter needs cleaning after used 3 months. Please take down the filter as following steps. Flush<br />
and clean the taken –down filter with water then dry it out and re-assemble.<br />
The unit<br />
PUSH<br />
Air intake grille<br />
PULL<br />
7. If you don’t use the heater for a long time, please take out the remote battery (to prevent<br />
corrosion) as shown below. Store remote in a safe place.<br />
PUSH<br />
Battery cover Battery<br />
PULL<br />
15<br />
Air filter
STORAGE<br />
Store the heater in a cool, dry location when not in use. To prevent dust and dirt build-up, use the original<br />
packaging to repack the unit.<br />
BASIC TROUBLESHOOTING<br />
If the heater will not operate, please check the following before seeking repair advice:<br />
1. Check if the power cord is plugged into an electrical outlet, if not, plug in.<br />
2. Check if power to the main power switch (in the back) is working.<br />
3. Check to see if the battery on the remote is placed correctly, undamaged, and if the insulating film<br />
is pulled out.<br />
NOTE: For the heater to function properly, the desired temperature on the heater must be set a few<br />
degrees higher than the temperature in the room. If it seems to not be heating, increase the desired<br />
temperature on the heater to engage the heat elements.<br />
16
Limited Manufacturer Warranty<br />
1 Year Limited Warranty: SND warrants this heater against defects in materials and workmanship on<br />
functional parts, for a period of 1 year from the original date of purchase. Your sales receipt showing the<br />
date of purchase of the product is your proof of purchase. Keep it in a safe place for future reference.<br />
Manufacturer Warranty<br />
All SND products are manufactured with the highest quality materials and are warranted to be free from<br />
defects in material and workmanship at the time of purchase. This limited warranty applies to products<br />
manufactured or distributed by the SND brand name, are delivered in the continental United States, and<br />
extends to the original purchaser, or gift recipient. This warranty becomes valid at the time of purchase and<br />
terminates either by the specified time frame listed above and/or owner transfer (unless otherwise<br />
authorized by SND, as the manufacturer). Any extended warranties (warranties that cover above and beyond<br />
this manufacturer warranty) that are sold through a retailer or third party, are not directly correlated with<br />
this SND limited warranty, and may be redirected to said retailer or third party for coverage.<br />
Extent of Warranty<br />
This warranty extends through the manufacturer of the product, and covers functional parts only.<br />
Cosmetics are not covered, unless unequivocally determined it is a manufacturer/workmanship defect. Note<br />
that surface cracks are not considered defects in material or workmanship, as they are normal characteristics<br />
of all wood. Unless SND was the direct shipper, shipping damage should be addressed with the shipping<br />
company, retailer, or place of purchase, prior to making a claim to SND, as the manufacturer.<br />
The manufacturer's sole obligation under this warranty shall be limited to furnishing the original purchaser<br />
replacement parts for units deemed repairable by the SND warranty department. The purchaser may also<br />
opt to ship the product to SND to have it repaired. The purchaser will be responsible to prepay any shipping<br />
charges (both ways), export taxes, custom duties and taxes, or any other charges associated with the<br />
transportation of the unit. In addition, the purchaser is responsible for insuring any parts shipped or returned,<br />
if desired. For products the warranty department deems un-repairable, or discontinued, SND reserves the<br />
right to issue a refurbished product, or product similar in size and functionality as a replacement for the<br />
defective unit, if available. All exchanged parts and products replaced under this warranty will become the<br />
property of SND. SND reserves the right to change manufacturers of replacement parts or products for use,<br />
in order to cover any existing warranty. Any parts determined defective may asked to be returned to SND or<br />
its representatives to validate a claim. Non-Warranty replacement parts will be warranted 30 days from the<br />
time the purchaser receives them.<br />
The purchaser must present SND with proof of purchase documents (including the date of purchase) if<br />
requested. Any evidence of alteration, erasing, or forgery of proof of purchase documents will be just cause<br />
to VOID this limited warranty. Products, in which the serial number has been defaced or removed, are not<br />
eligible for warranty coverage. Continued…<br />
17
Warranty Limitations<br />
This warranty does not apply if the unit has been subject to negligence, fabrication, misuse, abuse, or repairs<br />
(unless authorized verbally, or in writing, by an Authorized SND Representative) alteration by non SND<br />
authorized personnel, inappropriate installations, or any case beyond the control of SND. Examples of<br />
warranty invalidation may also include, but are not limited to:<br />
Use of lacquer or paints in (and around) the<br />
heaters<br />
Heater placed on non-approved surfaces<br />
Electrical requirement deficiencies (15-20<br />
amp dedicated outlet)<br />
Use on Extension Cords/Timers/Surge<br />
Protectors/GFCI<br />
Disclaimers<br />
18<br />
Outdoor applications<br />
Normal wear/tear/weathering<br />
Pet/Consumer accidents<br />
Purchases from dealers unauthorized by<br />
SND (Authorization in writing)<br />
SND shall not be liable for any loss due to use (or misuse) of the heater or other SND products or other<br />
incidental or consequential costs, expense or damages without irrefutable foundations. Under no<br />
circumstances shall SND or any of its representatives be held liable for injury to any person or damage to<br />
any property, however arising. Any implied warranty shall have duration equal of the applicable warranty<br />
stated above. Specifications are subject to change without notice or obligation.<br />
Legal Remedies<br />
This limited warranty gives the original purchaser specific legal rights. Other rights may vary from<br />
state to state.
Customer Service and Support<br />
To Obtain Warranty Support or Advice, Please Complete These Two Easy Steps:<br />
Contact SND PRODUCTS Technical Support<br />
E-mail: Warranty@sourcenetworksam.com<br />
Phone: 1-866-484-2066<br />
You will need to provide the unit's model number, serial number (located on the<br />
heater’s front panel, rear panel, or on the box), date of purchase, retailer of<br />
purchase, a daytime phone number, and possibly a copy of your receipt.<br />
Be Patient, Clear, and Concise.<br />
Describe the issue and symptoms you have for, and about the product. A certified<br />
SND Technical Support agent will give you an evaluation of your issue and your<br />
resolution options. If the answer is not available at that time, you will be referred to<br />
the appropriate channels, or given a call/e-mail back within 72 hours with an<br />
answer or resolution.<br />
*E-Mail is the Preferred Method of Communication<br />
19 SND-6-ECO Rev 1 Printed In China


