GPS Logger
GPS Logger
GPS Logger

You also want an ePaper? Increase the reach of your titles
YUMPU automatically turns print PDFs into web optimized ePapers that Google loves.
<strong>GPS</strong> <strong>Logger</strong><br />
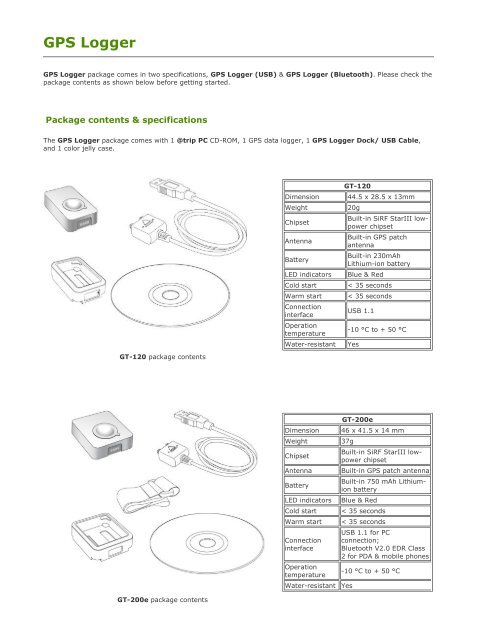
<strong>GPS</strong> <strong>Logger</strong> package comes in two specifications, <strong>GPS</strong> <strong>Logger</strong> (USB) & <strong>GPS</strong> <strong>Logger</strong> (Bluetooth). Please check the<br />
package contents as shown below before getting started.<br />
Package contents & specifications<br />
The <strong>GPS</strong> <strong>Logger</strong> package comes with 1 @trip PC CD-ROM, 1 <strong>GPS</strong> data logger, 1 <strong>GPS</strong> <strong>Logger</strong> Dock/ USB Cable,<br />
and 1 color jelly case.<br />
GT-120 package contents<br />
GT-200e package contents<br />
GT-120<br />
Dimension 44.5 x 28.5 x 13mm<br />
Weight 20g<br />
Chipset<br />
Antenna<br />
Battery<br />
Built-in SiRF StarIII lowpower<br />
chipset<br />
Built-in <strong>GPS</strong> patch<br />
antenna<br />
Built-in 230mAh<br />
Lithium-ion battery<br />
LED indicators Blue & Red<br />
Cold start < 35 seconds<br />
Warm start < 35 seconds<br />
Connection<br />
interface<br />
Operation<br />
temperature<br />
Water-resistant Yes<br />
USB 1.1<br />
-10 °C to + 50 °C<br />
GT-200e<br />
Dimension 46 x 41.5 x 14 mm<br />
Weight 37g<br />
Chipset<br />
Built-in SiRF StarIII lowpower<br />
chipset<br />
Antenna Built-in <strong>GPS</strong> patch antenna<br />
Battery<br />
LED indicators Blue & Red<br />
Built-in 750 mAh Lithiumion<br />
battery<br />
Cold start < 35 seconds<br />
Warm start < 35 seconds<br />
Connection<br />
interface<br />
Operation<br />
temperature<br />
Water-resistant Yes<br />
USB 1.1 for PC<br />
connection;<br />
Bluetooth V2.0 EDR Class<br />
2 for PDA & mobile phones<br />
-10 °C to + 50 °C
GT-600 package contents<br />
GT-200 package contents<br />
GT-600<br />
Dimension 46 x 41.5 x 14 mm<br />
Weight 37g<br />
Chipset<br />
Built-in SiRF StarIII low-power<br />
chipset<br />
Antenna Built-in <strong>GPS</strong> patch antenna<br />
Battery<br />
LED<br />
indicators<br />
Built-in 750 mAh Lithium-ion<br />
battery<br />
Blue & Red<br />
Cold start < 35 seconds<br />
Warm start < 35 seconds<br />
Connection<br />
interface<br />
USB 1.1 for PC connection;<br />
Operation<br />
-10 °C to + 50 °C<br />
temperature<br />
Waterresistant<br />
Motion<br />
detection<br />
Yes<br />
Yes<br />
GT-200<br />
Dimension 46 x 41.5 x 14 mm<br />
Weight 37g<br />
Chipset<br />
Built-in SiRF StarIII lowpower<br />
chipset<br />
Antenna Built-in <strong>GPS</strong> patch antenna<br />
Battery<br />
LED indicators Blue & Red<br />
Built-in 750 mAh Lithiumion<br />
battery<br />
Cold start < 60 seconds<br />
Warm start < 38 seconds<br />
Connection<br />
interface<br />
Operation<br />
temperature<br />
Water-resistant Yes<br />
USB 1.1 for PC<br />
connection;<br />
Bluetooth V2.0 EDR Class<br />
2 for PDA & mobile phones<br />
-10 °C to + 50 °C<br />
GT-100<br />
Dimension 47 x 29 x 12 mm<br />
Weight 21g<br />
Chipset<br />
Antenna<br />
Built-in SiRF StarIII lowpower<br />
chipset<br />
Built-in <strong>GPS</strong> patch
<strong>GPS</strong> <strong>Logger</strong> Dock<br />
<strong>GPS</strong> <strong>Logger</strong> USB Cable<br />
@trip PC CD-ROM<br />
<strong>GPS</strong> <strong>Logger</strong> jelly case<br />
<strong>GPS</strong> <strong>Logger</strong> Fastening Strap<br />
GT-100 package contents<br />
Battery<br />
antenna<br />
Built-in 230mAh<br />
Lithium-ion battery<br />
LED indicators Blue & Red<br />
Cold start < 60 seconds<br />
Warm start < 38 seconds<br />
Connection<br />
interface<br />
Operation<br />
temperature<br />
Water-resistant Yes<br />
USB 1.1<br />
-10 °C to + 50 °C<br />
<strong>GPS</strong> <strong>Logger</strong> Dock works both as GT-100 built-in battery charger and data<br />
transfer medium for GT-100.<br />
<strong>GPS</strong> <strong>Logger</strong> Cable works both as GT-600 / GT-200 / GT-200e / GT-120<br />
built-in battery charger and data transfer medium for GT-600 / GT-200 / GT-<br />
200e / GT-120.<br />
@trip PC is an easy to use software tool to fast create and personalize the<br />
Travel Blog for your journey. Follow the on-screen instructions to complete the<br />
installation.<br />
Besides especially designed for broader appliances, both <strong>GPS</strong> <strong>Logger</strong> (USB) &<br />
<strong>GPS</strong> <strong>Logger</strong> (Bluetooth) also comes with a jelly case for easier wear or any<br />
other kind of attachment.<br />
<strong>GPS</strong> <strong>Logger</strong> Fastening Strap allows you to tie and fasten the <strong>GPS</strong> <strong>Logger</strong><br />
anywhere for easier travel.<br />
Note: Considering the need for <strong>GPS</strong> <strong>Logger</strong> to be used outdoors, it is designed as a water-resistent device. Just like the watch, it'll still<br />
function normally when it gets splashed by rain or water. Although it is made water-resistent, it should NOT be carried under water for<br />
activities like swimming, diving, and etc. Inappropriate use of <strong>GPS</strong> <strong>Logger</strong> might cause unexpected damages to it.<br />
Outlook of <strong>GPS</strong> <strong>Logger</strong><br />
GT-100 / GT-120 GT-200 / GT-200e / GT-600
Next<br />
Getting Started with <strong>GPS</strong> <strong>Logger</strong><br />
The following demonstrates how to get started with your <strong>GPS</strong> <strong>Logger</strong> and @trip PC:<br />
1. Install @trip PC 2. Charge <strong>GPS</strong> <strong>Logger</strong> 3. Power on<br />
4. Get first <strong>GPS</strong> fix 5. Connect PC to import data<br />
1. Install @trip PC<br />
Insert the CD-ROM to the CD-ROM drive and follow the on-screen instructions to install @trip PC.<br />
Top<br />
2. Charge <strong>GPS</strong> <strong>Logger</strong><br />
<strong>GPS</strong> <strong>Logger</strong> Dock/ USB Cable serves as a charger as well as data transfer medium. Please follow the instructions<br />
shown in the illustrations below to connect your <strong>GPS</strong> <strong>Logger</strong> to PC and have it fully charged.<br />
It takes about 4 hours to fully charge your <strong>GPS</strong> <strong>Logger</strong> for the first time. 2-hour charge is enough for later use. The<br />
red LED indicator stays on during charging, and goes off when charging is complete. Remove your <strong>GPS</strong> <strong>Logger</strong> when<br />
charging is complete.<br />
Tip: You can also use any market available standard USB car charger or USB travel charger to charge up the battery power for your <strong>GPS</strong><br />
<strong>Logger</strong>.<br />
Note: One side of the USB connector marked with an arrow should face up when you intend to connect it to<br />
the device, in order to avoid unexpected damage caused by incorrect plugging.
Top<br />
Long press the button to power on/off your <strong>GPS</strong> <strong>Logger</strong>. The blue LED indicator blinks once upon power-on, and the<br />
red LED indicator blinks upon power-off.<br />
Tip: Go to <strong>GPS</strong> <strong>Logger</strong> indicators to familiarize yourself with the LED indicators.<br />
Note: @trip PC automatically adds <strong>GPS</strong> information to the photos taken on your journey with fussy time mapping; therefore, setting up a<br />
correct time for your camera/ camera phone will enhance the mapping procedure.<br />
Top<br />
Connect & Remove <strong>GPS</strong> <strong>Logger</strong> USB Cable<br />
Connect & Remove <strong>GPS</strong> <strong>Logger</strong> USB Cable<br />
Install & Charge <strong>GPS</strong> <strong>Logger</strong><br />
3. Power on/off your <strong>GPS</strong> <strong>Logger</strong><br />
4. Initiate your <strong>GPS</strong> <strong>Logger</strong> for the first <strong>GPS</strong> fix<br />
It requires a clear sky for your <strong>GPS</strong> <strong>Logger</strong> to receive <strong>GPS</strong> signals and acquires a <strong>GPS</strong> fix. Please leave your <strong>GPS</strong><br />
<strong>Logger</strong> on the balcony, the top of your car, or anyplace where there is no obstruction or shading to fasten up the <strong>GPS</strong><br />
fix acquisition for your <strong>GPS</strong> <strong>Logger</strong>.
Once the first <strong>GPS</strong> fix is successfully acquired, both the blue and red LED indicators of <strong>GPS</strong> <strong>Logger</strong> will blink<br />
simultaneously twice, indicating that track logging has begun. <strong>GPS</strong> <strong>Logger</strong> will then start logging based on the<br />
tracking interval configured in hardware settings.<br />
Note:<br />
1. Find the LED indicator demos in <strong>GPS</strong> <strong>Logger</strong> LED indicators.<br />
2. For more detailed information on the <strong>GPS</strong> fix, correct wear and use of your <strong>GPS</strong> <strong>Logger</strong>, please refer to Essentials for Beginners.<br />
Top<br />
5. Data import & @trip PC<br />
Connect your <strong>GPS</strong> <strong>Logger</strong> to your computer, and launch @trip PC to start importing track data logged in your <strong>GPS</strong><br />
device. Click Import <strong>GPS</strong> Track and follow the on-screen instruction to import the track logs saved on <strong>GPS</strong> <strong>Logger</strong><br />
to your computer. Click on the imported track, and you can see it on Google Map in few seconds.<br />
Note:<br />
1. It requires Internet connection to retrieve the map data for the selected track.<br />
2. For correct mapping of track data and photos, please make sure your camera time is adjusted prior to starting a track. If any photo taken<br />
along the track is not correctly located, please Adjust Camera Time with @trip PC, or use Photo Locator for further fixing.<br />
Top<br />
Next<br />
<strong>GPS</strong> <strong>Logger</strong> LED Indicators<br />
The following lists various LED indications of <strong>GPS</strong> <strong>Logger</strong>:<br />
Main indication:<br />
Power On<br />
The blue LED indicator blinks once.<br />
Operation: Long press (1.5 seconds) the button to power on<br />
<strong>GPS</strong> <strong>Logger</strong>.<br />
Note: When the device is powered on and starts tracking, the blue LED indicator blinks<br />
every 4 seconds. For <strong>GPS</strong> <strong>Logger</strong>s with firmware versions older than 3.0, the blue LED<br />
indicator blinks every 16 seconds.<br />
Data Logged<br />
Both the red and blue indicators blink simultaneously twice.<br />
Status: Device is powered on and <strong>GPS</strong> data has been logged<br />
successfully.<br />
Power Off<br />
Long press the button, and the red LED stays red until <strong>GPS</strong><br />
<strong>Logger</strong> is powered off.
Others:<br />
Next<br />
Memory full / Battery low<br />
The red LED blinks: twice / once.<br />
BT Pairing<br />
The blue and red LED indicators blink in turn for 5 minutes during pairing<br />
mode.<br />
Operation: While Bluetooth <strong>GPS</strong> <strong>Logger</strong> is turned off, long<br />
press (5 seconds) to enter pairing mode. (Please refer to the<br />
user manual of your handset or bluetooth device for details<br />
on bluetooth pairing.)<br />
Note:<br />
1. If necessary, enter the passcode " 0000 " to complete pairing.<br />
2. Once Bluetooth <strong>GPS</strong> <strong>Logger</strong> is successfully paired, it will not exit the pairing<br />
mode automatically. It is normal to see both the red and blue LED indicators<br />
flash continuously.<br />
3. Once Bluetooth <strong>GPS</strong> <strong>Logger</strong> is connected via bluetooth, only the blue LED<br />
indicator will flash continuously.<br />
4. Once bluetooth connection is enabled on GT-200e, it will start logging by default.<br />
5. If bluetooth connection fails, GT-200 Bluetooth <strong>GPS</strong> <strong>Logger</strong> will turn off<br />
automatically after 5 minutes.<br />
Charging The red LED indicator stays on during charging and goes off when charging is<br />
complete.<br />
Status: The device is connected to power sources, such as car charger or<br />
computer USB port.<br />
Push-to-log The blue LED indicator blinks once, followed by both indicators blinking<br />
simultaneously twice.<br />
Status: Device is powered on and functions normally.<br />
Operation: Press the button once to log the current <strong>GPS</strong> information.<br />
Data Transfer The red LED indicator stays on, and the blue LED indicator blinks randomly.<br />
Status: The device is connected to PC and transferring data.<br />
<strong>GPS</strong> Receiver The blue LED indicator blinks steadily.<br />
Status: Receiving <strong>GPS</strong> information for the connected navigation device/ software.
Essentials For Beginners<br />
Before hitting on the road with your <strong>GPS</strong> <strong>Logger</strong> , please read the following information thoroughly to ensure the<br />
<strong>GPS</strong> <strong>Logger</strong> to work properly, lest any incorrect operation ruin your precious travel memories.<br />
<strong>GPS</strong> <strong>Logger</strong> wear & attachment<br />
When taking <strong>GPS</strong> <strong>Logger</strong> from indoors to outdoors, it usually takes longer to get a <strong>GPS</strong> fix. Please place your <strong>GPS</strong><br />
<strong>Logger</strong> face-up toward the sky and press the button to acquire a <strong>GPS</strong> fix.<br />
Tip: If <strong>GPS</strong> <strong>Logger</strong> functions normally and gets a <strong>GPS</strong> fix, both the red and blue LED indicators blink simultaneously twice, indicating the<br />
current <strong>GPS</strong> information is logged successfully to the device memory.<br />
Please always place your <strong>GPS</strong> <strong>Logger</strong> exposed to the open sky to ensure the successful <strong>GPS</strong> fix acquisition. Refer to<br />
the illustration below to expose your <strong>GPS</strong> <strong>Logger</strong> as much as possible in the open sky to ensure stable and successful<br />
<strong>GPS</strong> fix acquisition.<br />
face-up exposed to the sky near the car windshield<br />
face-down inside backpack/ bag or pocket on the car backseats<br />
<strong>GPS</strong> <strong>Logger</strong> setup<br />
<strong>GPS</strong> <strong>Logger</strong>: <strong>GPS</strong> <strong>Logger</strong> is water-resistant, designed for a broader use. Multiple tracking modes with different data<br />
logging intervals work for both short & long journey.<br />
Note: Click on the main menu bar of @trip PC to configure your <strong>GPS</strong> <strong>Logger</strong>. For detailed setup information, please refer to Hardware &<br />
Software Settings.<br />
Camera/ Camera phones: @trip PC automatically adds <strong>GPS</strong> information to the photos taken on your journey with<br />
fussy time mapping; therefore, setting up a correct time for your camera/ camera phone will enhance the mapping<br />
procedure.<br />
Note: Besides auto-mapping, you can also manually map the photos to your Trip. For more information, please refer to Compose Trip.<br />
Safety information<br />
Please do not leave your <strong>GPS</strong> <strong>Logger</strong> exposed to high temperature for a long time, such as on the inside of the<br />
windshield of a car at noon in the summer, to avoid the overheat to cause any device malfunction or danger.
Next<br />
<strong>GPS</strong> Classroom<br />
What is <strong>GPS</strong>: Global Position System (<strong>GPS</strong>) is developed and operated by the Department of Defense (DOD) of the<br />
United States, on which the accuracy and maintenance of this system fully depends. Any change made by the<br />
authorities might influence the accuracy and performance of the <strong>GPS</strong> equipments.<br />
How <strong>GPS</strong> works: <strong>GPS</strong> provides satellite signals which are specially coded for the computation in a <strong>GPS</strong> receiver to<br />
produce the position, velocity and time. Usually it requires four <strong>GPS</strong> satellite signals to computer correctly the position<br />
in three dimensions and the offset time of the <strong>GPS</strong> receiver’s clock.<br />
Limitations on <strong>GPS</strong> reception: Initial or any use after a longer interval over four hours takes a few minutes for a<br />
successful location. Any obstruction above or around the receiver, such as high buildings in the neighborhood, or bad<br />
reception location, such as in a tunnel or in the building, will influence the time needed for a successful <strong>GPS</strong> location.<br />
Cold Start: Cold start of the <strong>GPS</strong> device refers to the state of the tracker when time and position are known to within<br />
some limits, the almanac known, and the ephemeris unknown.<br />
Example: If the <strong>GPS</strong> device has been off for a few hours, and the ephemeris data is known for at least three satellites, the start up will be a<br />
warm start and fix the positional in 10 - 20 seconds. Therefore, if ephemeris data for only 2 or less satellites is known it's a cold start and<br />
acquisition will take as much as a few minutes.<br />
Warm Start: Warm start of the <strong>GPS</strong> device refers to the state of the device when time and position are known to<br />
within some limits, the almanac known, and at least 3 satellite ephemeris are known from previous operation.<br />
Example: If the <strong>GPS</strong> device has been off for only a few minutes, the ephemeris data for all the satellites will be known and therefore the <strong>GPS</strong><br />
device will fix the positional in a matter of seconds.<br />
Note: The almanac data is an estimated (computed) data and can be valid for months while the ephemeris is only valid for 3 - 6 hours.<br />
Note: Actual acquisition time depends on the terrain and satellite coverage.<br />
Next<br />
Use <strong>GPS</strong> <strong>Logger</strong> as <strong>GPS</strong> Receiver<br />
A <strong>GPS</strong> <strong>Logger</strong> serves not only as a <strong>GPS</strong> data logger that records all the <strong>GPS</strong> data on your journey but also works as a<br />
<strong>GPS</strong> receiver for many navigation software by third parties. Connect it to any PC installed with navigation software to<br />
work both together as a <strong>GPS</strong> navigation system.<br />
<strong>GPS</strong> <strong>Logger</strong> with PC<br />
1. Slide <strong>GPS</strong> <strong>Logger</strong> onto <strong>GPS</strong> <strong>Logger</strong> Dock/ USB Cable and connect it to your PC USB port.<br />
2. Please go to Start-> Settings -> Control Panel -> System -> Hardware -> Device Manager -> Ports<br />
(COM & LPT), and note down the com port number of "<strong>GPS</strong> <strong>Logger</strong> USB Com Port" device.<br />
3. Please refer to the user manual of your navigation software to set up the transfer port and set the Baud rate<br />
between 9600 and 115200.<br />
4. The blue LED indicator starts to flash when the setup is completed. <strong>GPS</strong> <strong>Logger</strong> now works as <strong>GPS</strong> receiver for<br />
your navigation software.<br />
Note: When you connect <strong>GPS</strong> <strong>Logger</strong> to the PC installed with navigation software, please select the specific COM port that <strong>GPS</strong> <strong>Logger</strong> is<br />
assigned.
Bluetooth <strong>GPS</strong> <strong>Logger</strong><br />
1. During Bluetooth <strong>GPS</strong> <strong>Logger</strong> is turned off, long press (5 seconds) to enter pairing mode. Long press (1.5<br />
seconds) the button to power off Bluetooth <strong>GPS</strong> <strong>Logger</strong>.<br />
2. The blue and red LED indicators blink in turn for 5 minutes during pairing mode.<br />
3. Once Bluetooth <strong>GPS</strong> <strong>Logger</strong> is successfully paired, it will not exit the pairing mode automatically. It is normal to<br />
see both the red and blue LED indicators flash continuously.<br />
*If necessary, enter the passcode "0000" to complete pairing.<br />
4. Please refer to the user manual of your navigation software for the detailed information on using Bluetooth<br />
<strong>GPS</strong> <strong>Logger</strong> as <strong>GPS</strong> receiver for your navigation software.<br />
Next