D55dv-ing 01-16(attualeG1).PMD
D55dv-ing 01-16(attualeG1).PMD
D55dv-ing 01-16(attualeG1).PMD

Create successful ePaper yourself
Turn your PDF publications into a flip-book with our unique Google optimized e-Paper software.
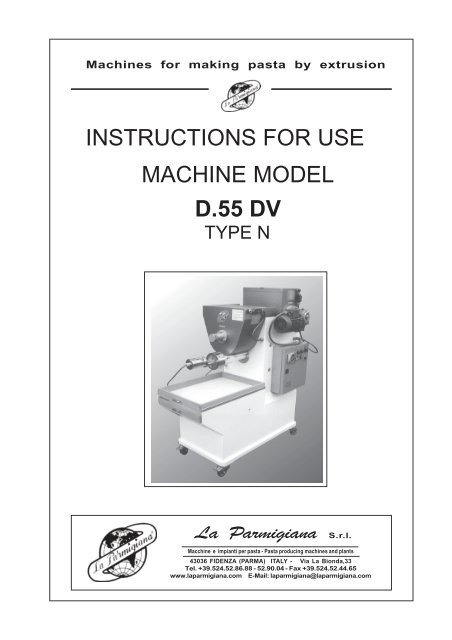
Machines for mak<strong>ing</strong> pasta by extrusion<br />
INSTRUCTIONS FOR USE<br />
MACHINE MODEL<br />
D.55 DV<br />
TYPE N<br />
La Parmigiana S.r.l.<br />
Macchine e impianti per pasta - Pasta produc<strong>ing</strong> machines and plants<br />
43036 FIDENZA (PARMA) ITALY - Via La Bionda,33<br />
Tel. +39.524.52.86.88 - 52.90.04 - Fax +39.524.52.44.65<br />
www.laparmigiana.com E-Mail: laparmigiana@laparmigiana.com
2<br />
INSTRUCTIONS<br />
D.55 DV<br />
Second Edition<br />
November 1997<br />
La Parmigiana S.r.l. Fidenza ITALY<br />
Second edition November 1997<br />
by La Parmigiana S.r.l.<br />
CERTIFICATION<br />
LA PARMIGIANA S.r.l.<br />
Via La Bionda, 33<br />
43036 Fidenza (PR)<br />
as. In person:<br />
Mrs. Dina Giordani<br />
Sole Administrator<br />
DECLARES<br />
under its own responsibility that the machine for the production of alimentary<br />
pasta mod.<br />
........................<br />
Serial no : ________<br />
to which this declaration refers is<br />
in Conformity<br />
with the legislative regulations with the follow<strong>ing</strong> directives:<br />
Machinery directive 89/392 CEE and/or further modifications<br />
Machinery directive 98/37<br />
Electro-magnetic compatibility directive 89/336<br />
Low tension directive73/23<br />
Date: Signature
INSTRUCTIONS<br />
D.55 DV<br />
Second Edition<br />
November 1997<br />
La Parmigiana S.r.l. Fidenza ITALY<br />
The instructions for use are an integral part of the machine which<br />
must accompany it throughout its work<strong>ing</strong> life until it is demolished.<br />
Always refer to the instructions for the carry<strong>ing</strong> out of all operations.<br />
Do not allow the machine to be used by operators who are not familiar<br />
with the contents of the instruction manual.<br />
Keep the instructions in good, legible condition in a place which is<br />
easily accessible to operators.<br />
La Parmigiana S.r.l. does not accept responsibility for malfunctions, breakages, accidents<br />
etc. caused by failure to read or to follow the instructions contained in this<br />
manual. The same applies to modifications, variations and/or installation of accessories<br />
carried out without prior authorization.<br />
All rights reserved. No part of this manual may be reproduced, either partially or totally, without the prior<br />
written consent of “La Parmigiana S.r.l.”.<br />
3
4<br />
INSTRUCTIONS<br />
D.55 DV<br />
Second Edition<br />
November 1997<br />
Contents<br />
La Parmigiana S.r.l. Fidenza ITALY<br />
General Precaution...................................................... 5<br />
Operator Safety........................................................... 7<br />
Mechanical faults......................................................... 7<br />
Hygiene and Clean<strong>ing</strong>.................................................. 8<br />
Technical Characteristics........................................... 9<br />
Machine description..................................................... 10<br />
Manufacturer.............................................................. 11<br />
Pack<strong>ing</strong> and transportation............................................ 11<br />
Use........................................................................... 12<br />
Environmental conditions.............................................. 12<br />
Technical assistance.................................................... 12<br />
Demolition.................................................................. 12<br />
Installation standards................................................ 13<br />
Checks...................................................................... 14<br />
Lift<strong>ing</strong> and transportation.............................................. 14<br />
Precautions................................................................ 14<br />
Preliminary clean<strong>ing</strong>.................................................... 15<br />
Start<strong>ing</strong> up................................................................. 15<br />
Production................................................................ 17<br />
Ingredients................................................................. 18<br />
Recipes..................................................................... 18<br />
Prepar<strong>ing</strong> the pasta dough............................................ 19<br />
Start<strong>ing</strong> production...................................................... 20<br />
Long pasta (Photo V)................................................... 21<br />
Short pasta (Photo T)................................................... 22<br />
Die substitution........................................................... 23<br />
Cool<strong>ing</strong> (see draw<strong>ing</strong>).................................................. 23<br />
Clean<strong>ing</strong> and Maintenance......................................... 25<br />
Clean<strong>ing</strong>.................................................................... 26<br />
Precautions................................................................ 27<br />
Periodical check-ups................................................... 28<br />
Spares...................................................................... 31<br />
Spare parts request form.............................................. 39<br />
Guarantee............................................................... 40
INSTRUCTIONS<br />
D.55 DV<br />
Second Edition<br />
November 1997<br />
General<br />
Precautions<br />
La Parmigiana S.r.l. Fidenza ITALY<br />
Operations which could be potentially dangerous for machine operators are marked<br />
with the symbol shown in the margin.<br />
5
6<br />
INSTRUCTIONS<br />
D.55 DV<br />
Second Edition<br />
November 1997<br />
There are “CAUTION” stickers on the machine.<br />
Look at these carefully before use.<br />
(Their positions are indicated in the draw<strong>ing</strong>).<br />
“CAUTION” stickers<br />
La Parmigiana S.r.l. Fidenza ITALY<br />
Oil Screw Sticker<br />
Oil Screw Sticker<br />
PRIMA DI METTERE IN FUNZIONE LA MACCHINA APRIRE IL<br />
COPERCHIO POSTERIORE E TOGLIERE LA VITE SUL<br />
BOLLINO BIANCO AUTOADESIVO DAL RIDUTTORE PER<br />
RIDURRE LA PRESSIONE<br />
BEFORE OPERATING THE MACHINE, OPEN THE BACK COVER<br />
AND REMOVE THE SCREW IN THE WHITE STICKER TO REDU-<br />
CE THE OIL PRESSURE<br />
First “CAUTION” Sticker<br />
ATTENZIONE<br />
NON INTRODURRE LE MANI NELLA VASCA IMPASTATRICE<br />
STACCARE LA SPINA, PRIMA DI PULIRE LA MACCHINA<br />
CAUTION<br />
DO NOT INTRODUCE YOUR HANDS INTO THE MIXING HOPPER<br />
UNPLUG THE MACHINE BEFORE CLEANING<br />
ATTENTION<br />
NE PAS INTRODUIRE LES MAINS DANS LA VASQUE DE MELANGE<br />
DETACHER LA FICHE AVANT DE NETTOYER LA MACHINE<br />
ACHTUNG<br />
DIE HANDE NICHT IN DIE KNETWANNE GEBEN<br />
BEVOR DER MASCHINENREINIGUNG, DEN STECKER HERAUSNEHMEN<br />
ATENCION<br />
NO INTRODUCIR LAS MANOS EN EL TANQUE MEZCLADOR<br />
DESCONECTAR EL ENCHUFE ANTES DE LIMPIAR LA MAQUINA<br />
Second “CAUTION” Sticker<br />
ATTENZIONE<br />
NON USARE LA MACCHINA SENZA IL COPERCHIO DELLA VASCA IMPASTATRICE<br />
NON MANOMETTERE I DISPOSITIVI DI SICUREZZA<br />
CAUTION<br />
DO NOT USE THE MACHINE WITHOUT THE LID OF THE MIXING HOPPER<br />
DO NOT BYPASS THE SAFETY DEVICES<br />
ATTENTION<br />
NE PAS UTILIZER LA MACHINE SANS LE COUVERCLE DE LA VASQUE DE MELANGE<br />
NE PAS FORCER LES DISPOSITIFS DE SURETE<br />
ACHTUNG<br />
DIE MASCHINE NICHT OHNE KNETWANNENDECKEL BENUTZEN<br />
DIE SCHUTZVORRICHTUNGEN NICHT BERUHREN<br />
ATENCION<br />
NO USAR LA MAQUINA SIN LA TAPA DEL TANIQUE MEZCLADOR<br />
NO DESCONECTAR LOS DISPOSITIVOS DE SEGURIDAD
INSTRUCTIONS<br />
D.55 DV<br />
Second Edition<br />
November 1997<br />
La Parmigiana S.r.l. Fidenza ITALY<br />
Operator Safety<br />
Never tamper with the safety devices<br />
Keep this manual for future reference.<br />
Do not remove or modify the protective devices.<br />
Check that the microswitches (No. 1 photo C) on the basins are always in perfect work<strong>ing</strong><br />
order; on open<strong>ing</strong> a cover, the motor of the basin connected to it must always stop. In<br />
the event of malfunction<strong>ing</strong>, replace the broken components immediately and do not use<br />
the machine until this has been done.<br />
Always unplug the machine before clean<strong>ing</strong> it.<br />
Never use the machine in a potentially explosive environment.<br />
Keep f<strong>ing</strong>ers away from the pasta cutter blades.<br />
The machine must always be used by one<br />
operator only. The operator position is in<br />
front of the electric board.<br />
Always stop the d.c. motor of the pasta<br />
cutter before remov<strong>ing</strong> it from the<br />
metal rods of the die-hold<strong>ing</strong> r<strong>ing</strong> nut.<br />
Look closely at draw<strong>ing</strong> E143 on page 32<br />
which illustrates the safety system of the<br />
basin covers in detail.<br />
While the machine is operat<strong>ing</strong>, the<br />
covers must always be closed.<br />
Do not tamper with the electrical system.<br />
Always lock the wheels before us<strong>ing</strong><br />
the machine.<br />
Remove garments or personal accessories<br />
such as ties and bracelets, and roll<br />
up long sleeves.<br />
Dwg.2<br />
Mechanical faults<br />
Ensure that the voltage of the electrical<br />
sockets corresponds to the voltage required<br />
by the machine. The plate on the<br />
electric board (No.3 Dwg.2) lists information<br />
such as:<br />
Machine model D55DV.<br />
Volts 380.<br />
Hz 50.<br />
Ph (phases) 3.<br />
Motor KW 1.65<br />
No. of motors 2<br />
Photo C<br />
3<br />
7
8<br />
INSTRUCTIONS<br />
D.55 DV<br />
Second Edition<br />
November 1997<br />
La Parmigiana S.r.l. Fidenza ITALY<br />
A heavy blow or vigorous push on the side of the machine could upset it. Always<br />
handle it carefully.<br />
Never leave the die fitted and pasta dough in the mix<strong>ing</strong> basin when the machine is not<br />
be<strong>ing</strong> used. Failure to take this precaution could lead to serious mechanical faults due to<br />
the dry<strong>ing</strong> out of the pasta dough.<br />
Only fit the die when the pasta dough is ready to use.<br />
Any modifications made to the machine must be authorized by the company.<br />
Always switch on the pasta cutter before the press. Never vice versa.<br />
After use, the die and filter must always be soaked in water.<br />
Do not use a jet of water to clean the machine and never immerse the die-hold<strong>ing</strong><br />
nut in water.<br />
Never fit a die or filter which has not been kept in water.<br />
For spare parts, contact “La Parmigiana S.r.l.” only original spares can guarantee<br />
the perfect work<strong>ing</strong> order and safety of the machine.<br />
The machine must only be used as described in this manual. Any other use is considered<br />
as improper.<br />
Hygiene and Clean<strong>ing</strong><br />
Clean the new machine as described on page 15.<br />
Always clean the machine carefully after use.<br />
Put the machine in a place which is suitable for the mak<strong>ing</strong> of pasta.<br />
All the dies must be kept soaked in water.<br />
Change the water twice a day.
INSTRUCTIONS<br />
D.55 DV<br />
Second Edition<br />
November 1997<br />
Technical<br />
La Parmigiana S.r.l. Fidenza ITALY<br />
Characteristics<br />
The machine has been constructed in conformity with the requirements of the<br />
follow<strong>ing</strong> EEC Machine Directives: 89/392 - 91/386 - 93/44.<br />
La Parmigiana guarantees that its machine is in conformity with the above quoted directives<br />
and hereby affixes the mark<strong>ing</strong> “CE” on the machine itself. (see plate below).<br />
9
10<br />
INSTRUCTIONS<br />
D.55 DV<br />
Second Edition<br />
November 1997<br />
La Parmigiana S.r.l. Fidenza ITALY<br />
Machine description<br />
The “La Parmigiana” machine model D.55DV is a machine for mak<strong>ing</strong> fresh pasta by<br />
extrusion.<br />
The D.55DV can make various types of pasta simply by chang<strong>ing</strong> the dies.<br />
The electrical system and the cover of the mix<strong>ing</strong> basin are constructed in conformity<br />
with EEC Directives and IEC safety standards.<br />
The machine is equipped with:<br />
Detachable electric pasta-cutter<br />
3 cutt<strong>ing</strong> knives (1 blade - 2 blades - 4 blades)<br />
2 wooden trays with nett<strong>ing</strong> base<br />
Detachable die-hold<strong>ing</strong> r<strong>ing</strong> nut<br />
Detachable worm screw<br />
Spanners (10/11 - 13/14 - <strong>16</strong>/17)<br />
Brush with plastic bristles for clean<strong>ing</strong> purposes<br />
Lever for unscrew<strong>ing</strong> r<strong>ing</strong> nut<br />
Overall dimensions (in millimetres)<br />
The machine must always work with one operator only, even when it is be<strong>ing</strong> used<br />
in combination with the ravioli maker.<br />
The operator position is in front of the electric board (see draw<strong>ing</strong> above).
INSTRUCTIONS<br />
D.55 DV<br />
Second Edition<br />
November 1997<br />
Manufacturer<br />
La Parmigiana S.r.l. Fidenza ITALY<br />
La Parmigiana S.r.l.<br />
Pasta-mak<strong>ing</strong> Machines and Systems<br />
43036 Fidenza (Parma) ITALY - Via La Bionda,33<br />
Tel. +39 524 52.86.88 - 52.90.04 - Fax + 39 524 52.44.65<br />
Machine model D55 DV Type N<br />
Year of Manufacture 1997<br />
Output per hour 30/35 Kg Upper basin capacity 8kg<br />
Lower basin capacity 6.5 Kg<br />
Dimensions<br />
Width 65 cm Length 115 cm Height 143 cm<br />
Weight 185 Kg<br />
Number of motors 3 (power per motor 380/50/3)<br />
Power of upper motor 0.55 Kw<br />
Power of lower motor 1.1 Kw<br />
Power of pasta cutter motor 0.<strong>01</strong>6 Kw<br />
Noise level 62.7 dB<br />
Voltage...........................Volt/Hertz/Phases<br />
Electrical current.............A<br />
Pack<strong>ing</strong> and transportation<br />
Please circulate these instructions to all personnel involved in the transportation<br />
and installation of the machine.<br />
The D55 DV machine is packed in wooden cases of suitable dimensions for palletiz<strong>ing</strong>.<br />
The case is stable in itself but, for safety reasons, it should be fastened to the flatbed or to<br />
the body sides of the transport vehicle to ensure against toppl<strong>ing</strong>.<br />
A packed machine weighs approx. 200 kg.<br />
Use a forklift truck to handle the machine, tak<strong>ing</strong> care not to accelerate or brake abruptly.<br />
Do not place it on top of other packages but directly on the flatbed of the transport<br />
vehicle, secur<strong>ing</strong> it with belts, or similar, to the body sides.<br />
11
12<br />
INSTRUCTIONS<br />
D.55 DV<br />
Second Edition<br />
November 1997<br />
La Parmigiana S.r.l. Fidenza ITALY<br />
Use<br />
The machine model D55 DV has been designed, built and protected for the mak<strong>ing</strong><br />
of pasta by extrusion obtained from raw materials such as common and durum<br />
wheat flour to which water and/or eggs are added.<br />
Any use other than that described above, is considered as improper use and can damage<br />
the machine and render the guarantee null and void.<br />
Environmental conditions<br />
The machine works correctly in the follow<strong>ing</strong> environmental conditions:<br />
Temperature rang<strong>ing</strong> from +20° to +30°C<br />
Humidity rang<strong>ing</strong> from 40% to 50%<br />
Technical assistance<br />
La Parmigiana S.r.l. places its Fidenza plant technicians at the complete disposal of its<br />
Clientele for the resolv<strong>ing</strong> of any problems which might arise regard<strong>ing</strong> the use and<br />
maintenance of the machine.<br />
For servic<strong>ing</strong>, repairs or technical instructions on premises other than those of La<br />
Parmigiana S.r.l., contact the Technical Department directly.<br />
The Technical Department, which can be reached by telephon<strong>ing</strong> +39.524/528688-529004<br />
dur<strong>ing</strong> office hours 8.30 - 12.00 and 14.00 - 17.30, can also give you the names of the<br />
authorized maintenance technicians in your area so as to ensure quicker service.<br />
Demolition<br />
Dispose of the various materials of which the machine is constructed in suitable dumps.<br />
Do not pollute the environment with the oil contained in the speed reducer.<br />
Keep yourself informed and always observe the laws in force.
INSTRUCTIONS<br />
D.55 DV<br />
Second Edition<br />
November 1997<br />
Installation<br />
standards<br />
La Parmigiana S.r.l. Fidenza ITALY<br />
13
14<br />
INSTRUCTIONS<br />
D.55 DV<br />
Second Edition<br />
November 1997<br />
La Parmigiana S.r.l. Fidenza ITALY<br />
Checks<br />
On receiv<strong>ing</strong> the machine, check that it has not been damaged<br />
dur<strong>ing</strong> transportation. Check that the microswitches on the mix<strong>ing</strong><br />
basins are work<strong>ing</strong> correctly and that the box contain<strong>ing</strong> the<br />
electrical system is undamaged. If the machine has been damaged<br />
dur<strong>ing</strong> transportation, follow the procedure laid down in the<br />
sales agreement for reimbursement. The cost of the repair is<br />
charged to the party which caused the damage. Remove any<br />
objects which have been placed in the mix<strong>ing</strong> basin for pack<strong>ing</strong><br />
purposes.<br />
Lift<strong>ing</strong> and transportation<br />
Use a mechanical lift, plac<strong>ing</strong> the machine on its supports.<br />
A heavy blow or vigorous push on the side of the machine<br />
could upset it. Always handle it carefully.<br />
After putt<strong>ing</strong> the machine in its place, always lock the front<br />
wheels by press<strong>ing</strong> down the lock<strong>ing</strong> pedal. (See Dwg. 3)<br />
The minimum space required for the machine in<br />
production is illustrated in Dwg. 4.<br />
Precautions<br />
Before start<strong>ing</strong> up the machine, check that the<br />
voltage of the electric board corresponds to<br />
that of the mains (No.3 Dwg.2).<br />
Ensure that the machine is stable.<br />
Remove the screw on the reducer inside the<br />
machine. Take off the rear hous<strong>ing</strong> first - this<br />
screw can be easily identified by its white sticker.<br />
(Photo No. 4)<br />
Please remember that the screw on the reducer<br />
prevents oil from spill<strong>ing</strong> out dur<strong>ing</strong> transportation<br />
and must be removed to stop pressure from<br />
build<strong>ing</strong> up inside the reducer while the machine<br />
is operat<strong>ing</strong>.<br />
Failure to remove this screw will cause oil to<br />
leak through the O r<strong>ing</strong>s.<br />
The screw must always be replaced when the<br />
machine is tilted or transported.<br />
Photo B<br />
Dwg.4<br />
Dwg.2<br />
3<br />
Dwg.3<br />
press
INSTRUCTIONS<br />
D.55 DV<br />
Second Edition<br />
November 1997<br />
La Parmigiana S.r.l. Fidenza ITALY<br />
Preliminary clean<strong>ing</strong><br />
The machine and, in particular, the mix<strong>ing</strong> basins and extrusion channel are dusty and<br />
dirty with various substances. La Parmigiana cleans the components which come into<br />
contact with the pasta in a preliminary manner by mak<strong>ing</strong> a test pasta dough. The worm<br />
screw and extrusion channel are then greased with protective oil.<br />
When the machine is new, the mix<strong>ing</strong> basins, extrusion channel and worm screw should<br />
be cleaned with a damp cloth; then a pasta dough with 5 kg of flour should be made and<br />
extruded through all the dies<br />
purchased. (The pasta produced<br />
is not suitable for human<br />
consumption and must<br />
Photo D<br />
therefore be used for other<br />
purposes). For safety reasons,<br />
it is advisable to repeat<br />
this operation twice over.<br />
Start<strong>ing</strong> up<br />
The machine does not have a<br />
plug for connect<strong>ing</strong> it to the<br />
mains socket. It is therefore<br />
the responsibility of the user<br />
to fit a plug suitable for his particular<br />
electrical system.<br />
(La Parmigiana S.r.l. refuses<br />
to accept responsibility for<br />
faulty connections or plugs<br />
which are not suitable for the<br />
electrical system).<br />
Connect the plug to the<br />
mains socket, ensur<strong>ing</strong> that<br />
the safety covers (No.2<br />
Photo C) of the basins are<br />
well closed.<br />
Start up the machine by<br />
turn<strong>ing</strong> the main switch to<br />
position 1(No.7 Photo D) and<br />
by press<strong>ing</strong> the green pushbutton<br />
which starts the<br />
hopper (No.9 Photo D) or<br />
that of the press (No.8 Photo<br />
D).<br />
Photo C<br />
15
<strong>16</strong><br />
INSTRUCTIONS<br />
D.55 DV<br />
Second Edition<br />
November 1997<br />
After start<strong>ing</strong> up the machine, ensure<br />
that the blades (No.11 Photo<br />
R page <strong>16</strong>) fitted inside the basins<br />
are turn<strong>ing</strong> in the direction shown<br />
by the arrow (No.12 Photo R page<br />
<strong>16</strong>) on the front of the mix<strong>ing</strong> basin<br />
and on the side of the hopper<br />
(No.12 Photo C).<br />
If they are not turn<strong>ing</strong> in the right<br />
direction, it is sufficient (for threephase<br />
motors) to change the position<br />
of two of the three phase<br />
wires in the electrical plug (as illustrated<br />
in the diagram on the<br />
right) leav<strong>ing</strong> the yellow-green<br />
earth wire in the same position.<br />
In the case of s<strong>ing</strong>le-phase motors,<br />
the adjustment requires an<br />
electrician.<br />
To stop the machine, press the<br />
red button on the electric board.<br />
In the event of emergency, turn<br />
off the main safety switch (No.7<br />
Photo D).<br />
La Parmigiana S.r.l. Fidenza ITALY<br />
Photo R<br />
Photo D
INSTRUCTIONS<br />
D.55 DV<br />
Second Edition<br />
November1997<br />
Production<br />
La Parmigiana S.r.l. Fidenza ITALY<br />
For maximum safety in the use of the machine, the operator must stand in the<br />
position described on page 10.<br />
17
18<br />
INSTRUCTIONS<br />
D.55 DV La Parmigiana S.r.l. Fidenza ITALY<br />
Second Edition<br />
November1997<br />
Ingredients<br />
The machine can operate with any kind of flour: common wheat, durum wheat, graded,<br />
special, wholemeal etc. flour. The last type of flour must, however, be sieved in order to<br />
eliminate any bran flakes.<br />
The quantity of flour poured into the basin must always be weighed so as to be able to<br />
gauge exactly how much liquid is to be added in order to obtain the correct consistency<br />
of the pasta dough.<br />
The eggs must be broken in a separate container so that the die does not become<br />
clogged with fragments of eggshell.<br />
The eggs, moreover, must be beaten so that the yolks and the whites are well mixed.<br />
Recipes<br />
Unfilled durum wheat pasta<br />
100% durum wheat flour<br />
310-350 cl. water per kilogram.<br />
Unfilled egg pasta<br />
Pasta dough -a-<br />
100% “00” type common wheat flour<br />
4/6 eggs per kilogram of flour<br />
Water until 310-350 cl. of total liquid per kilogram of flour is reached<br />
Pasta dough -b-<br />
50/70% “00” type common wheat flour<br />
30/50% durum wheat flour<br />
3/5 eggs per kilogram of flour<br />
Water until 310-350 cl. of total liquid per kilogram of flour is reached<br />
Sheets for filled pasta (such as ravioli)<br />
Pasta dough -a-<br />
100% “00” type common wheat flour.<br />
3/4 eggs per kilogram of flour (it is advisable not to add all the egg whites, so that the<br />
pasta sheet is more elastic and hence easier to work with).<br />
Slightly more water than that used for the normal pasta dough, so that the consistency is<br />
crumbly but with larger granules.<br />
Pasta dough -b-<br />
70/80% “00” type common wheat flour.<br />
20/30% durum wheat flour.<br />
2-3 eggs per kilogram of flour (better without the whites).<br />
Slightly more water than that used for the normal pasta dough, so that the consistency is<br />
crumbly but with larger granules.
INSTRUCTIONS<br />
D.55 DV<br />
Second Edition<br />
November1997<br />
La Parmigiana S.r.l. Fidenza ITALY<br />
Pasta with wholemeal flour<br />
100% sieved wholemeal flour.<br />
33% water.<br />
If the consistency of the product is not satisfactory, a small amount of “00” type common<br />
wheat flour (10/20%) can be added and/or<br />
2-3 eggs so that it maintains a firm consistency when cooked.<br />
Suggestions<br />
The percentage of liquid might have to be varied depend<strong>ing</strong> on the type of flour used.<br />
The pasta dough can also be affected by atmospheric conditions.<br />
Avoid work<strong>ing</strong> in:<br />
- strong draughts<br />
- temperatures below or above 20-30°C<br />
- humidity below or above 40-50%.<br />
If a lot of eggs are used, the pasta will have a better consistency when cooked, but the<br />
dough will be less elastic (and hence more difficult to work with).<br />
Prepar<strong>ing</strong> the pasta dough<br />
Preliminary steps<br />
Immerse the die chosen in hot water (40-50°C). Keep the filter (No.18 Photo K) and the<br />
die-hold<strong>ing</strong> r<strong>ing</strong> nut (No.<strong>16</strong> Photo K), already clean and dry, to hand.<br />
Do not fit any of these components onto the machine before mak<strong>ing</strong> the pasta<br />
dough.<br />
Handle them with care to avoid dropp<strong>ing</strong> them on your feet.<br />
The weight of the components is<br />
as follows:<br />
Worm screw (No.14) 1.8 Kg<br />
Die (No.17) 1.6 Kg<br />
R<strong>ing</strong> nut (No.<strong>16</strong>) 2.5 Kg<br />
Photo K<br />
19
20<br />
INSTRUCTIONS<br />
D.55 DV La Parmigiana S.r.l. Fidenza ITALY<br />
Second Edition<br />
November1997<br />
Start<strong>ing</strong> production<br />
The pasta dough is always made, and can<br />
only be made, in the upper basin (hopper).<br />
Do not pour common or durum wheat flour<br />
in the lower basin (press).<br />
If this should happen accidentally, empty the<br />
basin carefully (take off the die if it has already<br />
been fitted) and remove all traces of dry flour<br />
which can interfere with the knead<strong>ing</strong> of the<br />
pasta dough).<br />
Open the cover (No.2 Photo F), pour in the<br />
required quantity of the common or durum<br />
wheat flour, close the cover and start the<br />
machine.<br />
Pour the liquid through the grid on the cover<br />
(Photo G) in the quantity indicated accord<strong>ing</strong><br />
to the recipe be<strong>ing</strong> followed; pour it slowly to<br />
allow the flour to absorb it.<br />
The pasta dough must be kneaded for 10/15<br />
minutes, until it becomes granulous (No. 6<br />
Photo C1), the granules be<strong>ing</strong> approximately<br />
the size of coffee beans.<br />
It must be crumbly to the touch (and easy to<br />
compact when you press it between your<br />
hands) but must not leave traces of flour on<br />
your palms.<br />
When the pasta dough is ready, insert the<br />
worm screw (No. 14 Photo K page 21) into the<br />
pasta outlet channel (No. 37 Photo K) and fit it<br />
into place at the end of the channel. The worm<br />
screw is correctly engaged if it rotates when<br />
the machine is started.<br />
Open the basin covers (No. 2 Photo C page<br />
19), pull the lock<strong>ing</strong> knob (No. 15 Photo C page<br />
21) and turn the hopper over.<br />
Transfer the pasta dough manually to the basin<br />
below.<br />
Lift the hopper, br<strong>ing</strong><strong>ing</strong> it back to its original<br />
position and close the press cover. Start the<br />
motor so that the first handful of pasta comes<br />
out of the channel (Photo L page 21) in order<br />
to remove any dry traces of dough from<br />
previous operations, which could interfere with<br />
procedures.<br />
Photo F<br />
Photo G<br />
Photo C1
INSTRUCTIONS<br />
D.55 DV<br />
Second Edition<br />
November1997<br />
Stop the motor, then fit the dry die<br />
(No. 17 Photo K) and the filter (No.<br />
18 Photo K), in this order, into the<br />
die-hold<strong>ing</strong> r<strong>ing</strong> nut (No. <strong>16</strong> Photo<br />
K).<br />
Screw the r<strong>ing</strong> nut right down onto<br />
the channel in a clockwise direction<br />
(No. 37 Photo K) ensur<strong>ing</strong> that<br />
the rods (No. 22 Photo V) are kept<br />
horizontal.<br />
Fit the two trays (No.23 Photo V)<br />
into the guides located on the<br />
machine cas<strong>ing</strong>. The base of the<br />
trays is made of net to allow the<br />
pasta to be continuously ventilated.<br />
If this feature is not required,<br />
fit the air protection (supplied with<br />
the ravioli mak<strong>ing</strong> machine) immediately<br />
under the lower tray.<br />
Start the machine up again and<br />
throw away the first pasta produced,<br />
which serves to clean the<br />
die.<br />
Now production can begin.<br />
Long pasta (Photo V)<br />
Spaghetti, tagliatelle, bucatini<br />
The above described machine can<br />
produce long pasta.<br />
Let the pasta fall onto the trays<br />
(No. 23 Photo V) and cut it to<br />
the required length, keep<strong>ing</strong> a<br />
distance of 30-40 cm between<br />
the cutt<strong>ing</strong> point and the die<br />
so that the pasta can be wellventilated<br />
by the fan incorporated<br />
in the machine.<br />
La Parmigiana S.r.l. Fidenza ITALY<br />
Photo K<br />
Photo C<br />
Photo L<br />
Photo V<br />
21
22<br />
INSTRUCTIONS<br />
D.55 DV La Parmigiana S.r.l. Fidenza ITALY<br />
Second Edition<br />
November1997<br />
Short pasta (Photo T)<br />
Short pasta is produced by us<strong>ing</strong><br />
an electric dough- cutter with an<br />
electronic speed variator (No.25<br />
Photo T).<br />
Insert the knife (No. 21 Photo Q)<br />
into the pin of the pasta cutter<br />
motor until it strikes home, fitt<strong>ing</strong> it<br />
into the groove.<br />
Check that the cutt<strong>ing</strong> side of<br />
the blade is fac<strong>ing</strong> the die.<br />
Insert the pasta-cutter unit (blade<br />
and motor) on the rods (No.22<br />
Photo Q) of the die-hold<strong>ing</strong> nut,<br />
center<strong>ing</strong> the two washers with<br />
your f<strong>ing</strong>ers (No. 26 Photo Q).<br />
When the pasta-cutter comes into<br />
contact with the rod striker, release<br />
the washers, which will automatically<br />
fit into the notches, thus<br />
lock<strong>ing</strong> the pasta-cutter.<br />
Fit the motor plug into the socket<br />
located on the side of the cas<strong>ing</strong><br />
(No. 28 Photo Q) and turn on the<br />
switch (No. 29 Photo D).<br />
The cutt<strong>ing</strong> speed, and therefore<br />
the pasta length, can be adjusted<br />
by us<strong>ing</strong> the potentiometer knob<br />
(No. 30 Photo D) or by chang<strong>ing</strong><br />
the three knives provided.<br />
Always start the pasta-cutter<br />
first and then the press, never<br />
viceversa, as the knife could get<br />
damaged.<br />
Always turn the pasta-cutter<br />
motor off before remov<strong>ing</strong> it<br />
from the rods of the die-hold<strong>ing</strong><br />
nut.<br />
Photo T<br />
Photo Q<br />
Photo D
INSTRUCTIONS<br />
D.55 DV<br />
Second Edition<br />
November1997<br />
Die substitution<br />
Stop the machine by press<strong>ing</strong> the push-button<br />
(No.8 Photo D page 14).<br />
Switch the pasta-cutter motor off and remove<br />
it. Then place it on the special supports located<br />
on the left side of the machine (Photo J).<br />
To unscrew the die-hold<strong>ing</strong> r<strong>ing</strong> nut, insert the<br />
special lever provided (No. 32 Photo S) into<br />
the holes (No. 33 Photo S) located on the diehold<strong>ing</strong><br />
r<strong>ing</strong> nut.<br />
After remov<strong>ing</strong> the die and the filter, clean the<br />
threads of the r<strong>ing</strong> nut (No. <strong>16</strong> Photo U) and<br />
the channel (No. 37 Photo U) by means of the<br />
special brush (No. 34 Photo U).<br />
Then fit another die.<br />
After use, always keep the dies soaked in<br />
water.<br />
Cool<strong>ing</strong> (see draw<strong>ing</strong>)<br />
After the machine has been operat<strong>ing</strong> for 25-<br />
30 minutes, cool<strong>ing</strong> is necessary to maintain<br />
the right dough extrusion temperature and<br />
increase the output by 20-30%.<br />
Connect a suitably-sized hose to the water<br />
mains and the water inlet and a second hose<br />
to the outlet and the clarified water discharge.<br />
Open the mains tap to let out a trickle of water.<br />
La Parmigiana S.r.l. Fidenza ITALY<br />
Photo J<br />
Photo S<br />
Photo U<br />
23
INSTRUCTIONS<br />
D.55 DV<br />
Second Edition<br />
November1997<br />
La Parmigiana S.r.l. Fidenza ITALY<br />
Clean<strong>ing</strong> and<br />
Maintenance<br />
All clean<strong>ing</strong> and maintenance operations must be carried out with the main<br />
switch off.<br />
25
26<br />
INSTRUCTIONS<br />
D.55 DV La Parmigiana S.r.l. Fidenza ITALY<br />
Second Edition<br />
November1997<br />
Clean<strong>ing</strong><br />
Turn the main switch off (No. 7 Photo D page<br />
15).<br />
Remove the die-hold<strong>ing</strong> r<strong>ing</strong> nut (No. <strong>16</strong> Photo<br />
K) by insert<strong>ing</strong> the special lever (No. 32 Photo<br />
S) in the holes (No. 33 Photo S) and lever<strong>ing</strong><br />
upwards. Remove the die and the filter (Nos.<br />
17-18 Photo K), leav<strong>ing</strong> the worm screw fitted.<br />
The two basins, the hopper (Photo T1) and the<br />
press (Photo R page 27) are equipped with<br />
detachable mix<strong>ing</strong> shafts (No. 11 Photo R-T1)<br />
to enable thorough clean<strong>ing</strong> of the parts in<br />
contact with the pasta dough.<br />
In order to facilitate the disassembl<strong>ing</strong> of the<br />
lower basin shaft, check that the knife blade near<br />
the front wall of the basin is fac<strong>ing</strong> upwards.<br />
If it is not, switch the machine on and let the<br />
blade-hold<strong>ing</strong> shaft rotate until it is in position.<br />
In order to disassemble the various shafts,<br />
loosen the lock nuts (No. 40 Photo T1) and<br />
unscrew the r<strong>ing</strong> nuts (No. 38 Photo T1) until<br />
the blade-hold<strong>ing</strong> shafts are completely free.<br />
Clean the hopper inside with a sponge or a<br />
damp cloth; if necessary, rotate it to remove any<br />
traces of dry pasta.<br />
Clean the press in the same way and push all<br />
the scraps through the pasta outlet.<br />
Turn the main switch on and rotate the worm<br />
screw for a few seconds so that all the scraps<br />
area discharged.<br />
Turn the main switch off again.<br />
Remove the worm screw (No. 14 Photo W page<br />
27) and clean inside the channel (No. 37 Photo<br />
W) with a sponge or a damp cloth; particular<br />
care must be taken in clean<strong>ing</strong> the grooves,<br />
us<strong>ing</strong> a special tool (No. 32 Photo W) in order<br />
to remove all pasta scraps.<br />
Photo K<br />
PhotoS<br />
Photo T1
INSTRUCTIONS<br />
D.55 DV<br />
Second Edition<br />
November1997<br />
Wash the worm screw and fit it back<br />
into the channel.<br />
The worm screw might become<br />
scratched dur<strong>ing</strong> operation; this<br />
does not cause any damage in itself,<br />
but it is however advisable to<br />
smooth the surface as much as<br />
possible by us<strong>ing</strong> sand paper or a<br />
fine file.<br />
Re-assemble both mix<strong>ing</strong> shafts,<br />
tighten the r<strong>ing</strong>-nut (No.38 Photo T1<br />
page 26) but not too much, then<br />
secure it with the lock nut (No. 40<br />
Photo T1).<br />
Clean the external thread of the<br />
channel (No. 37 Photo U) and the<br />
internal thread of the die-hold<strong>ing</strong> r<strong>ing</strong><br />
nut (No. <strong>16</strong> Photo U), and lubricate<br />
them with vaseline oil.<br />
After use, keep the die and the filter<br />
soaked in water in order to prevent<br />
the dough remain<strong>ing</strong> in the holes<br />
from dry<strong>ing</strong>.<br />
Keep all dies, even those which<br />
are seldom used, soaked in water<br />
and remember to change it at<br />
least twice a day.<br />
Precautions<br />
Do not use a jet of water to clean<br />
the machine and never immerse<br />
the die-hold<strong>ing</strong> r<strong>ing</strong> nut (No. <strong>16</strong><br />
Photo U) in water.<br />
Never fit a die or a filter that have<br />
not been soaked in water, because<br />
they might contain dried pasta<br />
dough.<br />
If this occurs, boil them before use<br />
until the dough softens again.<br />
La Parmigiana S.r.l. Fidenza ITALY<br />
Photo F<br />
Photo W<br />
Photo U<br />
27
28<br />
INSTRUCTIONS<br />
D.55 DV La Parmigiana S.r.l. Fidenza ITALY<br />
Second Edition<br />
November1997<br />
Periodical check-ups<br />
Check daily that the safety system<br />
connected to the mix<strong>ing</strong> basin covers,<br />
the microswitch and the control wheel<br />
(Draw<strong>ing</strong> E 143, page 29) is operat<strong>ing</strong><br />
correctly.<br />
Periodically check (every 100 work<strong>ing</strong> hours)<br />
the motor belt (No. 6 Photo X) tension<strong>ing</strong> and,<br />
should they be loose, adjust the screw<br />
located under the motor base (No. 35 Photo<br />
X).<br />
Every 2/3 months disconnect the electric<br />
plug, remove the rear cover and grease the<br />
chain (No. 5 Photo B).<br />
Check monthly or every 200 hours of work the<br />
bolts lock<strong>ing</strong> that fix the reducer to the<br />
structure of the machine.<br />
The concerned bolts ane indicated in the picture<br />
B1, two of them are on the right side and the other<br />
two on the left side of the structure.<br />
Check that there are no oil leaks between the<br />
extrusion channel flange and the cas<strong>ing</strong> or<br />
inside the extrusion channel itself.<br />
If an oil leak is detected, replace the seal<strong>ing</strong><br />
r<strong>ing</strong> (No. 28 draw<strong>ing</strong> 6).<br />
CAUTION: This operation should be<br />
carried out by a skilled technician.<br />
To replace the seal r<strong>ing</strong>, remove the screws<br />
secur<strong>ing</strong> the extrusion channel to the mix<strong>ing</strong><br />
basin.<br />
Remove the nuts secur<strong>ing</strong> the extrusion<br />
channel to the cas<strong>ing</strong>, then extract the<br />
extrusion channel.<br />
At this point, remove the seal<strong>ing</strong> r<strong>ing</strong> from<br />
the reduction gear flange (No. 32 draw<strong>ing</strong> 6)<br />
by lever<strong>ing</strong> it off with a screwdriver.<br />
Put a new r<strong>ing</strong> on, then fit on the extrusion<br />
channel firmly tighten<strong>ing</strong> the screws and nuts.<br />
Dwg. 6<br />
Photo X<br />
Photo B<br />
Photo B1
INSTRUCTIONS<br />
D.55 DV<br />
Second Edition<br />
November1997<br />
La Parmigiana S.r.l. Fidenza ITALY<br />
Safety cover<br />
Draw<strong>ing</strong> E143 shows in detail the safety system which comes into operation whenever<br />
one of the mix<strong>ing</strong> basin covers moves.<br />
This system must always be in perfect work<strong>ing</strong> order, it therefore requires daily<br />
checks.<br />
Check that disc 2 is firmly secured by nut 5 and washer 4 and that rotates at the same<br />
time as the cover.<br />
Check that the contact pin of limit switch 7 is operat<strong>ing</strong> correctly (it must slide smoothly<br />
and a “click” must be heard when it makes contact).<br />
Check that the disc is aligned with the contact pin of limit switch 7 (draw<strong>ing</strong> 1).<br />
Do not tamper with the safety system.<br />
Never operate the machine if the safety system is not in perfect work<strong>ing</strong> order.<br />
Dwg 1 Dwg E143<br />
29
30<br />
INSTRUCTIONS<br />
D.55 DV La Parmigiana S.r.l. Fidenza ITALY<br />
Second Edition<br />
November1997
INSTRUCTIONS<br />
D.55 DV<br />
Second Edition<br />
November1997<br />
Spares<br />
La Parmigiana S.r.l. Fidenza ITALY<br />
For piece replacement always use Original Spares.<br />
Do not wait for the pieces to be worn out.<br />
Replac<strong>ing</strong> a piece at the right time means improv<strong>ing</strong> machine performance and avoid<strong>ing</strong><br />
worse damage.<br />
31
32<br />
INSTRUCTIONS<br />
D.55 DV La Parmigiana S.r.l. Fidenza ITALY<br />
Second Edition<br />
November1997<br />
Table E143<br />
Safety cover<br />
2 Camme in alluminio<br />
3 Rosetta 8x24<br />
4 Rosetta 6x18<br />
5 Dado cieco M6<br />
6 Vite M4x20<br />
7 Fine corsa<br />
8 Raccordo<br />
9 Guaina 10x14<br />
10 Raccordo<br />
11 Ghiera 1/4 Gas<br />
12 Dado autobloccante M8<br />
13 Rosetta 8,4x17<br />
14 Vite M8x15
INSTRUCTIONS<br />
D.55 DV<br />
Second Edition<br />
November1997<br />
QS1 Sezionatore<br />
TC Trasformatore<br />
KM1 Contattore pressa<br />
KM2 Contattore tramoggia<br />
FR1 Relè Termico Pressa<br />
FR2 Relè Termico Tramoggia<br />
SB0 Pulsante Emergenza<br />
SA1 Selettore<br />
SB2 Pulsan. arresto pressa<br />
SB4 Pulsan. arresto tramoggia<br />
SB1-HL1 Pulsan. luminoso marcia pressa<br />
La Parmigiana S.r.l. Fidenza ITALY<br />
Diagram E 171<br />
SB3-HL2 Pulsan. luminoso marcia tramoggia<br />
HLO Segnale Luminoso Bianco<br />
UF1 Regolatore Velocità<br />
UF1 Manopola<br />
XA Morsettiera<br />
XP Connettore<br />
SQ1 Finecorsa Vasca Inferiore<br />
SQ2 Finecorsa Vasca Superiore<br />
M1 Motore Pressa<br />
M2 Motore Tramoggia<br />
M3 Motore Tagliapasta<br />
33
34<br />
INSTRUCTIONS<br />
D.55 DV La Parmigiana S.r.l. Fidenza ITALY<br />
Second Edition<br />
November1997<br />
QS1 Sezionatore<br />
TC Trasformatore<br />
KM1 Contattore pressa<br />
KM2 Contattore tramoggia<br />
FR1 Relè Termico Pressa<br />
FR2 Relè Termico Tramoggia<br />
SB0 Pulsante Emergenza<br />
SA1 Selettore<br />
SB2 Pulsan. arresto pressa<br />
SB4 Pulsan. arresto tramoggia<br />
SB1-HL1 Pulsan. luminoso marcia pressa<br />
Diagram E 171<br />
SB3-HL2 Pulsan. luminoso marcia tramoggia<br />
HLO Segnale Luminoso Bianco<br />
UF1 Regolatore Velocità<br />
UF1 Manopola<br />
XA Morsettiera<br />
XP Connettore<br />
SQ1 Finecorsa Vasca Inferiore<br />
SQ2 Finecorsa Vasca Superiore<br />
M1 Motore Pressa<br />
M2 Motore Tramoggia<br />
M3 Motore Tagliapasta
INSTRUCTIONS<br />
D.55 DV<br />
Second Edition<br />
November1997<br />
1 Telaio per Pasta<br />
5 Perno fissaggio Vasca<br />
6 Sostegni Tagliapasta<br />
7 Carcassa<br />
10 Ventola<br />
12 Motore<br />
15 Puleggia Motore<br />
19 C<strong>ing</strong>hia A53<br />
20 Coperchio posteriore<br />
26 Vite M8x90<br />
27 Perno Piano Motore<br />
Table E49 Frame<br />
La Parmigiana S.r.l. Fidenza ITALY<br />
28 Ruota normale<br />
29 Piano Motore<br />
33 Ruota con Freno<br />
35 Pomolo bloccaggio Vasca<br />
40 Coperchio superiore<br />
52 Presa di Corrente<br />
35
36<br />
INSTRUCTIONS<br />
D.55 DV La Parmigiana S.r.l. Fidenza ITALY<br />
Second Edition<br />
November1997<br />
Table E66 Reductor<br />
3 Coperchio<br />
4 Guarnizione<br />
5 Ruota dentata z=174<br />
6 Chiavetta 6x6x18<br />
7 Vite M4x6<br />
8 Ghiera<br />
9 Cuscinetto 6004<br />
10 Flangia Alluminio<br />
11 Tendicatena<br />
13 Puleggia D=267<br />
<strong>16</strong> Pignone z=12<br />
17 Paraolio 22x38x7<br />
18 Chiavetta 6x5x18<br />
19 Flangia forata<br />
20 Cuscinetto 62/22 2RS<br />
21 Ingranaggio elicoidale z=19<br />
22 Scatola Riduttore<br />
24 Cuscinetto 7204 BEP<br />
25 Flangia ghisa<br />
28 Paraolio 50x65x8<br />
29 Perno con Innesto<br />
30 Cuscinetto 51306<br />
32 Flangia reggispinta<br />
33 Cuscinetto 6006<br />
42 Anello di guida
INSTRUCTIONS<br />
D.55 DV<br />
Second Edition<br />
November1997<br />
Table E37/51<br />
Extruder and Lower Basin<br />
1 Cavo completo<br />
2 Copritaglierino<br />
4 Motore Taglierino<br />
5 Supporto Motore<br />
6 Cuscinetto 6004<br />
7 Anello<br />
8 Perno curvo<br />
10 Perno scorrevole<br />
11 Molla<br />
12 Ghiera<br />
14 Rosetta di blocco<br />
17 Coltello 1 lama<br />
18 Coltello 4 lame<br />
20 Dado portatrafile<br />
21 Coltello 2 lame<br />
22 Vite coclea<br />
23 Vite prigioniera<br />
24 Canale di estrusione<br />
27 Bocchettone per acqua<br />
28 Copriflangia<br />
30 Salvatrafile<br />
La Parmigiana S.r.l. Fidenza ITALY<br />
31 Trafila<br />
38 Flangia tagliapasta<br />
40 Coperchio carter<br />
104 Coperchio<br />
106 Ghiera<br />
107 Controghiera<br />
108 Albero con pale<br />
109 Paraolio 30x52x7<br />
110 Perno con Innesto<br />
112 Corona z=75<br />
113 Cuscinetto 6205-2RS<br />
114 Boccola<br />
1<strong>16</strong> Cuscinetto 7205-2RS<br />
117 Testa di Perno<br />
122 Flangia anteriore<br />
123 Vasca<br />
125 Perno filettato<br />
126 Bussola di guida<br />
128 Supporto interno<br />
129 Maglia di giunzione<br />
130 Catena 3/8 “<br />
37
38<br />
INSTRUCTIONS<br />
D.55 DV La Parmigiana S.r.l. Fidenza ITALY<br />
Second Edition<br />
November1997<br />
Table E46-02 Upper Basin<br />
1 Perno filettato<br />
4 Motore<br />
5 Motoriduttore 1:28<br />
9 Antiurto per Vasca<br />
11 Maniglia Ribaltamento<br />
12 Cuscinetto 6205<br />
14 Paraolio 30x42x7<br />
15 Supporto Motoriduttore<br />
<strong>16</strong> Perno trasmissione<br />
17 Bussola di guida<br />
18 Ghiera<br />
19 Controghiera<br />
20 Albero impastatore<br />
21 Vasca impastatrice<br />
24 Pomolo di chiusura Coperchio<br />
29 Coperchio Vasca<br />
30 Boccola<br />
32 Molla ribaltamento<br />
33 Flangia sinistra<br />
34 Testa bloccaperno
INSTRUCTIONS<br />
D.55 DV<br />
Second Edition<br />
November1997<br />
Spare parts request form (module M1-e)<br />
Photocopy this, fill out and send it by Post of Fax to:<br />
La Parmigiana S.r.l. Fidenza ITALY<br />
Customer..........................................................................E.G. Reg. no...........................................<br />
street........................................................... no........ City..............................................................<br />
Postal code....................... Country...................................Tel.............................Fax......................<br />
e-mail............................................................................................................................................<br />
Machine Model ......<strong>D55dv</strong>...... Type ......N........... Date acquisition of year ...................<br />
..<br />
Serial number (on one side of the machine)......................................................................................<br />
Voltage........................Volt Frequency..............Hz No. of Phases............................<br />
(Refer to the relevant draw<strong>ing</strong>s and diagrams)<br />
No<br />
Draw<strong>ing</strong><br />
Position<br />
cod. Article<br />
Description<br />
LA PARMIGIANA s.r.l.<br />
Technical assistance service<br />
Via La Bionda, 33<br />
43036 Fidenza (PR) ITALY<br />
Tel.0524/528688-529004 Fax 0524/524465<br />
laparmigiana@laparmigiana.com<br />
Quantity<br />
Date (Stamp and Signature)<br />
................................... ...................................................................<br />
Under<br />
Guarantee<br />
(Yes/No)<br />
XII-03<br />
39
40<br />
INSTRUCTIONS<br />
D.55 DV La Parmigiana S.r.l. Fidenza ITALY<br />
Second Edition<br />
November1997<br />
GUARANTEE CERTIFICATE “LA PARMIGIANA”<br />
La Parmigiana s.r.l. guarantees the product from eventual manufactur<strong>ing</strong> defects<br />
of all parts for a period of 1 (one) year from the date shown on the purchas<strong>ing</strong><br />
receipt.<br />
The guarantee applies only for the replacements of the defective parts.<br />
The guarantee can be applied when the defective part is handed over to<br />
La Parmigiana s.r.l.<br />
Via La Bionda,33 43036<br />
Fidenza (PR) ITALY<br />
together with a copy of the purchas<strong>ing</strong> receipt of the machine and the declaration<br />
form (last page of the instruction manual) which has to be completed by the buyer.<br />
La Parmigiana reserves the right to replace the part or repair it.<br />
The guarantee does not cover the follow<strong>ing</strong> :<br />
- eventual defects result<strong>ing</strong> from operations carried out on the machine by the<br />
client without prior authorisation by La Parmigiana;<br />
- periodic maintenance and repairs or replacements of parts used normally or<br />
which are worn out;<br />
- transportation costs of the part from the client to La Parmigiana and vice versa,<br />
and the relative risks;<br />
- labour costs related to the defective part;<br />
- coverage of any damages, direct or indirect, due to breakdown of the machine<br />
itself (inclusive but not limited to the fact if the machine is used for other purposes<br />
than those foreseen: incorrect handl<strong>ing</strong> and disregard<strong>ing</strong> instructions in the<br />
manual of La Parmigiana relat<strong>ing</strong> to its use and maintenance, installation and<br />
non-adherence to technical and safety instructions, incorrect installation of<br />
software), and repairs carried out by the client to defective plants or equipment<br />
to which the machine has been connected, and other conditions and causes<br />
not attributed to La Parmigiana;<br />
- in any case the guarantee is not valid if the machine is handled by persons not<br />
authorised by La Parmigiana.<br />
La Parmigiana s.r.l. Fidenza