wood kiln firing techniques & tips techniques & tips - Ceramic Arts ...
wood kiln firing techniques & tips techniques & tips - Ceramic Arts ...
wood kiln firing techniques & tips techniques & tips - Ceramic Arts ...

You also want an ePaper? Increase the reach of your titles
YUMPU automatically turns print PDFs into web optimized ePapers that Google loves.
Wood-fired Raku Kiln<br />
by Nesrin During<br />
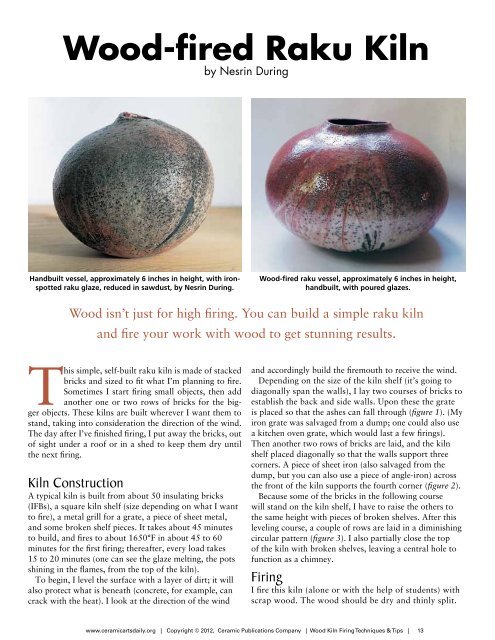
Handbuilt vessel, approximately 6 inches in height, with ironspotted<br />
raku glaze, reduced in sawdust, by Nesrin During.<br />
Wood isn’t just for high <strong>firing</strong>. You can build a simple raku <strong>kiln</strong><br />
and fire your work with <strong>wood</strong> to get stunning results.<br />
This simple, self-built raku <strong>kiln</strong> is made of stacked<br />
bricks and sized to fit what I’m planning to fire.<br />
Sometimes I start <strong>firing</strong> small objects, then add<br />
another one or two rows of bricks for the bigger<br />
objects. These <strong>kiln</strong>s are built wherever I want them to<br />
stand, taking into consideration the direction of the wind.<br />
The day after I’ve finished <strong>firing</strong>, I put away the bricks, out<br />
of sight under a roof or in a shed to keep them dry until<br />
the next <strong>firing</strong>.<br />
Kiln Construction<br />
A typical <strong>kiln</strong> is built from about 50 insulating bricks<br />
(IFBs), a square <strong>kiln</strong> shelf (size depending on what I want<br />
to fire), a metal grill for a grate, a piece of sheet metal,<br />
and some broken shelf pieces. It takes about 45 minutes<br />
to build, and fires to about 1650°F in about 45 to 60<br />
minutes for the first <strong>firing</strong>; thereafter, every load takes<br />
15 to 20 minutes (one can see the glaze melting, the pots<br />
shining in the flames, from the top of the <strong>kiln</strong>).<br />
To begin, I level the surface with a layer of dirt; it will<br />
also protect what is beneath (concrete, for example, can<br />
crack with the heat). I look at the direction of the wind<br />
Wood-fired raku vessel, approximately 6 inches in height,<br />
handbuilt, with poured glazes.<br />
and accordingly build the firemouth to receive the wind.<br />
Depending on the size of the <strong>kiln</strong> shelf (it’s going to<br />
diagonally span the walls), I lay two courses of bricks to<br />
establish the back and side walls. Upon these the grate<br />
is placed so that the ashes can fall through (figure 1). (My<br />
iron grate was salvaged from a dump; one could also use<br />
a kitchen oven grate, which would last a few <strong>firing</strong>s).<br />
Then another two rows of bricks are laid, and the <strong>kiln</strong><br />
shelf placed diagonally so that the walls support three<br />
corners. A piece of sheet iron (also salvaged from the<br />
dump, but you can also use a piece of angle-iron) across<br />
the front of the <strong>kiln</strong> supports the fourth corner (figure 2).<br />
Because some of the bricks in the following course<br />
will stand on the <strong>kiln</strong> shelf, I have to raise the others to<br />
the same height with pieces of broken shelves. After this<br />
leveling course, a couple of rows are laid in a diminishing<br />
circular pattern (figure 3). I also partially close the top<br />
of the <strong>kiln</strong> with broken shelves, leaving a central hole to<br />
function as a chimney.<br />
Firing<br />
I fire this <strong>kiln</strong> (alone or with the help of students) with<br />
scrap <strong>wood</strong>. The <strong>wood</strong> should be dry and thinly split.<br />
www.ceramicartsdaily.org | Copyright © 2012, <strong>Ceramic</strong> Publications Company | Wood Kiln Firing Techniques & Tips | 13<br />
www.ceramicartsdaily.org | Copyright © 2011, <strong>Ceramic</strong> Publications Company | Wood Firing Techniques & Tips | Second Edition | 13