wood kiln firing techniques & tips techniques & tips - Ceramic Arts ...
wood kiln firing techniques & tips techniques & tips - Ceramic Arts ...
wood kiln firing techniques & tips techniques & tips - Ceramic Arts ...

You also want an ePaper? Increase the reach of your titles
YUMPU automatically turns print PDFs into web optimized ePapers that Google loves.
ceramic artsdaily.org<br />
<strong>wood</strong> <strong>kiln</strong> <strong>firing</strong><br />
<strong>techniques</strong> & <strong>tips</strong><br />
| | Second Third Edition | |<br />
plans and instructions<br />
for making a <strong>wood</strong>-fired <strong>kiln</strong><br />
and <strong>firing</strong> with <strong>wood</strong><br />
This special report is brought to you with the support of Larkin Refractory Solutions<br />
This special report is brought to you with the support of Larkin Refractory Solutions<br />
www.ceramicartsdaily.org | Copyright © 2011, <strong>Ceramic</strong> Publications Company | Wood Firing Techniques & Tips | Second Edition | i
Wood Kiln Firing Techniques & Tips<br />
Plans and Instructions for Making a<br />
Wood-fired Kiln and Firing with Wood<br />
Since humans first began to understand how fire hardened clay, we have been making ceramics, both in pits and<br />
in <strong>wood</strong> <strong>kiln</strong>s. Now, with so many fuel options available to the potter, <strong>wood</strong>-fired <strong>kiln</strong>s are more of a choice than a<br />
necessity. While <strong>wood</strong> <strong>firing</strong> isn’t easy, the results are incomparable. The work in <strong>wood</strong> <strong>kiln</strong>s reveals the story of<br />
the <strong>firing</strong>, with pieces showing ash deposits and the path of the flame through the <strong>kiln</strong>. But not all <strong>wood</strong> <strong>kiln</strong>s are<br />
built alike. Some are made for flashing from the flame, some are made for melted rivulets of ash and others still<br />
are designed to bury the ware in ash and make it crusty and craggy. Regardless of your <strong>wood</strong>-<strong>firing</strong> aesthetic, the<br />
<strong>wood</strong> <strong>kiln</strong> plans and diagrams in this helpful guide will show you several ways to get started understanding and<br />
building <strong>wood</strong> <strong>kiln</strong>s.<br />
Wood Firing Basics<br />
by W. Lowell Baker<br />
Each <strong>wood</strong> <strong>kiln</strong> has its own <strong>firing</strong> characteristics, but there are some basic principles that hold true for any <strong>kiln</strong><br />
using <strong>wood</strong> as fuel. Getting the basics right means better chances for great results<br />
Gayagama Kiln Build<br />
by Shana Angela Salaff<br />
Gyan Daniel Wall is a ceramic artist who builds <strong>wood</strong>-fired <strong>kiln</strong>s using an ancient Middle-Eastern bricklaying<br />
technique developed for creating vaults and domes on houses and mosques. Shana Salaff documented the<br />
process this July at the Gaya <strong>Ceramic</strong> <strong>Arts</strong> Center in Bali, Indonesia.<br />
Hai Kaburi: Creating Consistent Crusty<br />
Wood-Fire Results<br />
by Lee Middleman<br />
If you want crusty pots in a <strong>wood</strong>-fired <strong>kiln</strong>, you almost have to put them in or near the firebox, where they will<br />
be exposed to a lot of ash. This <strong>kiln</strong> design puts the firebox on top of the ware chamber, so the entire <strong>kiln</strong> load is<br />
exposed to ash as if it were in a firebox.<br />
The Manabigama<br />
by John Thies<br />
A cross between an anagama and a groundhog-style <strong>kiln</strong>, the manabigama is a <strong>wood</strong> <strong>kiln</strong> that’s within everyone’s<br />
reach. Small, compact and simple to fire, this <strong>wood</strong> <strong>kiln</strong> can be fired by one person in a matter of hours—not days.<br />
Wood-fired Raku Kiln<br />
by Nesrin During<br />
Wood <strong>firing</strong> isn’t just about high <strong>firing</strong>. You can build a simple raku <strong>kiln</strong> and fire your work with <strong>wood</strong> to get<br />
stunning results. Nesrin During constructs a simple <strong>kiln</strong> that’s easy to stoke and reaches raku temperatures<br />
without a lot of effort.<br />
www.ceramicartsdaily.org | Copyright © 2012, <strong>Ceramic</strong> Publications Company | Wood Kiln Firing Techniques & Tips | 1
Wood Firing Basics<br />
Wood burns in two distinctly different stages.<br />
The first, and most obvious, is the burning<br />
of gasses produced when <strong>wood</strong> is heated.<br />
Wood begins to gasify at about 500°F. The<br />
second is the burning of the charcoal. This happens, for<br />
the most part, after the materials that form the gasses have<br />
been driven out of the <strong>wood</strong>. The coals in your ash pit<br />
serve to provide some heat to the <strong>kiln</strong> and to gasify the<br />
freshly stoked <strong>wood</strong>, mostly through radiant heat energy.<br />
As the gasses burn in a <strong>wood</strong> <strong>kiln</strong>, they typically produce<br />
very long flames. These flames can be easily over 30 feet<br />
long. Charcoal produces very hot, but very short, flames.<br />
The flame from charcoal is normally less than a few inches<br />
long. All of these issues are relevant to building and <strong>firing</strong><br />
any <strong>wood</strong>-burning <strong>kiln</strong>.<br />
One of the demonstrations I take my students through<br />
when we begin talking about <strong>kiln</strong> design is to bring an<br />
oxygen-acetylene torch into the classroom. If the torch is<br />
ignited with only acetylene (fuel), it produces a very long,<br />
very dirty flame. One can quickly pass his or her hand<br />
through this flame without any real danger, but it will be<br />
covered with black soot. As oxygen is added, the flame<br />
shortens and becomes significantly hotter. As the flame<br />
shortens with the changing oxygen-fuel ratio, smaller<br />
flame <strong>tips</strong> appear in the center of the flame. This is the<br />
place where the flame is the hottest. The more defined the<br />
<strong>tips</strong> are, the hotter the flame. You want this part of the<br />
flame in the <strong>firing</strong> chamber of a <strong>kiln</strong>, not in the firebox or<br />
the flue.<br />
If you have a small <strong>kiln</strong> and a fuel that develops a long<br />
flame, you need to either redesign your <strong>kiln</strong> to use the<br />
length of the flame, or simply shorten the flame to bring<br />
the hottest part of the fire back into the chamber where<br />
the pots are stacked. As with the acetylene example, the<br />
by W. Lowell Baker<br />
Each <strong>wood</strong> <strong>kiln</strong> has its own characteristics for <strong>firing</strong>, but there are some basic<br />
principles that hold true for any <strong>kiln</strong> using <strong>wood</strong> as a fuel.<br />
easiest way to shorten the flame and make it hotter is to<br />
add oxygen.<br />
If you have electricity at the <strong>kiln</strong> site, adding a blower<br />
is one of the easiest and most controllable ways of adding<br />
oxygen.<br />
A small squirrel-cage fan that will deliver about 100<br />
cubic feet of air per minute will supply all the air you<br />
will need to fire a small <strong>kiln</strong>. You can fabricate a bolt-on<br />
connector to attach the pipe to the blower, or duct tape<br />
a piece of automotive tail pipe to the blower. You should<br />
realize that the end of the metal pipe will be subjected<br />
to a great deal of heat and will have to be replaced after<br />
a number of <strong>firing</strong>s. Place the pipe in the ash pit of your<br />
firebox and adjust the air-input damper to the desired air<br />
flow. You will find that the flame around the blow pipe<br />
will be very intense. This system will allow you to fire<br />
your <strong>kiln</strong> with a much smaller firebox than would normally<br />
be needed in a natural-draft <strong>kiln</strong>. The smaller firebox<br />
will require more frequent stoking, simply because it will<br />
not hold as much fuel as a larger box.<br />
Increasing the flue height would be the last choice in a<br />
small <strong>kiln</strong>. If you do this, you must be certain that you<br />
have air intake ports and a flue cross section large enough<br />
to allow easy circulation of hot gasses. A damper will be<br />
essential for control. This will be less responsive than a<br />
forced-air system and will vary more due to atmospheric<br />
conditions, because it depends on lowered pressure to<br />
bring air into the <strong>kiln</strong>.<br />
So, more air shortens the flame and more air increases<br />
the temperature of the coal bed to help gasify your fuel<br />
more quickly.<br />
W. Lowell Baker is currently Professor of Art at the University of Alabama,<br />
and has taught workshops for nearly 40 years.<br />
www.ceramicartsdaily.org | Copyright | Copyright © 2012, © 2009, <strong>Ceramic</strong> Publications Company | Wood | Wood Kiln Firing Techniques & Tips | | 2
Gayagama Kiln Build<br />
The Australia- and New Zealand-based Gyan<br />
Daniel Wall heard of the Gaya <strong>Ceramic</strong> <strong>Arts</strong><br />
Center in Bali, Indonesia when he met its director,<br />
Hillary Kane, at a <strong>wood</strong> fire conference in<br />
Tasmania last year. Already planning to visit Bali, Wall<br />
ended up spending much of that trip at the Gaya studio,<br />
making pots and helping to fire their first <strong>wood</strong> <strong>kiln</strong>. This<br />
year, he was invited back as interim director and to facilitate<br />
the building of two more <strong>wood</strong>-fired <strong>kiln</strong>s at the<br />
center’s new studio location. The first of these was an<br />
anagama and took form during a one-week <strong>kiln</strong>-building<br />
workshop followed by a two-week pottery making and <strong>firing</strong><br />
workshop.<br />
During the first week of July, Wall and participants in<br />
the workshop built the Gayagama. For this <strong>kiln</strong>, Wall used<br />
a Middle-Eastern bricklaying technique where arch bricks<br />
are laid diagonally against each other, causing each brick<br />
to be supported by the one underneath it. Thus, aside from<br />
two temporary forms used to support the front and back<br />
by Shana Angela Salaff<br />
1<br />
4<br />
arches, no internal support was needed. The Gayagama<br />
was primarily constructed from raw handmade bricks<br />
made from local materials. The combination of the use of<br />
raw bricks and the self-supporting arch technique enabled<br />
the build to be closer to the kind of fluid and intuitive process<br />
that one associates more with making ceramic vessels<br />
than with <strong>kiln</strong> building. Though Wall’s basic plan called<br />
for the general dimensions of the <strong>kiln</strong>, many decisions<br />
were made on site. The result is a beautiful, organic-looking,<br />
and well-functioning <strong>kiln</strong>.<br />
Origins of the Technique<br />
When asked about the origins of the technique, and<br />
how he came to use it, Wall explained, “As far as I am<br />
aware, Australian <strong>wood</strong>-fire potter/<strong>kiln</strong> builder Daniel<br />
Lafferty was the first to use this technique for building<br />
<strong>kiln</strong>s in modern times. The building technique is<br />
originally from the Middle East and is used for building<br />
brick domes and vaults without the aid of a form-work<br />
2 3<br />
www.ceramicartsdaily.org | Copyright © 2012, <strong>Ceramic</strong> Publications Company | Wood Kiln Firing Techniques & Tips | 3<br />
5
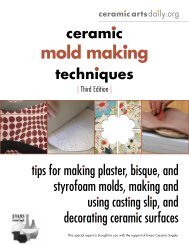
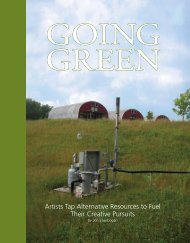
1 Loo Jia Wen (l) and Tok Yu Xiang (r) learning how to<br />
form bricks using <strong>wood</strong>en molds, then refining them.<br />
2 Subfloor, firebox, and base of wall.<br />
3 First four courses of raw bricks built up on the subfloor.<br />
4 Laying in the floor using hard brick placed on a thin<br />
layer of silica sand.<br />
5 Creating the back arch using a bucket for support.<br />
6 Setting up the first 45°-angle course off of the back<br />
arch.<br />
7 Laying in the first courses off the back arch.<br />
8 View of completed back arch, beginning of the roof,<br />
and walls with built-in side stoke holes.<br />
9 Loo Jia Wen (l) and Bruce McWhinney (r) building the<br />
front arch.<br />
6<br />
7<br />
8<br />
structure. Daniel came across this technique in a book called<br />
<strong>Ceramic</strong> Houses, written by Nader Kalili, and decided to<br />
translate it into <strong>kiln</strong> building. However, recently while researching<br />
<strong>kiln</strong>s on the Internet, I came across an image of an<br />
ancient <strong>kiln</strong> in Thailand that also used this building method.<br />
“Daniel is a close friend and mentor. I first met him and<br />
experienced his <strong>kiln</strong>-building <strong>techniques</strong> at the Hyperclay<br />
Gulgong event in 1998. I helped on a raw adobe brick anagama<br />
build that he facilitated at the Tanja <strong>wood</strong>-fire event in 2002,<br />
hosted by Yuri Wiedenhofer who had also built his <strong>kiln</strong>s using<br />
this technique. I loved this simple free-form style of building<br />
using raw, handmade bricks, so that when it came time to build<br />
my own <strong>kiln</strong> that was the way to go.”<br />
The building method appeals to Wall on many levels, and fits<br />
with his clay working methods and philosophy. “In my work<br />
in general, I love the feeling of freedom and the sense of selfreliance<br />
and connectedness I get from using minimal technology<br />
and sourcing materials from nature,” he explains. “I love engaging<br />
in the creative process in a very earthy and holistic way.<br />
I love the free-form style of building that this method allows; it<br />
is like making a big pot. The form evolves and unfolds during<br />
the building process. To me, working with raw materials, making<br />
work, designing, building, and <strong>firing</strong> <strong>kiln</strong>s are all part of an<br />
integrated holistic co-creative process.”<br />
The Building Process<br />
Before the build began, a typical Balinese–style tile roof<br />
was built over the <strong>kiln</strong> area. The dirt under the <strong>kiln</strong>, well<br />
compressed ahead of time, was graded at a slope of about 15<br />
degrees. Staff at the Gaya CAC made over 900 bricks that<br />
were set out to dry —as much as the Balinese humidity would<br />
allow. During the workshop, participants learned how to<br />
make bricks, and added these to the stockpile (1).<br />
Wall used <strong>kiln</strong> shelves and a center string line to map out the<br />
floor plan of the <strong>kiln</strong> and then created a sketch with the measurements.<br />
Once the workshop started, the <strong>kiln</strong> building began<br />
with digging in the footings for the walls and the steps for the<br />
floor, making the base of the <strong>kiln</strong> lower than the earth around<br />
it, creating natural insulation and support. The front and sidestoke<br />
firebox areas were dug out even lower to create underfloor<br />
air grates, with a duct running under the floor from the<br />
www.ceramicartsdaily.org | Copyright © 2012, <strong>Ceramic</strong> Publications Company | Wood Kiln Firing Techniques & Tips | 4<br />
9
12<br />
firebox to the side-stoke that provided pre-heated air.<br />
Local soft red bricks were used for the foundations and<br />
air grates of the fireboxes. These were laid with mortar<br />
made from the earth excavated out of the floor (2). In<br />
keeping with his philosophy of continual experimentation,<br />
and because there was a surplus of red brick available,<br />
Wall decided to use these extra bricks as an external<br />
support wall that was completed after the main walls were<br />
built. The chimney and walls were started using the raw<br />
brick and brick mortar, and the <strong>kiln</strong> grew in many directions<br />
at once.<br />
When the walls were a few courses high (3), the hard<br />
firebrick floor was laid out on a thin bed of silica sand<br />
(4). Wall wanted the floor to be made from durable hard<br />
brick, and for the floor to be separate from the walls so<br />
that it could be replaced in the future if needed. Next, the<br />
red brick outer wall was built up, along with the base of<br />
the chimney.<br />
Once the area between the chimney and the back of the<br />
<strong>kiln</strong> was high enough, the back arch was created, using a<br />
bucket as a temporary arch support (5). Raw bricks were<br />
10 11<br />
13<br />
shaved down on two sides to create tapered arch bricks.<br />
Spaces between the bricks were filled with mortar and then<br />
well compressed. The front arch was formed in the same<br />
way later in the process. After the key brick for each arch<br />
was hammered into place, the supports were removed.<br />
Once an arch was in place, the first arch course was laid<br />
diagonally over it at a 45-degree angle, with small chunks<br />
of brick filling in any large gaps (6). The second course<br />
of the back arch was laid in, supported by the first course<br />
and the side walls (7). Each successive course was staggered<br />
over the one before it. Side stoke holes were created<br />
(8) and blow holes were placed along the spine of the <strong>kiln</strong>.<br />
The front arch was built next. (9). The plastic bucket supported<br />
the structure until the key brick was inserted (10).<br />
The chimney was built using raw bricks laid in a circular<br />
pattern (12), with a slot created for a <strong>kiln</strong>-shelf damper.<br />
The brick above the slot was keyed in place so that it<br />
would never sag or bulge outward.<br />
The staggered, self-supporting courses built off of the<br />
front and back arches met in the middle with one final key<br />
brick (13). This created a strong barrel vault with a beauti-<br />
www.ceramicartsdaily.org | Copyright © 2012, <strong>Ceramic</strong> Publications Company | Wood Kiln Firing Techniques & Tips | 5<br />
14
10 Gyan Wall and Bruce McWhinney finishing<br />
front arch.<br />
11 The roof is formed by laying in angled rows<br />
against the front and back arches.<br />
12 The chimney is made of the same bricks, laid in<br />
a circular pattern. The damper is a <strong>kiln</strong> shelf.<br />
13 Gyan Wall closes up the central arch from the<br />
inside.<br />
14 The top view of the <strong>kiln</strong> after closing central<br />
arch.<br />
15 The interior of the finished <strong>kiln</strong>, coated with a<br />
thin layer of clay and alumina hydrate.<br />
16 Plaster is mixed by foot, then coated over the<br />
raw bricks above the courses of red bricks that<br />
lined the lower portion of the wall.<br />
17 Here Loo Jia Wen (l), Bruce McWhinney (c), and<br />
Gyan Wall (r) apply a layer of plaster.<br />
18 The finished <strong>kiln</strong> showing the stonework outer<br />
wall. The pizza oven can be seen between the<br />
chimney and the back of the <strong>kiln</strong>.<br />
15 16 17<br />
ful herringbone-like pattern (14). Final details that were<br />
added to the <strong>kiln</strong> included a pizza oven built between the<br />
back of the <strong>kiln</strong> and the chimney (over the back arch and<br />
first courses). The mortar around all bricks, both inside<br />
and out, was compressed as much as possible, and the<br />
interior of the <strong>kiln</strong> was washed with a thin mixture of clay<br />
and alumina hydrate (15). Once the <strong>kiln</strong> was essentially<br />
complete, insulating plaster was mixed by foot. Three layers<br />
of plaster were spread over the <strong>kiln</strong> (16–17), for a total<br />
thickness of about 6 inches (15 cm). Wall added stonework<br />
around the <strong>kiln</strong> that is both functional—providing<br />
steps to climb on to see through the air holes and further<br />
buttressing for the walls of the <strong>kiln</strong>—and aesthetically<br />
pleasing (18).<br />
Kiln Blessing<br />
Because the <strong>kiln</strong> is in Bali, local custom must be followed.<br />
The Balinese, mainly Hindu, believe the gods must<br />
be given the correct offerings and prayers for any project<br />
to succeed. From rice fields to houses, vehicles to tools,<br />
marriages to cremations, the proper ceremonies are necessary.<br />
The Gayagama blessing took place on a drizzly day,<br />
with the local village priest and an assistant presiding.<br />
Blessings include fruit, flowers, food, baskets, and other<br />
forms woven from banana and palm leaves.<br />
Following the <strong>kiln</strong>-building workshop was the making<br />
and <strong>firing</strong> workshop. Wall kept a small fire going<br />
inside the <strong>kiln</strong> to dry out the bricks and plaster during<br />
the first week. After a week of making, pots were loaded<br />
green into the <strong>kiln</strong>; both <strong>kiln</strong> and contents were fired<br />
together. The <strong>firing</strong> took three days and culminated in<br />
a pizza party on the last night. At the end of the <strong>firing</strong>,<br />
the firebox was filled with fuel and the dampers were<br />
closed for an intense reduction. After about six hours, (at<br />
about 1050°C), Wall re-stoked the <strong>kiln</strong> and then introduced<br />
a small amount of water and a little more air to<br />
re-oxidize the iron and to coax a rich red color out of the<br />
pots. Most of these pots were made with a red clay/ball<br />
clay blend that Wall has christened “Bali Bagus” (bagus<br />
means “good” in Bahasa Indonesian).<br />
the author Shana Angela Salaff is an artist and instructor living in Fort<br />
Collins, Colorado. In addition to contributing to <strong>Ceramic</strong>s Monthly,<br />
she has written for Pottery Making Illustrated.<br />
www.ceramicartsdaily.org | Copyright © 2012, <strong>Ceramic</strong> Publications Company | Wood Kiln Firing Techniques & Tips | 6<br />
18
Hai Kaburi<br />
Creating Consistent Crusty Wood-Fire Results<br />
by Lee Middleman<br />
Matsumiya Ryoji, a master potter living<br />
in Aomori prefecture, Japan, has developed<br />
a unique <strong>wood</strong>-fire <strong>kiln</strong> to consistently<br />
create ceramic pieces with a very<br />
crusty ash surface. He achieves this by burying the work in four<br />
successive layers of ash during the <strong>firing</strong>.<br />
During his more-than-thirty-year career, Matsumiya has built fourteen<br />
<strong>kiln</strong>s and fired them more than 750 times. He currently has two<br />
noborigamas, an anagama with two additional chambers, an Olsen<br />
crossfire, an archaeological Sueki, and his new bourry box hai<br />
kaburi (ash covering) <strong>kiln</strong>.<br />
Matsumiya was seeking a way to achieve work similar<br />
to the few pieces created in the rebox of his anagama. In<br />
the firebox, only a small area is effective and the work<br />
is subject to damage from stoking. The anagama requires<br />
eight days of <strong>firing</strong>; a long time to carefully<br />
avoid damaging the ware. On a visit to fellow potter<br />
Kusakabe Masakazu in Miharu, Matsumiya<br />
studied Kusakabe’s version of the bourry box<br />
<strong>kiln</strong> in which ash drops from an overhead grate<br />
in one chamber onto the side of the floor of a<br />
second chamber. A few pieces in or near this<br />
area developed the appearance Matsumiya<br />
sought. The ware must be small to avoid<br />
blocking the holes between the chambers.<br />
Thus he decided to design a single-chamber<br />
<strong>kiln</strong> in which low side stokeholes are<br />
used to heat and maintain temperature<br />
while three high stokeholes located in the<br />
front are used to place <strong>wood</strong> on grates over<br />
most of the pieces. Because the work gets<br />
covered in the embers from above, top stoking<br />
alone is insufficient to ensure watertight<br />
vessels and to maintain the temperature to<br />
melt the ash. So, after the <strong>kiln</strong> is brought to a<br />
temperature of 2282°F (1250°C) by side stoking,<br />
long pieces of <strong>wood</strong> are front stoked (he<br />
continues to side stoke to maintain temperature).<br />
The embers created from the front stoking above<br />
fall onto the work.<br />
Matsumiya has found that using four bundles of<br />
<strong>wood</strong> creates the best results. A bundle is about 4 feet<br />
(1.2 m) in diameter and 6 feet (1.8 m) long, made up of<br />
Sake bottle, 15 cm (6 in.) in height, thrown stoneware<br />
(a blend of local Kanayama clay and Shigaraki clay),<br />
unglazed, <strong>wood</strong> fired, by Matsumiya Ryoji.<br />
www.ceramicartsdaily.org<br />
www.ceramicartsdaily.org<br />
| Copyright<br />
| Copyright<br />
© 2011,<br />
©<br />
<strong>Ceramic</strong><br />
2012, <strong>Ceramic</strong><br />
Publications<br />
Publications<br />
Company<br />
Company<br />
| Wood<br />
|<br />
Firing<br />
Wood<br />
Techniques<br />
Kiln Firing<br />
&<br />
Techniques<br />
Tips | Second<br />
& Tips<br />
Edition<br />
| 7<br />
| 7
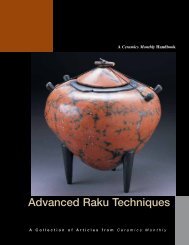
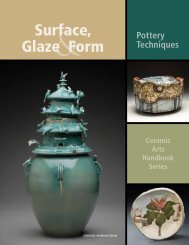
The <strong>kiln</strong> door in the center front of the <strong>kiln</strong> is bricked up for <strong>firing</strong>. A square in the middle of the <strong>kiln</strong> door becomes<br />
a top stokehole later in the <strong>firing</strong> (see diagram below). The before-and-after pictures above show the<br />
ware stacked under removable brick hobs (left) and the bed of coals (right), produced by top stoking, which<br />
covers the ware later in the <strong>firing</strong>.<br />
angle iron arch supports<br />
concrete wall for<br />
added support<br />
side stokehole<br />
(one on each side)<br />
top stokeholes<br />
draft holes for top stoking<br />
draft holes for side stoking<br />
www.ceramicartsdaily.org | Copyright © 2011, <strong>Ceramic</strong> Publications Company | Wood Firing Techniques & Tips | Second Edition | 8<br />
www.ceramicartsdaily.org | Copyright © 2012, <strong>Ceramic</strong> Publications Company | Wood Kiln Firing Techniques & Tips | 8
The central row<br />
of brick hobs are<br />
removable to allow<br />
for stacking ware<br />
below the grate.<br />
The top firebox<br />
runs the entire<br />
length of the<br />
ware chamber.<br />
The ware stacking<br />
area is directly beneath<br />
brick grates,<br />
and becomes buried<br />
in coals as the<br />
<strong>firing</strong> progresses.<br />
Top View<br />
Side View<br />
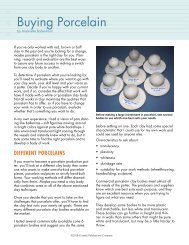
As the <strong>firing</strong> nears completion, Matsumiya adjusts the draft hole in the front of the Hai Kaburi <strong>kiln</strong> before<br />
continuing to side stoke.<br />
www.ceramicartsdaily.org | Copyright © 2011, <strong>Ceramic</strong> Publications Company | Wood Firing Techniques & Tips | Second Edition | 9<br />
www.ceramicartsdaily.org | Copyright © 2012, <strong>Ceramic</strong> Publications Company | Wood Kiln Firing Techniques & Tips | 9
¾-inch square (2×2 cm) <strong>wood</strong> scrap. As each bundle is added<br />
gradually, the ash coals completely cover the ware. Then<br />
they are allowed to burn down before the next bundle is<br />
added. This ash-covering process takes about 24 hours. Top<br />
and side stoking are complete when Matsumiya is satisfied<br />
with the coverage of final ash. The graph below illustrates a<br />
typical <strong>firing</strong> schedule. As a result, the ware develops melted<br />
glaze at the upper surfaces, different colors (gray, brown,<br />
black and some blushes), and a crusty finish below. He prefers<br />
ash glaze melted on the top third to half of the ware,<br />
leaving a rough, crusty and eroded appearance on the remaining<br />
lower portion. Constructed of hardbrick, the <strong>kiln</strong><br />
takes four days to cool. The larger ware is soaked in hot<br />
water when unloaded to prevent cracking. Surfaces of some<br />
ware, such as sake bottles, are lightly sanded with fine sandpaper<br />
to make them easier to use.<br />
Matsumiya now bisque fires most pieces to minimize<br />
breakage. The interior dimensions reflect practical considerations.<br />
The lumber company scrap is just less than 6½ feet<br />
(2 m) long and six hardbricks are 4½ feet (1.4 m) wide, allowing<br />
for mortar.<br />
The <strong>kiln</strong> produces consistent results, but Matsumiya<br />
will continue to adjust the <strong>firing</strong> process to improve the<br />
look he prefers.<br />
For more information on Kusakabe Masakazu’s bourry box<br />
<strong>kiln</strong>, see Japanese Wood-fired <strong>Ceramic</strong>s, by Kusakabe and Marc<br />
Lancet (kp books, 2005).<br />
the author Lee Middleman is a full-time ceramics artist living in<br />
the San Francisco Bay Area. He participates in <strong>wood</strong> <strong>firing</strong> in Japan,<br />
Korea and China. His website is www.leemiddleman.com.<br />
Firing Schedule<br />
The <strong>kiln</strong> is fired with oil for the first 24 hours in order to<br />
get the temperature up to about 450°C (850°F), after which<br />
the <strong>kiln</strong> is side stoked for the remainder of the <strong>firing</strong>. Once<br />
the temperature reaches 1250°C (2282°F ), top stoking<br />
begins in order to bury the ware in embers from above.<br />
Vase, 30 cm (12 in.) in height, thrown stoneware<br />
(a blend of local Kanayama clay and Shigaraki<br />
clay), unglazed, <strong>wood</strong> fired on its side with ash<br />
drips, by Matsumiya Ryoji, Aomori, Japan.<br />
www.ceramicartsdaily.org | Copyright © 2012, <strong>Ceramic</strong> Publications Company | Wood Kiln Firing Techniques & Tips | 10<br />
www.ceramicartsdaily.org | Copyright © 2011, <strong>Ceramic</strong> Publications Company | Wood Firing Techniques & Tips | Second Edition | 10
The Manabigama<br />
For more than thirty years now, I have been building,<br />
<strong>firing</strong> and maintaining various large <strong>wood</strong><br />
<strong>kiln</strong>s. Almost all of them have been a design taken<br />
directly from the chamber <strong>kiln</strong>s used historically<br />
around the world. My present <strong>kiln</strong> is fired seven times<br />
a year for my personal work and also for group workshops.<br />
The <strong>kiln</strong> is a 300-cubic-foot cross-draft, with<br />
three chambers in the traditional noborigama style.<br />
Two of the chambers are used for glaze work and one<br />
is used for salt glazing.<br />
I started using this <strong>kiln</strong> nine years ago for teaching<br />
group workshop <strong>firing</strong>s. I schedule three a year, which is<br />
all I can manage given the labor and time involved. Each<br />
year, the groups enjoy the experience and the work that<br />
comes from it, but many ask for additional space in my<br />
<strong>kiln</strong> at other times during the year, which is not possible<br />
given my production schedule.<br />
With new ideas in mind, I set out to build a very versatile<br />
and efficient <strong>wood</strong>-<strong>firing</strong> <strong>kiln</strong> that could be used by students<br />
who had interest in a complete hands-on experience, from the<br />
preparation, loading, <strong>firing</strong> and unloading to the final cleanup<br />
phase. I didn’t want to interfere with the successful larger<br />
<strong>firing</strong>s, in which students can get a large volume of <strong>wood</strong>-fired<br />
pots without the in-depth hands-on experience. The new <strong>kiln</strong><br />
would allow me to cut down on the extensive labor, fuel and<br />
overhead costs of my larger <strong>kiln</strong>.<br />
I named the new <strong>kiln</strong> “Manabigama” at the suggestion of<br />
my friend Phil Berneburg, former technical editor for CM. In<br />
Japanese, mana means educational or learning, bi means a<br />
thing of beauty, and gama means <strong>kiln</strong>. The Manabigama is a<br />
traditional design with a few simple modifications. I see it as a<br />
cross between an anagama and a groundhog-style <strong>kiln</strong>. Basically,<br />
it is a cross-draft tube built into the side of a hill.<br />
The overall interior dimensions are 24 inches in width, 7<br />
feet in depth, 40 inches in height. Its firebox is in the front,<br />
incorporated into the inside with a grate system, and extra air<br />
intakes are built into the front and sides. This is done to provide<br />
more secondary air intake to help burn green or wet fuel.<br />
The firebox is plenty adequate being 2 feet wide, 2 feet deep<br />
and 30 inches high from the floor to ware level. The chimney<br />
has inside dimensions of 9 inches deep by 18 inches wide and<br />
is 12 feet high. The shape is a long rectangle with two straight,<br />
18-inch-tall side walls and a catenary arch built on top. This<br />
creates ample headroom for ease of loading, as well as extra<br />
height for stacking and tall pieces.<br />
There is approximately 24 cubic feet of ware space, more<br />
than enough for teaching purposes. The <strong>kiln</strong> door is in front,<br />
only halfway down, and is bricked up including the stoke<br />
by John Thies<br />
hole. It can be loaded in two to three hours, fires evenly to<br />
Cone 10–12 in eight hours tops, or if you choose, you can fire<br />
two to three days depending on how much ash buildup you<br />
like. The consumption of fuel is also minimal—less than half<br />
a cord of <strong>wood</strong>.<br />
All in all, the Manabigama is a very simple design to build.<br />
It is capable of yielding wonderful ash-glazed pieces with a<br />
minimum of labor, fuel and overhead costs. And it is a fantastic<br />
<strong>wood</strong>-fired <strong>kiln</strong> for teaching without the tremendous strain<br />
of a large three-chambered <strong>kiln</strong>.<br />
Thanks to Phil Berneburg, who was instrumental in inspiring me to<br />
build this <strong>kiln</strong>. For further information on Monocacy Pottery, see<br />
www.monocacypottery.com.<br />
John Thies stokes the 24-cubic-foot Manabigama.<br />
Side view of the Manabigama during the cooling phase.<br />
www.ceramicartsdaily.org | Copyright | Copyright © 2011, <strong>Ceramic</strong> © 2012, Publications <strong>Ceramic</strong> Publications Company Company | Wood Firing | Wood Techniques Kiln Firing & Techniques Tips | Second & Tips Edition | 11 | 11
Thoughts from a Manabigama<br />
Guinea Pig<br />
by Mea Rhee<br />
I<br />
had attended <strong>kiln</strong> workshops for several<br />
years, and felt I was ready for more. I was<br />
looking for a <strong>wood</strong> <strong>kiln</strong> that I could try to<br />
fire by myself when John called and said,<br />
“Come see my new <strong>kiln</strong>. I think you’re going to<br />
like it.” Of course I volunteered to test fire it.<br />
I had help and John was always nearby, but<br />
for the first time I was able to manage the entire<br />
process, which was my goal for this <strong>firing</strong>. The<br />
<strong>kiln</strong>’s design is just right for a student at my<br />
level. All of its processes are small, straightforward<br />
and flexible. I love that there is no barrier<br />
between the firebox and the pots, so the pots<br />
receive as much effect from the fire as possible.<br />
This is my goal aesthetically too.<br />
I am already busy designing pots for my next<br />
<strong>kiln</strong> load. I plan to gain as much understanding<br />
as I can each time I fire it, and enjoy every<br />
minute of it. This <strong>kiln</strong> is going to carry me to a<br />
point in the future when I’m ready to build my<br />
own. And when I get there, I’ll probably build<br />
something very similar.<br />
Bottle, 5 in. (13 cm) in height, stoneware with<br />
natural fly ash glaze, <strong>wood</strong> fired to Cone 12 in<br />
the Manabigama, by Mea Rhee, Silver Spring,<br />
Maryland.<br />
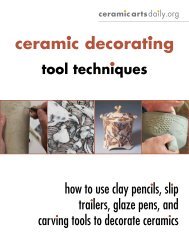
12’<br />
4<br />
4<br />
4<br />
Chimney<br />
Side View of Kiln<br />
Ware Chamber<br />
The Manabigama <strong>kiln</strong> was constructed<br />
with one layer of firebrick,<br />
a 2-inch coating of mud and straw,<br />
and steel buttressing, which is an<br />
optional feature.<br />
Top View of Kiln<br />
www.ceramicartsdaily.org | Copyright | Copyright © 2011, © <strong>Ceramic</strong> 2012, <strong>Ceramic</strong> Publications Publications Company Company | Wood | Firing Wood Techniques Kiln Firing & Techniques Tips | Second & Tips Edition | 12 | 12<br />
9”<br />
4<br />
4<br />
Flue<br />
4<br />
4<br />
4<br />
4<br />
4<br />
4½”<br />
60”<br />
Chimney<br />
4<br />
Flue Exits<br />
4½”w × 9“h<br />
Ware Chamber<br />
24”<br />
4<br />
Firebox<br />
24”<br />
4<br />
4<br />
Air Intakes<br />
4<br />
4<br />
4<br />
4<br />
9”<br />
4<br />
4<br />
40”<br />
4<br />
4<br />
60”<br />
4<br />
4<br />
25”<br />
4<br />
4<br />
4<br />
4<br />
4<br />
8”<br />
l l l<br />
4<br />
Removable steel<br />
grate bars<br />
Ash Pit<br />
4<br />
24”<br />
Fire Box<br />
4<br />
4<br />
4<br />
4<br />
67”<br />
4<br />
4<br />
4<br />
Three removable<br />
steel grate bars<br />
1½–2” in diameter<br />
Stoke<br />
Hole<br />
Air<br />
Intake
Wood-fired Raku Kiln<br />
by Nesrin During<br />
Handbuilt vessel, approximately 6 inches in height, with ironspotted<br />
raku glaze, reduced in sawdust, by Nesrin During.<br />
Wood isn’t just for high <strong>firing</strong>. You can build a simple raku <strong>kiln</strong><br />
and fire your work with <strong>wood</strong> to get stunning results.<br />
This simple, self-built raku <strong>kiln</strong> is made of stacked<br />
bricks and sized to fit what I’m planning to fire.<br />
Sometimes I start <strong>firing</strong> small objects, then add<br />
another one or two rows of bricks for the bigger<br />
objects. These <strong>kiln</strong>s are built wherever I want them to<br />
stand, taking into consideration the direction of the wind.<br />
The day after I’ve finished <strong>firing</strong>, I put away the bricks, out<br />
of sight under a roof or in a shed to keep them dry until<br />
the next <strong>firing</strong>.<br />
Kiln Construction<br />
A typical <strong>kiln</strong> is built from about 50 insulating bricks<br />
(IFBs), a square <strong>kiln</strong> shelf (size depending on what I want<br />
to fire), a metal grill for a grate, a piece of sheet metal,<br />
and some broken shelf pieces. It takes about 45 minutes<br />
to build, and fires to about 1650°F in about 45 to 60<br />
minutes for the first <strong>firing</strong>; thereafter, every load takes<br />
15 to 20 minutes (one can see the glaze melting, the pots<br />
shining in the flames, from the top of the <strong>kiln</strong>).<br />
To begin, I level the surface with a layer of dirt; it will<br />
also protect what is beneath (concrete, for example, can<br />
crack with the heat). I look at the direction of the wind<br />
Wood-fired raku vessel, approximately 6 inches in height,<br />
handbuilt, with poured glazes.<br />
and accordingly build the firemouth to receive the wind.<br />
Depending on the size of the <strong>kiln</strong> shelf (it’s going to<br />
diagonally span the walls), I lay two courses of bricks to<br />
establish the back and side walls. Upon these the grate<br />
is placed so that the ashes can fall through (figure 1). (My<br />
iron grate was salvaged from a dump; one could also use<br />
a kitchen oven grate, which would last a few <strong>firing</strong>s).<br />
Then another two rows of bricks are laid, and the <strong>kiln</strong><br />
shelf placed diagonally so that the walls support three<br />
corners. A piece of sheet iron (also salvaged from the<br />
dump, but you can also use a piece of angle-iron) across<br />
the front of the <strong>kiln</strong> supports the fourth corner (figure 2).<br />
Because some of the bricks in the following course<br />
will stand on the <strong>kiln</strong> shelf, I have to raise the others to<br />
the same height with pieces of broken shelves. After this<br />
leveling course, a couple of rows are laid in a diminishing<br />
circular pattern (figure 3). I also partially close the top<br />
of the <strong>kiln</strong> with broken shelves, leaving a central hole to<br />
function as a chimney.<br />
Firing<br />
I fire this <strong>kiln</strong> (alone or with the help of students) with<br />
scrap <strong>wood</strong>. The <strong>wood</strong> should be dry and thinly split.<br />
www.ceramicartsdaily.org | Copyright © 2012, <strong>Ceramic</strong> Publications Company | Wood Kiln Firing Techniques & Tips | 13<br />
www.ceramicartsdaily.org | Copyright © 2011, <strong>Ceramic</strong> Publications Company | Wood Firing Techniques & Tips | Second Edition | 13
Two courses of bricks are laid to establish<br />
the back and side walls, then an iron<br />
grate positioned on top.<br />
4<br />
The <strong>kiln</strong> fires to about 1650°F in 45 to<br />
60 minutes, while pieces for the next<br />
<strong>firing</strong> preheat on top.<br />
1<br />
I start with some newspaper and thinly split <strong>wood</strong><br />
(figure 4).<br />
The fire is well fed in the beginning in order to get<br />
the bricks to temperature, but after the first load is<br />
done, I fire with less <strong>wood</strong> and rake the fallen ash from<br />
underneath the grate to ensure the fire has enough oxygen<br />
to burn well.<br />
Because the bricks are so loosely stacked, I can create<br />
new openings between bricks to manipulate the flames in<br />
a certain direction, causing interesting effects on pots.<br />
The pots intended to go into the next <strong>firing</strong> are placed<br />
on top of the <strong>kiln</strong> to dry. When the glaze on the pots<br />
inside the <strong>kiln</strong> is shiny and molten, I remove a few bricks<br />
from one side of the top to facilitate taking the pots out<br />
(figure 5); the pots are then placed in a metal bin containing<br />
sawdust (figure 6).<br />
The glaze is a simple: alkali-borate frit (70%) with<br />
kaolin (30%). With additions of 0.5% to 3% iron oxide,<br />
this gives very beautiful pinks and grays (pink to pome-<br />
After another two courses of brick, a<br />
sheet of iron across the firemouth supports<br />
the corner of a <strong>kiln</strong> shelf.<br />
www.ceramicartsdaily.org www.ceramicartsdaily.org | Copyright | Copyright © 2011, © <strong>Ceramic</strong> 2012, <strong>Ceramic</strong> Publications Publications Company Company | Wood | Firing Wood Techniques Kiln Firing & Techniques Tips | Second & Tips Edition | 14 | 14<br />
2<br />
3<br />
Some of the bricks in the following<br />
course stand on the <strong>kiln</strong> shelf, so level<br />
with pieces of broken <strong>kiln</strong> shelf.<br />
When the glaze on the pots inside is molten, remove a few bricks from one side of<br />
the chamber to facilitate removal of the pots for post-fire reduction.<br />
5<br />
6<br />
granate red in oxidation, and gray to black in reduction).<br />
Additions of 2% to 3% copper carbonate yield apple<br />
green in oxidation and bordeaux red in reduction. Other<br />
oxide combinations, such as iron and copper, or iron and<br />
manganese, are also good.<br />
The amount of crackle depends on the type of clay used<br />
and the handling. After taking the piece out of the <strong>kiln</strong>,<br />
if you keep it in the air for a minute or so before putting<br />
it in the reduction container, you’re bound to get more<br />
crazing, especially on a smooth surface. If the surface is<br />
rough, you’re more likely to get iron oxide “bleeding,”<br />
producing thousands of little dots and giving the piece a<br />
rocklike appearance.<br />
Building such a <strong>kiln</strong> requires few materials, and fuel for<br />
<strong>firing</strong> is equally economical. Because it is a <strong>wood</strong> <strong>firing</strong>,<br />
there is bound to be some oxidation and some reduction<br />
at the same time. The resulting variation in surfaces gives<br />
beauty and individuality to the work. Not every piece<br />
comes out well, but some are really wonderful.
Lots of Inventory • Lowest Prices<br />
Unparalleled service & refractory design assistance for over<br />
35 years by the folks who truly care about your business<br />
• Firebrick – straights, arches, wedges & tiles<br />
• Insulating firebrick – straights, arches, wedges & tiles<br />
• <strong>Ceramic</strong> fiber blankets, boards, papers & textiles<br />
• Castables in several insulating & dense compositions<br />
• Mortars, patches & inexpensive coatings<br />
• Nitride & Fines Bonded Kiln Shelves<br />
• Custom Manabigama Kiln Refractory Package<br />
Kiln Furniture<br />
GALORE!<br />
ALL SIZES AVAILABLE!<br />
REFRACTORY SOLUTIONS<br />
P. O. Box 716, Lithonia, GA 30058<br />
Phone: 678.336.7090 Fax: 678.336.7094<br />
Email: LRS@LarkinRefractory.com<br />
www.LarkinRefractory.com<br />
www.ceramicartsdaily.org | Copyright © 2012, <strong>Ceramic</strong> Publications Company | Wood Kiln Firing Techniques & Tips | 15<br />
www.ceramicartsdaily.org | Copyright © 2011, <strong>Ceramic</strong> Publications Company | Wood Firing Techniques & Tips | Second Edition | 15<br />
L<br />
R<br />
S