Mini MP 170 V.V. Mini MP 220 V.V.
Mini MP 170 V.V. Mini MP 220 V.V.
Mini MP 170 V.V. Mini MP 220 V.V.

You also want an ePaper? Increase the reach of your titles
YUMPU automatically turns print PDFs into web optimized ePapers that Google loves.
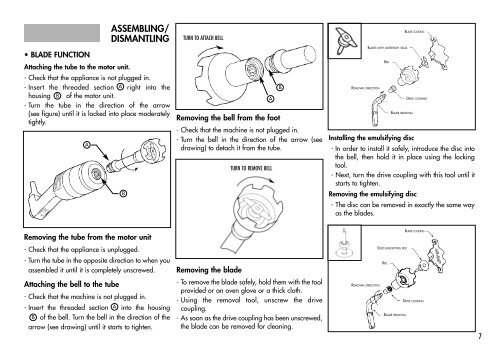
• BLADE FUNCTION<br />
ASSEMBLING/<br />
DISMANTLING<br />
Removing the tube from the motor unit<br />
- Check that the appliance is unplugged.<br />
- Turn the tube in the opposite direction to when you<br />
assembled it until it is completely unscrewed.<br />
Attaching the bell to the tube<br />
- Check that the machine is not plugged in.<br />
- Insert the threaded section A into the housing<br />
B of the bell. Turn the bell in the direction of the<br />
arrow (see drawing) until it starts to tighten.<br />
TURN TO ATTACH BELL<br />
Attaching the tube to the motor unit.<br />
- Check that the appliance is not plugged in.<br />
- Insert the threaded section A right into the<br />
B<br />
REMOVAL DIRECTION<br />
housing B of the motor unit.<br />
A<br />
DRIVE COUPLING<br />
- Turn the tube in the direction of the arrow<br />
(see figure) until it is locked into place moderately<br />
tightly.<br />
Removing the bell from the foot<br />
- Check that the machine is not plugged in.<br />
BLADE REMOVAL<br />
- Turn the bell in the direction of the arrow (see Installing the emulsifying disc<br />
A<br />
drawing) to detach it from the tube.<br />
- In order to install it safely, introduce the disc into<br />
the bell, then hold it in place using the locking<br />
TURN TO REMOVE BELL<br />
tool.<br />
- Next, turn the drive coupling with this tool until it<br />
starts to tighten.<br />
B<br />
Removing the emulsifying disc<br />
- The disc can be removed in exactly the same way<br />
as the blades.<br />
Removing the blade<br />
- To remove the blade safely, hold them with the tool<br />
provided or an oven glove or a thick cloth.<br />
- Using the removal tool, unscrew the drive<br />
coupling.<br />
- As soon as the drive coupling has been unscrewed,<br />
the blade can be removed for cleaning.<br />
REMOVAL DIRECTION<br />
BLADES WITH WATERTIGHT SEALS<br />
BELL<br />
SOLID EMULSIFYING DISC<br />
BELL<br />
BLADE REMOVAL<br />
BLADE LOCKING<br />
BLADE LOCKING<br />
DRIVE COUPLING<br />
7