Instruction Manual - Black & Decker
Instruction Manual - Black & Decker
Instruction Manual - Black & Decker

Create successful ePaper yourself
Turn your PDF publications into a flip-book with our unique Google optimized e-Paper software.
AD600-XE<br />
www.blackanddecker.com.au<br />
Australia<br />
New Zealand
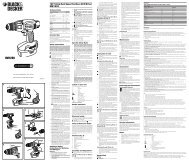
A<br />
E<br />
2<br />
4<br />
3<br />
1<br />
2<br />
3<br />
5<br />
Position <strong>Instruction</strong>s<br />
6<br />
5<br />
7<br />
4<br />
B<br />
C<br />
D
Intended use<br />
Your <strong>Black</strong> & <strong>Decker</strong> drill/screwdriver has been designed for<br />
screwdriving applications and for drilling in wood, metal and<br />
plastics. This tool is intended for consumer use only.<br />
Safety instructions<br />
General power tool safety warnings<br />
Warning! Read all safety warnings and all<br />
instructions. Failure to follow the warnings and<br />
instructions listed below may result in electric shock,<br />
fire and/or serious injury.<br />
Save all warnings and instructions for future reference.<br />
The term "power tool" in all of the warnings listed below refers<br />
to your mains operated (corded) power tool or battery<br />
operated (cordless) power tool.<br />
1. Work area safety<br />
a. Keep work area clean and well lit. Cluttered or dark<br />
areas invite accidents.<br />
b. Do not operate power tools in explosive atmospheres,<br />
such as in the presence of flammable liquids, gases<br />
or dust. Power tools create sparks which may ignite the<br />
dust or fumes.<br />
c. Keep children and bystanders away while operating<br />
a power tool. Distractions can cause you to lose control.<br />
2. Electrical safety<br />
a. Power tool plugs must match the outlet. Never modify<br />
the plug in any way. Do not use any adapter plugs<br />
with earthed (grounded) power tools. Unmodified plugs<br />
and matching outlets will reduce risk of electric shock.<br />
b. Avoid body contact with earthed or grounded<br />
surfaces such as pipes, radiators, ranges and<br />
refrigerators. There is an increased risk of electric shock<br />
if your body is earthed or grounded.<br />
c. Do not expose power tools to rain or wet conditions.<br />
Water entering a power tool will increase the risk of<br />
electric shock.<br />
d. Do not abuse the cord. Never use the cord for carrying,<br />
pulling or unplugging the power tool. Keep cord away<br />
from heat, oil, sharp edges or moving parts. Damaged<br />
or entangled cords increase the risk of electric shock.<br />
e. When operating a power tool outdoors, use an<br />
extension cord suitable for outdoor use. Use of a cord<br />
suitable for outdoor use reduces the risk of electric shock.<br />
f. If operating a power tool in a damp location is<br />
unavoidable, use a residual current device (RCD)<br />
protected supply. Use of an RCD reduces the risk of<br />
electric shock.<br />
3. Personal safety<br />
a. Stay alert, watch what you are doing and use common<br />
sense when operating a power tool. Do not use a power<br />
tool while you are tired or under the influence of drugs,<br />
alcohol or medication. A moment of inattention while<br />
operating power tools may result in serious personal injury.<br />
b. Use personal protective equipment. Always wear eye<br />
protection. Protective equipment such as dust mask,<br />
non-skid safety shoes, hard hat, or hearing protection<br />
used for appropriate conditions will reduce personal injuries.<br />
c. Prevent unintentional starting. Ensure the switch is in<br />
the off-position before connecting to power source<br />
and/or battery pack, picking up or carrying the tool.<br />
Carrying power tools with your finger on the switch or<br />
energising power tools that have the switch on invites<br />
accidents.<br />
d. Remove any adjusting key or wrench before turning<br />
the power tool on. A wrench or a key left attached to a<br />
rotating part of the power tool may result in personal injury.<br />
e. Do not overreach. Keep proper footing and balance at<br />
all times. This enables better control of the power tool in<br />
unexpected situations.<br />
f. Dress properly. Do not wear loose clothing or<br />
jewellery. Keep your hair, clothing and gloves away<br />
from moving parts. Loose clothes, jewellery or long hair<br />
can be caught in moving parts.<br />
g. If devices are provided for the connection of dust<br />
extraction and collection facilities, ensure these are<br />
connected and properly used. Use of dust collection can<br />
reduce dust-related hazards.<br />
4. Power tool use and care<br />
a. Do not force the power tool. Use the correct power<br />
tool for your application. The correct power tool will do<br />
the job better and safer at the rate for which it was<br />
designed.<br />
b. Do not use the power tool if the switch does not turn it<br />
on and off. Any power tool that cannot be controlled with<br />
the switch is dangerous and must be repaired.<br />
c. Disconnect the plug from the power source and/or the<br />
battery pack from the power tool before making any<br />
adjustments, changing accessories, or storing power<br />
tools. Such preventive safety measures reduce the risk of<br />
starting the power tool accidentally.<br />
d. Store idle power tools out of the reach of children and<br />
do not allow persons unfamiliar with the power tool or<br />
these instructions to operate the power tool. Power<br />
tools are dangerous in the hands of untrained users.<br />
3
e. Maintain power tools. Check for misalignment or<br />
binding of moving parts, breakage of parts and any<br />
other condition that may affect the power tools<br />
operation. If damaged, have the power tool repaired<br />
before use. Many accidents are caused by poorly<br />
maintained power tools.<br />
f. Keep cutting tools sharp and clean. Properly<br />
maintained cutting tools with sharp cutting edges are less<br />
likely to bind and are easier to control.<br />
g. Use the power tool, accessories and tool bits etc.,<br />
in accordance with these instructions, taking into<br />
account the working conditions and the work to be<br />
performed. Use of the power tool for operations different<br />
from those intended could result in a hazardous situation.<br />
5. Battery tool use and care<br />
a. Recharge only with the charger specified by the<br />
manufacturer. A charger that is suitable for one type of<br />
battery pack may create a risk of fire when used with<br />
another battery pack.<br />
b. Use power tools only with specifically designated<br />
battery packs. Use of any other battery packs may create<br />
a risk of injury and fire.<br />
c. When battery pack is not in use, keep it away from<br />
other metal objects, like paper clips, coins, keys, nails,<br />
screws, or other small metal objects, that can make a<br />
connection from one terminal to another. Shorting the<br />
battery terminals together may cause burns or a fire.<br />
d. Under abusive conditions, liquid may be ejected from<br />
the battery; avoid contact. If contact accidentally<br />
occurs, flush with water. If liquid contacts eyes,<br />
additionally seek medical help. Liquid ejected from the<br />
battery may cause irritation or burns.<br />
6. Service<br />
a. Have your power tool serviced by a qualified repair<br />
person using only identical replacement parts. This will<br />
ensure that the safety of the power tool is maintained.<br />
b. The tool always is supplied via residual current device with<br />
a rated residual current of 30 mA or less.<br />
SPECIFIC SAFETY RULES<br />
◆ Hold tool by insulated gripping surfaces when<br />
performing an operation where the cutting tool may<br />
contact hidden wiring or its own cord. Contact with a<br />
"live" wire will make exposed metal parts of the tool "live"<br />
and shock the operator.<br />
◆ Avoid body contact with grounded surfaces such as<br />
pipes, radiators, ranges and refrigerators. There is an<br />
increased risk of electric shock if your body is grounded.<br />
4<br />
The label on your tool may include the following symbols.<br />
V....................volts<br />
A....................Amperes<br />
Hz..................Hertz<br />
W...................Watts<br />
min.................Minutes<br />
.................Alternating Current<br />
.................Direct Current<br />
n0...................No Load Speed<br />
..................Class II Construction<br />
..................Earthing Terminal<br />
..................Safety alert symbol<br />
.../min ............revolutions or reciprocations per minute<br />
WARNING!Some dust created by power sanding, sawing,<br />
grinding, drilling, and other construction activities contains<br />
chemicals known to cause cancer, birth defects or other<br />
reproductive harm. Some examples of these chemicals are:<br />
◆ Lead from lead-based paints,<br />
◆ crystalline silica from bricks and cement and other<br />
masonry products, and arsenic and chromium from<br />
chemically-treated lumber. (CCA)<br />
Your risk from these exposures varies, depending on how<br />
often you do this type of work. To reduce your exposure to<br />
these chemicals: work in a well ventilated area, and work with<br />
approved safety equipment, such as those dust masks that<br />
are specially designed to filter out microscopic particles.<br />
◆ Avoid prolonged contact with dust from power<br />
sanding, sawing, grinding, drilling, and other<br />
construction activities. Wear protective clothing and<br />
wash exposed areas with soap and water. Allowing dust<br />
to get into your mouth, eyes, or lay on the skin may<br />
promote absorption of harmful chemicals.<br />
FEATURES (FIGURE A)<br />
1. On / Off Switch (forward direction)<br />
2. On / Off Switch (reverse direction)<br />
3. Spindle lock collar<br />
4. Bit holder sleeve<br />
5. Battery holder<br />
BATTERY INSTALLATION<br />
The AD600 drill/driver uses four size AA alkaline batteries only.<br />
To install batteries in your tool, remove the battery holder end<br />
cap (5) by depressing the two tabs (7), as shown in Figure B.<br />
Pull the battery holder out of the tool, as shown in Figure C<br />
and observe the battery position instructions printed on the<br />
battery holder. (The plus and minus ends of the batteries are<br />
marked with + and - signs.)
NOTE:<br />
Some battery manufacturers mark only the plus (+) ends of<br />
the batteries. In these cases, the unmarked end of the battery<br />
is the (-) end. Install the batteries as indicated and reinstall the<br />
cap.<br />
The end cap and battery holder assembly will only fit back into<br />
the tool one way. If it does no seem to fit properly, don't force<br />
it. Rotate it one half way around and try it again. When it is in<br />
all the way, ensure that the two tabs snap into place.<br />
IMPORTANT:<br />
Incorrectly installed bat teries will reduce the tool's<br />
performance or prevent its operation entirely. If your batteries<br />
are fresh and you feel the tool lacks power or doesn't run,<br />
double check the battery holder to see if the batteries are<br />
installed properly (+ and - signs aligned as shown.) If proper<br />
installation and fresh batteries do not yield satisfactory<br />
performance, take or send the tool to your local <strong>Black</strong> &<br />
<strong>Decker</strong> Service Center for a thorough inspection.<br />
Be careful when storing the tool so that the switch is not<br />
inadvertently depressed by some object. This would, of<br />
course, deplete the batteries in just a short while.<br />
OPERATING INSTRUCTIONS<br />
INSERTING AN ACCESSORY (FIGURE D)<br />
◆ Hold the unit in one hand.<br />
◆ Pull the sleeve (4) back.<br />
◆ Insert the shank of the accessory (6) into the holder.<br />
◆ Release the sleeve.<br />
MANUAL SPINDLE LOCK (FIGURE E)<br />
The manual spindle lock allows you to use the tool as a<br />
regular manual screwdriver. You can give an extra twist to<br />
firmly tighten a screw or to loosen a very tight screw.<br />
◆ To activate the spindle lock, turn the collar (3) to show the<br />
LOCK symbol.<br />
◆ To release the spindle lock, turn the collar (3) to show the<br />
POWER symbol.<br />
NOTE: Do not attempt to operate the tool when the spindle<br />
lock is activated.<br />
OPERATING THE TOOL (FIGURE A)<br />
◆ Make sure that the spindle lock is released.<br />
◆ To tighten a screw or nut, keep the on/off switch (1)<br />
depressed.<br />
◆ To loosen a screw or nut, keep the on/off switch (2)<br />
depressed.<br />
◆ To switch the tool off, release the on/off switch.<br />
Hints for optimum use<br />
◆ Always use the correct type of screwdriver bit or drill bit.<br />
◆ If screws are difficult to tighten, try applying a small<br />
amount of washing liquid or soap as a lubricant.<br />
◆ Use the spindle lock to loosen very tight screws or to<br />
firmly tighten screws.<br />
◆ Always hold the tool and screwdriver bit in a straight line<br />
with the screw.<br />
◆ Do not use drill bits with a diameter larger than 1/4 inch.<br />
◆ When drilling in plasterboard, use a 3/16 inch drill bit for<br />
the supplied plugs.<br />
◆ When screwing in wood, drill a 1/8 inch pilot hole for the<br />
supplied screws. A pilot hole guides the screw and<br />
prevents splintering or distortion of the wood.<br />
Maintenance<br />
Your <strong>Black</strong> & <strong>Decker</strong> tool has been designed to operate over a<br />
long period of time with a minimum of maintenance.<br />
Continuous satisfactory operation depends upon proper tool<br />
care and regular cleaning.<br />
Your charger does not require any maintenance apart from<br />
regular cleaning.<br />
Warning! Before performing any maintenance on the tool,<br />
remove the battery from the tool. Unplug the charger before<br />
cleaning it.<br />
◆ Regularly clean the ventilation slots in your tool and<br />
charger using a soft brush or dry cloth.<br />
◆ Regularly clean the motor housing using a damp cloth.<br />
Do not use any abrasive or solvent-based cleaner.<br />
Protecting the environment<br />
Separate collection. This product must not be<br />
disposed of with normal household waste.<br />
Should you find one day that your <strong>Black</strong> & <strong>Decker</strong> product<br />
needs replacement, or if it is of no further use to you, do not<br />
dispose of it with household waste. Make this product<br />
available for separate collection.<br />
Separate collection of used products and packaging<br />
allows materials to be recycled and used again.<br />
Re-use of recycled materials helps prevent<br />
environmental pollution and reduces the demand for<br />
raw materials.<br />
Local regulations may provide for separate collection of<br />
electrical products from the household, at municipal waste<br />
sites or by the retailer when you purchase a new product.<br />
5
<strong>Black</strong> & <strong>Decker</strong> provides a facility for the collection and<br />
recycling of <strong>Black</strong> & <strong>Decker</strong> products once they have reached<br />
the end of their working life. To take advantage of this service<br />
please return your product to any authorised repair agent who<br />
will collect them on our behalf.<br />
You can check the location of your nearest authorised repair<br />
agent by contacting your local <strong>Black</strong> & <strong>Decker</strong> office at the<br />
address indicated in this manual. Alternatively, a list of<br />
authorised <strong>Black</strong> & <strong>Decker</strong> repair agents and full details of our<br />
after-sales service and contacts are available on the Internet<br />
at: www.2helpU.com<br />
Batteries<br />
6<br />
<strong>Black</strong> & <strong>Decker</strong> batteries can be recharged many<br />
times. At the end of their useful life, discard batteries<br />
with due care for our environment:<br />
◆ Run the battery down completely, then remove it from the<br />
tool.<br />
◆ NiCd, NiMH and Li-Ion batteries are recyclable. Take them<br />
to any authorised repair agent or a local recycling station.<br />
Technical data<br />
Voltage<br />
AD600-XE<br />
VDC 6<br />
No-load speed min-1 130<br />
Bit holder 1/4" (6.35 mm)<br />
Weight kg 0.3<br />
Battery<br />
Voltage V 1.5<br />
Battery type AA alkaline<br />
Guarantee<br />
<strong>Black</strong> & <strong>Decker</strong> is confident of the quality of its products and<br />
offers an outstanding guarantee. This guarantee statement is<br />
in addition to and in no way prejudices your statutory rights.<br />
The guarantee is valid within the territories of the Member<br />
States of the European Union and the European Free Trade<br />
Area.<br />
If a <strong>Black</strong> & <strong>Decker</strong> product becomes defective due to faulty<br />
materials, workmanship or lack of conformity, within 24 months<br />
from the date of purchase, <strong>Black</strong> & <strong>Decker</strong> guarantees to<br />
replace defective parts, repair products subjected to fair wear<br />
and tear or replace such products to ensure minimum<br />
inconvenience to the customer unless:<br />
◆ The product has been used for trade, professional or hire<br />
purposes;<br />
◆ The product has been subjected to misuse or neglect;<br />
◆ The product has sustained damage through foreign<br />
objects, substances or accidents;<br />
◆ Repairs have been attempted by persons other than<br />
authorised repair agents or <strong>Black</strong> & <strong>Decker</strong> service staff.<br />
To claim on the guarantee, you will need to submit proof of<br />
purchase to the seller or an authorised repair agent. You can<br />
check the location of your nearest authorised repair agent by<br />
contacting your local <strong>Black</strong> & <strong>Decker</strong> office at the address<br />
indicated in this manual. Alternatively, a list of authorised<br />
<strong>Black</strong> & <strong>Decker</strong> repair agents and full details of our after-sales<br />
service and contacts are available on the Internet at:<br />
www.2helpU.com<br />
Please visit our website www.blackanddecker.com.au to<br />
register your new <strong>Black</strong> & <strong>Decker</strong> product and to be kept up to<br />
date on new products and special offers. Further information<br />
on the <strong>Black</strong> & <strong>Decker</strong> brand and our range of products is<br />
available at www.blackanddecker.com.au
Australia<br />
<strong>Black</strong> & <strong>Decker</strong> (Australia) Pty. Ltd. Tel. 03-8720 5100<br />
20 Fletcher Road, Mooroolbark Fax 03-9727 5940<br />
Victoria, 3138<br />
New Zealand<br />
<strong>Black</strong> & <strong>Decker</strong> Tel. +0800 339 258<br />
5 Te Apunga Place Fax +64 9 259 1122<br />
Mt Wellington<br />
Auckland 1060<br />
90566180