Post Synthesis Simulation Using NCLaunch(NC ... - DAIICT Intranet
Post Synthesis Simulation Using NCLaunch(NC ... - DAIICT Intranet
Post Synthesis Simulation Using NCLaunch(NC ... - DAIICT Intranet

You also want an ePaper? Increase the reach of your titles
YUMPU automatically turns print PDFs into web optimized ePapers that Google loves.
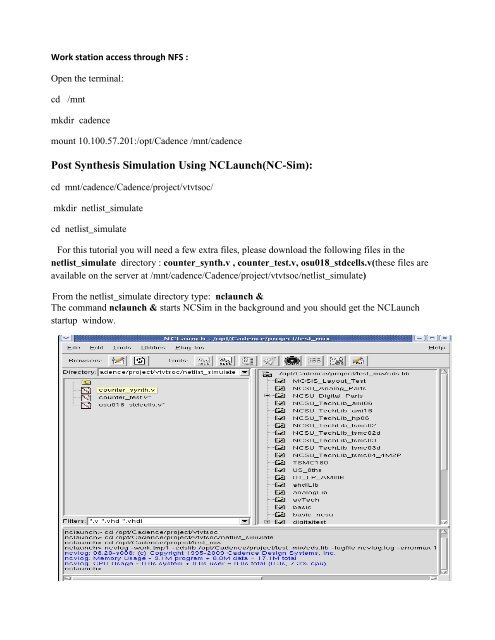
Work station access through NFS :<br />
Open the terminal:<br />
cd /mnt<br />
mkdir cadence<br />
mount 10.100.57.201:/opt/Cadence /mnt/cadence<br />
<strong>Post</strong> <strong>Synthesis</strong> <strong>Simulation</strong> <strong>Using</strong> <strong><strong>NC</strong>Launch</strong>(<strong>NC</strong>-Sim):<br />
cd mnt/cadence/Cadence/project/vtvtsoc/<br />
mkdir netlist_simulate<br />
cd netlist_simulate<br />
For this tutorial you will need a few extra files, please download the following files in the<br />
netlist_simulate directory : counter_synth.v , counter_test.v, osu018_stdcells.v(these files are<br />
available on the server at /mnt/cadence/Cadence/project/vtvtsoc/netlist_simulate)<br />
From the netlist_simulate directory type: nclaunch &<br />
The command nclaunch & starts <strong>NC</strong>Sim in the background and you should get the <strong><strong>NC</strong>Launch</strong><br />
startup window.
Now we need to set the work directory and create a work library (to contain your circuits) so go<br />
to File -> Set Design Directory from the File menu of the Menu Bar.<br />
First set the design directory to the netlist_simulate directory that you just created (this should<br />
be automatic if you started <strong><strong>NC</strong>Launch</strong> from the tutorial directory as described here): then click<br />
on Create cds.lib File and click Save (you should only need to do this once when you run the<br />
tool for the first time).<br />
and finally click OK to Include default libraries.<br />
Finally, making sure that worklib has appeared for Work Library click OK on the Set Design<br />
Directory pop-up window. Please notice that the Library Browser window (right side) of<br />
<strong><strong>NC</strong>Launch</strong> has become populated now.
There are 3 steps that we need to perform now (remember we chose multistep):<br />
Compile (ncvlog)<br />
Elaborate (ncelab)<br />
Simulate (ncsim)<br />
1. In order to compile you first need to select the various files in the File Browser (left side) by<br />
clicking on the mouse left button (simultaneously press on shift for multiple selections), then click<br />
on the corresponding buttons in the Menu Bar (in this case the ncvlog button) or explicitly go to<br />
Tools -> Verilog Compiler.<br />
You can edit the verilog files from File -> Edit.<br />
2. In order to elaborate first click on the + in front of the worklib on the Library Browser<br />
window in order to see its contents:
Now select the top file under worklib (counter_test) then click on the <strong>NC</strong>Elab button in the<br />
Menu (by right click on counter_test you will get a option <strong>NC</strong>Elab), or go to Tools -><br />
Elaborator <strong>NC</strong>Elab.
3. To simulate click on the + sign in front of the Snapshots library to expand its contents, then<br />
select worklib.counter_test:module and click on <strong>NC</strong>sim (by right click on<br />
worklib.counter_test:module you will get a option <strong>NC</strong>sim) or go to Tools -> Simulator. This<br />
will launch the Simvision Design Browser and Console windows:<br />
4. To see the results of your simulation right click on counter_test and choose send<br />
waveforms to browser as option.
After running the simulation you will get the wave form something like this.<br />
References:<br />
http://www.ee.virginia.edu/~mrs8n/soc/sim_tutorial.html.