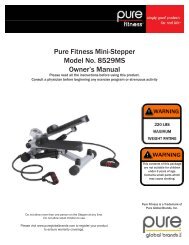
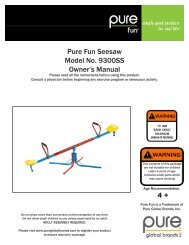
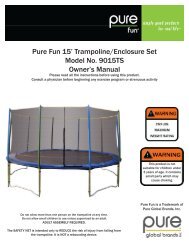
Multi-Purpose Mid-Width #8638 Manual - Pure Global Brands, Inc.
Multi-Purpose Mid-Width #8638 Manual - Pure Global Brands, Inc.
Multi-Purpose Mid-Width #8638 Manual - Pure Global Brands, Inc.

You also want an ePaper? Increase the reach of your titles
YUMPU automatically turns print PDFs into web optimized ePapers that Google loves.
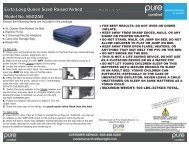
STEP 3: ATTACH CUSHIONS AND LEG LIFT BAR<br />
Locate: 2x Backrest Tubes (15), Backrest Cushion (10), Seat Cushion (11), 2x Leg Lift Cross Bars (12), Leg Lift (7), 4x Foam Rollers<br />
(19), 8x M8*40 Bolts (36), 8x M8 Washers (38), 1x M10*85 Bolt (33), 2x M10 Washers (37), 1x M10 Nut (39), Butterfly Weight Lock<br />
(20), 4x Round Plugs (23), 4x Square End Caps 1 (25), 2x Large Round Plugs (27) and 1x Rubber Bumper (22).<br />
A. Place the Leg Lift so the hold in the center is lined up to the brackets on the Front Leg (2). Slide a M10 Washer (37) onto the<br />
M10*85 Bolt (33) and place this combination through the Front Leg brackets and Leg Lift. Secure with another M10 Washer and a<br />
M10 Nut (39).<br />
B. Place the Leg Lift Cross Bars (12) through the two holes at the top and bottom of the Leg Lift (7). Keep these bars centered and<br />
slide the Foam Rollers (19) onto the Cross Bars. Place the Rubber Bumper (22) on the tube end that contacts the Front Leg. Place<br />
the Butterfly Weight Lock (20) on the opposite end of this tube. Place 4x Round Plugs (23) into the ends of the Cross Bars. Insert 2x<br />
Large Round Plugs (27) into the open ends of the Leg Lift.<br />
C. Place 4x Square End Caps 1 (25) into the ends of the Backrest Tubes (15). Line up the two holes in the sides of the 2x Backrest<br />
Tubes and slide these Tubes onto the round welded bar on the Control Brace (8). Lay the top ends of the Backrest Tubes against the<br />
Backrest Support Bar (5) between the posts. Keeping the Backrest Tubes securely inserted onto the welded bar, use 4x M8 Washers<br />
(38) and 4x M8*40 Bolts (36) to attach the Backrest Cushions to the Backrest Tubes. When complete, raise and lower the back<br />
cushion to ensure proper assembly. to the Control Brace.<br />
D. Place the Seat Cushion onto the two welded square bars on the Control Brace (8). Secure the Seat Cushion to the Control Brace<br />
using 4x M8 Washers (38) and 4x M8*40 Bolts (36).