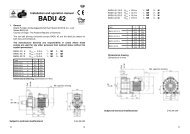
INSTALLATION AND MAINTENANCE MANUAL
INSTALLATION AND MAINTENANCE MANUAL
INSTALLATION AND MAINTENANCE MANUAL

You also want an ePaper? Increase the reach of your titles
YUMPU automatically turns print PDFs into web optimized ePapers that Google loves.
Two Speed pool MoTor wiTh prograMMable ConTrol / TiMer<br />
<strong>INSTALLATION</strong> <strong>AND</strong><br />
<strong>MAINTENANCE</strong> <strong>MANUAL</strong><br />
These instructions cover the motor and the<br />
operation of the user interface timer/controller<br />
which may be integrated with the motor.<br />
Save this instruction manual for future reference.
IMPorTAnT SAFETy InSTruCTIonS<br />
2EZ Speed TM<br />
Motor Control/Timer Installation & Maintenance Manual<br />
Save this Instruction Manual for future reference.<br />
Table of Contents<br />
Motor Control/Timer Specifications . . . . . . . . . . . . . . . . . . . . . . . . . . . . . . . . . . . . . 3<br />
About the 2EZ Speed TM<br />
Motor Control/Timer . . . . . . . . . . . . . . . . . . . . . . . . . . . . . . 3<br />
Important Safety Instructions. . . . . . . . . . . . . . . . . . . . . . . . . . . . . . . . . . . . . . . . .4-5<br />
General Installation Instructions . . . . . . . . . . . . . . . . . . . . . . . . . . . . . . . . . . . . . . . 6<br />
Basic Motor/Timer Operation. . . . . . . . . . . . . . . . . . . . . . . . . . . . . . . . . . . . . . . . . . 6<br />
User Interface Identification. . . . . . . . . . . . . . . . . . . . . . . . . . . . . . . . . . . . . . . . . .7-9<br />
Quick Start Programming . . . . . . . . . . . . . . . . . . . . . . . . . . . . . . . . . . . . . . . . . . . 10<br />
Detail Programming . . . . . . . . . . . . . . . . . . . . . . . . . . . . . . . . . . . . . . . . . . . . . . 11-13<br />
How to Connect. . . . . . . . . . . . . . . . . . . . . . . . . . . . . . . . . . . . . . . . . . . . . . . . . . . 14<br />
Freeze Sensor . . . . . . . . . . . . . . . . . . . . . . . . . . . . . . . . . . . . . . . . . . . . . . . . . . . . 14<br />
Locking the Keypad . . . . . . . . . . . . . . . . . . . . . . . . . . . . . . . . . . . . . . . . . . . . . . . . 15<br />
Operating the 2EZ Speed TM<br />
Pool Motor/Control<br />
with other Equipment Pad Items . . . . . . . . . . . . . . . . . . . . . . . . . . . . . . 15<br />
General Troubleshooting . . . . . . . . . . . . . . . . . . . . . . . . . . . . . . . . . . . . . . . . . . . . 16<br />
How to Lower Utility Bills . . . . . . . . . . . . . . . . . . . . . . . . . . . . . . . . . . . . . . . . . . . . 16<br />
Recommended Maintenance. . . . . . . . . . . . . . . . . . . . . . . . . . . . . . . . . . . . . . . . . 17<br />
Limited Warranty . . . . . . . . . . . . . . . . . . . . . . . . . . . . . . . . . . . . . . . . . . . . . . . . . . 17<br />
For Technical Assistance or Questions related to your 2EZ Speed TM<br />
Motor Control/Timer:<br />
Call our Pool Motor Product Services Hotline:<br />
1-800-566-1418<br />
or email questions to:<br />
motorhelp@nidec-motor.com<br />
or visit our web site at:<br />
www.nidec-motor.com/pool
M017837080000 REV. January 19, 2011<br />
2EZ Speed TM<br />
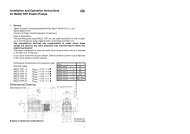
Motor Control/Timer Specifications<br />
Timer/Control<br />
Terminal<br />
Cover<br />
• The 2EZ Speed TM<br />
motor control is designed to operate from<br />
a typical U.S. residential single-phase 230 volt line supply.<br />
Operational voltage range – 207-253 VAC 60 hertz.<br />
• The motor operates at two speeds; high speed<br />
(approximately 3450 RPM) and low speed<br />
(approximately 1725 RPM).<br />
• Maximum continuous current: See motor nameplate<br />
for motor rating, control rated for 14.0 amps maximum.<br />
About the 2EZ Speed TM<br />
Motor/Control<br />
The 2EZ Speed TM<br />
motor and timer is an easy-to-install twospeed<br />
pool pump motor with an integrated programmable<br />
timer, designed to achieve maximum energy efficiency and<br />
utility dollar savings.<br />
• Easy Installation: Drop-in design allows for fast<br />
replacement of your existing pool motor.<br />
• Easy Programming: Supplied with default speed<br />
settings – Just set the time and day of the week and<br />
the timer does the rest! To customize your speed<br />
settings, provide on and off times for Low and<br />
High Speeds!<br />
Motor<br />
User Interface<br />
w/Cover<br />
• Energy Efficient: Did you know that you can save the<br />
most energy by maximizing your low speed operation,<br />
and yet still clean your pool, just by customizing your<br />
settings? To determine your energy savings, try our<br />
energy calculator online:<br />
www.nidec-motor.com/Pool<br />
Mounted on the 2EZ Speed TM<br />
motor is a user interface<br />
which allows the pool owner to easily control the operating<br />
times and motor speeds. Schedules can be programmed<br />
for weekdays: Monday through Friday and weekends:<br />
Saturday and Sunday.<br />
Motor Features<br />
• 2 Speed – Permanent Split Capacitor Single Phase Motor<br />
• 56 Frame (Offered in both Square and C-Face)<br />
• ¾ HP thru 2 HP Full Rated<br />
• High Efficiency<br />
• Switchless<br />
• Easy to Operate Programmable User Interface<br />
• Freeze Sensor<br />
• Designed for Quiet Operation<br />
• Single Phase Motor<br />
• Meets Title 20 Legislation<br />
2EZ Speed TM Pool Motor with Programmable Control/Timer<br />
3
M017837080000 REV. January 19, 2011<br />
Important Safety Instructions<br />
! WARNING This unit should not be serviced in the field. Do not disassemble or reconnect<br />
components in the field; use authorized factory service only. High voltage and rotating parts can cause<br />
serious or fatal injury. Safe installation, operation and maintenance must be performed by qualified<br />
personnel. Familiarization with and adherence to the National Electric Code, NFPA (National Fire Protection<br />
Association) standards and local codes is required. It is important to observe safety precautions to protect<br />
personnel from possible injury. Personnel should be instructed for handling each of the following:<br />
• This motor control/timer should be powered from<br />
a separate circuit of adequate capacity to maintain<br />
sufficient voltage during starting and running conditions.<br />
Wire size shall be adequate to minimize voltage drop<br />
during starting and running. A qualified or licensed<br />
electrician should be used to properly size the motor<br />
control/timer supply circuit. Reference Articles 310<br />
and 400 of the NEC for further information on wire<br />
sizing. A #8 AWG or larger conductor must be wired<br />
to the motor control/timer ground/bonding lug. Use<br />
#6 AWG in Canada. Wiring, including flexible cords,<br />
should be as short as possible to minimize voltage<br />
drop. All electrical connections in this system must be<br />
secure to prevent voltage drop and localized heating.<br />
If AC power is supplied by a GFCI circuit breaker, use<br />
a dedicated circuit that has no other electrical loads.<br />
GFCI use shall be in accordance with NEC and all other<br />
applicable state, local, and national electrical codes.<br />
• A 2-pole device, such as a circuit breaker, relay,<br />
timer, etc., that creates an open circuit when the<br />
motor control is “OFF” should be used to permanently<br />
connect the motor and timer. Failure to use a 2-pole<br />
device will result in voltage being present at the<br />
motor and timer and potential shock hazard.<br />
• To connect power to the motor control/timer unit, refer<br />
to the connection diagram on the motor nameplate and<br />
the timer connection label.<br />
• Insulate all connections carefully to prevent grounding or<br />
short circuits. Reinstall all conduit and terminal box covers.<br />
• Voltage to the motor control/timer shall be within plus or<br />
minus 10% of the nameplate voltage to avoid overheating<br />
and loss of performance.<br />
• Make sure the unit is electrically grounded and proper<br />
electrical installation wiring and controls are used<br />
consistent with local and national electric codes. Refer<br />
to “National Electrical Code Handbook” & NFPA No. 70.<br />
4<br />
2EZ Speed TM Pool Motor with Programmable Control/Timer<br />
Employ qualified electricians. Insulate all connections<br />
carefully to prevent grounding or short circuits. Reinstall<br />
all conduit and terminal box covers.<br />
• Code requirements differ from state to state. Install<br />
equipment in accordance with all applicable codes<br />
and ordinances in your area and in accordance with<br />
the National Electrical Code. All electrical connections<br />
should be made and maintained by a qualified or<br />
licensed electrician.<br />
• Make sure there are no unusual noises or vibrations<br />
when the motor/control is running. If noise and vibration<br />
are observed, refer to the Troubleshooting section on<br />
page 16.<br />
• This motor/control shall only be used above ground.<br />
It is not a submersible pump motor/control.<br />
• Pump size and pump impeller size shall match the<br />
existing hydraulic system of the pool.<br />
• Avoid contact with energized circuits or rotating parts.<br />
• Provide proper safeguards for personnel against<br />
rotating parts.<br />
! WARNING Always disconnect electrical power<br />
at the fuse box or circuit breaker before handling<br />
electrical connections or performing maintenance<br />
on this unit. Double check to make sure power is OFF,<br />
and that it cannot be turned on while you are working<br />
on the equipment.<br />
! WARNING In the event of a motor control/timer<br />
power outage, the motor control/timer may restart<br />
without warning.<br />
WARNING<br />
! A poor electrical connection can overheat<br />
and cause terminal and/or terminal board failures.<br />
Because of this possibility, wiring harness quick-connect
M017837080000 REV. January 19, 2011<br />
terminals should be examined carefully for any signs<br />
of physical deterioration or loose fit to the terminals on<br />
the motor/control terminal board. If there is evidence<br />
that the electrical connection is loose or deteriorated,<br />
quick-connect terminals should be removed from the<br />
wiring harness so the wires can be connected directly<br />
to the motor/timer terminals. Care must be taken to<br />
assure connections are made to the proper terminals<br />
and adequate electrical clearances are maintained.<br />
! WARNING Although the 2EZ Speed TM<br />
motor<br />
control/timer is a product designed for outdoor use,<br />
rare circumstances (i.e., motor submersion due to<br />
flood or high pressure water stream aimed directly<br />
at motor), might allow water to infiltrate the motor<br />
control/timer. If this occurs, the unit shall be serviced<br />
by a qualified service person before operating. Wet<br />
internal components may cause a shock hazard.<br />
! WARNING To prevent accidents, make sure<br />
equipment is properly protected to prevent access by<br />
children or other unauthorized personnel.<br />
! WARNING The control/timer on top of the motor<br />
contains potentially hazardous voltage inside and should<br />
NEVER be opened or disassembled for any reason.<br />
The User Interface should NEVER be disassembled<br />
from the control/timer for any reason.<br />
! CAUTION Direct-coupled installations, such as<br />
pool pump products, require a careful check of shaft<br />
and coupling alignment. Position the motor/timer for<br />
proper alignment. Do not depend on a flexible coupling<br />
to compensate for misalignment. Do not strike the motor<br />
shaft with a hammer or other tool as this may damage<br />
the bearings.<br />
! CAUTION Act with care and in accordance<br />
with prescribed procedures in handling and lifting this<br />
equipment.<br />
! NOTICE Become familiar with the equipment<br />
and read all instructions thoroughly before installing or<br />
working on the equipment.<br />
! NOTICE The 2EZ Speed TM<br />
motor control/timer<br />
is properly packaged for shipment. Storage should be<br />
in a clean, dry indoor area.<br />
! NOTICE Safety glasses should be worn to inspect<br />
the equipment while it is running or while a mallet or<br />
hammer is used, especially if cover plates are removed.<br />
! NOTICE All aspects of the installation shall<br />
conform to the applicable requirements of the NEC<br />
(National Electrical Code), including Article 430 (Motor<br />
Circuits and Controllers), as well as all local codes.<br />
! NOTICE The 2EZ Speed TM<br />
motor control/timer<br />
shall be used for swimming pool pump applications only.<br />
! NOTICE There is a small time delay before the<br />
unit starts.<br />
! NOTICE The 2EZ Speed TM<br />
motor control/timer<br />
is controlled for automatic starts. Starting is controlled<br />
by your program schedule or via user input through the<br />
user interface mounted on top of the motor.<br />
! NOTICE The Association of Pool and Spa<br />
Professionals (APSP) recommends the following to<br />
keep your pool, spa, or hot tub safe and free from<br />
entrapment risk:<br />
• Have your pool inspected by a licensed industry<br />
professional<br />
• There is no backup for a broken, missing or inadequate<br />
drain cover. Replace any broken, missing or noncompliant<br />
drain covers with drain covers marked:<br />
“VGB2008,” “ASME/ANSI A112.19.8-2007,” or drain<br />
covers showing the swimmer logo.<br />
• Pools or spas with a single main drain require additional<br />
protection. Options include:<br />
1. Eliminating the drain or reversing the flow<br />
2. Adding a second, properly spaced outlet<br />
3. Installing an SVRS (Safety Vacuum Release<br />
System). THIS FEATurE IS noT AVAILABLE<br />
on your nEW 2EZ SPEED TM<br />
MoTor/TIMEr.<br />
4. Installing an automatic pump shut-off system<br />
5. Installing a suction-limiting vent system<br />
6. Adding a gravity drainage system<br />
For additional information regarding the Virginia<br />
Graeme Baker (VGB) Pool and Spa Safety Act,<br />
consult the following web sites:<br />
www.apsp.org<br />
www.cpsc.gov/cpscpub/pubs/363.pdf<br />
2EZ Speed TM Pool Motor with Programmable Control/Timer<br />
5
M017837080000 REV. January 19, 2011<br />
General Installation Instructions<br />
Follow these instructions to prolong the life of your<br />
swimming pool pump motor/control.<br />
6<br />
a. Protection against Heat<br />
• Shade the motor/control from the sun.<br />
• Provide ample cross ventilation.<br />
• Protect the motor/control from lint, etc.,<br />
that can plug the ventilation openings.<br />
b. Protection against Dirt<br />
• Keep motor/control and surrounding area clean.<br />
• Avoid sweeping or stirring dust near the motor/<br />
control while it is running.<br />
• Avoid storing or spilling dry chemicals near<br />
the motor/control.<br />
c. Protection against Moisture<br />
• Shade the motor/control from rain, snow, etc.<br />
• Do not wrap motor/control with plastic or other<br />
air tight materials.<br />
• Locate motor/control on a slight elevation so water<br />
will not run or puddle nearby.<br />
• Avoid splashing water on or near the motor/control.<br />
• Contact qualified service person to repair leaky<br />
pipe joints or pump seals promptly.<br />
2EZ Speed TM Pool Motor with Programmable Control/Timer<br />
Basic Motor/Timer operation<br />
! WARNING A properly functioning motor may<br />
be too hot to touch and cause injury! Be careful when<br />
touching the exterior of an operating motor! This condition<br />
is normal for most motors when operated at rated load<br />
and voltage.<br />
Your 2EZ Speed TM<br />
motor/timer has been fully tested for<br />
pool pump use before shipment. It is designed to be a<br />
drop-in replacement for a standard single or two-speed<br />
pool pump motor with only minor programming required.<br />
To operate the motor control/timer, the installer must first<br />
set the time of day and the day of the week. Please see the<br />
specific sections of this manual for additional information.<br />
Visually re-inspect the installation. Make sure that guards<br />
and other protective devices are securely in place.<br />
All covers and gaskets must be re-installed to minimize<br />
the entry of dirt and moisture.
M017837080000 REV. January 19, 2011<br />
user Interface Identification<br />
This section describes the motor’s user interface.<br />
3<br />
1<br />
2<br />
3<br />
4<br />
4<br />
Low High<br />
10:00 AM<br />
MTuWThFSaSu<br />
Press Enter to Confirm<br />
www.nidec-motor.com/Pool<br />
HIGH SPEED<br />
oVErrIDE<br />
Program<br />
Set Clock<br />
Set on Time<br />
Set off Time<br />
override<br />
LoW SPEED<br />
oVErrIDE<br />
run/SToP button. This button is used to activate or stop the unit operation. The button<br />
will be not be lit when power is applied to the user interface while in STOP mode and<br />
will be illuminated if in the run mode.<br />
power to the unit.<br />
! NOTICE This button does noT disconnect<br />
Press the EnTEr button to confirm and save your selections. Use the arrow keys<br />
for menu navigation purposes and the <br />
changing the time, keys will move you from the hours to the minute’s field, while<br />
the <br />
keys will change the hour from 10 to 11 etc.<br />
MEnu<br />
run / SToP<br />
EnTEr<br />
keys for changing values. For example, while<br />
High Speed override – Runs the motor on high speed and sets countdown timer for<br />
60 minutes and will begin counting down. Pressing the button again will end override.<br />
Low Speed override – Runs the motor on low speed and sets countdown timer for<br />
60 minutes and will begin counting down. Pressing the button again will end override.<br />
2EZ Speed TM Pool Motor with Programmable Control/Timer<br />
1<br />
2<br />
7
M017837080000 REV. January 19, 2011<br />
user Interface Identification<br />
This section describes the user interface in detail, including buttons, and LCD data.<br />
8<br />
2<br />
3<br />
4<br />
1<br />
2<br />
3<br />
4<br />
5<br />
6<br />
7<br />
8<br />
Low High<br />
10:00 AM<br />
MTuWThFSaSu<br />
Press Enter to Confirm<br />
www.nidec-motor.com/Pool<br />
HIGH SPEED<br />
oVErrIDE<br />
Program<br />
Set Clock<br />
Set on Time<br />
Set off Time<br />
override<br />
LoW SPEED<br />
oVErrIDE<br />
Press the MEnu button. This menu allows you to set the time, day of the week,<br />
and for setting or reviewing the current schedule for Pump On and Off times for<br />
Low and High speeds.<br />
Program icon is illuminated while a programmed setting is in process of running.<br />
The Low icon is illuminated when the pump is in Low speed or when the Low speed<br />
is being programmed by the user.<br />
The High icon is illuminated when the pump is on in High speed or the High speed is<br />
being programmed by the user. noTE: While pump is priming, HIGH will be flashing.<br />
Set Clock is flashing and illuminated after pressing menu and illuminated while<br />
programming the clock and time of day.<br />
Set on Time is flashing and illuminated after pressing menu. Also illuminates while<br />
programming the On Time as the user navigates through the setting of both High and<br />
Low Speeds for both Monday thru Friday and Saturday/Sunday settings.<br />
The Menu item Set off Time is flashing and illuminated after pressing menu. Also<br />
illuminates while setting the Off Time as the user navigates through the setting of both<br />
High and Low Speeds for both Monday thru Friday and Saturday/Sunday settings.<br />
override, is illuminated after the user has selected one of the Override buttons,<br />
and while it is in Override mode.<br />
2EZ Speed TM Pool Motor with Programmable Control/Timer<br />
MEnu<br />
run / SToP<br />
EnTEr<br />
1<br />
5<br />
6<br />
7<br />
8
M017837080000 REV. January 19, 2011<br />
user Interface Identification<br />
This section describes the user interface in detail, including buttons, and LCD data.<br />
1<br />
2<br />
3<br />
1<br />
2<br />
3<br />
Low High<br />
10:00 AM<br />
MTuWThFSaSu<br />
Press Enter to Confirm<br />
www.nidec-motor.com/Pool<br />
HIGH SPEED<br />
oVErrIDE<br />
Program<br />
Set Clock<br />
Set on Time<br />
Set off Time<br />
override<br />
LoW SPEED<br />
oVErrIDE<br />
MEnu<br />
run / SToP<br />
EnTEr<br />
In MEnu mode, the clock and day of the week will be used to set the Clock, On Time,<br />
and Off Time for all settings, and while in RUN mode, it will display the set time and day<br />
of the week.<br />
When setting the clock, the user will be prompted to also the select the current day of<br />
the week. While in RUN mode the current day of the week will be illuminated based on<br />
the user setting.<br />
Press Enter to Confirm is illuminated during the MENU mode, This will remind the<br />
user that pressing enter will confirm the settings the user has selected. While in MENU<br />
mode, a second press of the enter key will move the navigation forward to the next<br />
menu item even if there is no change made to that particular setting.<br />
2EZ Speed TM Pool Motor with Programmable Control/Timer<br />
9
M017837080000 REV. January 19, 2011<br />
How to Program your 2EZ Speed TM<br />
Control<br />
Quick Start<br />
A) Setting the Clock and Day<br />
• Press Menu<br />
– Clock Flashing<br />
– Press Enter<br />
– Hour Digits will be Flashing<br />
– Use Up/Down <br />
– Use Side to Side to Navigate thru the fields<br />
to adjust minutes as well as AM/PM<br />
– Select current Day of the Week by using<br />
the up/down arrows<br />
– Press Enter to complete and proceed to setting speeds<br />
10<br />
to adjust the digits<br />
B) Programming Speeds<br />
• While in Menu<br />
– Low will be Blinking<br />
– MTuWThF will be illuminated<br />
– Set On Time is illuminated<br />
– Press Enter<br />
– Use Up/Down <br />
Monday thru Friday<br />
– Use Side to Side to Navigate<br />
– Press Enter<br />
– MTuWThF will be illuminated<br />
– Set Off Time is illuminated<br />
– Use Up/Down <br />
Monday thru Friday<br />
– Use Side to Side to Navigate<br />
– Press Enter<br />
– Programming Monday-Friday High Speed<br />
• Same as above except High will be illuminated<br />
– Programming Saturday/Sunday Low Speed<br />
• Same as above except Days of Week will read SaSu<br />
– Programming Saturday/Sunday High Speed<br />
• Same as above except Days of Week will read SaSu<br />
and High will be illuminated<br />
to Change Time On for Low Speed<br />
to Change Time Off for Low Speed<br />
C) using Low and High Speed override<br />
• The user can press either the Low or High Speed Override<br />
button at any time.<br />
– 60 Minutes will appear on the clock and begin to countdown<br />
– Pressing the Override button again will Exit from the<br />
override selection and user programming will resume.<br />
– When the 60 minute timer reaches zero, the unit will exit<br />
from override mode and user programming will resume<br />
2EZ Speed TM Pool Motor with Programmable Control/Timer<br />
10:00 AM<br />
MTuWThFSaSu<br />
Press Enter to Confirm<br />
Low<br />
10:00 AM<br />
MTuWThF<br />
Program<br />
Set Clock<br />
Press Enter to Confirm<br />
High<br />
10:00 AM<br />
MTuWThF<br />
Press Enter to Confirm<br />
Low<br />
59<br />
59<br />
High<br />
Program<br />
Set on Time<br />
Program<br />
Set off Time<br />
Program<br />
override<br />
Program<br />
override<br />
HIGH SPEED<br />
oVErrIDE<br />
MEnu<br />
MEnu<br />
MEnu<br />
LoW SPEED<br />
oVErrIDE<br />
EnTEr<br />
EnTEr<br />
EnTEr
M017837080000 REV. January 19, 2011<br />
How to Program (Detail) See Quick Start if Desired<br />
Factory Settings<br />
Timer is preset with the following factory default settings.<br />
Monday thru Friday Low Speed Setting<br />
Time On: 7:00 A.M.<br />
Time Off: 2:00 P.M.<br />
Monday thru Friday High Speed Setting<br />
Time On: 8:00 P.M.<br />
Time Off: 12:00 A.M.<br />
Saturday-Sunday Low Speed Setting<br />
Time On: 8:00 A.M.<br />
Time Off: 4:00 P.M.<br />
Saturday-Sunday High Speed Setting<br />
Time On: 8:00 P.M.<br />
Time Off: 12:00 A.M.<br />
restore Factory Defaults<br />
The preset factory settings above can be restored at any<br />
time. To change the program settings back to their factory<br />
default settings:<br />
1. While in STOP mode, press the enter button for<br />
5 seconds Verify Press ENTER to confirm appears<br />
in the display.<br />
2. Press ENTER again if you want to return to factory<br />
settings. noTE: After ENTER is pressed, the motor<br />
will adjust and run according to the factory default<br />
settings. All prior programmed settings (user defined)<br />
will be lost.<br />
Setting A user Program<br />
Press the MENU button to enter the MENU mode you will<br />
be guided through a sequential menu selection: (Please<br />
use keys to navigate and <br />
keys to change data.)<br />
A. Set Clock and Day of Week, press ENTER<br />
Set Hours/Minutes/AM/PM and day of the week.<br />
Days of the Week are denoted by MTuWThFSaSu<br />
(M=Monday, Tu=Tuesday, W=Wednesday,<br />
Th=Thursday, F=Friday, Sa=Saturday, Su=Sunday)<br />
Once correct day of the week is chosen, press ENTER<br />
B. Set Low Speed on Time (Monday thru Friday)<br />
LOW will be flashing, Press ENTER. Set desired<br />
“on” time for motor to begin running on low speed.<br />
Use keys to Navigate through each of the fields.<br />
The flashing field is the active field. Using the <br />
keys to adjust the time as desired for the low speed to<br />
turn on. Pressing ENTER will finalize your selections.<br />
noTE: In each Low or High Setting the user can<br />
select the “off” position when selecting the hour.<br />
off resides between the hours of 12 and 1. If off<br />
is selected that setting will then be ignored.<br />
<br />
C. Set Low Speed off Time (Monday thru Friday)-<br />
LOW will be flashing. Set desired “off” time for motor<br />
to stop running on low speed. Use keys to<br />
navigate through each of the fields. The flashing field<br />
is the active field. Using the <br />
as desired for the low speed to turn off. Pressing<br />
ENTER will finalize your selections.<br />
keys, adjust the time<br />
D. Set High Speed on Time (Monday thru Friday)<br />
HIGH will be flashing, Press ENTER Set desired “on”<br />
time for motor to begin running on high speed. Use<br />
keys to navigate through each of the fields. The<br />
flashing field is the active field. Using the <br />
adjust the time as desired for the high speed to turn<br />
on. Pressing ENTER will finalize your selections.<br />
keys<br />
E. Set High Speed off Time (Monday thru Friday)<br />
HIGH will be flashing. Set desired “off” time for motor<br />
to stop running on high speed. Use keys to<br />
navigate through each of the fields. The flashing field<br />
is the active field. Using the <br />
as desired for the high speed to turn off. Pressing<br />
ENTER will finalize your selections.<br />
keys, adjust the time<br />
F. Set Low Speed on Time (Saturday and Sunday)<br />
Press ENTER Set desired “on” time for motor to begin<br />
running on low speed. Use keys to navigate<br />
through each of the fields. The flashing field is the<br />
active field. Using the <br />
desired for the low speed to turn on. Pressing ENTER<br />
will finalize your selections.<br />
keys adjust the time as<br />
G. Set Low Speed off Time (Saturday and Sunday)<br />
Set desired “off” time for motor to stop running on low<br />
speed. Use keys to navigate through each of the<br />
fields. The flashing field is the active field. Using the<br />
keys, adjust the time as desired for the low speed to<br />
turn off. Pressing ENTER will finalize your selections.<br />
2EZ Speed TM Pool Motor with Programmable Control/Timer<br />
11
M017837080000 REV. January 19, 2011<br />
12<br />
H. Set High Speed on Time (Saturday and Sunday)<br />
Press ENTER. Set desired “on” time for motor to<br />
begin running on high speed. Use keys to<br />
navigate through each of the fields. The flashing field<br />
is the active field. Using the <br />
as desired for the high speed to turn on. Pressing<br />
ENTER will finalize your selections.<br />
keys adjust the time<br />
I. Set High Speed off Time (Saturday and Sunday)<br />
Set desired “off” time for motor to stop running on<br />
high speed. Use keys to navigate through<br />
each of the fields. The flashing field is the active field.<br />
Using the <br />
the high speed to turn off. Pressing ENTER will<br />
finalize your selections.<br />
keys, adjust the time as desired for<br />
High Speed override – Pressing the High Speed<br />
Override button will set the motor on high speed for 60<br />
minutes. In override mode, the LCD displays an illuminated<br />
“Override” icon. Pressing High Speed Override button<br />
again will exit override and your program settings will take<br />
precedence.<br />
Low Speed override – Pressing the Low Speed Override<br />
button will set the motor on low speed for 60 minutes.<br />
In override, the LCD displays an illuminated “Override”<br />
icon. Pressing Low Speed Override button again will exit<br />
override and your program settings will take precedence.<br />
2EZ Speed TM Pool Motor with Programmable Control/Timer<br />
Functions of The Enter Button:<br />
1. Press to activate menu selection.<br />
2. Press to confirm changes to each menu selection<br />
(ENTER can be pressed to exit a menu selection<br />
at any point if that setting is acceptable as is.<br />
3. After pressing to confirm changes, pressing<br />
ENTER again will take you out of the MENU mode.<br />
Three events will cause the motor to run or stop.<br />
The first event is a timer event. This type of event<br />
occurs when the current system time matches one of the<br />
programmed Time On or Time Off setting.<br />
If the programmed time settings overlap, the following rules<br />
are used to determine which setting takes precedent.<br />
1. Time “On” takes precedence over Time “Off”.<br />
a. Example:<br />
8 AM<br />
Low On<br />
10 AM<br />
High On<br />
12 PM<br />
High Off<br />
Low On<br />
In the above example –<br />
Low On 8 AM<br />
High On 10 AM<br />
High Off 12 PM<br />
At 12 PM Transitions from High to Low<br />
Low remains On until scheduled 7 PM Off time.<br />
The above scenario works the same whether Low overlaps<br />
with High, or High overlaps with Low.<br />
2. Setting the “On” time and “Off” time to the same<br />
value for one of the flow settings, will cause the<br />
setting to be used continuously 24 hours a day.<br />
a. Example Setting:<br />
Low On: 8:00 AM<br />
Low Off: 8:00 AM<br />
7 PM<br />
Low Off<br />
3. As the day changes from Friday to Saturday, the<br />
settings for Saturday become effective immediately<br />
at midnight. As the day changes from Sunday to<br />
Monday, the settings for Monday become effective<br />
immediately when the day changes at midnight.
M017837080000 REV. January 19, 2011<br />
The second event is a press of the run/SToP button.<br />
1. When the timer has been “enabled”, the RUN/STOP<br />
button will be illuminated. Pressing the RUN/STOP<br />
button when the timer is “enabled” will disable the<br />
timer and the motor will STOP. The RUN/STOP button<br />
will NOT be illuminated when the timer is “disabled.”<br />
When the RUN/STOP button is illuminated, power is<br />
sent to the motor based on the time and day of the<br />
week and the programmed settings.<br />
The third event is a press of the High Speed override,<br />
or Low Speed override button.<br />
1. This button press will only take effect if the timer is<br />
“enabled” (RUN/STOP button is illuminated.)<br />
2. After pressing the High Speed Override or Low Speed<br />
Override, the motor will operate at the selected speed<br />
for 60 minutes. Pressing Override again while either<br />
High or Low Speed Override is enabled, will end the<br />
override condition and the programmed speeds will<br />
take over.<br />
In the event of a power outage, the time and day of the<br />
week will be stored in memory for a minimum of 12 hours.<br />
All other programming will not be affected by the outage.<br />
Priming Feature: The motor always starts at high speed<br />
for 4 minutes, after any period of motor inactivity. This<br />
ensures proper priming of the pump. The HIGH icon will<br />
be flashing while in prime mode.<br />
2EZ Speed TM Pool Motor with Programmable Control/Timer<br />
13
M017837080000 REV. January 19, 2011<br />
How to Connect<br />
! WARNING This unit shall not be serviced in the<br />
field. Do not disassemble or reconnect components<br />
in the field; use authorized factory service only. High<br />
voltage and rotating parts can cause serious or fatal<br />
injury. Safe installation, operation and maintenance<br />
must be performed by qualified personnel.<br />
Familiarization with and adherence to the National Electric<br />
Code, NFPA (National Fire Protection Association) standards<br />
and local codes is required. It is important to observe safety<br />
precautions to protect personnel from possible injury.<br />
! WARNING Always disconnect electrical power<br />
at the fuse box or circuit breaker before handling<br />
electrical connections or performing maintenance<br />
on this unit. Allow the motor to come to a complete<br />
stop. This will allow the capacitors to discharge any<br />
residual voltage for safety. Double check to make<br />
sure power is oFF, and that it cannot be turned on<br />
while you are working on the equipment.<br />
! WARNING The control/timer on top of the<br />
motor contains potentially hazardous voltage inside<br />
and should nEVEr be opened or disassembled for<br />
any reason. The user Interface should nEVEr be<br />
disassembled from the control/timer for any reason.<br />
The motor/control is designed to be operated on a 230 volt,<br />
60 Hz nominal power supply. The suitable voltage range is<br />
207-253 volts under rated load conditions.<br />
“Hot” power connections should only be connected to the<br />
C terminal of the motor terminal board assembly and P2<br />
terminal of the control circuit board. Connect supply ground<br />
(Green or Green with Yellow insulated lead wire) to the<br />
ground screw provided in this same connection area near<br />
the motor terminal board assembly (see connection label<br />
on motor/control). Permanent field wiring should be from<br />
a 2-pole device (a device that disconnects two “hot” lines.)<br />
See Important Safety Instructions on pages 4 and 5.<br />
14<br />
Timer Wiring<br />
Instructions<br />
2EZ Speed TM Pool Motor with Programmable Control/Timer<br />
If AC power is supplied by a GFCI circuit breaker, use a<br />
properly sized dedicated circuit that has no other electrical<br />
loads. Use of a GFCI circuit with electrical loads other<br />
than the 2EZ Speed TM<br />
motor/control and timer could result<br />
in nuisance tripping. See Important Safety Instructions<br />
Section (pages 4 and 5) for more information.<br />
With the 2EZ Speed TM<br />
motor/control, an external timer<br />
is not required to operate the motor. If an external<br />
mechanical/digital timer is used, follow the manufacturer’s<br />
connection instructions, however, in order for the<br />
2EZ Speed TM<br />
motor and timer to be the primary control,<br />
the power must continually be supplied to the 2EZ Speed TM<br />
motor/control through the external timer.<br />
! NOTICE Some auxiliary equipment is dependent<br />
on the operation of the main pump, please consider these<br />
when programming your timer/user interface.<br />
Freeze Sensor<br />
The 2EZ Speed TM<br />
motor and timer includes a freeze sensor<br />
feature that is mounted internally in the control. If the timer<br />
is “enabled” (on), the sensor will detect temperatures below<br />
40 degrees Fahrenheit and run the motor on low speed 30<br />
minutes on and 30 minutes off. The freeze sensor cycle will<br />
not override the time when the program schedule would<br />
normally operate the motor.<br />
! NOTICE The level of freeze protection provided will<br />
depend on the location of the 2EZ Speed TM<br />
motor/control,<br />
since the temperature sensor is located in the timer.<br />
Homeowners should be informed of this when depending<br />
on this product for protection. The freeze sensor only<br />
provides limited protection from freezing, and does not<br />
guarantee total freeze protection.
M017837080000 REV. January 19, 2011<br />
Locking The Keypad<br />
To prevent undesired changes to your programming,<br />
a keypad lockout feature is included.<br />
To set the keypad lockout mode:<br />
1. Press the down arrow first and then press the MENU<br />
button. Hold both for 2 seconds. After 2 seconds the<br />
“Press ENTER to Confirm” icon in the display will<br />
start blinking.<br />
2. Press ENTER. The unit is now in keypad lockout mode,<br />
and only LOC should be displayed for 5 seconds using<br />
the clock display. After 5 seconds, LOC turns off, and<br />
the display will revert back to the normal display.<br />
noTES:<br />
• Pressing any button on the keypad while in keypad<br />
lockout mode, (other than the RUN/STOP button), will<br />
cause LOC to appear on the display for 5 seconds after<br />
the button is pressed. After 5 seconds, the display will<br />
revert back to the normal display.<br />
• Additional button presses during the 5 seconds will not<br />
extend the time LOC is displayed. Pressing the RUN/<br />
STOP button while in lockout mode will either stop the<br />
motor (if it was running) and the RUN/STOP button will<br />
not be illuminated, or start the motor in program mode<br />
if it was stopped and the RUN/STOP button will then<br />
be illuminated.<br />
To exit keypad lockout mode:<br />
1. Press the down arrow and then press the MENU button.<br />
Hold both for 2 seconds. For the first 2 seconds, the<br />
display will just display LOC. After 2 seconds, LOC turns off<br />
and the “Press ENTER to Confirm” icon will start blinking.<br />
2. Press ENTER. The display will revert back to the normal<br />
display. The keypad is now unlocked and all the buttons<br />
will function normally. (If the ENTER button is not pressed<br />
within 5 seconds, the keypad will stay locked, the “Press<br />
ENTER to Confirm” icon will go out, and the display will<br />
revert back to the normal display.<br />
operating the 2EZ Speed TM<br />
Pool Motor/Control with<br />
other Equipment Pad Items<br />
Heaters<br />
If your pool heater has a time clock function, it is very<br />
important to make sure the pool filtration pump is running<br />
anytime the pool heater is running. The pool heater should<br />
not run when the filtration pump is off. The pool heater<br />
program timer should be set to start and stop during the<br />
programmed on and off times programmed on your 2EZ<br />
Speed TM<br />
pool motor/control. Be aware of the backup power<br />
supply feature on the 2EZ Speed TM<br />
pool motor/control as<br />
other time clocks may lose the correct time in the event of<br />
a power outage. noTE: It is always good practice to check<br />
and reset the current time of day and day of week settings<br />
on your equipment pad time clocks in the event of a power<br />
outage or during spring/fall time changes.<br />
Pool Cleaners with Booster Pumps<br />
It is recommended to start your pool sweep one hour or<br />
more after your filtration pump has started and to stop the<br />
pool sweep one hour or more before your filtration pump<br />
shuts off. If your pool cleaner operates on a time clock, it<br />
is very important to set your pool cleaner on and off times<br />
according to the above recommendation. Be aware of the<br />
backup power supply feature on the 2EZ Speed TM<br />
pool<br />
motor/control as other time clocks may lose the correct<br />
time in the event of a power outage. noTE: It is always<br />
good practice to check and reset the current time of day<br />
and day of week settings on your equipment pad time<br />
clocks in the event of a power outage or in the during<br />
spring/fall time changes. The manufacturer’s product<br />
manual for your pool cleaner will have recommendations<br />
for proper cleaning time durations.<br />
Pool Cleaners without Booster Pumps<br />
After your 2EZ Speed TM<br />
pool motor is running and your<br />
pump is fully primed, follow the pool cleaner manufacturer’s<br />
startup procedures then follow the procedures for High<br />
Speed Override found on page 12.<br />
Other pool equipment pad item with a timer<br />
If an item has a timer regulating its operation, it may be<br />
required that the equipment pad item runs only when the<br />
2EZ Speed TM<br />
motor/control is running. Check the item’s<br />
product manual to properly determine if the item should run<br />
only when the filtration pump is running. If this is the case,<br />
follow these instructions when synchronizing the timer<br />
operations of your various equipment pad items. noTE: It<br />
is always good practice to check and reset the current time<br />
of day and day of week settings on your equipment pad<br />
time clocks in the event of a power outage or in the event<br />
of a spring/fall time changes.<br />
Any other pool equipment pad item without a timer<br />
Please follow the operating instructions of these equipment<br />
pad items.<br />
2EZ Speed TM Pool Motor with Programmable Control/Timer<br />
15
M017837080000 REV. January 19, 2011<br />
General Troubleshooting<br />
This chart suggests common answers to electric motor and control/timer issues. Refer to your pump manual for<br />
hydraulic guidance. When repetitive issues occur, Nidec recommends contacting your local pool and spa professional<br />
for technical assistance.<br />
Symptom Possible Causes Corrective Action<br />
Blown Fuse or<br />
Open Circuit Breaker<br />
Replace fuses with time delay type or reset breaker.<br />
Verify voltage to the motor terminals matches the nameplate<br />
Incorrect Voltage to<br />
voltage requirements. 207-253 Volts (60 Hertz) is the allowable<br />
Motor/Control Motor/Control<br />
voltage range for this product. Is there a timer, a controller, or a line<br />
fails to start<br />
switch? Are they in the ON position?<br />
Improper terminal<br />
Turn off power. Verify connections are per the nameplate<br />
connections<br />
connection diagram.<br />
Blocked Pump or Shaft<br />
Turn off power. Follow pump manufacturer’s instructions for<br />
dislodging foreign matter inside the pump.<br />
Motor/Control<br />
does not come up<br />
to full speed<br />
Application issue<br />
Low Voltage<br />
Call your pool service professional. The motor/control could<br />
be overloaded.<br />
Verify voltage to the motor terminals matches the nameplate<br />
voltage requirements.<br />
Motor/Control<br />
stalls during<br />
operation<br />
Low Voltage<br />
Verify voltage to the motor terminals matches the nameplate<br />
voltage requirements.<br />
Motor vibrates<br />
or is excessively<br />
Motor and Pump<br />
misalignment<br />
Consult your pump manual for proper alignment instructions or call<br />
your pool service professional. Before taking any corrective actions,<br />
ensure the power is OFF.<br />
noisy<br />
High Voltage<br />
Verify motor/control voltage to the terminals matches the nameplate<br />
voltage requirements.<br />
How to Lower utility Bills by using the 2EZ Speed TM<br />
Motor/Timer<br />
Did you know that just by reducing the motor speed to low,<br />
you optimize your pool energy costs and still clean your<br />
pool? This is a primary advantage of the 2EZ Speed TM<br />
motor/timer! Your electric bill is based on the number of<br />
Kilowatt hours used in a typical billing cycle. The fewer<br />
Kilowatts used, the lower the bill!<br />
16<br />
2EZ Speed TM Pool Motor with Programmable Control/Timer<br />
To calculate how much energy your current pool motor is<br />
using and to calculate your potential savings with the 2EZ<br />
Speed TM<br />
motor/timer, visit www.nidec-motor.com/Pool<br />
and use our energy calculator. The calculator will show you<br />
how many hours to run your pump each day along with the<br />
appropriate speed settings for maximum energy savings<br />
while enabling the proper amount of daily flow to properly<br />
filter your pool.<br />
IMPorTAnT noTE: Contact your local utility company to<br />
determine if there are times when usage may be prohibited,<br />
then program your 2EZ Speed TM<br />
motor/timer to turn off or to<br />
run at a very low flow rate during these periods.
M017837080000 REV. January 19, 2011<br />
recommended Maintenance<br />
! WARNING Always disconnect electrical power<br />
at the fuse box or circuit breaker before handling<br />
electrical connections or performing maintenance<br />
on this unit. Allow the motor to come to a complete<br />
stop. This will allow the capacitors to discharge any<br />
residual voltage for safety. Double check to make<br />
sure power is oFF, and that it cannot be turned on<br />
while you are working on the equipment.<br />
Periodically inspect the installation.<br />
• Check for dirt accumulations, unusual noises or vibration,<br />
overheating, worn or loose couplings, high motor amps,<br />
poor wiring or overheated connections, and for loose<br />
mounting bolts or guards.<br />
• Remove dirt accumulation, particularly in and around<br />
the ventilation openings on the motor by vacuuming.<br />
Dirt accumulations can cause motor overheating and<br />
a fire hazard.<br />
• Do not use any type of solvents! Some solvents may have<br />
adverse interactions with the motor insulation, finish or<br />
bearing lubricants. Solvents are also highly flammable.<br />
• This motor has permanently lubricated bearings –<br />
No further lubrication is recommended or required.<br />
LIMITED WArrAnTy<br />
Nidec Motor Corporation (hereinafter “Nidec”) extends the<br />
following LIMITED WARRANTY to the purchaser and to<br />
its customers (collectively referred to as the “Purchaser”)<br />
of the enclosed motor and components: the motor and<br />
components are free from defects in materials and<br />
workmanship under normal use, service and maintenance<br />
FOR A PERIOD OF 12 MONTHS FROM THE DATE OF<br />
ORIGINAL PURCHASE FROM NIDEC OR THE NIDEC<br />
DEALER/RETAILER, NOT TO EXCEED 24 MONTHS<br />
FROM THE DATE OF MANUFACTURE BY NIDEC. THE<br />
FOREGOING WARRANTY IS THE ONLY WARRANTY<br />
GIVEN <strong>AND</strong> NO OTHER WARRANTY IS PROVIDED,<br />
EXPRESS OR IMPLIED, INCLUDING WITHOUT<br />
LIMITATION, MERCHANTABILITY OR FITNESS<br />
FOR A PARTICULAR PURPOSE. Certain aspects or<br />
disclaimers are not applicable to consumer products,<br />
i.e., motors and components acquired by individuals and<br />
used for personal, family or household purposes (as<br />
distinguished from industrial or other purposes). Some<br />
states do not allow limitations on how long an implied<br />
warranty lasts, so the above limitation may not apply to<br />
you. This warranty gives you specific legal rights, and you<br />
may have other rights which vary from state to state.<br />
Certain repairs or services are the responsibility<br />
of the Purchaser and the Purchaser is expected to<br />
pay for them. This warranty does not extend to any<br />
losses or damages due to misuse, accident, abuse,<br />
neglect, negligence, unauthorized modification or<br />
alteration, use beyond rated capacity, or improper<br />
installation, maintenance, application or use, including,<br />
without limitation, use in a manner contrary to the<br />
accompanying instructions or applicable codes.<br />
If within thirty (30) days after Purchaser’s discovery of<br />
any warranty defects within the above stated warranty<br />
period, Purchaser notifies Nidec or the dealer from whom<br />
the motor was purchased in writing, Nidec shall, at its<br />
option and as Purchaser’s exclusive remedy, repair or<br />
replace or refund the purchase price for, that portion of the<br />
motor and components found by Nidec to be defective.<br />
Failure by Purchaser to give such written notice within the<br />
applicable time period shall be deemed an absolute and<br />
unconditional waiver of Purchaser’s claim for such defects.<br />
Purchaser must write or call the dealer from whom the<br />
motor was purchased for directions regarding the shipment<br />
of the motor, with freight prepaid by the Purchaser, to<br />
an authorized service location for warranty service.<br />
If Purchaser is unable to contact the dealer to obtain<br />
sufficient instructions regarding the handling of the motor,<br />
Purchaser should write Nidec at the address below, giving<br />
the motor model number, the dealer’s name, address and<br />
number of dealer’s invoice; and describing the nature of<br />
the alleged defect. Arrangements for warranty service will<br />
then be made by Nidec. If the motor is damaged in transit,<br />
Purchaser should file a claim directly with the carrier.<br />
IN NO EVENT, REGARDLESS OF THE FORM OF THE<br />
CLAIM OR CAUSE OF ACTION (WHETHER BASED<br />
IN CONTRACT, INFRINGEMENT, NEGLIGENCE,<br />
STRICT LIABILITY, OTHER TORT OR OTHERWISE),<br />
SHALL NIDEC’S LIABILITY TO PURCHASER OR<br />
ITS CUSTOMER EXCEED THE PRICE PAID BY<br />
PURCHASER FOR THE SPECIFIC MOTOR OR<br />
OTHER GOODS PROVIDED BY NIDEC GIVING<br />
RISE TO THE CAUSE OF ACTION. IN NO EVENT<br />
SHALL NIDEC’S LIABILITY TO PURCHASER OR ITS<br />
CUSTOMER EXTEND TO INCLUDE INCIDENTAL<br />
CONSEQUENTIAL OR PUNITIVE DAMAGES, WITH<br />
RESPECT TO CONSUMER PRODUCTS, SOME<br />
STATES DO NOT ALLOW THE EXCLUSION OR<br />
LIMITATION OF INCIDENTAL OR CONSEQUENTIAL<br />
DAMAGES, SO THE ABOVE LIMITATION OR<br />
EXCLUSION MAY NOT APPLY TO YOU.<br />
2EZ Speed TM Pool Motor with Programmable Control/Timer<br />
17
Nidec Motor Corporation<br />
8050 W. Florissant Avenue<br />
St. Louis, MO 63136<br />
www.nidec-motor.com/pool<br />
Pool Motor Product Service Hotline:<br />
1-800-566-1418