Model: HT503TH(HT503TH-DH, SH53TH-S/C/W) Unique Features
Model: HT503TH(HT503TH-DH, SH53TH-S/C/W) Unique Features
Model: HT503TH(HT503TH-DH, SH53TH-S/C/W) Unique Features

Create successful ePaper yourself
Turn your PDF publications into a flip-book with our unique Google optimized e-Paper software.
<strong>HT503TH</strong>-<strong>DH</strong>_BDEULL_ENG_3960 6/28/08 12:12 AM Page 1<br />
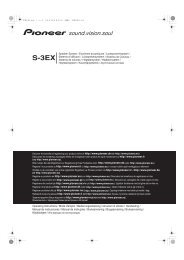
<strong>Unique</strong> <strong>Features</strong><br />
USB Direct Recording<br />
Record music from CD to<br />
your USB device.<br />
Go to page 17<br />
<strong>Model</strong>: <strong>HT503TH</strong>(<strong>HT503TH</strong>-<strong>DH</strong>, <strong>SH53TH</strong>-S/C/W)<br />
Full HD up-scaling<br />
(1080p)<br />
View Full HD picture quality<br />
with simple setup.<br />
Go to page 10<br />
Portable In<br />
Listen to music from your<br />
portable device (MP3,<br />
Notebook, etc).<br />
Go to page 17<br />
5.1ch ez Set-up<br />
Listen sound from TV, DVD<br />
and Digital Device with vivid<br />
5.1ch mode.<br />
Go to page 15<br />
P/NO : MFL54563960
<strong>HT503TH</strong>-<strong>DH</strong>_BDEULL_ENG_3960 6/28/08 12:12 AM Page 2<br />
Safety Precaution<br />
CAUTION: TO REDUCE THE RISK OF ELECTRIC SHOCK DO NOT REMOVE<br />
COVER (OR BACK) NO USER-SERVICEABLE PARTS INSIDE REFER SERVICING<br />
TO QUALIFIED SERVICE PERSONNEL.<br />
This lightning flash with arrowhead symbol within an equilateral triangle is<br />
intended to alert the user to the presence of uninsulated dangerous voltage<br />
within the product’s enclosure that may be of sufficient magnitude to constitute<br />
a risk of electric shock to persons.<br />
The exclamation point within an equilateral triangle is intended to alert the<br />
user to the presence of important operating and maintenance (servicing)<br />
instructions in the literature accompanying the product.<br />
WARNING: TO PREVENT FIRE OR ELECTRIC SHOCK HAZARD, DO NOT<br />
EXPOSE THIS PRODUCT TO RAIN OR MOISTURE.<br />
WARNING: Do not install this equipment in a confined space such as a book case or<br />
similar unit.<br />
CAUTION: Do not block any ventilation openings. Install in accordance with the manufacturer's<br />
instructions.<br />
Slots and openings in the cabinet are provided for ventilation and to ensure reliable<br />
operation of the product and to protect it from over heating. The openings should be<br />
never be blocked by placing the product on a bed, sofa, rug or other similar surface.<br />
This product should not be placed in a built-in installation such as a bookcase or rack<br />
unless proper ventilation is provided or the manufacturer's instruction has been<br />
adhered to.<br />
CAUTION: This product employs a Laser System.<br />
To ensure proper use of this product, please read this owner’s<br />
manual carefully and retain it for future reference. Should the<br />
unit require maintenance, contact an authorized service center.<br />
Use of controls, adjustments or the performance of procedures<br />
other than those specified herein may result in hazardous radiation exposure.<br />
To prevent direct exposure to laser beam, do not try to open the enclosure. Visible<br />
laser radiation when open. DO NOT STARE INTO BEAM.<br />
CAUTION: The apparatus should not be exposed to water (dripping or splashing) and<br />
no objects filled with liquids, such as vases, should be placed on the apparatus.<br />
CAUTION concerning the Power Cord<br />
Most appliances recommend they be placed upon a dedicated circuit;<br />
2<br />
CAUTION<br />
RISK OF ELECTRIC SHOCK<br />
DO NOT OPEN<br />
That is, a single outlet circuit which powers only that appliance and has no additional<br />
outlets or branch circuits. Check the specification page of this owner's manual to be<br />
certain.<br />
Do not overload wall outlets. Overloaded wall outlets, loose or damaged wall outlets,<br />
extension cords, frayed power cords, or damaged or cracked wire insulation are dangerous.<br />
Any of these conditions could result in electric shock or fire. Periodically<br />
examine the cord of your appliance, and if its appearance indicates damage or deterioration,<br />
unplug it, discontinue use of the appliance, and have the cord replaced with<br />
an exact replacement part by an authorized service center.<br />
Protect the power cord from physical or mechanical abuse, such as being twisted,<br />
kinked, pinched, closed in a door, or walked upon. Pay particular attention to plugs,<br />
wall outlets, and the point where the cord exits the appliance.<br />
To disconnect power from the mains, pull out the mains cord plug. When installing the<br />
product, ensure that the plug is easily accessible.<br />
Disposal of your old appliance<br />
1. When this crossed-out wheeled bin symbol is attached to a product it<br />
means the product is covered by the European Directive 2002/96/EC.<br />
2. All electrical and electronic products should be disposed of separately from<br />
the municipal waste stream via designated collection facilities appointed by<br />
the government or the local authorities.<br />
3. The correct disposal of your old appliance will help prevent potential negative<br />
consequences for the environment and human health.<br />
4. For more detailed information about disposal of your old appliance, please<br />
contact your city office, waste disposal service or the shop where you purchased<br />
the product.<br />
This product is manufactured to comply with EMC Directive<br />
2004/108/EC and Low Voltage Directive 2006/95/EC.<br />
European representative :<br />
LG Electronics Service Europe B.V.<br />
Veluwezoom 15, 1327 AE Almere, The Netherlands<br />
(Tel : +31-036-547-8940)
<strong>HT503TH</strong>-<strong>DH</strong>_BDEULL_ENG_3960 6/28/08 12:12 AM Page 3<br />
Welcome to your new DVD Receiver<br />
Contents<br />
Setting up . . . . . . . . . . . . . . . . . . . . . . . . . . . . . . . . .4<br />
Hooking up the unit . . . . . . . . . . . . . . . . . . . . . . . . .5-6<br />
Remote control . . . . . . . . . . . . . . . . . . . . . . . . . . . . .7<br />
Main Unit . . . . . . . . . . . . . . . . . . . . . . . . . . . . . . . . . .8<br />
OSD Initial language settings . . . . . . . . . . . . . . . . . . .9<br />
Initial Setting the Area Code . . . . . . . . . . . . . . . . . . . .9<br />
Adjust the settings . . . . . . . . . . . . . . . . . . . . . . . . .9-11<br />
Setting the sound mode . . . . . . . . . . . . . . . . . . . . . .11<br />
Displaying Disc Information . . . . . . . . . . . . . . . . . . .12<br />
Playing a disc or file . . . . . . . . . . . . . . . . . . . . . .12-14<br />
Viewing photo files . . . . . . . . . . . . . . . . . . . . . . . . . .14<br />
Listening to the radio . . . . . . . . . . . . . . . . . . . . . . . .15<br />
5.1ch ez Set-up . . . . . . . . . . . . . . . . . . . . . . . . . . . .15<br />
Listening to music from your USB device . . . . . . . . .16<br />
Recording music from CD to your USB device . . . . .17<br />
Listening to music from your portable player . . . . . . .17<br />
Language Codes . . . . . . . . . . . . . . . . . . . . . . . . . . .18<br />
Area Codes . . . . . . . . . . . . . . . . . . . . . . . . . . . . . . .18<br />
Troubleshooting . . . . . . . . . . . . . . . . . . . . . . . . . . . .19<br />
Types of Playable Discs . . . . . . . . . . . . . . . . . . . . . .20<br />
Specifications . . . . . . . . . . . . . . . . . . . . . . . . . . . . . .21<br />
What is SIMPLINK?<br />
Some functions of this unit are controlled by TV’s remote control when this unit and<br />
LG TV with SIMPLINK are connected through HDMI connection.<br />
• Controllable functions by LG TV’s remote control; Play, Pause, Scan, Skip, Stop,<br />
Power Off, etc.<br />
• Refer to the TV owner’s manual for the details of SIMPLINK function.<br />
• LG TV with SIMPLINK function has the logo as shown above.<br />
• Use a higher version cable than 1.2A HDMI cable.<br />
3
<strong>HT503TH</strong>-<strong>DH</strong>_BDEULL_ENG_3960 6/28/08 12:12 AM Page 4<br />
Setting up<br />
4<br />
The speakers are detached from the speaker stands.<br />
Assembling the Speakers<br />
Fix the speaker to the base by rotating the speaker<br />
Attaching the speakers to the DVD receiver<br />
a You will have received six speaker cables.<br />
Each one is colour-coded by a band near each end and connects one of<br />
the six speakers to the DVD receiver.<br />
b Connect the wires to the DVD receiver.<br />
Match each wire’s coloured band to the same coloured connection terminal<br />
on the rear of the DVD receiver. To connect the cable to the DVD<br />
receiver, press each plastic finger pad to open the connection terminal.<br />
Insert the wire and release the finger pad.<br />
Connect the red end of each wire to the<br />
terminals marked +(plus) and the black<br />
end to the terminals marked - (minus).<br />
c Connect the wires to the speakers.<br />
Connect the other end of each wire to the correct speaker according to<br />
the colour coding:<br />
COLOUR<br />
Grey<br />
Blue<br />
Green<br />
Orange<br />
Red<br />
White<br />
SPEAKER<br />
Rear<br />
Rear<br />
Centre<br />
Sub Woofer<br />
Front<br />
Front<br />
POSITION<br />
Behind you and to your right.<br />
Behind you and to your left.<br />
Above screen, directly in front of you.<br />
In front of you, to the right of<br />
the screen.<br />
In front of you, to the left of<br />
the screen.<br />
To connect the cable to the speakers, press each plastic finger pad to open the<br />
connection terminals on the base of each speaker. Insert the wire and release<br />
the finger pad.<br />
Be careful of the following<br />
Be careful to make sure children do not put their hands or any objects into the<br />
*speaker duct.<br />
*Speaker duct: A hall for plentiful bass sound on speaker cabinet(enclosure).
<strong>HT503TH</strong>-<strong>DH</strong>_BDEULL_ENG_3960 6/28/08 12:12 AM Page 5<br />
Hooking up the unit<br />
a Connect jacks on the unit and your TV (DVD player or Digital Device etc.) using the cables.<br />
Video Out connection<br />
FM connection<br />
SCART connection<br />
Connect the VIDEO OUT-<br />
PUT (MONITOR) jack on the<br />
unit to the corresponding<br />
input jack on your TV using a<br />
Video cable.<br />
FM - Connect the FM aerial.<br />
The reception will be its best<br />
when the two loose ends of<br />
the aerial are in a straight and<br />
horizontal line.<br />
Connect the TO TV jack on<br />
the unit and your TV using<br />
the SCART cable.<br />
b Plug the power cord into the power source.<br />
Audio In connection<br />
Component Video connection<br />
The unit’s Audio jacks are<br />
colour coded (red for right<br />
audio and white for left<br />
audio). If your TV has only<br />
one input for audio (mono),<br />
connect it to the left (white)<br />
audio jack on the unit.<br />
Connect the COMPONENT<br />
VIDEO (PROGRESSIVE<br />
SCAN) OUTPUT jacks on<br />
the unit to the corresponding<br />
input jacks on your TV using<br />
a Y PB PR cable.<br />
5
<strong>HT503TH</strong>-<strong>DH</strong>_BDEULL_ENG_3960 6/28/08 12:12 AM Page 6<br />
Hooking up the unit<br />
6<br />
HDMI Out connection<br />
Connect the HDMI OUTPUT jack<br />
on the unit to the HDMI input jack<br />
on a HDMI compatible TV using a<br />
HDMI cable.<br />
Digital Audio in connection<br />
Connect the unit’s OPTICAL<br />
IN jack to the optical out to<br />
jack on your TV (or Digital<br />
Devicae etc.)<br />
Hooking up the unit - more you<br />
can do<br />
Resolution Setting<br />
You can change the resolution for component video<br />
and HDMI output.<br />
To change the resolution using setup menu to select<br />
the desired resolution - Auto, 480i(576i), 480p(576p),<br />
720p, 1080i, 1080p.<br />
Available resolution according to connection<br />
[HDMI OUT]: Auto, 1080p, 1080i, 720p and 480p (or<br />
576p)<br />
[COMPONENT VIDEO OUT]: 480p (or 576p) and 480i<br />
(or 576i)<br />
[VIDEO OUT]: 480i (or 576i)<br />
[SCART]: 576i<br />
Notes on HDMI Out connection<br />
• If your TV does not accept your resolution setting,<br />
abnormal picture appears on the screen.<br />
Please read owner’s manual for TV, and then set<br />
the resolution that your TV can accept.<br />
• Use the HDMI cable within 5 meters<br />
• If the volume bar is not displayed on TV screen,<br />
when you select Simplink to off on TV, restart the<br />
unit.<br />
Enjoying audio from an external source<br />
You can enjoy audio from an external source through<br />
your unit.<br />
Press INPUT repeatedly to select the desired input<br />
source. - AUX, AUX OPT, TV-AUDIO, PORTABLE,<br />
USB
<strong>HT503TH</strong>-<strong>DH</strong>_BDEULL_ENG_3960 6/28/08 12:12 AM Page 7<br />
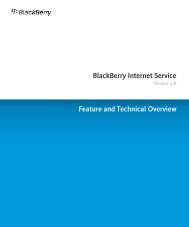
Remote control<br />
a<br />
b<br />
c<br />
d<br />
a <br />
POWER: Switches the unit ON or OFF.<br />
FUNCTION : Selects the function (DVD/CD, FM)<br />
INPUT : Changes the input source ( AUX, AUX OPT,<br />
TV-AUDIO, PORTABLE, USB)<br />
SLEEP : Sets the System to turn off automatically at a<br />
specified time. (Dimmer : Dims the LED (Light-emitting<br />
diode) of front panel by half in power-on status.)<br />
MUTE : Press MUTE to mute your unit. You can mute your<br />
unit in order, for example, to answer the telephone.<br />
EQ : You can choose 6 (or 7) fixed sound impressions.<br />
VSM : Press VSM to set the Dolby Pro Logic II or VIRTU-<br />
AL sound.<br />
RETURN (O): Press to move back wards in the menu.<br />
0-9 numerical buttons: Selects numbered options in a<br />
menu.<br />
b <br />
SETUP : Accesses or removes setup menu<br />
MENU : Accesses the menu on a DVD disc.<br />
DISPLAY: Accesses On-Screen Display.<br />
TITLE : If the current DVD title has a menu, the title menu<br />
appears on the screen. Otherwise, the disc menu may<br />
appear.<br />
b / B / v / V (left/right/up/down):Used to navigate onscreen<br />
displays.<br />
ENTER : Acknowledges menu selection.<br />
PRESET(-/+): Selects programme of Radio.<br />
TUN.(-/+): Tunes in the desired radio station.<br />
PLAY (B): Starts playback. Mono/Stereo(St.)<br />
STOP (x): Stops playback or recording.<br />
PAUSE/STEP (X): Pause playback.<br />
REC (z) : USB RECORD<br />
SCAN(bb/BB) : Search backward or forward.<br />
SKIP(. / >): Go to next or previous chapter/ track.<br />
PROG./MEMO. : Accesses or removes Program menu.<br />
VOLUME (+/-) : Adjusts speaker volume.<br />
c <br />
CLEAR: Removes a track number on the Program List.<br />
S-TITLE: During playback, S - TITLE repeatedly to select a<br />
desired subtitle language .<br />
REPEAT: Repeats a Chapter/ Track/ Title/ all.<br />
RDS: Radio display mode<br />
PTY: Views the various displays of the RDS<br />
HT SPK: Press HT SPK to select the AUX OPT directly<br />
d <br />
TV Control buttons : Controls the TV. (LG TV only)<br />
Put the batteries into the remote control<br />
Make sure that the + (plus) and – (minus) on the batteries<br />
match those on the remote control.<br />
Controlling the TV.<br />
You can control the sound level, input source, and<br />
power switch of LG TVs as well. Hold POWER (TV) and<br />
press PROGRAM (v/V) button repeatedly until the TV<br />
on or off.<br />
7
<strong>HT503TH</strong>-<strong>DH</strong>_BDEULL_ENG_3960 6/28/08 12:12 AM Page 8<br />
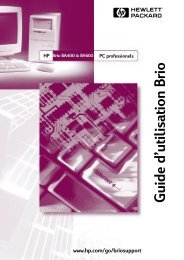
Main Unit<br />
8<br />
Open/Close<br />
DVD/CD Disc Drawer<br />
PORT. IN port<br />
The PORT. In port means you can connect<br />
an audio device to play trough the surround<br />
sound speakers.<br />
USB port<br />
The USB port allows you can connect a<br />
memory device to your DVD player.<br />
Power<br />
Turn the unit on and off.<br />
Play/Pause, Function<br />
Press and hold down this button for<br />
about 3 seconds then press repeatedly<br />
to select other function.<br />
Stop<br />
Tuning (-/+)<br />
Skip / Search<br />
VSM<br />
Selects the Dolby Pro Logic II<br />
or Virtual sound.<br />
Volume<br />
Control the volume when using any function.
<strong>HT503TH</strong>-<strong>DH</strong>_BDEULL_ENG_3960 6/28/08 12:12 AM Page 9<br />
OSD Initial language settings<br />
Before using the unit for the first time, you have to adjust OSD initial<br />
language<br />
1 Turn the power on:<br />
Appear the language list display window POWER<br />
2 Select the language: vV b B<br />
3 Press: ENTER<br />
4 To confirm press: bB and ENTER<br />
Initial Setting the Area Code<br />
ON REMOTE<br />
After factory setting, To set the Area code you have to as below.<br />
1 Display setup menu: SETUP<br />
2 Select LOCK menu on the first level: v V<br />
3 Move to second level:<br />
Appears the activated Area code on the<br />
second level.: B<br />
4 Move to third level: B<br />
ON REMOTE<br />
5 Enter the new password: numerical buttons<br />
(0-9) and ENTER<br />
6 Recheck entered new password: numerical buttons<br />
(0-9) and ENTER<br />
7 Select a code for a geographic area:<br />
After select, Rating and Passward will be<br />
activated.(page18) vV b B<br />
8 To confirm press: ENTER<br />
Adjust the settings<br />
1 Display setup menu : SETUP<br />
2 Select a desired option on the first level: v V<br />
3 Move to second level: B<br />
4 Select a desired option on the second level: v V<br />
5 Move to third level: B<br />
Adjust the settings - more you can do<br />
Adjust the language settings<br />
ON REMOTE<br />
6 Change the setting: v V, ENTER<br />
OSD – Select a language for the Setup menu and on-screen display.<br />
There is displayed as “-” or other error mark on display when you<br />
change OSD.<br />
- Restart the unit<br />
- Change function<br />
- Disconnect and connect USB device.<br />
Disc Menu/Audio/Subtitle – Select a language for the Menu/Audio/Subtitle.<br />
[Original]: Refers to the original language in which the disc was recorded.<br />
[Others]: To select another language, press number buttons then ENTER to<br />
enter the corresponding 4-digit number according to the language code list in<br />
the reference chapter (see page 18). If you make a mistake before pressing<br />
ENTER, press CLEAR.<br />
[OFF] (for Disc Subtitle): Turn off Subtitle.<br />
9
<strong>HT503TH</strong>-<strong>DH</strong>_BDEULL_ENG_3960 6/28/08 12:12 AM Page 10<br />
Adjust the display settings<br />
TV Aspect – Select which screen aspect to use based on the shape of your TV<br />
screen.<br />
[4:3]: Select when a standard 4:3 TV is connected.<br />
[16:9]: Select when a 16:9 wide TV is connected.<br />
Display Mode – If you selected 4:3, you’ll need to define how you would like<br />
widescreen programs and films to be displayed on your TV screen.<br />
[Letterbox]: This displays a widescreen picture with black bands at the top<br />
and bottom of the screen.<br />
[Panscan]: This fills the entire 4:3 screen, cropping the picture as necessary.<br />
TV Output Select – Select an option according to the TV connection type.<br />
[YPbPr]: When your TV is connected with the COMPONENT/PROGRESSIVE<br />
SCAN jacks on the unit.<br />
[RGB]: When your TV is connected with the SCART jack.<br />
Video Resolution - Use vV to select the desired resolution then press ENTER<br />
to confirm your selection.<br />
You can set 1080p video resolution to enjoy Full HD picture quality.<br />
(Full HD up-scaling)<br />
The number in 480p (or 576p), 720p, 1080p and 1080i indicates the number of<br />
lines of video. The “i” and “p” indicate interlaced and progressive scan, respectively.<br />
[Auto] If your HDMI jack is connected to TVs providing display information<br />
(EDID), automatically selects the resolution best suited to the connected TV<br />
(1080p, 1080i, 720p or 480p (or 576p)). (only for HDMI connection)<br />
[1080p] Outputs 1080 lines of progressive video. (only for HDMI connection)<br />
[1080i] Outputs 1080 lines of interlaced video.(only for HDMI connection)<br />
[720p] Outputs 720 lines of progressive video.(only for HDMI connection)<br />
[480p (or 576p)] Outputs 480 (or 576) lines of progressive video.<br />
[480i (or 576i)] Outputs 480 (or 576) lines of interlaced video.<br />
Notes on Video Resolution<br />
• Only resolutions supported by the TV are available.<br />
• Depending on your TV, certain HDMI output resolutions may not work.<br />
• If your TV does not accept your resolution setting, an abnormal picture<br />
appears on the screen. Please read TV’s owner’s manual then set the resolution<br />
that your TV can accept.<br />
• If the HDMI jack is connected for TVs providing display information (EDID),<br />
you can not select resolutions that the TV does not accept.<br />
• If the picture does not appear on the screen, change the TV’s input source.<br />
10<br />
• If you turn off the TV or disconnect the HDMI cable during playback of the<br />
device, playback will pause. You have to click on the play button to play back<br />
again. For some TVs, when you change the TV mode, such condition specified<br />
above may happen.<br />
Adjust the audio settings<br />
5.1 Speaker Setup - Adjust 5.1 Speaker Setup menu for amplifier’s output.<br />
[Speaker]: Select a speaker that you want to adjust.<br />
[Size]: Since the speaker settings are fixed, you cannot change the settings.<br />
[Volume]: Adjust the output level of the selected speaker. (-5dB ~ 5dB)<br />
[Distance]: If you connected speakers to your DVD/CD Receiver, setting the<br />
Distance lets the speakers know how far the sound has to travel to reach<br />
your set listening point. This allows the sound from each speaker to reach<br />
the listener at the same time.<br />
Press b / B to adjust the Distance of the selected speaker. (You can’t adjust<br />
front / Woofer speakers)<br />
[Test]: Press b / B to test the signals of each speaker. Adjust the volume to<br />
match the volume of test signals memorized in the system.<br />
DRC (Dynamic Range Control) – Make the sound clear when the volume is<br />
turned down (Dolby Digital only). Set to [On] for this effect.<br />
Vocal – Select [On] to mix karaoke channels into normal stereo. This function is<br />
effective for multi-channel karaoke DVDs only.<br />
HD AV Sync - Sometimes Digital TV encounters a delay between picture and<br />
sound. If this happens you can compensate by setting a delay on the sound so<br />
that it effectively ‘waits’ for the picture to arrive: this is called HD AV Sync. Use vV<br />
to scroll up and down through the delay amount, which you can set at anything<br />
between 0 and 300m sec.<br />
The delay will vary depending on which digital TV channel you are on. If you<br />
change channel you may need to readjust the HD AV Sync.
<strong>HT503TH</strong>-<strong>DH</strong>_BDEULL_ENG_3960 6/28/08 12:12 AM Page 11<br />
Adjust the lock settings<br />
To access the lock options, you must enter the 4-digit password. If you have not<br />
yet entered a password you are prompted to do so. Enter a 4-digit password.<br />
Enter it again to verify. If you make a mistake while entering number, press<br />
CLEAR to delete numbers.<br />
If you forget your password you can reset it. Press SETUP to display the Setup<br />
menu. Input ‘210499’ and press ENTER. The password has now been cleared.<br />
Rating – Select a rating level. The lower the level, the stricter the rating. Select<br />
[Unlock] to deactivate the rating.<br />
Password – Sets or changes the password for lock settings.<br />
[New]: Enter a new 4-digit password using the numerical buttons then press<br />
ENTER. Enter the password again to confirm.<br />
[Change]: Enter the new password twice after entering the current password.<br />
Area code – Select a code for a geographic area as the playback rating level.<br />
This determines which area’s standards are used to rate DVDs controlled by the<br />
parental lock. See the Area Codes on page 18.<br />
Adjust the others settings<br />
DivX(R) Registration – We provide you with the DivX® VOD (Video On<br />
Demand) registration code that allows you to rent and purchase videos using<br />
the DivX® VOD service.<br />
For more information, visit www.divx.com/vod.<br />
Press ENTER when [Select] icon is highlighted and you can view the registration<br />
code of the unit.<br />
Bit Rate – You can set the quality of the recorded file.<br />
Setting the sound mode<br />
VSM (VIRTUAL SOUND MATRIX) and Dolby Pro Logic II<br />
You can select the Dolby Pro Logic II or Virtual sound. Press VSM to set the virtual<br />
sound or to change sound mode repeatedly.<br />
[BYPASS] mode : Software with multichannel surround audio signals is played<br />
according to the way it was recorded.<br />
2Ch source<br />
[PL II MOVIE] mode: The Movie mode is for use with stereo television shows<br />
and all programs encoded in Dolby Surround. The result is enhanced sound<br />
field directionality that approaches the quality of discrete 5.1-channel sound.<br />
[PL II MUSIC] mode: The Music mode is for use with any stereo music<br />
recordings.<br />
[PL II MATRIX] mode: The Matrix mode is the same as the Music mode<br />
except that the directional enhancement logic is turned off. It may be used to<br />
enhance mono signals by making them seem “larger.” The Matrix mode may<br />
also find use in auto systems, where the fluctuations from poor FM stereo<br />
reception can otherwise cause disturbing surround signals from a logic<br />
decoder. The ultimate “cure” for poor FM stereo reception may be simply to<br />
force the audio to mono.<br />
[ON STAGE] mode: Simulates a large Concert hall<br />
[VIRTUAL] mode: Realtime 3D positioned sound rendering technology<br />
with stereo sources, optimized for stereo speakers. Listeners may experience<br />
amazing virtual surround effects with their own multimedia players.<br />
5.1Ch source<br />
[VIRTUAL] mode: The Multichannel sound changes the sound in 5.1 ch<br />
into a virtual one in the 10.1 ch so that it provides such a feeling that<br />
you listen to the sound simultaneously from the right and left speakers<br />
and center speaker.<br />
Set a pre-programmed sound field<br />
This system has a number of pre-set surround sound fields. Select the one<br />
which best suits the programme you are watching by pressing EQ repeatedly to<br />
cycle through the options: NORMAL, NATURAL, AUTO EQ, POP, CLASSIC,<br />
ROCK, JAZZ<br />
[AUTO EQ]: AUTO EQ operates only in the MP3/ WMA files which include<br />
the information. (ID3 Tag is operated ver.1 only.) WMA file operates to Normal<br />
EQ regardless of Tag information.<br />
11
<strong>HT503TH</strong>-<strong>DH</strong>_BDEULL_ENG_3960 6/28/08 12:12 AM Page 12<br />
Displaying Disc Information - more you can do<br />
You can select an item by pressing vV and change or select the setting by<br />
pressing b B.<br />
12<br />
Displaying Disc Information<br />
1 Press DISPLAY: DISPLAY<br />
2 Select a item: v V<br />
3 Adjust the Display menu settings: b B<br />
4 To return the exit: DISPLAY<br />
1/6<br />
4/26<br />
1 ENG<br />
D<br />
3/2.1CH<br />
1 KOR<br />
1/3<br />
Current title (or track)<br />
number/total number of titles (or tracks)<br />
Current chapter number/total number of chapters<br />
Elapsed playing time<br />
Selected audio language or channel<br />
Selected subtitle<br />
Selected angle/total number of angles<br />
Selected sound mode<br />
Symbol Used in this Manual<br />
All discs and file listed below ALL MP3 files<br />
DVD and finalized DVD±R/RW DVD WMA files<br />
DivX files DivX Audio CDs<br />
ON REMOTE<br />
MP3<br />
WMA<br />
ACD<br />
Playing a Disc or file<br />
1 Open the disc tray: (On unit: Z) -<br />
2 Insert a Disc: (On unit) -<br />
3 Close the disc tray: (On unit: Z) -<br />
4 Adjust the menu settings: vV b B<br />
or Select a file from the menu: v V<br />
Playing a Disc or file - more you can do<br />
Playing a DVD that has a menu<br />
Most DVD now have menus which load first before the film begins to play. You<br />
can navigate these menus using vV b B to highlight an option.<br />
Press ENTER to select.<br />
Skip to the next/previous chapter/track ALL<br />
Press SKIP (>) to move to the next chapter/track.<br />
Press SKIP (.) to return to the beginning of the current chapter/track.<br />
Press SKIP (.) twice briefly to step back to the previous chapter/track.<br />
Pause playback<br />
Press PAUSE/STEP (X) to pause playback. Press PLAY (B) to continue playback.<br />
Frame-by-Frame playback DVD DivX<br />
Press PAUSE/STEP (X) repeatedly to play title Frame-by-Frame.<br />
Playing repeatedly<br />
ALL<br />
ALL<br />
DVD<br />
ON REMOTE<br />
5 Start the Disc playing: B PLAY<br />
6 To stop the Disc playing: x STOP<br />
Press REPEAT repeatedly to select an item to be repeated. The current title,<br />
chapter or track will be played back repeatedly. To return to normal playback,<br />
press REPEAT repeatedly to select [OFF].
<strong>HT503TH</strong>-<strong>DH</strong>_BDEULL_ENG_3960 6/28/08 12:12 AM Page 13<br />
Fast forward or fast reverse<br />
Press SCAN (m or M) to play fast forward or fast reverse during playback.<br />
You can change the playback speed by pressing SCAN (m or M) repeatedly.<br />
Press PLAY (B) to continue play at normal speed.<br />
Selecting a subtitle language<br />
During playback, press S-TITLE ( ) repeatedly to select a desired subtitle language.<br />
Slow down the playing speed DVD<br />
While playback is paused, press SCAN (bb or BB) to slow down forward or<br />
reverse playback. You can change the various playback speed by pressing<br />
SCAN (m or M) repeatedly. Press PLAY (B) to continue play at normal<br />
speed.<br />
Watch and listen 1.5 times faster<br />
Press PLAY when a DVD is already playing to watch and listen to a DVD 1.5<br />
times faster than normal playback speed. B x1.5 will appear in the top right corner<br />
of the screen. Press PLAY again to return to normal playback speed.<br />
Viewing the Title menu<br />
Press TITLE to display the disc's title menu, if available.<br />
Viewing the DVD MENU<br />
DVD<br />
DVD<br />
Press MENU to display the disc menu, if available.<br />
Starting play from selected time<br />
ALL<br />
DVD<br />
DVD<br />
DVD<br />
DivX<br />
ACD<br />
DivX<br />
WMA<br />
Searches for the starting point of entered time code. Press DISPLAY during<br />
playback and select the time clock icon. Input the required start time in hours,<br />
minutes, and seconds, and press ENTER. If you enter the wrong number, press<br />
CLEAR to enter again.<br />
Last Scene Memory DVD<br />
This unit memorizes the last scene from the last disc that is viewed. The last<br />
scene remains in memory even if you remove the disc from the player or switch<br />
off(Stand-by mode) the unit. If you load a disc that has the scene memorized,<br />
the scene is automatically recalled.<br />
MP3<br />
Mixed disc or USB Flash Drive – DivX, MP3/WMA and JPEG<br />
When playing a disc or USB Flash Drive containing with DivX, MP3/WMA and<br />
JPEG files together, you can select which menu of files you would like to play<br />
by pressing TITLE<br />
Changing the character set to display DivX ® subtitle correctly<br />
DivX<br />
If the subtitle does not display properly during playback, press and hold S-TITLE<br />
for about 3 seconds then press S-TITLE to select another language code until<br />
the subtitle is displayed properly<br />
DivX file requirement DivX<br />
DivX disc compatibility with this player is limited as follows:<br />
• Available resolution size: 800x600 (W x H) pixel<br />
• The file name of the DivX subtitle is available by 45 characters.<br />
• If there is impossible code to express in the DivX file, it may be displayed as<br />
" _ " mark on the display.<br />
• If the number of the screen frame is over 30 per 1 second, this unit may not<br />
operate normally.<br />
• If the video and audio structure of recorded files are not interleaved, either<br />
video or audio is outputted.<br />
• If the name of movie file is different from that of the subtitle file,during playback<br />
of a DivX file, subtitle may not be display..<br />
• MPEG4 file extensions: “.avi”, “.mpg”, “.mpeg”<br />
• Playable DivX subtitle: SubRip (.srt / .txt), SAMI (.smi),<br />
SubStation Alpha(.ssa/.txt), MicroDVD (.sub/.txt), VobSub (.sub)<br />
SubViewer 2.0 (.sub/.txt), TMPlayer(.txt), DVD Subtitle System(.txt)<br />
(Files (VobSub(.sub)) included with USB device is not supported)<br />
• Playable Codec format: “DIVX3.xx”, “DIVX4.xx “, “DIVX5.xx”, “MP43”, “3IVX”<br />
• Playable Audio format: “AC3”, “DTS”, “PCM”, “MP3”, “WMA”<br />
• Sampling frequency: within 32 - 48 kHz (MP3), within 24 - 48kHz (WMA)<br />
• Bit rate: within 32 - 320kbps (MP3), 40 - 192kbps (WMA)<br />
• CD-R/RW, DVD±R/RW Format: ISO 9660<br />
• Maximum Files/Disc: Less than 999 (total number of files and folders)<br />
13
<strong>HT503TH</strong>-<strong>DH</strong>_BDEULL_ENG_3960 6/28/08 12:12 AM Page 14<br />
Creating your own program<br />
You can play the contents of a disc in the order you want by arranging the order<br />
of the music files on the disc. The program is cleared when the disc is removed.<br />
Select a desired music file then press PROG./MEMO. or select “ “ and then<br />
press ENTER to add the music file to the program list. To add all music files on<br />
the disc, select “ ” and then press ENTER. Select a music file from the program<br />
list then press ENTER to start programmed playback.To clear a music file<br />
from the program list, select the music file you want to clear then press CLEAR<br />
or select “ ” icon and then press ENTER. To clear all music files from the<br />
program list, select " " then press ENTER.<br />
Displaying file information (ID3 TAG ) MP3<br />
While playing an MP3 file containing file information, you can display the information<br />
by pressing DISPLAY repeatedly.<br />
MP3/WMA music file requirement<br />
MP3/WMA compatibility with this unit is limited as follows:<br />
• File extensions: “.mp3”, “.wma”.<br />
• Sampling frequency: within 32 - 48 kHz (MP3), within 24 - 48kHz (WMA)<br />
• Bit rate: within 32 - 320kbps (MP3), 40 - 192kbps (WMA)<br />
• CD-R/RW, DVD±R/RW Format: ISO 9660<br />
• Maximum Files/Disc: Less than 999 (total number of files and folders)<br />
Screen Saver<br />
The screen saver appears when you leave the unit in Stop mode for about five<br />
minutes.<br />
System Select<br />
You must select the appropriate system mode for your TV system. If “NO DISC”<br />
appears in the display window, press and hold PAUSE/STEP (X) for more than<br />
five seconds to be able to select a system.<br />
14<br />
ACD<br />
MP3<br />
WMA<br />
Viewing photo files<br />
1 Open the disc tray: (On unit: Z) -<br />
2 Insert a disc: (On unit) -<br />
3 Close the disc tray: (On unit: Z) -<br />
4 Select a photo file: v V<br />
Viewing photo files - more you can do<br />
Viewing photo files as a slide show<br />
Use vV b B to highlight ( ) icon then press ENTER to start slide show.<br />
You can change slide show speed using b Bwhen ( ) icon is highlighted.<br />
Skip to the next/previous photo<br />
Press SKIP (. or >) to view the previous/next photo.<br />
Rotate a photo<br />
Use vV b B to rotate the photo in full screen mode.<br />
Pause a slide show<br />
ON REMOTE<br />
5 Display the selected file in full screen: ENTER<br />
6 To return to the menu: x STOP<br />
Press PAUSE/STEP (X) to pause a slide show. Press PLAY (B) to continue the<br />
slide show.<br />
Photo file requirement<br />
JPEG file compatibility with this unit is limited as follows:<br />
• File extensions: “.jpg”<br />
• Photo size: Less than 2MB recommended<br />
• CD-R/RW, DVD±R/RW Format: ISO 9660<br />
• Maximum Files/Disc: Less than 999 (total number of files and folders)
<strong>HT503TH</strong>-<strong>DH</strong>_BDEULL_ENG_3960 6/28/08 12:12 AM Page 15<br />
Listening to the radio<br />
Be sure that both FM aerials are connected.<br />
1 Turn the power on: POWER<br />
2 Select FM: FUNCTION<br />
3 Select a radio station: TUN-/+<br />
4 To ‘save’ a radio station:<br />
A preset number will show in the display. PROG/MEMO.<br />
5 To select a ‘saved’ station input the preset<br />
number:<br />
Up to 50 radio stations can be saved. PRESET-/+<br />
6 To confirm press: PROG/MEMO.<br />
Listening to the radio - more you can do<br />
Look for radio stations automatically<br />
ON REMOTE<br />
Press and hold TUN.-/TUN.+ for more than a second. The tuner will scan automatically<br />
and stop when it finds a radio station.<br />
Choose a preset number for a radio station<br />
When storing a radio station, the preset number can be chosen. When the player<br />
automatically shows a preset number, press PRESET -/+ to change it. Press<br />
PROG./MEMO. to save your chosen number.<br />
Delete all the saved stations<br />
Press and hold PROG./MEMO. for two seconds. ERASE ALL will flash up on the<br />
DVD receiver display. Press PROG./MEMO. to erase all saved radio stations.<br />
Improve poor FM reception<br />
Press PLAY (B) (MONO/ST). This will change the tuner from stereo to mono<br />
and usually improve the reception.<br />
See information about a radio station<br />
The FM tuner is supplied with the RDS (Radio Data System) facility. This shows<br />
information about the radio station being listened to. Press RDS repeatedly to cycle<br />
through the various data types:<br />
PS (Programme Service Name)<br />
The name of the channel will appear in the display<br />
PTY (Programme Type Recognition)<br />
The programme type (e.g. Jazz or News) will appear in the display.<br />
RT (Radio Text)<br />
A text message contains special information from the broadcast station.<br />
This text may scroll across the display.<br />
CT (Time controlled by the channel)<br />
This shows the time and date as broadcast by the station.<br />
5.1ch ez Set-up<br />
Listen to sound from TV, DVD and Digital Device with vivid 5.1ch mode.<br />
Even in power off mode, if you press HT SPK, then power is on and<br />
automatically changed to AUX OPT mode.<br />
1 Connect the unit’s OPTICAL IN jack to jack on<br />
optical out of your TV (or Digital Device etc.).: -<br />
2 Select the AUX OPT:<br />
To select the AUX OPT directly HT SPK<br />
ON REMOTE<br />
3 Listen sound with 5.1ch speaker.: -<br />
4 To escape from AUX OPT: FUNCTION or INPUT<br />
15
<strong>HT503TH</strong>-<strong>DH</strong>_BDEULL_ENG_3960 6/28/08 12:12 AM Page 16<br />
16<br />
Listening to music from your<br />
USB device<br />
The advantage of connecting your portable USB player through the system’s<br />
USB port is that the USB device can be controlled from the system.<br />
1 Connect the USB device to the unit<br />
using a USB cable (not supplied).: -<br />
2 Select the USB function: INPUT<br />
3 Select a file from the menu: v V<br />
ON REMOTE<br />
4 Start your music playing: B<br />
5 Before disconnecting the portable USB<br />
device, change to any other function by<br />
pressing: FUNCTION or INPUT<br />
6 Remove the USB device: -<br />
Listening to music from your USB device -<br />
more you can do<br />
Compatible USB Devices<br />
• Devices which require additional program installation when you have connected<br />
it to a computer, are not supported.<br />
• MP3 Player : Flash type MP3 player.<br />
The MP3 player requiring installation of a driver is not supported.<br />
• USB Flash Drive : Devices that support USB2.0 or USB1.1. (In case USB 2.0<br />
is inserted in the the player, if operates at the same speed<br />
as that of USB 1.1)<br />
USB device requirement<br />
• Do not extract the USB device while in operation.<br />
• To prevent data loss, back up all data.<br />
• If you use a USB extension cable or USB hub, the USB device might not be<br />
recognized.<br />
• A device using NTFS file system is not supported. (Only FAT (16/32) file system<br />
is supported.)<br />
• The USB function of this unit does not support all USB devices.<br />
• Digital camera and mobile phone are not supported.<br />
• This unit is not supported when the total number of files is 1000 or more.<br />
• If the connected USB device has two or more folders, a drive folder is displayed<br />
on the screen. If you want to move to the previous menu after you<br />
select a folder, press RETURN.
<strong>HT503TH</strong>-<strong>DH</strong>_BDEULL_ENG_3960 6/28/08 12:12 AM Page 17<br />
Recording music from CD to<br />
your USB device<br />
ON REMOTE<br />
1 Connect the USB device to the unit:<br />
2 Select a mode (DVD/CD) in which you want<br />
-<br />
to record: FUNCTION<br />
3 Start the recording:<br />
If you want to record desired music file in<br />
Disc to USB. Select a file after start the<br />
z<br />
recording: v V and z<br />
4 To stop a recording: x STOP<br />
Recording music from CD to your USB<br />
device - more you can do<br />
Record Audio CD source to USB<br />
One track recording - If the USB recording is played during playback of the<br />
CD, the only track would be recording into the USB<br />
All track recording - If the REC button is pressed at the CD stop, all track<br />
would be recording.<br />
Program list recording - USB Records after selecting the tracks pressing the<br />
PROG./MEMO button if you want to record the track you want.<br />
When you are recording, look out for the following<br />
• When you start the USB direct recording, you can check the Recording percentage<br />
rate for the USB record on the display window during the recording.<br />
• During the recording is no sound and not operate for volume .<br />
• When you stop recording during playback, the file that has been recorded at<br />
that time will be stored<br />
• If you disconnect the USB without STOP button while recording, the file can<br />
not delete in the PC.<br />
• Playable USB REC. Bit rate : 96/128kbps (Refer to the SET UP page)<br />
• During USB record can not operate Pause key for Audio CD only.<br />
• Card reader device can not be use for USB record.<br />
• USB port of the unit can not be connected to PC. The unit can not be used<br />
as a storage device.<br />
• If the USB can not record appears “NO USB”.“ERROR”,“USB FULL”,<br />
“NO REC” on the display window.<br />
• File will be stored to CD_REC folder in a format “TRK-001.mp3”.<br />
• In the state CD-G, DTS disc USB Record is not operated.<br />
• If you record more 999 files on CD_REC folder appears “ERROR” on the<br />
display.<br />
• New files are numbered in numeric sequence. if the total number of the files<br />
are more than 999, delete some or store some in PC.<br />
• External HDD,Card reader, Locked device and MP3 player is not supported.<br />
The making of unauthorized copies of copy-protected material, including<br />
computer programs, files, broadcasts and sound recordings, may be an<br />
infringement of copyrights and constitute a criminal offense. This equipment<br />
should not be used for such purposes.<br />
Be responsible<br />
Respect copyrights<br />
Listening to music from your<br />
portable player<br />
The player can be used to play the music from many types of portable<br />
player<br />
1 Connect the portable player by plugging the<br />
unit into PORT. IN on the front of the player.: -<br />
2 Turn the power on: POWER<br />
3 Select the PORTABLE function:<br />
4 Turn the portable player on and start it<br />
INPUT<br />
playing: -<br />
ON REMOTE<br />
17
<strong>HT503TH</strong>-<strong>DH</strong>_BDEULL_ENG_3960 6/28/08 12:12 AM Page 18<br />
18<br />
Language Codes<br />
Use this list to input your desired language for the following initial settings: Disc Audio, Disc Subtitle, Disc Menu.<br />
Language Code<br />
Afar 6565<br />
Afrikaans 6570<br />
Albanian 8381<br />
Ameharic 6577<br />
Arabic 6582<br />
Armenian 7289<br />
Assamese 6583<br />
Aymara 6588<br />
Azerbaijani 6590<br />
Bashkir 6665<br />
Basque 6985<br />
Bengali; Bangla 6678<br />
Bhutani 6890<br />
Bihari 6672<br />
Breton 6682<br />
Bulgarian 6671<br />
Burmese 7789<br />
Byelorussian 6669<br />
Chinese 9072<br />
Area Codes<br />
Choose a area code from this list.<br />
Area Code<br />
Afghanistan AF<br />
Argentina AR<br />
Australia AU<br />
Austria AT<br />
Belgium BE<br />
Bhutan BT<br />
Bolivia BO<br />
Brazil BR<br />
Cambodia KH<br />
Canada CA<br />
Chile CL<br />
China CN<br />
Colombia CO<br />
Congo CG<br />
Language Code<br />
Croatian 7282<br />
Czech 6783<br />
Danish 6865<br />
Dutch 7876<br />
English 6978<br />
Esperanto 6979<br />
Estonian 6984<br />
Faroese 7079<br />
Fiji 7074<br />
Finnish 7073<br />
French 7082<br />
Frisian 7089<br />
Galician 7176<br />
Georgian 7565<br />
German 6869<br />
Greek 6976<br />
Greenlandic 7576<br />
Guarani 7178<br />
Gujarati 7185<br />
Area Code<br />
Costa Rica CR<br />
Croatia HR<br />
Czech Republic CZ<br />
Denmark DK<br />
Ecuador EC<br />
Egypt EG<br />
El Salvador SV<br />
Ethiopia ET<br />
Fiji FJ<br />
Finland FI<br />
France FR<br />
Germany DE<br />
Great Britain GB<br />
Greece GR<br />
Language Code<br />
Hausa 7265<br />
Hebrew 7387<br />
Hindi 7273<br />
Hungarian 7285<br />
Icelandic 7383<br />
Indonesian 7378<br />
Interlingua 7365<br />
Irish 7165<br />
Italian 7384<br />
Javanese 7487<br />
Kannada 7578<br />
Kashmiri 7583<br />
Kazakh 7575<br />
Kirghiz 7589<br />
Korean 7579<br />
Kurdish 7585<br />
Laothian 7679<br />
Latin 7665<br />
Latvian, Lettish 7686<br />
Area Code<br />
Greenland GL<br />
Hong Kong HK<br />
Hungary HU<br />
India IN<br />
Indonesia ID<br />
Israel IL<br />
Italy IT<br />
Jamaica JM<br />
Japan JP<br />
Kenya KE<br />
Kuwait KW<br />
Libya LY<br />
Luxembourg LU<br />
Malaysia MY<br />
Language Code<br />
Lingala 7678<br />
Lithuanian 7684<br />
Macedonian 7775<br />
Malagasy 7771<br />
Malay 7783<br />
Malayalam 7776<br />
Maori 7773<br />
Marathi 7782<br />
Moldavian 7779<br />
Mongolian 7778<br />
Nauru 7865<br />
Nepali 7869<br />
Norwegian 7879<br />
Oriya 7982<br />
Panjabi 8065<br />
Pashto, Pushto 8083<br />
Persian 7065<br />
Polish 8076<br />
Portuguese 8084<br />
Area Code<br />
Maldives MV<br />
Mexico MX<br />
Monaco MC<br />
Mongolia MN<br />
Morocco MA<br />
Nepal NP<br />
Netherlands NL<br />
Netherlands Antilles AN<br />
New Zealand NZ<br />
Nigeria NG<br />
Norway NO<br />
Oman OM<br />
Pakistan PK<br />
Panama PA<br />
Language Code<br />
Quechua 8185<br />
Rhaeto-Romance 8277<br />
Rumanian 8279<br />
Russian 8285<br />
Samoan 8377<br />
Sanskrit 8365<br />
Scots Gaelic 7168<br />
Serbian 8382<br />
Serbo-Croatian 8372<br />
Shona 8378<br />
Sindhi 8368<br />
Singhalese 8373<br />
Slovak 8375<br />
Slovenian 8376<br />
Spanish 6983<br />
Sudanese 8385<br />
Swahili 8387<br />
Swedish 8386<br />
Tagalog 8476<br />
Area Code<br />
Paraguay PY<br />
Philippines PH<br />
Poland PL<br />
Portugal PT<br />
Romania RO<br />
Russian Federation RU<br />
Saudi Arabia SA<br />
Senegal SN<br />
Singapore SG<br />
Slovak Republic SK<br />
Slovenia SI<br />
South Africa ZA<br />
South Korea KR<br />
Spain ES<br />
Language Code<br />
Tajik 8471<br />
Tamil 8465<br />
Telugu 8469<br />
Thai 8472<br />
Tonga 8479<br />
Turkish 8482<br />
Turkmen 8475<br />
Twi 8487<br />
Ukrainian 8575<br />
Urdu 8582<br />
Uzbek 8590<br />
Vietnamese 8673<br />
Volapük 8679<br />
Welsh 6789<br />
Wolof 8779<br />
Xhosa 8872<br />
Yiddish 7473<br />
Yoruba 8979<br />
Zulu 9085<br />
Area Code<br />
Sri Lanka LK<br />
Sweden SE<br />
Switzerland CH<br />
Taiwan TW<br />
Thailand TH<br />
Turkey TR<br />
Uganda UG<br />
Ukraine UA<br />
United States US<br />
Uruguay UY<br />
Uzbekistan UZ<br />
Vietnam VN<br />
Zimbabwe ZW
<strong>HT503TH</strong>-<strong>DH</strong>_BDEULL_ENG_3960 6/28/08 12:12 AM Page 19<br />
Troubleshooting<br />
PROBLEM CAUSE<br />
CORRECTION<br />
No power<br />
No picture<br />
There is little or no sound<br />
The DVD picture quality is poor<br />
A DVD/CD will not play<br />
Humming noise heard while a<br />
DVD or CD is playing<br />
Radio stations can’t be tuned in<br />
properly<br />
The remote control doesn’t<br />
work well / at all<br />
The power cord is disconnected.<br />
The TV is not set to receive the DVD signal.<br />
The video cables are not connected securely.<br />
Equipment connected via the audio cable is not set to<br />
receive DVD signal output.<br />
The audio cables are not connected to the speakers or<br />
receiver securely.<br />
The audio cables are damaged.<br />
The disc is dirty.<br />
No disc is inserted.<br />
An unplayable disc is inserted.<br />
The disc is inserted upside down.<br />
The menu is open on screen.<br />
There is a parental lock which prevents the playback of DVDs<br />
with a certain rating.<br />
The disc is dirty.<br />
The DVD receiver is located too close to the TV, causing feedback.<br />
The antenna is positioned or connected poorly.<br />
The signal strength of the radio station is too weak.<br />
No stations have been preset or preset stations have<br />
been.cleared(when tuning by scanning preset channels).<br />
The remote is not pointed directly at the DVD receiver.<br />
The remote is too far from the DVD receiver.<br />
There is an obstacle in the path between the remote control<br />
and the unit.<br />
The batteries in the remote control are flat.<br />
Plug the power cord into the wall outlet securely.<br />
Select the appropriate video input mode on the TV so the picture<br />
from the DVD Receiver appears on the TV screen.<br />
Connect the video cables securely to both the TV and DVD<br />
Receiver.<br />
Select the correct input mode of the audio receiver so you can<br />
hear the sound from the DVD receiver.<br />
Connect the audio cables into the connection terminals correctly.<br />
Replace with a new audio cable.<br />
Clean the disc using a soft cloth with outward strokes.<br />
Insert a disc<br />
Insert a playable disc (check the disc type, colour system<br />
and regional code).<br />
Place the disc with the label or printed side facing<br />
upwards.<br />
Press SETUP to close the menu screen.<br />
Enter your password or change the rating level.<br />
Clean the disc using a soft cloth with outward strokes.<br />
Move DVD receiver and audio components further away from<br />
your TV.<br />
Check the antenna connection and adjust its position.<br />
Attach an external aerial if necessary.<br />
Tune to the station manually.<br />
Preset some radio stations, see page 15 for details.<br />
Point the remote directly at the unit.<br />
Use the remote within 23 feet (7m) of the DVD receiver.<br />
Remove the obstacle.<br />
Replace the batteries with new ones.<br />
19
<strong>HT503TH</strong>-<strong>DH</strong>_BDEULL_ENG_3960 6/28/08 12:12 AM Page 20<br />
20<br />
Types of Playable Discs<br />
DVD-VIDEO: Discs such as movies that can<br />
be purchased or rented.<br />
DVD-R: Video mode and finalized only<br />
DVD-RW: Video mode and finalized only<br />
DVD VR format that have been finalized can not be<br />
played in this unit<br />
DVD+R: Video mode only<br />
Supports the double layer disc also<br />
DVD+RW: Video mode only<br />
Audio CD:<br />
Type<br />
Logo<br />
This unit plays DVD±R/RW and CD-R/RW that contains audio titles,<br />
DivX, MP3,WMA and/or JPEG files. Some DVD±RW/DVD±R or CD-<br />
RW/CD-R cannot be played on this unit due to the recording quality or<br />
physical condition of the disc, or the characteristics of the recording<br />
device and authoring software.<br />
“Dolby”, “Pro Logic”, and the double-D symbol are trademarks of Dolby<br />
Laboratories.<br />
Manufactured under license from Dolby Laboratories.<br />
Manufactured under license under U.S. Patent #’s: 5,451,942; 5,956,674;<br />
5,974,380; 5,978,762; 6,487,535 & other U.S. and worldwide patents issued &<br />
pending. DTS and DTS Digital Surround are registered trademarks and the<br />
DTS logos and Symbol are trademarks of DTS, Inc. © 1996-2007 DTS, Inc. All<br />
Rights Reserved.<br />
HDMI, the HDMI logo and High-Definition Multimedia Interface are trademarks<br />
or registered trademarks of HDMI licensing LLC.<br />
About the Symbol Display<br />
“ ” may appear on your TV display during operation and indicates that the<br />
function explained in this owner’s manual is not available on that specific DVD<br />
video disc.<br />
Regional Codes<br />
This unit has a regional code printed on the rear of the unit. This unit can play<br />
only DVD discs labeled same as the rear of the unit or “ALL”.<br />
• Most DVD discs have a globe with one or more numbers in it clearly visible<br />
on the cover. This number must match your unit’s regional code or the disc<br />
cannot play.<br />
• If you try to play a DVD with a different regional code from your player, the<br />
message “Check Regional Code” appears on the TV screen.<br />
Copyrights<br />
It is forbidden by law to copy, broadcast, show, broadcast via cable, play in<br />
public, or rent copyrighted material without permission. This product features<br />
the copy protection function developed by Macrovision. Copy protection signals<br />
are recorded on some discs. When recording and playing the pictures of these<br />
discs picture noise will appear. This product incorporates copyright protection<br />
technology that is protected by method claims of certain U.S. patents and other<br />
intellectual property rights owned by Macrovision Corporation and other rights<br />
owners. Use of this copyright protection technology must be authorized by<br />
Macrovision Corporation, and is intended for home and other limited viewing<br />
uses only unless otherwise authorized by Macrovision Corporation. Reverse<br />
engineering or disassembly is prohibited.<br />
CONSUMERS SHOULD NOTE THAT NOT ALL HIGH DEFINITION TELEVI-<br />
SION SETS ARE FULLY COMPATIBLE WITH THIS PRODUCT AND MAY<br />
CAUSE ARTIFACTS TO BE DISPLAYED IN THE PICTURE. IN CASE OF 525<br />
OR 625 PROGRESSIVE SCAN PICTURE PROBLEMS, IT IS RECOMMEND-<br />
ED THAT THE USER SWITCH THE CONNECTION TO THE ‘STANDARD<br />
DEFINITION’ OUTPUT. IF THERE ARE QUESTIONS REGARDING OUR TV<br />
SET COMPATIBILITY WITH THIS MODEL 525p AND 625p UNIT, PLEASE<br />
CONTACT OUR CUSTOMER SERVICE CENTER.<br />
You have to set the disc format option to [Mastered] in order to make the discs<br />
compatible with the LG players when formatting rewritable discs. When setting<br />
the option to Live File System, you cannot use it on LG players.<br />
(Mastered/Live File System : Disc format system for Windows Vista)
<strong>HT503TH</strong>-<strong>DH</strong>_BDEULL_ENG_3960 6/28/08 12:12 AM Page 21<br />
Specifications<br />
General<br />
Power supply Refer to main label.<br />
Power consumption Refer to main label.<br />
Net Weight 3.9 kg<br />
External dimensions (W x H x D) 430 x 73 x 305 mm<br />
Operating conditions Temperature 5°C to 35°C,<br />
Operation status: Horizontal<br />
Operating humidity 5% to 85%<br />
Laser<br />
Tuner FM<br />
Semiconductor laser,<br />
wavelength 650 nm<br />
FM Tuning Range 87.5 - 108.0 MHz or 65.0 - 74.0 MHz, 87.5 - 108.0 MHz<br />
FM Intermediate Frequency 10.7 MHz<br />
Amplifier<br />
Stereo mode 70 W + 70 W (4Ω at 1 kHz, THD 10 %)<br />
Surround mode Front:<br />
Speakers<br />
70 W + 70 W (THD 10 %) Center*: 70 W<br />
Surround*: 70 W + 70 W<br />
(4Ω at 1 kHz, THD 10 %)<br />
Subwoofer*: 150 W (3Ω at 30 Hz, THD 10 %)<br />
Front/Rear Center Passive<br />
Speaker speaker Subwoofer<br />
Type 2 Way 3 Speaker 2 Way 3 Speaker 1Way1Speaker<br />
Impedance 4 Ω 4 Ω 3 Ω<br />
Rated Input Power 70 W 70 W 150 W<br />
Max. Input Power 140 W 140 W 300 W<br />
Net Dimensions (W x H x D) 270 x 1103 x 270 mm 331 x 111 x 96 mm 170 x 400 x 382 mm<br />
Net Weight 3.6 kg 1.2 kg 5.7 kg<br />
Designs and specifications are subject to change without<br />
prior notice.<br />
21
<strong>HT503TH</strong>-<strong>DH</strong>_BDEULL_ENG_3960 6/28/08 12:12 AM Page 22<br />
22