DM-24 Installation and Use EPROM Replacement ... - Tascam
DM-24 Installation and Use EPROM Replacement ... - Tascam
DM-24 Installation and Use EPROM Replacement ... - Tascam
You also want an ePaper? Increase the reach of your titles
YUMPU automatically turns print PDFs into web optimized ePapers that Google loves.
.<br />
TASCAM<br />
TEAC Professional Division<br />
7733 Telegraph Road<br />
Montebello, CA 90640<br />
Phone (323) 726-0303<br />
Fax (323) 727-7632<br />
INSTALLATION INFORMATION<br />
<strong>DM</strong>-<strong>24</strong> V2.0 software upgrade.<br />
<strong>Installation</strong> procedure.<br />
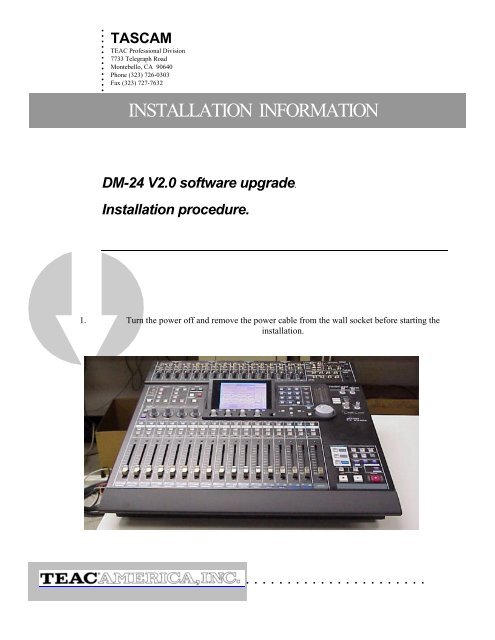
1. Turn the power off <strong>and</strong> remove the power cable from the wall socket before starting the<br />
installation.<br />
. . . . . . . . . . . . . . . . . . . . . . . . . .
TASCAM<br />
TEAC Professional Division<br />
7733 Telegraph Road<br />
Montebello, CA 90640<br />
Phone (323) 726-0303<br />
Fax (323) 727-7632<br />
INSTALLATION INFORMATION<br />
2. Raise the unit’s top cover by removing 15 cover screws. (See Ex. 1)<br />
5 SCREWS<br />
(LEFT SIDE)<br />
5 SCREWS<br />
(RIGHT SIDE)<br />
5 SCREWS<br />
(REAR)<br />
Ex. 1<br />
. . . . . . . . . . . . . . . . . . . . . . . . . .
TASCAM<br />
TEAC Professional Division<br />
7733 Telegraph Road<br />
Montebello, CA 90640<br />
Phone (323) 726-0303<br />
Fax (323) 727-7632<br />
INSTALLATION INFORMATION<br />
3. Detach the armrest by removing the 3 screws located underneath. (See Ex. 2)<br />
3 SCREWS<br />
(ARM REST)<br />
4. To keep the top cover in a raised position, partially insert a screw on both sides of the case<br />
where indicated. (See Ex. 3)<br />
Ex. 3<br />
Ex. 2<br />
. . . . . . . . . . . . . . . . . . . . . . . . . .
TASCAM<br />
TEAC Professional Division<br />
7733 Telegraph Road<br />
Montebello, CA 90640<br />
Phone (323) 726-0303<br />
Fax (323) 727-7632<br />
INSTALLATION INFORMATION<br />
5. Looking into the unit from the rear right side, you will see the (3) I.C.’s to be replaced.<br />
(See Ex. 4)<br />
MAIN<br />
U7<br />
The <strong>EPROM</strong> can be removed by sliding the black plastic locking device<br />
in the direction shown below. The holder then lifts from the PCB allowing<br />
removal of the <strong>EPROM</strong>. Reverse the procedure to install the new<br />
<strong>EPROM</strong>.<br />
Detach<br />
Attach<br />
PANEL<br />
U31<br />
Ex. 4<br />
MAIN<br />
U6<br />
. . . . . . . . . . . . . . . . . . . . . . . . . .
TASCAM<br />
TEAC Professional Division<br />
7733 Telegraph Road<br />
Montebello, CA 90640<br />
Phone (323) 726-0303<br />
Fax (323) 727-7632<br />
INSTALLATION INFORMATION<br />
IMPORTANT INFORMATION!!!<br />
To prevent damage to the <strong>EPROM</strong>s or <strong>EPROM</strong> sockets, it is imperative that they are removed <strong>and</strong><br />
installed exactly as shown in the following photos.<br />
REMOVAL<br />
One h<strong>and</strong> is providing support<br />
to the PCB while the other<br />
removes the locking device<br />
To keep the PCB from flexing <strong>and</strong> possibly cracking, provide support to the PCB while the<br />
locking device is being removed.<br />
Remove the locking device by lifting it STRAIGHT up <strong>and</strong> away from the <strong>EPROM</strong>.<br />
. . . . . . . . . . . . . . . . . . . . . . . . . .
TASCAM<br />
TEAC Professional Division<br />
7733 Telegraph Road<br />
Montebello, CA 90640<br />
Phone (323) 726-0303<br />
Fax (323) 727-7632<br />
INSTALLATION INFORMATION<br />
Remove the <strong>EPROM</strong> by placing the index finger of each h<strong>and</strong> on each end of the <strong>EPROM</strong>.<br />
Applying equal pressure to both ends of the <strong>EPROM</strong>, lift it STRAIGHT up <strong>and</strong> away from the<br />
socket.<br />
NEVER REMOVE THE <strong>EPROM</strong> BY LIFTING IT FROM ONLY ONE SIDE!!!!!!!!!!<br />
This can cause the <strong>EPROM</strong> legs to bend or break <strong>and</strong> the socket to be damaged.<br />
. . . . . . . . . . . . . . . . . . . . . . . . . .
TASCAM<br />
TEAC Professional Division<br />
7733 Telegraph Road<br />
Montebello, CA 90640<br />
Phone (323) 726-0303<br />
Fax (323) 727-7632<br />
INSTALLATION INFORMATION<br />
INSTALLATION<br />
Holding the <strong>EPROM</strong> firmly <strong>and</strong> parallel to the PCB, place the <strong>EPROM</strong> STRAIGHT down into<br />
the socket.<br />
Once again, provide support to the PCB while the locking device is being reinstalled.<br />
. . . . . . . . . . . . . . . . . . . . . . . . . .
TASCAM<br />
TEAC Professional Division<br />
7733 Telegraph Road<br />
Montebello, CA 90640<br />
Phone (323) 726-0303<br />
Fax (323) 727-7632<br />
INSTALLATION INFORMATION<br />
6. Confirm the new software version by simultaneously holding down the “2 ND F.”,<br />
“HIGH” (E.Q.) <strong>and</strong> the “ - ” (LIBRARY) buttons while powering on the <strong>DM</strong>-<strong>24</strong><br />
(Diagnostics Mode). (See Ex. 5)<br />
Ex. 5<br />
. . . . . . . . . . . . . . . . . . . . . . . . . .
TASCAM<br />
TEAC Professional Division<br />
7733 Telegraph Road<br />
Montebello, CA 90640<br />
Phone (323) 726-0303<br />
Fax (323) 727-7632<br />
INSTALLATION INFORMATION<br />
7. While in “Diagnostics Mode”, using the cursor keys, select SRAM INIT. Press ENTER to<br />
select <strong>and</strong> ENTER again to perform the function. Using the cursor keys, select EXIT then press<br />
ENTER. (See Ex. 6)<br />
CURSOR<br />
KEYS<br />
ENTER<br />
KEY<br />
8. Secure the unit by reversing steps 1,2,3 <strong>and</strong> 4.<br />
9. Return the old <strong>EPROM</strong>s to TASCAM using the pre-addressed envelope.<br />
Ex. 6<br />
. . . . . . . . . . . . . . . . . . . . . . . . . .
TASCAM<br />
TEAC Professional Division<br />
7733 Telegraph Road<br />
Montebello, CA 90640<br />
Phone (323) 726-0303<br />
Fax (323) 727-7632<br />
INSTALLATION INFORMATION<br />
1. IF ELECTING TO HAVE L.A. FACTORY SERVICE DO THE UPGRADE:<br />
The requester will be responsible for labor charges (if the unit is out of<br />
warranty) <strong>and</strong> the cost of shipping the unit to <strong>and</strong> from our Los Angeles<br />
Factory Service location.<br />
Additional repair costs may be incurred for services requested other than the<br />
upgrade.<br />
The unit must be addressed to the following location in the following<br />
manner.<br />
TEAC AMERICA, Inc.<br />
(Factory Service)<br />
ATTN: <strong>DM</strong>-<strong>24</strong> Upgrade Program<br />
7733 Telegraph Road<br />
Montebello, CA 90640<br />
For Labor estimate or status, please contact Factory Service.<br />
(323) 727-7627<br />
or<br />
e-mail to: tascamrepair@teac.com<br />
2. IF ELECTING TO HAVE A LOCAL SERVICE AGENCY DO THE UPGRADE:<br />
To locate the nearest Authorized Service Agency, call (800) 447-8322.<br />
Follow the prompt to find the closest “TASCAM” agency (bypass the TEAC<br />
agency selection <strong>and</strong> press #3).<br />
Call the Agency <strong>and</strong> arrange for a convenient time to have the upgrade<br />
completed. They will inform you of any estimated labor charge.<br />
. . . . . . . . . . . . . . . . . . . . . . . . . . . . . . . . . .<br />
.


