The Steps for Updating the 2488 - Tascam
The Steps for Updating the 2488 - Tascam
The Steps for Updating the 2488 - Tascam

Create successful ePaper yourself
Turn your PDF publications into a flip-book with our unique Google optimized e-Paper software.
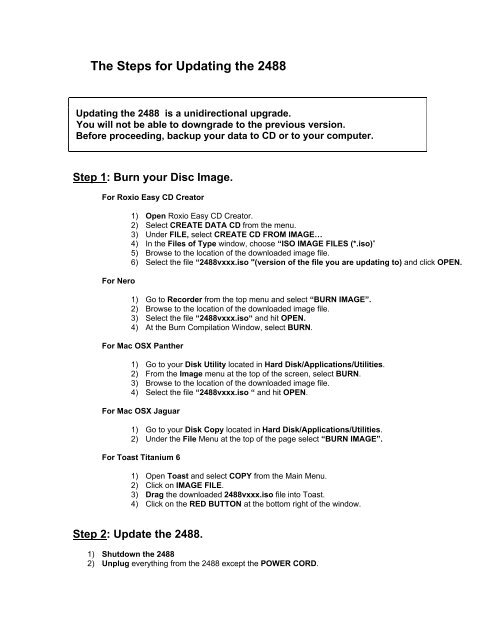
<strong>The</strong> <strong>Steps</strong> <strong>for</strong> <strong>Updating</strong> <strong>the</strong> <strong>2488</strong><br />
<strong>Updating</strong> <strong>the</strong> <strong>2488</strong> is a unidirectional upgrade.<br />
You will not be able to downgrade to <strong>the</strong> previous version.<br />
Be<strong>for</strong>e proceeding, backup your data to CD or to your computer.<br />
Step 1: Burn your Disc Image.<br />
For Roxio Easy CD Creator<br />
For Nero<br />
1) Open Roxio Easy CD Creator.<br />
2) Select CREATE DATA CD from <strong>the</strong> menu.<br />
3) Under FILE, select CREATE CD FROM IMAGE…<br />
4) In <strong>the</strong> Files of Type window, choose “ISO IMAGE FILES (*.iso)”<br />
5) Browse to <strong>the</strong> location of <strong>the</strong> downloaded image file.<br />
6) Select <strong>the</strong> file “<strong>2488</strong>vxxx.iso "(version of <strong>the</strong> file you are updating to) and click OPEN.<br />
1) Go to Recorder from <strong>the</strong> top menu and select “BURN IMAGE”.<br />
2) Browse to <strong>the</strong> location of <strong>the</strong> downloaded image file.<br />
3) Select <strong>the</strong> file “<strong>2488</strong>vxxx.iso“ and hit OPEN.<br />
4) At <strong>the</strong> Burn Compilation Window, select BURN.<br />
For Mac OSX Pan<strong>the</strong>r<br />
1) Go to your Disk Utility located in Hard Disk/Applications/Utilities.<br />
2) From <strong>the</strong> Image menu at <strong>the</strong> top of <strong>the</strong> screen, select BURN.<br />
3) Browse to <strong>the</strong> location of <strong>the</strong> downloaded image file.<br />
4) Select <strong>the</strong> file “<strong>2488</strong>vxxx.iso “ and hit OPEN.<br />
For Mac OSX Jaguar<br />
1) Go to your Disk Copy located in Hard Disk/Applications/Utilities.<br />
2) Under <strong>the</strong> File Menu at <strong>the</strong> top of <strong>the</strong> page select “BURN IMAGE”.<br />
For Toast Titanium 6<br />
1) Open Toast and select COPY from <strong>the</strong> Main Menu.<br />
2) Click on IMAGE FILE.<br />
3) Drag <strong>the</strong> downloaded <strong>2488</strong>vxxx.iso file into Toast.<br />
4) Click on <strong>the</strong> RED BUTTON at <strong>the</strong> bottom right of <strong>the</strong> window.<br />
Step 2: Update <strong>the</strong> <strong>2488</strong>.<br />
1) Shutdown <strong>the</strong> <strong>2488</strong><br />
2) Unplug everything from <strong>the</strong> <strong>2488</strong> except <strong>the</strong> POWER CORD.
3) While holding down <strong>the</strong> MONITOR SOURCE and <strong>the</strong> SHUTDOWN buttons turn on <strong>the</strong><br />
power.<br />
4) When you see “PREPARE UPDATE” on <strong>the</strong> screen let go of <strong>the</strong> Buttons.<br />
5) <strong>The</strong> CD tray will open, insert <strong>the</strong> CD and press YES/ENTER.<br />
6) <strong>The</strong> display will <strong>the</strong>n show <strong>the</strong> new version.<br />
7) Press YES/ENTER to update <strong>the</strong> <strong>2488</strong>.<br />
8) *******VERY IMPORTANT! ******* THE POWER TO THE <strong>2488</strong> MUST NOT BE<br />
INTERRUPTED AT THIS TIME. POWER LOSS DURING THE UPDATE WILL RESULT<br />
IN DAMAGE TO THE <strong>2488</strong>.<br />
9) When <strong>the</strong> update is completed you will be prompted to shutdown <strong>the</strong> power. Remove <strong>the</strong><br />
CD from <strong>the</strong> tray and power off <strong>the</strong> <strong>2488</strong>.<br />
Step 3: Confirm <strong>the</strong> Update<br />
1) Press <strong>the</strong> POWER BUTTON on <strong>the</strong> back of <strong>the</strong> <strong>2488</strong>.<br />
2) On <strong>the</strong> Boot up screen you should see “Ver. x.xx Build xxxx”(version you have updated to)<br />
3) You have successfully updated your <strong>2488</strong>