
You also want an ePaper? Increase the reach of your titles
YUMPU automatically turns print PDFs into web optimized ePapers that Google loves.
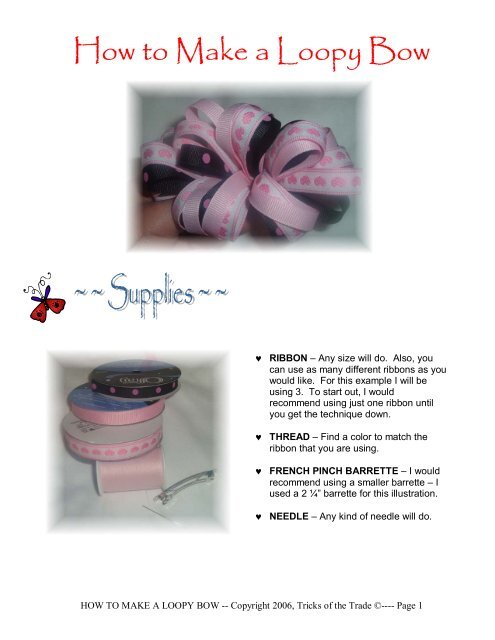
<strong>How</strong> <strong>to</strong> <strong>Make</strong> a <strong>Loopy</strong> <strong>Bow</strong><br />
♥ RIBBON – Any size will do. Also, you<br />
can use as many different ribbons as you<br />
would like. For this example I will be<br />
using 3. To start out, I would<br />
recommend using just one ribbon until<br />
you get the technique down.<br />
♥ THREAD – Find a color <strong>to</strong> match the<br />
ribbon that you are using.<br />
♥ FRENCH PINCH BARRETTE – I would<br />
recommend using a smaller barrette – I<br />
used a 2 ¼” barrette for this illustration.<br />
♥ NEEDLE – Any kind of needle will do.<br />
HOW TO MAKE A LOOPY BOW -- Copyright 2006, Tricks of the Trade ©---- Page 1
STEP 1<br />
STEP 2<br />
Get your needle and thread ready. You will need 4 strands of thread in your needle and they will<br />
need <strong>to</strong> be around 48 inches long – or just spread your arms out as far as they can go and cut the<br />
thread <strong>to</strong> that length. <strong>Make</strong> sure you put a knot at the end of the thread.<br />
STEP 3<br />
Remove the metal piece from the<br />
inside of the barrette. Set it<br />
aside.<br />
Seal the ends of your ribbon with<br />
whatever method you prefer – I<br />
used a lighter. Depending on<br />
how big your loops are and how<br />
many loops you have, will depend<br />
on how much ribbon you need –<br />
and it’s very hard <strong>to</strong> gauge that<br />
amount. So, don’t cut a certain<br />
amount of ribbon off the spool<br />
just yet.<br />
HOW TO MAKE A LOOPY BOW -- Copyright 2006, Tricks of the Trade ©---- Page 2
STEP 4<br />
STEP 5<br />
A. If you’re using more than one<br />
ribbon, place them on <strong>to</strong>p of<br />
each other as shown.<br />
B. Take you needle and thread<br />
through the ribbon – about a<br />
quarter of an inch from the<br />
end.<br />
C. Thread it all the way through<br />
until the knot s<strong>to</strong>ps at the<br />
back.<br />
Place the ribbon on the back of<br />
the barrette as shown. You can<br />
start at either side – it really<br />
doesn’t matter.<br />
HOW TO MAKE A LOOPY BOW -- Copyright 2006, Tricks of the Trade ©---- Page 3
STEP 6<br />
STEP 7<br />
STEP 8<br />
Take a stitch through the hole at the<br />
end of the barrette. Repeat on the<br />
other side. Pull tightly after each<br />
stitch.<br />
From this point forward until the very end,<br />
you will not need <strong>to</strong> hold on<strong>to</strong> the needle –<br />
just the thread.<br />
Wrap the thread a couple of times around<br />
the barrette and the ribbon – just inside the<br />
barrette next <strong>to</strong> the spring as shown in the<br />
picture.<br />
A. Turn the barrette over so that the flat<br />
side of the barrette is on <strong>to</strong>p.<br />
B. Take up a loop – any size that you<br />
wish. The bigger the loop, the taller<br />
the bow.<br />
HOW TO MAKE A LOOPY BOW -- Copyright 2006, Tricks of the Trade ©---- Page 4
STEP 9<br />
STEP 10<br />
STEP 11<br />
Now you need <strong>to</strong> take the thread and wrap<br />
it around the barrette a couple of times,<br />
pulling slightly each time.<br />
**<strong>Make</strong> sure that you squeeze the ribbon<br />
<strong>to</strong>gether over the <strong>to</strong>p of the barrette so that<br />
the ribbon doesn’t fold over <strong>to</strong> the bot<strong>to</strong>m of<br />
the barrette.<br />
A. Before you pull <strong>to</strong>o tightly, you need<br />
<strong>to</strong> spread the loops out slightly.<br />
Then, wrap the thread around the<br />
barrette a couple more times, this<br />
time pulling very tightly.<br />
B. Slide the loop <strong>to</strong> the end of the<br />
barrette so that you can make room<br />
for more loops.<br />
<strong>Make</strong> another loop. This time angle the<br />
loop downward or upward if you wish.<br />
**For this example, I angled it downward<br />
as shown, then upward the next time.<br />
Remember <strong>to</strong> pull the ribbons apart,<br />
making the bow more full.<br />
Continue in this manner until you get <strong>to</strong><br />
the end of the barrette.<br />
HOW TO MAKE A LOOPY BOW -- Copyright 2006, Tricks of the Trade ©---- Page 5
STEP 12<br />
STEP 13<br />
Once you’ve reached the end of the<br />
barrette, take your scissors and clip the<br />
tails of the ribbon. Then, use your<br />
desired method of sealing the ends.<br />
**Just be careful if you’re using a<br />
lighter. It might be easier <strong>to</strong> use the<br />
liquid fray check for this.<br />
A. Turn the bow <strong>to</strong> the bot<strong>to</strong>m so that the<br />
underside of the barrette is showing.<br />
B. At this point, I like <strong>to</strong> take some of the<br />
remaining thread and sew back and<br />
forth on the barrette at an angle until I<br />
reach the other side.<br />
**See the picture below as a reference.<br />
C. Take up a couple of stitches at the<br />
end and tie a knot <strong>to</strong> secure.<br />
HOW TO MAKE A LOOPY BOW -- Copyright 2006, Tricks of the Trade ©---- Page 6
STEP 14<br />
**This step is optional, but I like <strong>to</strong> do it<br />
because it gives the bow a more finished<br />
look.<br />
A. Cut a piece of ribbon <strong>to</strong> fit the inside<br />
of the barrette and seal the ends.<br />
B. Glue the ribbon <strong>to</strong> the inside of the<br />
barrette.<br />
C. Put the metal piece back inside the<br />
barrette.<br />
You now have a finished bow!<br />
HOW TO MAKE A LOOPY BOW -- Copyright 2006, Tricks of the Trade ©---- Page 7