A-1121 Manual.pdf - Wintal
A-1121 Manual.pdf - Wintal
A-1121 Manual.pdf - Wintal

Create successful ePaper yourself
Turn your PDF publications into a flip-book with our unique Google optimized e-Paper software.
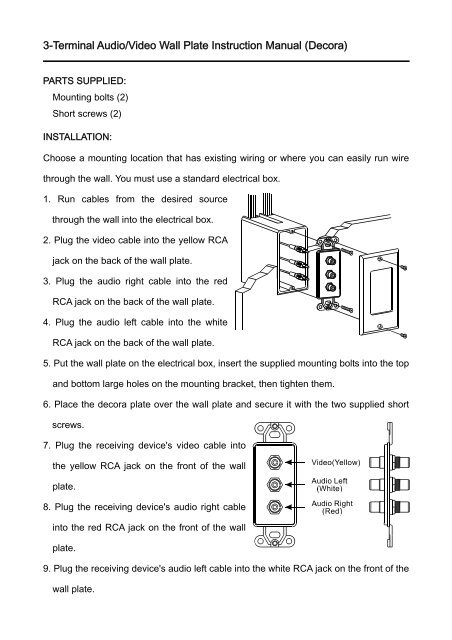
3-Terminal Audio/Video Wall Plate Instruction <strong>Manual</strong> (Decora)<br />
PARTS SUPPLIED:<br />
Mounting bolts (2)<br />
Short screws (2)<br />
INSTALLATION:<br />
Choose a mounting location that has existing wiring or where you can easily run wire<br />
through the wall. You must use a standard electrical box.<br />
1. Run cables from the desired source<br />
through the wall into the electrical box.<br />
2. Plug the video cable into the yellow RCA<br />
jack on the back of the wall plate.<br />
3. Plug the audio right cable into the red<br />
RCA jack on the back of the wall plate.<br />
4. Plug the audio left cable into the white<br />
RCA jack on the back of the wall plate.<br />
5. Put the wall plate on the electrical box, insert the supplied mounting bolts into the top<br />
and bottom large holes on the mounting bracket, then tighten them.<br />
6. Place the decora plate over the wall plate and secure it with the two supplied short<br />
screws.<br />
7. Plug the receiving device's video cable into<br />
the yellow RCA jack on the front of the wall<br />
plate.<br />
8. Plug the receiving device's audio right cable<br />
into the red RCA jack on the front of the wall<br />
plate.<br />
9. Plug the receiving device's audio left cable into the white RCA jack on the front of the<br />
wall plate.