manual_ 27L05.pdf - Wintal
manual_ 27L05.pdf - Wintal
manual_ 27L05.pdf - Wintal

Create successful ePaper yourself
Turn your PDF publications into a flip-book with our unique Google optimized e-Paper software.
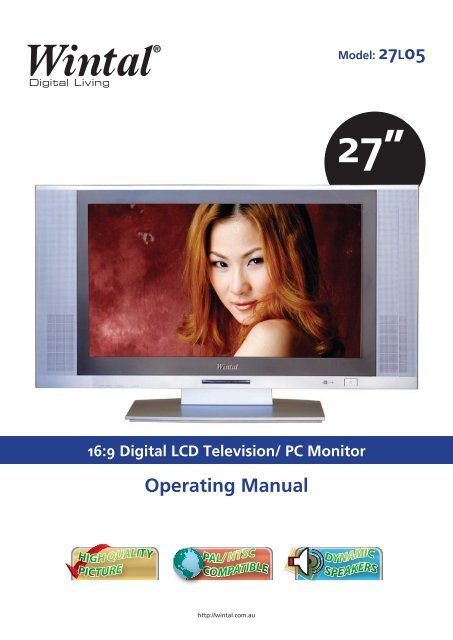
16:9 Digital LCD Television/ PC Monitor<br />
Operating Manual<br />
http://wintal.com.au<br />
Model: 27L05<br />
27”<br />
Manual 27L05.indd a 12/07/2005 11:43:31 AM
Manual 27L05.indd b 12/07/2005 11:43:43 AM
TABLE OF CONTENTS<br />
1. PreFace 1<br />
2. Safety Precautions 1<br />
3. Front, Back Connections 2<br />
4. TV Installation Guide 3<br />
4.1 Connecting Antennas 3<br />
4.2 AV Video Input 3<br />
4.3 S-Video Input 3<br />
4.4 YCbCr Connection 4<br />
4.5 YPbPr Connection 4<br />
4.6 PC (VGA) Connection 4<br />
4.7 AV Video Out Connection 5<br />
4.8 DVI Connection 5<br />
5. Confi guration 6<br />
5.1 Picture Setting 6<br />
5.2 AUDIO SETTING 6<br />
5.3 SOURCE SETTING 7<br />
5.4 TV CHANNEL SEARCH 7<br />
6. Remote Control Instructions 8<br />
7. Remote Control Setup 9<br />
7.1 Battery Usage Caution 9<br />
8. Accessories 9<br />
9. Troubleshooting & Advice 10<br />
10. Specifi cations 11<br />
Manual 27L05.indd c 12/07/2005 11:43:43 AM
1 | <strong>Wintal</strong> LCD<br />
1. PREFACE<br />
Congratulations on your purchase of a <strong>Wintal</strong> LCD! Please read this <strong>manual</strong><br />
thoroughly before operating the monitor. Make sure the monitor was not damaged<br />
in transit. Should the monitor be damaged, do not install it and contact your dealer.<br />
Check that you have all the accessories according to the model.<br />
2. SAFETY PRECAUTIONS<br />
Place the Monitor on a stable surface.<br />
Do not use the monitor with other fi xations than those provided or suggested by the<br />
manufacturer.<br />
Do not place any material on the monitor.<br />
Do not block or cover the ventilation openings on the monitor.<br />
If you have a wall mount, check that it is steady.<br />
Power source<br />
Th e monitor must be plugged with a voltage source of 220/240 volts and 50 Hz.<br />
Connection cable<br />
Power cord and cables must be properly routed and protected to prevent people from<br />
stepping on them and causing the monitor to fall.<br />
Heating sources and humidity<br />
Keep the monitor dry and away from humidity.<br />
Keep the monitor away from heat sources<br />
Cleaning and maintenance<br />
Unplug the monitor before cleaning it. Do not use solvents or liquids to clean the<br />
monitor.<br />
Only clean the monitor with a soft and dry cloth.<br />
In case of troubleshooting, do not use spare parts other than those suggested by the<br />
manufacturer. Using incorrect spare parts can lead to electric shocks, short-circuits<br />
fi re or other incidents.<br />
Lightning/ Holidays<br />
Unplug the LCD during lightning storms or when not used for long periods of time.<br />
Manual 27L05.indd Sec1:1 12/07/2005 11:43:43 AM
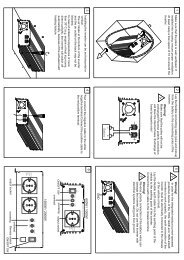
3. FRONT, BACK CONNECTIONS<br />
Front View and Controls<br />
Back View<br />
Rear Connections<br />
DVI Input PC Audio<br />
R/L Input<br />
Y Pb Pr<br />
PC<br />
AV2<br />
AV1<br />
VGA Input Audio R/L Audio R/L S-Video<br />
CVBS Video<br />
Y Cb Cr AV Out<br />
Audio R/L Out<br />
CVBS Video Out<br />
RF In<br />
<strong>Wintal</strong> LCD | 2<br />
Manual 27L05.indd Sec1:2 12/07/2005 11:43:43 AM
3 | <strong>Wintal</strong> LCD<br />
4. TV INSTALLATION GUIDE<br />
4.1 Connecting Antennas<br />
To ensure good picture and sound, TV antenna system needs to be installed. Th e<br />
antenna system as shown can be sourced from TV equipment shops, which will<br />
provide service for correct installation and connection. After installation, insert the<br />
75-ohm antenna plug into the antenna jack as shown.<br />
4.2 AV Video Input<br />
4.3 S-Video Input<br />
Manual 27L05.indd Sec1:3 12/07/2005 11:43:44 AM
4.4 YCbCr Connection<br />
4.5 YPbPr Connection<br />
4.6 PC (VGA) Connection<br />
<strong>Wintal</strong> LCD | 4<br />
Manual 27L05.indd Sec1:4 12/07/2005 11:43:44 AM
5 | <strong>Wintal</strong> LCD<br />
4.7 AV Video Out Connection<br />
4.8 DVI Connection<br />
Manual 27L05.indd Sec1:5 12/07/2005 11:43:44 AM
5. CONFIGURATION<br />
5.1 Picture Setting<br />
Press key until the screen displays as below.<br />
a. Press ► key to access image adjusting programmer. Press ▲ or ▼ key to select<br />
Mode, Bright, Contrast, Colour and Sharpness for required adjusting option.<br />
Press ◄ or ► key to adjust the setting selected.<br />
5.2 AUDIO SETTING<br />
Press key until the screen displays as below.<br />
a. Press ► key enter into audio menu press ▲ or ▼ key to select Mode, Volume,<br />
Treble, Bass, Balance and Surround for required adjusting option.<br />
b. Press ◄ or ► key to adjust the setting selected.<br />
<strong>Wintal</strong> LCD | 6<br />
Manual 27L05.indd Sec1:6 12/07/2005 11:43:44 AM
7 | <strong>Wintal</strong> LCD<br />
5.3 SOURCE SETTING<br />
Press key until the screen displays as below.<br />
a. Press ► key to access Input Group –Blue Screen –Language—Reset menu<br />
setting.<br />
b. Press ▲ or ▼ key to select exact menu setting.<br />
c. Select menu, press ► key to access TV-SCART-DVD-PC for<br />
choose input source.<br />
d.<br />
In menu, will access to choose terminal-select in sub-menu SCART<br />
CVBS or SCART RGB for input source.<br />
Press ▲ or ▼ key to access OSD , select your language.<br />
Press ▲ or ▼ key to access the function which will reset your LCD<br />
back to default factory settings.<br />
e.<br />
5.4 TV CHANNEL SEARCH<br />
Press key until the screen displays as below.<br />
a. Press ► key to access Auto Tune – Manu Tune – Fine Tune – Sort – Add/skip–<br />
Color System –Sound System menu setting.<br />
b. Press ▲ or ▼ key to select exact menu setting.<br />
c. Press ▲ or ▼ key to select or menu to adjust the<br />
TV.<br />
d. Press ▲ or ▼ key to access to exchange channel.<br />
e. Press ▲ or ▼ key to access to add or skip the channel.<br />
* Before tuning in the TV, please choose the correct colour system and sound system<br />
for your country. After that, choose the auto tune to start searching.<br />
Manual 27L05.indd Sec1:7 12/07/2005 11:43:44 AM
6. REMOTE CONTROL INSTRUCTIONS<br />
3<br />
1<br />
5<br />
6<br />
9<br />
12<br />
POWER<br />
1<br />
4<br />
7<br />
-/--<br />
PICTURE<br />
SLEEP MUTE MODE<br />
2 3<br />
5 6<br />
8<br />
0<br />
CH+<br />
ENTER<br />
CH-<br />
9<br />
BACK<br />
SYS MENU<br />
AUDIO<br />
VOL - VOL +<br />
27L05<br />
1 Power ON/OFF<br />
2 TV/AV/PC Mode<br />
3 Sleep Timer<br />
4 Mute<br />
5 Number keys<br />
6 Access to several numbers program<br />
7 System setting menu key<br />
8 Return to the previous program<br />
9 Picture mode<br />
10 Audio mode<br />
11 Channel control and menu item execute key<br />
12 Decrease volume control key<br />
13 Increase volume control key<br />
4<br />
2<br />
7<br />
8<br />
10<br />
11<br />
13<br />
<strong>Wintal</strong> LCD | 8<br />
Manual 27L05.indd Sec1:8 12/07/2005 11:43:45 AM
9 | <strong>Wintal</strong> LCD<br />
7. REMOTE CONTROL SETUP<br />
a.<br />
b.<br />
c.<br />
Open the cover<br />
Insert the supplied “AA” size batteries<br />
When inserting the batteries, make sure correct polarities as per the “+” and “-”<br />
marks on the batteries are correct<br />
Replace the battery cover<br />
7.1 Battery Usage Caution<br />
To prevent battery leakage which may result in injury or damage to the remote:<br />
1.<br />
2.<br />
3.<br />
Install all batteries correctly, and as marked on the remote control<br />
Do not mix batteries: (OLD and NEW or CARBON and ALKALINE, etc.)<br />
Remove batteries when the remote is not used for a long time<br />
8. ACCESSORIES<br />
Included with your <strong>Wintal</strong> LCD are the following accessories:<br />
1.<br />
2.<br />
3.<br />
4.<br />
5.<br />
AC/DC Power Adapter<br />
One Remote Control<br />
2x 1.5V “AA” batteries<br />
One User Manual<br />
AV Cable<br />
Manual 27L05.indd Sec1:9 12/07/2005 11:43:45 AM
9. TROUBLESHOOTING & ADVICE<br />
Before calling our Customer Centre, please check if you can the following<br />
suggestions will solve your problem.<br />
Troubleshooting Control<br />
No signal<br />
Please check that all cables and connectors are<br />
correctly plugged in.<br />
Incorrect colour shades Adjust the contrast, the colour and the brightness<br />
Double or multiple<br />
image display<br />
Bad/ Snowy picture<br />
The remote control does<br />
not work<br />
No sound<br />
May be the result of an electrical wave disturbance<br />
from another TV, Computer, Game console, or Radio<br />
The cables of the antenna are not correctly plugged<br />
in.<br />
Please check that the batteries are inserted correctly.<br />
Check that the IR of the remote control is not hidden<br />
by something.<br />
Make sure that you have not pressed the MUTE<br />
button on the front panel or on the remote control.<br />
<strong>Wintal</strong> LCD | 10<br />
Manual 27L05.indd Sec1:10 12/07/2005 11:43:45 AM
11 | <strong>Wintal</strong> LCD<br />
10. SPECIFICATIONS<br />
Screen Size 27 Inch<br />
Display Type TFT LCD<br />
Resolution(Pixel) 1280*720<br />
Brightness 500nits<br />
Color 24bit (16.7m)<br />
Contrast Ratio 600:1<br />
View Angle (H/V) Horizontal 160,Vertical 140.CR 10<br />
Aspect Ratio 16:9<br />
Power Source 100-240VAC,50/60HZ. ≤180W<br />
TV System PAL/NTSC<br />
Video Input Format PAL/ NTSC<br />
Antenna Input Standard antenna socket 75Ω<br />
Audio Output L/R 10W*2<br />
VGA Input Format 640*480, 800*600, 1024*768<br />
Input<br />
RGB 0.7VP-P 75∩<br />
VIDEO CVBS:1.0VP-P,75∩;RCA<br />
AV Video1.0Vp-p,75∩;Audio20k∩ ;RCA<br />
YCbCr 1.0VP-P75∩;RCA<br />
YPbPr 1.0VP-P75∩;RCA<br />
DVI<br />
Output VIDEO 1 CVBS:1.0VP-P,75∩;RCA<br />
AUDIO L/R 200mVrms,20k∩(max.3.0VP-P);RCA<br />
IR remote control
Manual 27L05.indd Sec1:12 12/07/2005 11:43:46 AM