Word Processing Basics—EAS205
Word Processing Basics—EAS205
Word Processing Basics—EAS205

Create successful ePaper yourself
Turn your PDF publications into a flip-book with our unique Google optimized e-Paper software.
<strong>Word</strong> <strong>Processing</strong> Basics—EAJ205<br />
This handout will not teach you everything there is to know about word processing in Japanese, but it will teach<br />
you what you need in order to finish the homework assignments.<br />
Many of the aspects of a manuscript can be put in either while you are typing or after the fact. These<br />
instructions will tell you how to do this after the fact not because this is inherently better but rather because it’s<br />
easier for the purposes of making this handout. Feel free to choose either method when you’re writing your<br />
own paper.<br />
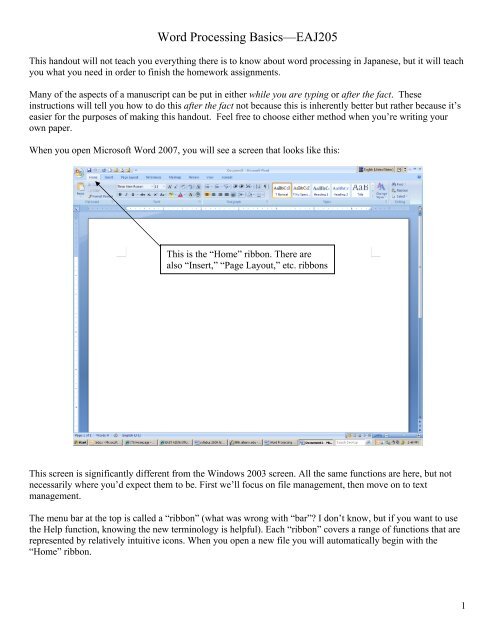
When you open Microsoft <strong>Word</strong> 2007, you will see a screen that looks like this:<br />
This is the “Home” ribbon. There are<br />
also “Insert,” “Page Layout,” etc. ribbons<br />
This screen is significantly different from the Windows 2003 screen. All the same functions are here, but not<br />
necessarily where you’d expect them to be. First we’ll focus on file management, then move on to text<br />
management.<br />
The menu bar at the top is called a “ribbon” (what was wrong with “bar”? I don’t know, but if you want to use<br />
the Help function, knowing the new terminology is helpful). Each “ribbon” covers a range of functions that are<br />
represented by relatively intuitive icons. When you open a new file you will automatically begin with the<br />
“Home” ribbon.<br />
1
One of the most un-intuitive things about <strong>Word</strong> 2007 is where “Open” “Close” “Save” and other such basic<br />
commands are located. Apparently someone at Microsoft decided that the old pull-down menu of “File” was<br />
passé. Why not replace it with a non-descript icon? Hey, now that’s a great idea! (not). But that’s what they did.<br />
In order to find all the basic file-management menu options, you need to click on the multi-colored icon on the<br />
far left.<br />
When you do this, you’ll get a pop-up menu that looks like this:<br />
This should look familiar—at least, the choices should look familiar even if the layout<br />
doesn’t. For the purposes of our class you will only need New, Open, Save, Save As, Print,<br />
and Close.<br />
Now, before we get into the actual text formatting, let me make one more observation: in<br />
older Microsoft products the “Help” menu was always the furthest thing to the right,<br />
regardless of which software you were using. In this version of <strong>Word</strong> it is still up to the right,<br />
but not in the family of “ribbons,” where you’d expect it to be. Indeed, it is ALL the way to<br />
the right, represented by an icon that looks like this:<br />
O.K., let’s get started!<br />
2
Everyone has his or her favorite screen layout. I’ll let you customize yours, but I have one piece of advice: life<br />
will be much easier for you if you set your <strong>Word</strong> to show you the “ruler.” Here’s how you do that:<br />
In the document, choose the “View” Ribbon:<br />
One of your choices here is “Ruler” – check the box and you should see the “ruler” at the top of your page. This<br />
will show you where your margins are set, and you can also use the little triangle icons to drag the margins to<br />
your needs.<br />
Centering and Enlarging Text<br />
Once you have opened a new file, you can begin typing. Most machines are set up so that “Times New Roman”<br />
is the default font and 12 pt. is the default font size. Note that both of these will be indicated on the “Home”<br />
ribbon at the top of the screen. (If you need to change the font, click on the arrow to the right of the font box to<br />
see your choices.) You can also expand the Font box by clicking on the lower right hand arrow<br />
Begin by typing your title:<br />
Now you need to do two things:<br />
1) Center the text<br />
2) Make the font bigger<br />
To do both, first highlight all of the text (this is most easily done using the mouse).<br />
Once you have done this, click on the “center text” icon on the “Paragraph” box and the text should move to a<br />
center position (see diagram on next page).<br />
3
Center Text Icon<br />
Once you’ve done this, the title should still be highlighted. Now click on the font size box and choose a bigger<br />
font—16 or 18 are usually best for a title. Put your name on the title page, too, and any other identifying<br />
information you think necessary.<br />
Now that you’ve done all this, you’ll have to “undo” it for the body of your paper. Hit return a couple times.<br />
Your cursor will still be in the middle of the screen. Now, go back to the Paragraph box and click on the left<br />
alignment button (to the left of the center alignment button you just clicked to center the text). Likewise,<br />
change the font size to 12 pt. now your screen should look like this:<br />
4
Inserting a Page Break<br />
At this point you could hit “Enter” many time in order to get to a second page. But, if you change any<br />
formatting or text later on, it could screw up your nice title page. The way around that is to “insert a page break”<br />
after the last word on your title page (whatever that may be).<br />
It’s pretty simple, really. On the “Insert” ribbon just click on “Page Break” and you’re done.<br />
Adding Page Numbers<br />
You can add page numbers to your text automatically—they will move if necessary without you having to pay<br />
attention to them. You can choose their position (top, bottom, right, left) you can choose their style (Arabic or<br />
Roman numerals, upper case or lower case, etc.), you can choose their font…the choices are wide and varied.<br />
Once your papers get big and complicated (i.e., they have prefaces and introductions and they are hundreds of<br />
pages long) there are some other formatting concerns to pay attention to. But right now, all you need to do is<br />
learn the basics.<br />
For your homework assignment, and, frankly, for most of the papers you’ll have to write as a college student,<br />
you’ll want a title page. I can’t tell you how many students send me their papers as two files—one is the title<br />
page and the other is the paper itself—because they can’t figure out how to make a title page. It is sloppy and<br />
silly and a pain in the neck to keep the files straight on my end. The good news: this isn’t rocket science, so pay<br />
attention and you’ll impress your professors:<br />
Put your cursor at the beginning of your document, then choose the “Insert” ribbon:<br />
Click on “Page Number” and you’ll get a new menu that looks like this:<br />
5
I’ve chosen “Bottom of Page” here, but you could make a different choice depending on what you’re doing.<br />
Once you click on your choice you’ll end up with a screen that looks like the screen shot on the next page.<br />
6
There are a couple important things to note at his point. First, you are now in the “Header & Footer Tools” subribbon<br />
of the “Design” ribbon.<br />
If you want to change something about your page numbers, this is where you want to be. But, when you’re done<br />
with formatting your page numbers you’ll need to click on the “Close Header and Footer” icon to escape.<br />
Now, what you want to do to create a title page is 1) Remove the page number from your first page and 2) start<br />
numbering from your 2 nd page. Not too hard, really.<br />
Microsoft actually explains this adequately in their Help section, so I’ll give you their version:<br />
7
Remove the page number from the first page<br />
1. Click anywhere in the document.<br />
2. On the Page Layout tab, click the Page Setup Dialog Box Launcher, and then click the Layout tab.<br />
3. Under Headers and footers, select the Different first page check box, and then click OK.<br />
Start numbering on the second page with 1<br />
1. Follow the steps for removing the page number from the first page.<br />
2. On the Insert tab, in the Headers & Footers group, click Page Number, and then click Format Page Numbers.<br />
3. In the Start at box, type 0.<br />
8
Double Spacing<br />
Congratulations! Now you’re ready to type the body of your paper. You’ll need to double space the body. The<br />
command to change spacing is also in the Paragraph box of the “Home” ribbon.<br />
This icon is self-explanatory when you click on it, so let’s move on to a cautionary word: although it might<br />
seem easier to hit the “Enter” key twice at the end of every line instead of using the <strong>Word</strong> functions, it will be a<br />
headache in the end. If you edit or change things later the formatting will be all wrong. So, take a little extra<br />
time at the start to set things up correctly and you’ll be happier in the end.<br />
Also, when you indent your paragraph, use the “Tab” key, don’t type a bunch of spaces. <strong>Word</strong> then recognizes<br />
what you’re doing is a paragraph, and when you get into fancier formatting this is really important. Also, most<br />
fonts are not fixed width, so typing spaces does not guarantee the proper alignment.<br />
OK, type two pages of text, being sure that it has the characteristics you’ll need for this assignment. Once<br />
you’ve done that, return to this point.<br />
Adjusting the spacing for indented quotations<br />
When you have a very long quotation—more than a sentence—you should set it apart from the rest of your text<br />
by single-spacing it, and adjusting the margins on both sides about 1/2 inch. This is easy to do: simply highlight<br />
the text of the quotation with your mouse, then use the change spacing (see above). To move the margins, keep<br />
the text highlighted and drag the ruler marker at the top of the page over to the desired location.<br />
Footnotes<br />
<strong>Word</strong> will automatically create nicely formatted footnotes (or endnotes) for you. This DOES NOT mean that it<br />
magically inserts all the necessary information, but rather that it places the note in an appropriate place on the<br />
page, and moves the note if the reference in the main text moves.<br />
I know, you’re thinking that this is no big deal. But it is! Before such software was created, footnotes would be<br />
inserted at the bottom of the page (using a typewriter—remember what those are?) and an author would have to<br />
know exactly how long his/her footnote would be before beginning to type it, so as to leave enough room for<br />
the whole thing while preserving the margins. A ruler next to your typewriter was a must. But I digress…<br />
Put your cursor where you want the note to be and then click on the “References” ribbon and choose “Insert<br />
Footnote”<br />
9
The software will number it automatically and put it at the bottom of your page. You can add, delete, expand,<br />
etc. as much as you like and the software will adjust. Nifty!<br />
Italicizing<br />
Most footnotes are references to your source. In this case, you’ll want to italicize the title of the work to which<br />
you refer. You could underline it instead, but italicizing looks nicer (underlining was common when we used<br />
typewriters, and there was no way to change font).<br />
It’s easy to italicize—simply highlight what you want to change (using the mouse is easiest here) and then go to<br />
the “Home” ribbon and click on the italic capital “I,” located between the bold “B” and the underlined “U.”<br />
Voila, you have italicized. And, now you know how to make something bold type or underlined, too.<br />
Running Spell Check<br />
You’ve finished your paper and you’re happy. But it’s three in the morning and you’ve never been the most<br />
accurate typist in the world. Trust me, this will not matter to your instructor: he or she will find it irritating to<br />
receive a paper if you haven’t bothered to check the spelling. <strong>Word</strong> will automatically check your spelling for<br />
you, underlining everything that’s wrong with a red, squiggly line. A green squiggly line means that the<br />
grammar may be questionable. (These squiggly lines will not show up when you print the document.)<br />
<strong>Word</strong> will also often fix problems for you as you type, which is handy. However, to be safe, it is best to double<br />
check. Once you have finished typing, either go through and make sure EVERY red squiggly line is fixed OR<br />
you can check using one of the <strong>Word</strong> tools.<br />
Click on “Spelling & Grammar” on the “Review” ribbon.<br />
<strong>Word</strong> will let you add vocabulary to your database, which is handy when the name of some Japanese, Chinese,<br />
or Korean person is initially marked as misspelled (because <strong>Word</strong> doesn’t recognize it). Follow the Spell-check<br />
window instructions—they are self-explanatory.<br />
OK, now you’ve been working on your assignment for a goodly amount of time. Time to save! Just about<br />
everyone has a battle story about losing tons of data because they didn’t save early and often. Protect your work!<br />
Save!<br />
Be sure to name your file something clear, and choose the directory where you will save it.<br />
10
SPECIAL WORDPROCESSING ISSUES FOR STUDENTS OF JAPANESE<br />
The electronic world is a wonderful place. We can input Japanese characters with very little effort, mix them up<br />
with Roman Letters, insert glossing (furigana)…it is fantastic, really. The technology, software, and<br />
standardization involved here did not really become cemented until about the year 2000 or 2001. Prior to that<br />
there were all sorts of clunky methods, and prior to that (we’re talking mid-1990’s) there was essentially<br />
nothing if you were working in an English language environment. Let’s just refer to them as the “bad old days.”<br />
Inputting “symbols”<br />
Japanese uses diacritical marks when it is Romanized. These marks are all available in Microsoft <strong>Word</strong>.<br />
Inputting is not difficult, and one can even re-program one’s keyboard for shortcuts (however, if you do not<br />
have your own computer and are relegated to using the computing center, you will not have permission to do<br />
this). These instructions will only show you how to input the diacritical marks—reprogramming your keyboard<br />
is relatively self-explanatory and up to you, should you wish to do so.<br />
In your document, click on the “Insert” ribbon and the “Symbol” box:<br />
When you do this, you’ll get an abbreviated menu of commonly used symbols. The ones you want may be there,<br />
but most likely will not be there, (it depends who used what most recently on the computer) so you can then<br />
click on “More Symbols” for a full menu that will look something like this:<br />
12
Scrolling up and down the menu will give you a large number of choices. Clicking on your choice and then on<br />
“Insert” will insert the symbol into your document.<br />
If you want to re-program your keyboard, click on the button that says “shortcut key” –again, the process is<br />
relatively intuitive.<br />
Inputting Japanese Characters<br />
Now for the fun part: typing in Japanese. You could, if you were feeling perverse, reprogram your keyboard so<br />
that each key represented a kana, but I’ve never met a student who wants to do that so these instructions will be<br />
for typing in Romanization only.<br />
On your main screen, you should see a small blue box with “EN” on it. The location of this box could be<br />
anywhere—like many menu bars, the user can move it at will. In the screen shot below, I’ve put it on the top<br />
right-hand side:<br />
This is the language bar. You can type in many different languages in Microsoft <strong>Word</strong>, but most versions don’t<br />
automatically install it for you. The process is actually done at the level of Windows, not <strong>Word</strong>. And, it might<br />
require that you install a Language Pack. Because there are so many variables, we don’t have time to work<br />
through it in class, but I would recommend using the <strong>Word</strong> Help feature on your own machine. The first article<br />
you want to read is “Step-by-step: Preparing your computer to type and edit text in another language.”<br />
Now, I’ll assume that you’ve set up your computer to work with Japanese. Let’s get started!<br />
Open a document and then click on the Language Bar. You’ll get choices of different languages (whatever you<br />
have on your machine). Choose “Japanese” and your language bar will change appearance. It should look like<br />
this:<br />
The first thing you should do is change the Input Mode. Click on it and you’ll get a sub menu that looks like<br />
this:<br />
You want “Hiragana.” Now, when you type on your keyboard using Romanization, you should see Japanese.<br />
13
When you enter Japanese it will first appear in hiragana, and will have a dotted line below it. If you hit the<br />
Enter button the dotted line will disappear and the hiragana is “entered” into your document.<br />
Entering kanji requires an additional step. First, type the word you want in hiragana. Next, hit the space bar.<br />
You will get a “first choice” selection of kanji for the word. If you hit Enter, it will be entered into the document.<br />
But maybe that’s not the kanji you want. To see more, hit the space bar again and you’ll get a menu of all the<br />
kanji that might fit the phonetic selection you’ve typed. For example, if you type きこう and then hit the space<br />
bar twice, this is what you should see:<br />
Here, 紀行 was my first choice, but I didn’t want it. The next choice is 機構 and so<br />
on. By using either the space bar or the arrows keys you can scroll through the menu<br />
to find which set of kanji you want. Notice that the screen only shows ten at a time,<br />
but that there are plenty more beyond that. Depending on how common the phonetic<br />
combination you’ve entered is, this list can grow really long.<br />
If you move your mouse over the little yellow call-out icons, you’ll get definitions<br />
(albeit in Japanese) of each word. Not all words get an icon, though—only the ones<br />
that some editor saw fit to annotate.<br />
There are a few tricks you’ll need to get used to:<br />
1. To enter ん you need to type nn (or, if the ん is in a word but not at the end, such as in ぶんぽう you<br />
can type a single n and the software will figure it out)<br />
2. To enter a small っ simply enter a double consonant. For example, typing katte will result in かって<br />
3. To enter the particle を you need to type “wo” not “o”. There’s actually a phonetic reason for this, but<br />
we won’t get to it for a few more units.<br />
4. The software works with a number of Romanization systems simultaneously (this is not true for word<br />
processing in Chinese, by the way). For example, in order to get ち, you can type either “chi” or “ti” (the<br />
“ti” is from a Romanization system you’re probably not familiar with, but again, we’ll get there in a few<br />
more units).<br />
5. In order to get づ and ぢ you must type “du” and “di” respectively. Typing “zu” and “ji” will only result<br />
in ず and じ.<br />
6. To enter Japanese-style quotation marks use the bracket keys [ and ] to get「 and 」<br />
7. The forward slash / key will give you this character in Japanese mode: ・ This is used to separate words,<br />
such as your first and last name when written in katakana<br />
8. The backward slash \ key will give you the yen symbol ¥<br />
9. To write katakana, first type what you want in hiragana, then hit F7.<br />
10. Periods and commas are the same keys as they are in English<br />
14
11. Some characters, like 々 can be entered by writing a nickname for them. For example, I entered 々 by<br />
typing “onaji” and then selecting it from a menu of characters that represent repetition:<br />
The software remembers the last word you chose, so it will change the menus as you type. This is convenient if<br />
you are using the same machine all the time, but less so if you’re using a public computer.<br />
Now, one of the biggest drawbacks to the software is that it often does not dredge up the character you want,<br />
even if you’ve correctly entered the reading of the character. But do not despair—there is a way to get what you<br />
need. It is the IME pad, which you’ll find on the language toolbar:<br />
Click on this and you’ll get a menu that looks like this:<br />
Click on “Hand Writing” and you’ll get the following pop-up window:<br />
15
Along the line in <strong>Word</strong> history, someone decided that this window should always open with the roof radical<br />
represented. Don’t ask me why. It just happens. If you click on “Clear” you can clear the handwriting pad. Now<br />
you can use your mouse to draw the character you want. As you do so, choices will appear in the middle box.<br />
As soon as you see what you want, you can double click on it to enter it into the document.<br />
Although you might think it some perverted conspiracy against Japanese language students, I have to tell you<br />
that the software REALLY prefers that you write the character using the correct stroke order. If you don’t you<br />
may end up wasting a lot of time looking for what you want.<br />
16
The IME pad has other input methods, as indicated on the left-hand side:<br />
If you click on these icons you’ll get other input methods. The one that I use the most often is the organization<br />
by radical, but you might also use the total stroke order option. Let’s take a quick look at how the organization<br />
by radical is done:<br />
Within the strokenumber<br />
category,<br />
there are different<br />
radicals. The one<br />
chosen here is the<br />
horse radical.<br />
To get here in the<br />
first place I clicked<br />
on this icon 部,<br />
which stands for<br />
“radical”<br />
Pull-down menu for finding radicals with<br />
a certain number of brushstrokes<br />
17
By the way, you can change the appearance of your Japanese the same way you can change the appearance of<br />
English text (bold, italics, etc.) using the same tools as described above.<br />
Vertical Text<br />
So far we’ve only been looking at horizontal text. But as often as not, Japanese is written vertically. <strong>Word</strong> will<br />
let you do that, too. You can compose horizontally then convert the text to vertical, or you can compose<br />
vertically. Either way it is fairly easy. On the “Page Layout”<br />
ribbon choose “Text Direction”<br />
The choices you’ll get are as follows:<br />
Entering a Japanese gloss (furigana)<br />
By the way, if you click on “Text Direction Options” you’ll get essentially the same<br />
choices, but in a little bit easier-to-decipher format.<br />
There may be times when you want to gloss your kanji with hiragana to indicate the reading. This kind of gloss<br />
is called furigana (振り仮名) <strong>Word</strong> makes this easy. First, enter the kanji in your document. Then, highlight it.<br />
Next, in the “Home” ribbon, choose the ABC icon. When you do this, you’ll see that it is called “phonetic guide”<br />
in <strong>Word</strong> parlance:<br />
18
At this point you’ll get a new pop-up menu. The example below shows what happens when I enter the kanji for<br />
“gakkō” 学校, highlight it, and then click on the ABC icon:<br />
The software chooses what it anticipates the reading would be, and generally speaking, is right about 90% of<br />
the time. But, if it isn’t, you can change it in this dialog box. You might also want to “offset” the text one point<br />
or two, to keep it from being squished. The other settings you should probably not need to change. Once<br />
everything looks good to you, click on OK and you should end up with glossed text.<br />
You can gloss in either horizontal or vertical text. One thing to keep in mind is that if you later change the size<br />
of the font in your main document, the glossing will not automatically change in proportion. So, make sure<br />
you’ve got the font size where you want it before you add furigana.<br />
Japanese Greetings<br />
<strong>Word</strong> has a fun function that comes in handy when writing letters. It is the “Japanese Greetings” function, found<br />
on the “Insert” ribbon:<br />
When you click on “Japanese Greetings” you’ll get a small pull-down menu<br />
that gives you three choices: “Greeting” “Opening” and “Closing”<br />
Clicking on each choice will bring up different windows.<br />
19
“Greeting” looks like this:<br />
Be careful about which Greeting, Salutation and Statement of appreciation you choose. The Greeting isn’t too<br />
hard to screw up (it always has to do with the weather) but the Salutation and the Statement of appreciation<br />
differs depending on who you are writing to (a person, a company or office, etc.) Likewise, the Statement of<br />
appreciation will differ depending on your relationship with the letter recipient.<br />
The “Opening” choice brings up this window:<br />
This is not terribly difficult, but notice that some of the openings are specific, like the 5 th one which indicates<br />
that you’re asking a favor. Choose appropriately.<br />
The “Closing” choice brings up this window:<br />
20
Again, choose appropriately. Do not use the one I’ve highlighted here (“Please convey my kindest regards to<br />
your wife”), for example, if you’re writing to a female colleague.<br />
21