
You also want an ePaper? Increase the reach of your titles
YUMPU automatically turns print PDFs into web optimized ePapers that Google loves.
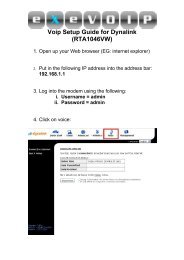
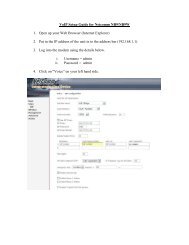
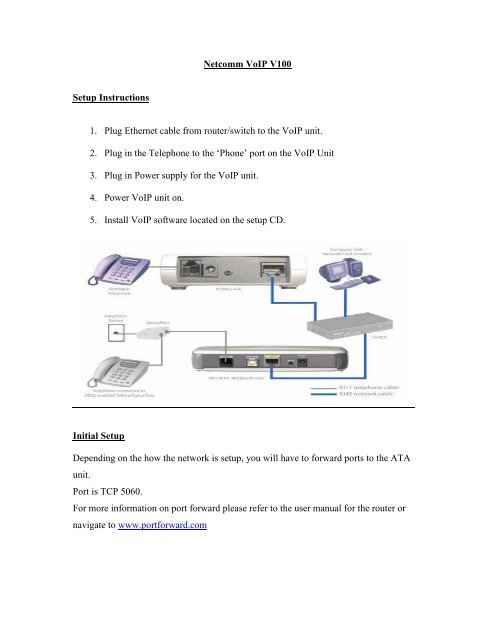
<strong>Setup</strong> Instructions<br />
Netcomm VoIP <strong>V100</strong><br />
1. Plug Ethernet cable from router/switch to the VoIP unit.<br />
2. Plug in the Telephone to the ‘Phone’ port on the VoIP Unit<br />
3. Plug in Power supply for the VoIP unit.<br />
4. Power VoIP unit on.<br />
5. Install VoIP software located on the setup CD.<br />
Initial <strong>Setup</strong><br />
Depending on the how the network is setup, you will have to forward ports to the ATA<br />
unit.<br />
Port is TCP 5060.<br />
For more information on port forward please refer to the user manual for the router or<br />
navigate to www.portforward.com
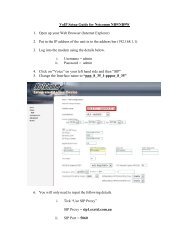
VoIP Service <strong>Setup</strong><br />
1. After the software has been install open “Netcomm <strong>V100</strong> PCTool” located on<br />
desktop.<br />
2. Make sure DHCP is enabled on the router/switch, check if all IP are correct and<br />
assigned by DHCP from the router/switch.<br />
3. Click on the “SIP” tab<br />
4. Fields to be configured<br />
Under Phone Configuration fields<br />
• Username = Your <strong>Exetel</strong> VoIP Telephone Number<br />
Under Proxy and Registrar fields<br />
• Proxy/registrar info = SIP server provided in the <strong>Setup</strong> Email.<br />
• Domain info = SIP server provided in the <strong>Setup</strong> Email.<br />
• Auth. Username = Your VoIP telephone number<br />
• Auth. Password = Your VoIP Password provided in the <strong>Setup</strong> Email<br />
5. All other settings should be left at defaults.<br />
6. Click on apply.<br />
7. If it says ‘Register Successful’ everything is setup correctly, you must save the<br />
settings. (If ‘register fail’ please double check all settings are correct by following<br />
”Step 4” again).<br />
8. Click on Tool<br />
9. Click on Save to save the configurations.
Below is a screenshot to show you where to input the settings provided in the <strong>Setup</strong><br />
Email..