

Smart Touch System - Malibu 2011
Smart Touch System - Malibu 2011
Smart Touch System - Malibu 2011

Create successful ePaper yourself
Turn your PDF publications into a flip-book with our unique Google optimized e-Paper software.
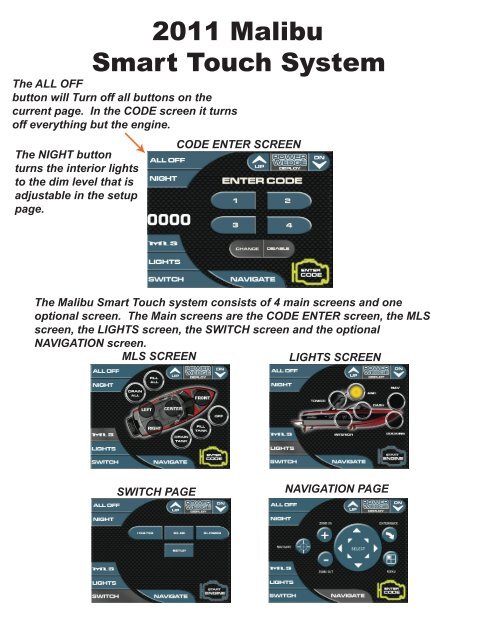
<strong>2011</strong> <strong>Malibu</strong><br />
<strong>Smart</strong> <strong>Touch</strong> <strong>System</strong><br />
The ALL OFF<br />
button will Turn off all buttons on the<br />
current page. In the CODE screen it turns<br />
off everything but the engine.<br />
The NIGHT button<br />
turns the interior lights<br />
to the dim level that is<br />
adjustable in the setup<br />
page.<br />
CODE ENTER SCREEN<br />
The <strong>Malibu</strong> <strong>Smart</strong> <strong>Touch</strong> system consists of 4 main screens and one<br />
optional screen. The Main screens are the CODE ENTER screen, the MLS<br />
screen, the LIGHTS screen, the SWITCH screen and the optional<br />
NAVIGATION screen.<br />
MLS SCREEN LIGHTS SCREEN<br />
SWITCH PAGE<br />
NAVIGATION PAGE
<strong>2011</strong> <strong>Malibu</strong><br />
CODE ENTRY SCREEN<br />
Use the KEY PAD to enter the four digit start code. The numbers will<br />
appear on the left. The numbers will disappear when the correct numbers<br />
have been entered<br />
CODE<br />
NUMBERS<br />
The ENTER CODE button<br />
will appear until the code<br />
has been entered.<br />
KEY PAD<br />
START/STOP STATUS<br />
The CHANGE button will allow the user to select a new code. This can only<br />
done when the current correct code has been entered. Make sure to keep<br />
track of the new code number.<br />
CHANGE<br />
BUTTON<br />
The START button will<br />
appear after the code<br />
has been entered and will<br />
start the engine when<br />
pressed. The button must<br />
be held for a second before<br />
the engine will crank.<br />
Press the STOP button<br />
to stop the engine without<br />
turning off the dash. The<br />
button must be held for<br />
a second before the engine<br />
will shutdown.<br />
DISABLE AND ENABLE<br />
BUTTON<br />
DISABLE/ENABLE button will allow the user to disable the code screen after<br />
the correct code has been entered. The user can enable the code by pressing<br />
the same button. This can only be done with the engine off. This feature will<br />
also require you to enter the start code.
<strong>2011</strong> <strong>Malibu</strong><br />
MLS SCREEN<br />
The MLS screen is setup to control the available water tanks on the boat.<br />
The user has the ability to fill or drain all the tanks at once or control the<br />
tanks individually. The tanks configurations can be changed in the<br />
SETUP menu located on the SWITCH screen.<br />
MLS<br />
BUTTON<br />
MLS control buttons<br />
START/STOP STATUS<br />
Press the FILL ALL or DRAIN ALL buttons to control all the tanks at once.<br />
If you press the ALL OFF or the OFF button the boat will stop the FILL ALL<br />
or DRAIN ALL process.<br />
ALL OFF button<br />
is used to stop<br />
all tanks from<br />
filling or emptying.<br />
Individual control buttons<br />
The MLS screen also allows for individual control of each tank. Press the tank<br />
button that you wish to control. Once it is pressed it will have a yellow ring<br />
indicating that it can be controlled by the DRAIN TANK, FILL TANK, and the OFF<br />
buttons. Press the selected tank again to unselect.
<strong>2011</strong> <strong>Malibu</strong><br />
LIGHTS SCREEN<br />
The LIGHTS screen is where all the available lights for the boat are controlled.<br />
Depending on how many lights are available on the boat a button will be<br />
Displayed in approximately location of the light. Optional lights can be added<br />
or removed in the setup screen located on the SWITCH screen.<br />
ALL OFF button<br />
is used to turn<br />
off all the light.<br />
LIGHTS<br />
BUTTON<br />
Lights buttons<br />
START/STOP STATUS<br />
The buttons will light up yellow when active. The tower lights will switch from<br />
front to rear to all as the button is pressed.<br />
If the main power to the dash is turned off any lights that are on will turn off<br />
automaticly in 10 minutes.
<strong>2011</strong> <strong>Malibu</strong><br />
SETUP SCREEN<br />
The SWITCH screen is where all the available option for the boat are controlled.<br />
Depending on how many lights are available on the boat a button will be<br />
Displayed in approximately location of the light. Optional heater switch can<br />
be added or removed in the setup screen. If the heater is removed the button<br />
will turn into an auxiliary output to be used if needed.<br />
ALL OFF button<br />
is used to turn<br />
off all the switches.<br />
SWITCH<br />
BUTTON<br />
Switch buttons<br />
START/STOP STATUS<br />
The setup button contains some of the setup features needed for the <strong>Smart</strong><br />
<strong>Touch</strong> display and Maliview system.<br />
All the Switches have an automatic shutoff that will turn all the switches off in<br />
5 minutes after the power has been removed.
<strong>2011</strong> <strong>Malibu</strong><br />
SETUP SCREENS<br />
The setup screen is used to keep the software up to date, adjust, and troubleshoot<br />
the <strong>Touch</strong>/Maliview system. Use the UP and DOWN buttons to highlight the<br />
setup mode desired. Press enter button to access the mode highlighted.<br />
ALL OFF button<br />
is used to turn<br />
off all the switches.<br />
SETUP button will<br />
bring you back to<br />
the Main SETUP<br />
screen<br />
Setup Options<br />
Pressing the ENTER button will activate the RESET TO FACTORY SETTINGS.<br />
Doing the reset is a good idea after every new software update. You may have<br />
to do some additional setup adjustments after the reset to add or subtract the<br />
options that are installed on the boat. The reset will also change your START<br />
CODE back to 1, 2, 3, and 4.
<strong>2011</strong> <strong>Malibu</strong><br />
SETUP SCREENS<br />
The setup screen is used to keep the software up to date, adjust, and troubleshoot<br />
The <strong>Touch</strong>/Maliview system. Use the UP and DOWN buttons to highlight the<br />
setup mode desired. Press enter button to access the mode highlighted.<br />
SETUP button will<br />
bring you back to<br />
the Main SETUP<br />
screen<br />
Setup Options<br />
Pressing the ENTER button will activate the UPDATE SMARTTOUCH mode.<br />
The UPDATE will read a USB and load the <strong>Smart</strong><strong>Touch</strong>.mem file. The update<br />
will not work unless the file is named <strong>Smart</strong><strong>Touch</strong>.mem. The system will<br />
reset automatically when complete. The UPDATE can also be done by just<br />
turning off and on the power with the USB stick attached to the smart touch<br />
USB port.
<strong>2011</strong> <strong>Malibu</strong><br />
SET DIM LEVEL SCREENS<br />
The setup screen is used to keep the software up to date, adjust, and troubleshoot<br />
The <strong>Touch</strong>/Maliview system. Use the UP and DOWN buttons to highlight the<br />
setup mode desired. Press enter button to access the mode highlighted.<br />
SETUP button will<br />
bring you back to<br />
the Main SETUP<br />
screen<br />
Setup Options<br />
Pressing the ENTER button will activate the BACKLIGHT DIM LEVEL mode.<br />
Once activated use the UP and DOWN buttons to set the desired dim level.<br />
This will determine how dim the DASH and INTERIOR lights will be when<br />
the NIGHT button is pressed.<br />
The NIGHT button<br />
will dim the<br />
dash and interior<br />
lights to the set dim<br />
level. Press the<br />
button again to return<br />
to 100% on.
<strong>2011</strong> <strong>Malibu</strong><br />
SETUP OUTPUTS SCREENS<br />
The setup screen is used to keep the software up to date, adjust, and troubleshoot<br />
The <strong>Touch</strong>/Maliview system. Use the UP and DOWN buttons to highlight the<br />
setup mode desired. Press enter button to access the mode highlighted.<br />
SETUP button will<br />
bring you back to<br />
the Main SETUP<br />
screen<br />
Setup Options<br />
Pressing the ENTER button will activate the SETUP OUTPUTS mode.<br />
Turning on and off ballast will change the appearance of the MLS screen.<br />
If the heater is removed the heater button will indicate AUX. This will<br />
allow what was the heater button to be used. The heater output on the<br />
Primary power module can be used with the new AUX button.<br />
Highlight the output<br />
you wish to turn on<br />
or off. Press the<br />
ENTER button to<br />
change its status.
<strong>2011</strong> <strong>Malibu</strong><br />
SETUP LIGHTS SCREENS<br />
The setup screen is used to keep the software up to date, adjust, and troubleshoot<br />
The <strong>Touch</strong>/Maliview system. Use the UP and DOWN buttons to highlight the<br />
setup mode desired. Press enter button to access the mode highlighted.<br />
SETUP button will<br />
bring you back to<br />
the Main SETUP<br />
screen<br />
Setup Options<br />
Pressing the ENTER button will activate the SETUP LIGHTS mode.<br />
Turning on and off lights will change the appearance of the LIGHTS screen.<br />
If the TOWER is removed the image of the boat will have no tower.<br />
Highlight the light<br />
you wish to turn on<br />
or off. Press the<br />
ENTER button to<br />
change its status.
<strong>2011</strong> <strong>Malibu</strong><br />
SETUP NAVIGATION SCREENS<br />
The setup screen is used to keep the software up to date, adjust, and troubleshoot<br />
The <strong>Touch</strong>/Maliview system. Use the UP and DOWN buttons to highlight the<br />
setup mode desired. Press enter button to access the mode highlighted.<br />
SETUP button will<br />
bring you back to<br />
the Main SETUP<br />
screen<br />
Setup Options<br />
Pressing the ENTER button will activate the NAVIGATION mode.<br />
Refer to the NAVIGATION manual for complete NAVIGATION operation.<br />
once active a navigation button will appear on all the main screens.<br />
Make sure this is a valid option on the boat. It can be added at anytime.<br />
Highlight the<br />
Navigation option<br />
Press the ENTER<br />
button to change<br />
its status.
<strong>2011</strong> <strong>Malibu</strong><br />
ABOUT SMARTTOUCH SCREENS<br />
The setup screen is used to keep the software up to date, adjust, and troubleshoot<br />
The <strong>Touch</strong>/Maliview system. Use the UP and DOWN buttons to highlight the<br />
setup mode desired. Press enter button to access the mode highlighted.<br />
SETUP button will<br />
bring you back to<br />
the Main SETUP<br />
screen<br />
Setup Options<br />
Pressing the ENTER button will activate the View the current software<br />
version in the <strong>Smart</strong><strong>Touch</strong> display.<br />
Press the ENTER<br />
button when done