ENG - Tulikivi
ENG - Tulikivi
ENG - Tulikivi

Create successful ePaper yourself
Turn your PDF publications into a flip-book with our unique Google optimized e-Paper software.
18<br />
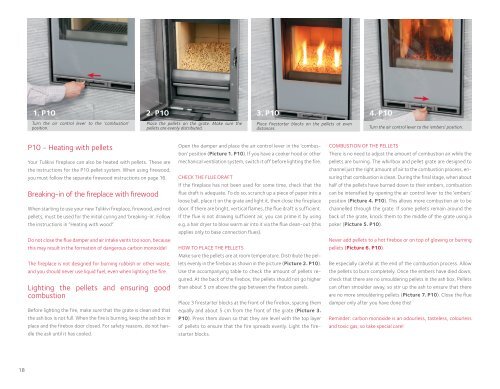
1. P10 2. P10 3. P10 4. P10<br />
Turn the air control lever to the ‘combustion’<br />
position.<br />
P10 - Heating with pellets<br />
Your <strong>Tulikivi</strong> fireplace can also be heated with pellets. These are<br />
the instructions for the P10 pellet system. When using firewood,<br />
you must follow the separate firewood instructions on page 16.<br />
Breaking-in of the fireplace with firewood<br />
When starting to use your new <strong>Tulikivi</strong> fireplace, firewood, and not<br />
pellets, must be used for the initial curing and ‘breaking-in’. Follow<br />
the instructions in ”Heating with wood”.<br />
do not close the flue damper and air intake vents too soon, because<br />
this may result in the formation of dangerous carbon monoxide!<br />
The fireplace is not designed for burning rubbish or other waste,<br />
and you should never use liquid fuel, even when lighting the fire.<br />
Lighting the pellets and ensuring good<br />
combustion<br />
Before lighting the fire, make sure that the grate is clean and that<br />
the ash box is not full. When the fire is burning, keep the ash box in<br />
place and the firebox door closed. For safety reasons, do not handle<br />
the ash until it has cooled.<br />
Place the pellets on the grate. Make sure the<br />
pellets are evenly distributed.<br />
Place firestarter blocks on the pellets at even<br />
distances.<br />
Open the damper and place the air control lever in the ‘combustion’<br />
position (Picture 1. P10). If you have a cooker hood or other<br />
mechanical ventilation system, switch it off before lighting the fire.<br />
cHEcK THE FLUE dRAFT<br />
If the fireplace has not been used for some time, check that the<br />
flue draft is adequate. To do so, scrunch up a piece of paper into a<br />
loose ball, place it on the grate and light it, then close the fireplace<br />
door. If there are bright, vertical flames, the flue draft is sufficient.<br />
If the flue is not drawing sufficient air, you can prime it by using<br />
e.g. a hair dryer to blow warm air into it via the flue clean-out (this<br />
applies only to base connection flues).<br />
HOW TO PLAcE THE PELLETS<br />
Make sure the pellets are at room temperature. distribute the pellets<br />
evenly in the firebox as shown in the picture (Picture 2. P10).<br />
Use the accompanying table to check the amount of pellets required.<br />
At the back of the firebox, the pellets should not go higher<br />
than about 5 cm above the gap between the firebox panels.<br />
Place 3 firestarter blocks at the front of the firebox, spacing them<br />
equally and about 5 cm from the front of the grate (Picture 3.<br />
P10). Press them down so that they are level with the top layer<br />
of pellets to ensure that the fire spreads evenly. Light the firestarter<br />
blocks.<br />
3.<br />
Turn the air control lever to the ‘embers’ position.<br />
cOMBUSTION OF THE PELLETS<br />
There is no need to adjust the amount of combustion air while the<br />
pellets are burning. The whirlbox and pellet grate are designed to<br />
channel just the right amount of air to the combustion process, ensuring<br />
that combustion is clean. during the final stage, when about<br />
half of the pellets have burned down to their embers, combustion<br />
can be intensified by opening the air control lever to the ‘embers’<br />
position (Picture 4. P10). This allows more combustion air to be<br />
channelled through the grate. If some pellets remain around the<br />
back of the grate, knock them to the middle of the grate using a<br />
poker (Picture 5. P10).<br />
Never add pellets to a hot firebox or on top of glowing or burning<br />
pellets (Picture 6. P10).<br />
Be especially careful at the end of the combustion process. Allow<br />
the pellets to burn completely. Once the embers have died down,<br />
check that there are no smouldering pellets in the ash box. Pellets<br />
can often smoulder away, so stir up the ash to ensure that there<br />
are no more smouldering pellets (Picture 7. P10). close the flue<br />
damper only after you have done this!<br />
Reminder: carbon monoxide is an odourless, tasteless, colourless<br />
and toxic gas, so take special care!