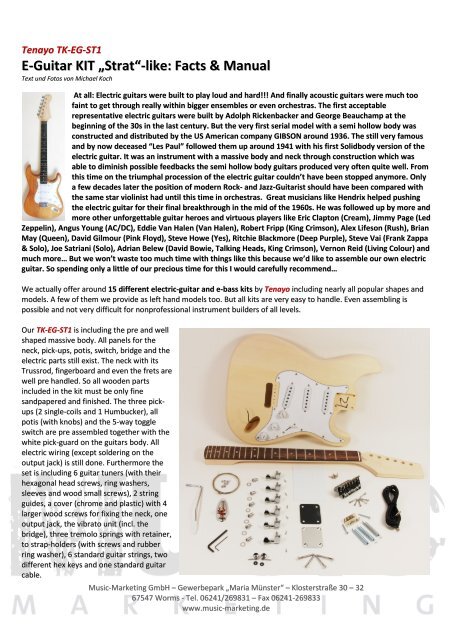
E-Guitar KIT „Strat“-like: Facts & Manual
E-Guitar KIT „Strat“-like: Facts & Manual
E-Guitar KIT „Strat“-like: Facts & Manual

Create successful ePaper yourself
Turn your PDF publications into a flip-book with our unique Google optimized e-Paper software.
Tenayo TK-EG-ST1<br />
E-<strong>Guitar</strong> <strong>KIT</strong> <strong>„Strat“</strong>-<strong>like</strong>: <strong>Facts</strong> & <strong>Manual</strong><br />
Text und Fotos von Michael Koch<br />
At all: Electric guitars were built to play loud and hard!!! And finally acoustic guitars were much too<br />
faint to get through really within bigger ensembles or even orchestras. The first acceptable<br />
representative electric guitars were built by Adolph Rickenbacker and George Beauchamp at the<br />
beginning of the 30s in the last century. But the very first serial model with a semi hollow body was<br />
constructed and distributed by the US American company GIBSON around 1936. The still very famous<br />
and by now deceased “Les Paul” followed them up around 1941 with his first Solidbody version of the<br />
electric guitar. It was an instrument with a massive body and neck through construction which was<br />
able to diminish possible feedbacks the semi hollow body guitars produced very often quite well. From<br />
this time on the triumphal procession of the electric guitar couldn’t have been stopped anymore. Only<br />
a few decades later the position of modern Rock- and Jazz-<strong>Guitar</strong>ist should have been compared with<br />
the same star violinist had until this time in orchestras. Great musicians <strong>like</strong> Hendrix helped pushing<br />
the electric guitar for their final breakthrough in the mid of the 1960s. He was followed up by more and<br />
more other unforgettable guitar heroes and virtuous players <strong>like</strong> Eric Clapton (Cream), Jimmy Page (Led<br />
Zeppelin), Angus Young (AC/DC), Eddie Van Halen (Van Halen), Robert Fripp (King Crimson), Alex Lifeson (Rush), Brian<br />
May (Queen), David Gilmour (Pink Floyd), Steve Howe (Yes), Ritchie Blackmore (Deep Purple), Steve Vai (Frank Zappa<br />
& Solo), Joe Satriani (Solo), Adrian Belew (David Bowie, Talking Heads, King Crimson), Vernon Reid (Living Colour) and<br />
much more… But we won’t waste too much time with things <strong>like</strong> this because we’d <strong>like</strong> to assemble our own electric<br />
guitar. So spending only a little of our precious time for this I would carefully recommend…<br />
We actually offer around 15 different electric-guitar and e-bass kits by Tenayo including nearly all popular shapes and<br />
models. A few of them we provide as left hand models too. But all kits are very easy to handle. Even assembling is<br />
possible and not very difficult for nonprofessional instrument builders of all levels.<br />
Our TK-EG-ST1 is including the pre and well<br />
shaped massive body. All panels for the<br />
neck, pick-ups, potis, switch, bridge and the<br />
electric parts still exist. The neck with its<br />
Trussrod, fingerboard and even the frets are<br />
well pre handled. So all wooden parts<br />
included in the kit must be only fine<br />
sandpapered and finished. The three pickups<br />
(2 single-coils and 1 Humbucker), all<br />
potis (with knobs) and the 5-way toggle<br />
switch are pre assembled together with the<br />
white pick-guard on the guitars body. All<br />
electric wiring (except soldering on the<br />
output jack) is still done. Furthermore the<br />
set is including 6 guitar tuners (with their<br />
hexagonal head screws, ring washers,<br />
sleeves and wood small screws), 2 string<br />
guides, a cover (chrome and plastic) with 4<br />
larger wood screws for fixing the neck, one<br />
output jack, the vibrato unit (incl. the<br />
bridge), three tremolo springs with retainer,<br />
to strap-holders (with screws and rubber<br />
ring washer), 6 standard guitar strings, two<br />
different hex keys and one standard guitar<br />
cable.<br />
Music-Marketing GmbH – Gewerbepark „Maria Münster“ – Klosterstraße 30 – 32<br />
67547 Worms - Tel. 06241/269831 – Fax 06241-269833<br />
www.music-marketing.de
Tools and Materials which will be needed to assemble the Tenayo electric-guitar kit…<br />
• A rasp, different files and sandpapers with variably granulation for a fine “rose”<br />
• Different metal files<br />
• A wood saw<br />
• 1 block for sandpapering<br />
• Wood glue<br />
• Screw clamps or rubber ties<br />
• Fill-in for wood repair<br />
• 1 rubber-mallet or another hammer<br />
• Wood wedges, rubber stripes or a small scratchpad to prevent damage on screws while hammering<br />
• A flat nose plier<br />
• A lead pencil and a rubber eraser<br />
• Different screwdrivers or a battery powered electric screwdriver<br />
• 1 wood drill and a cutter<br />
• A electric soldering iron and some tin for wiring the potis, PUs and the output jack<br />
• Oil (in case the instrument shall be finished with that)<br />
• Different lacquers and colors (if desired)<br />
• Seersucker adhesive tape (to prevent stains while coloring)<br />
First Steps…<br />
Initially neck and body of the guitar has to be put together!! Thereby you have to take care on the correct seat of the<br />
neck. It has to be absolutely straight later on. Please check the photos below too! But this should not be a problem in<br />
because of the pre shaping and the room which has been made for the necks rudiment. If the rudiment does not fit into<br />
its place exactly take some sandpapers or a file – don’t try to put the neck into its place by force. This construction will<br />
be fixed by using the chrome neck plate cover (in between the black plastic washer) and the 4 big wood screws – as<br />
shown on the photos below. If gaps occur in between the parts after doing that you can now fill them up with some fill<br />
in for wood repair. But by getting in the neck correctly this should be no matter at all.<br />
Now you can handle the headstocks design (if desired) – giving it a new shape. Before<br />
cutting the wood with a saw take a lead pencil to make some trials first for your <strong>like</strong>.<br />
A rubber eraser can be a great help by correcting your most desired artful design until<br />
perfection.<br />
Sandpapering and finishing your guitar…<br />
Please check if there are no spaces ore damages in the wood which has to be repaired potentially. If all these things<br />
have been done all wooden parts of the instrument should be handled with different sandpapers (down to the finest<br />
granulation) until you’re satisfied or the guitar “feels <strong>like</strong> a child’s bum”. If there are any frets which feel sharp at their<br />
edges last improvements can now be done with a flat and fine metal-file. Yet all wooden parts can be oiled or colored<br />
with different lacquers. Oiling can be done with a standard vegetable or olive oil. You only need a primitive cotton flap.<br />
But oiling should be repeated a few times within days to get a good effect. Possibly you have to use fine sandpapers<br />
again between these processes. If lacquering is wanted you should check for professional (<strong>like</strong> literature or so) help in<br />
front of doing that. But please take care on all parts which shall not be lacquered at all. To prevent stains on the<br />
fretboard or other parts you can use seersucker adhesive tape for bonding them in front of doing the coloring so you<br />
can finish the guitar part by part. It is recommended too removing the pick-guard of the guitar before beginning with<br />
the work on the finish.<br />
Music-Marketing GmbH – Gewerbepark „Maria Münster“ – Klosterstraße 30 – 32<br />
67547 Worms - Tel. 06241/269831 – Fax 06241-269833<br />
www.music-marketing.de<br />
1
Assembling of the tuners…<br />
Yet the tuners can be put into the complying predrilled holes on the guitars headstock. Doing that is very simple and<br />
well shown on the photos. All 6 tuners have to be fixed with its head sleeve on the upside and with two little wood<br />
screws on the back of the headstock. The sleeve has to be hammered in using a wooden wedge ore something similar<br />
avoiding damage on the material. It is recommended too to pre drill all holes for the little wood screws. The back part of<br />
each mechanic is a very good template marking the focus points onto the surface of the headstocks back.<br />
Re-assembling of the pick-guard…<br />
Now the white pick-guard has to be put on the top of the body again – fixing it with the complying wood screws it was<br />
attached before finishing the guitars body. The two black cables (please check the two photos below) have to be lead to<br />
its channel to the output jack – while the white (or yellow) cable has to be lead to the vibrato unit panel. Later on it has<br />
to be braced (soldered) on the retainer for the three vibrato springs for ground. Before you fix the pick-guard at all<br />
please take care on to avoid having cables in between the bodies top and the guard itself. Possibly you got to push some<br />
cables back into the panel first. Also the face guard should seat on absolute flat. Yet you can get in all the screws fixing<br />
the pick guard in its right place.<br />
Music-Marketing GmbH – Gewerbepark „Maria Münster“ – Klosterstraße 30 – 32<br />
67547 Worms - Tel. 06241/269831 – Fax 06241-269833<br />
www.music-marketing.de
Setting up the vibrato unit…<br />
First the so called vibrato unit (check out the pic on the left below) has to be laid into its provided panel because before<br />
fixing it the scale has to be checked. This means that the distance between the<br />
nut and the saddles (preferred in a middle position and the place where the<br />
strings run over later) has to be exactly the double of the distance between the<br />
nut and the inner edge of the 12 th fret. Later the three saddles for the higher<br />
strings have to be moved slightly into direction of the neck – and the other three<br />
into the opposite direction. This is in relation to the gauge of each string.<br />
But since the 6 holes for fixing the bridge are pre drilled this shall be no problem<br />
at all<br />
fixing<br />
the bridge on its right place. So adjusting the<br />
saddles can follow on later after the set up<br />
and tuning of the strings. To bring on the<br />
retainer for the vibrato springs the guitar has<br />
to be turned onto its backside. Then you can<br />
fix it with the two bigger wood screws in its<br />
right place in the complying panel. Please<br />
check the first photo on the right. After fixing<br />
it the three springs can be connected to the<br />
vibrato unit by hooking them in. Take care and don’t get the two screws too much into the wood. This is important for<br />
adjusting the whole thing later on after the guitar got stringed and tuned.<br />
Assembling and soldering the output jack…<br />
In our actual kit you should have a thicker black cable with two<br />
different colors – mostly black and white (or blank). Check out<br />
the photo on the left. Sometimes you only have two different<br />
single cables <strong>like</strong> described sometime before. Each kit can differ<br />
a little. Important is only that most of the time the white (blank)<br />
one is for ground and shall be soldered on the inner ring<br />
contact of the output jack while the black one is the hot contact<br />
got to be connected to the outer rim. It is really not stupid<br />
trying it out now<br />
if it’s working at<br />
all before fixing<br />
the output jack<br />
with its plate on<br />
the instruments<br />
body as shown on the photo on the right side. Here it’s also<br />
recommended marking and pre drilling the holes for the cover panel.<br />
Music-Marketing GmbH – Gewerbepark „Maria Münster“ – Klosterstraße 30 – 32<br />
67547 Worms - Tel. 06241/269831 – Fax 06241-269833<br />
www.music-marketing.de
Fixing the strap holders…<br />
Simply check out the three photos below where the two pins have to be placed. Even here it’s applied: marking, pre<br />
drilling and after that fixing both with their screws using the rubber ring washer in between.<br />
Putting on the strings and fixing the string guides…<br />
Usually it is not wrong starting with the most thinly string - that’s the “e” or<br />
so called 1 st string. Each string has a ball-end and a sharp end. Get this<br />
through the holes at the backside of the vibrato unit; lead it up and out of<br />
the saddle<br />
(and over it)<br />
into direction<br />
of the<br />
headstock.<br />
Now each string got to be winded up with its complying<br />
tuner respectively the tuners machine head by rotating<br />
them into the opposite direction than your body took place<br />
- two or three times until it’s fixed reasonably. The two<br />
string guides (photo above) have to be set up between the<br />
1 st and the 2 nd string and between the 4 th and the 3 rd and<br />
the 4 th string. This can be seen very well on the two photos<br />
on the right side. Check it out…<br />
Fixing the back cover of the vibrato unit…<br />
This cover has to be adjusted very well in its place<br />
(second photo on the left) so that you can put in<br />
strings later on while changing them - without<br />
unfixing the plate again. The holes have to be<br />
drilled - and at all the cover is the best way having a<br />
fine template to mark them!! After drilling the plate<br />
has to be fixed with its wood screws. No problem at<br />
all I think.<br />
Music-Marketing GmbH – Gewerbepark „Maria Münster“ – Klosterstraße 30 – 32<br />
67547 Worms - Tel. 06241/269831 – Fax 06241-269833<br />
www.music-marketing.de
Adjusting the neck with its truss rod…<br />
Every guitar is including a truss rod inside its neck. The approach to that is<br />
at the headstock top above the nut and the necks rudiment. Please check<br />
out the photo on the right. The truss can be adjusted with the complying<br />
hex screw which is included in the kit. Tighten the screw (most of the time<br />
by rotating it clockwise) of the truss is resulting in getting the neck more<br />
straight. If you loosen the screw (most of the time by rotating it to the left)<br />
the neck is getting concave. If the neck get too skew by weather-related or<br />
other influences it is recommended asking a professional guitar craftsman.<br />
Smaller correcting can be easily done by you.<br />
String action adjustment…<br />
This is (proverbial) a matter of taste. Some guitarists prefer a very low string action (the speed section) others <strong>like</strong> a<br />
higher string action possibly in because of their extraordinary picking technique (the older blue grass generation…)<br />
which is for perhaps not to handle by beginners. But in every case the saddles on the bridge have to be adjusted in a<br />
way that the strings don’t rattle on the higher frets while doing chords at the 5 th fret or so. In relationship to lighter or<br />
heavier string-gauges they have to be lift a little up or down.<br />
As an average value the following string action will be recommended:<br />
1. String 6. String<br />
1. Fret 0,5 mm -0,8 mm 0,8 mm – 1,0 mm<br />
12. Fret 2,5 mm – 3,0 mm 3,0 mm – 3,5 mm<br />
Tuning of the guitar/the tremolo:<br />
For beginners or relatively inexperienced guitar players the standard tuning in E (6 th ), A<br />
(5 th ), D (4 th ), G (3 rd ), b (2 nd ), e (1 st ) is well recommended. If you are not able to identify<br />
each single note by hearing ☺ please use a standard tuner. Concluding the arm of the<br />
vibrato unit has to be screwed in (photo on the left). That’s an easy job I think…<br />
So get a move on – and have a lot of fun while playing your first<br />
home-made electric guitar by TENAYO!!!<br />
PS.: The original and full colored version of this fine manual can be requested via info@mm-wo.de …<br />
Attention!!! „All Electric equipment can usually not be disposed with your household refuse!! This guitar kit is including parts<br />
which do not belong into domestic waste too!!! All these parts have to be brought to your local collecting point or recycling<br />
depot. Our WEEE-Registration-Number is DE 57445331.<br />
Music-Marketing GmbH – Gewerbepark „Maria Münster“ – Klosterstraße 30 – 32<br />
67547 Worms - Tel. 06241/269831 – Fax 06241-269833<br />
www.music-marketing.de