Application Note #5442 - Galil
Application Note #5442 - Galil
Application Note #5442 - Galil

You also want an ePaper? Increase the reach of your titles
YUMPU automatically turns print PDFs into web optimized ePapers that Google loves.
Nov-08<br />
<strong>Application</strong> <strong>Note</strong> <strong>#5442</strong><br />
Connecting and Programming a QSI HMI to a <strong>Galil</strong> Controller<br />
Introduction and Description:<br />
One of the many benefits to <strong>Galil</strong> controllers is the ability to communicate to 3 rd party<br />
devices. This is possible because <strong>Galil</strong> products send and receive commands as standard<br />
8 bit ASCII characters. The standard communication methods that <strong>Galil</strong>’s stand alone<br />
controllers support include RS-232, Ethernet and USB. This allows for communication<br />
between <strong>Galil</strong> controllers and a variety of Human Machine Interfaces or HMI’s. One<br />
popular HMI is the QSI QTERM-G124 or GS124, RS-232/10Base-T touch screen. This<br />
HMI is very easy to use, inexpensive and has been customized to interface to <strong>Galil</strong> stand<br />
alone controllers by offering pre-built programming and communication objects. This<br />
<strong>Application</strong> note will describe how to communicate to a <strong>Galil</strong> stand alone controller<br />
through the QSI GS124 HMI. Although this application note describes using the GS124<br />
specifically, any of the QSI’s Qlarity based terminals can be used with the predefined<br />
<strong>Galil</strong> programming and communication objects.<br />
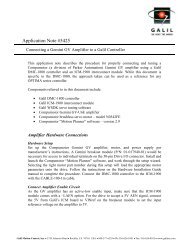
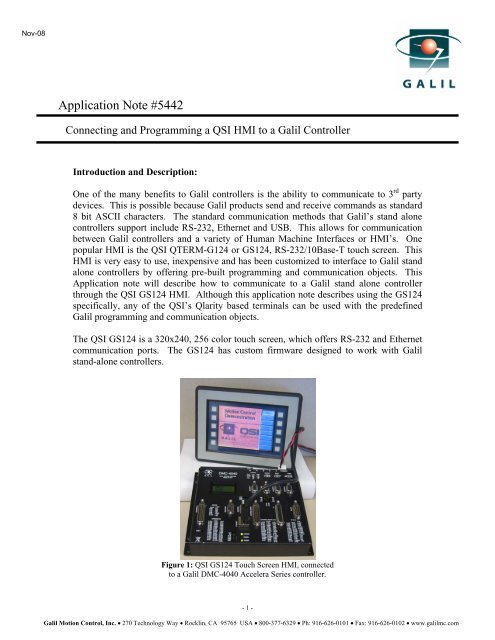
The QSI GS124 is a 320x240, 256 color touch screen, which offers RS-232 and Ethernet<br />
communication ports. The GS124 has custom firmware designed to work with <strong>Galil</strong><br />
stand-alone controllers.<br />
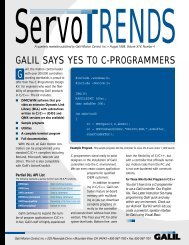
Figure 1: QSI GS124 Touch Screen HMI, connected<br />
to a <strong>Galil</strong> DMC-4040 Accelera Series controller.<br />
- 1 -<br />
<strong>Galil</strong> Motion Control, Inc. • 270 Technology Way • Rocklin, CA 95765 USA • 800-377-6329 • Ph: 916-626-0101 • Fax: 916-626-0102 • www.galilmc.com
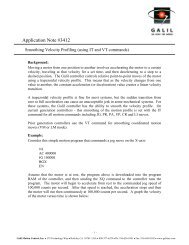
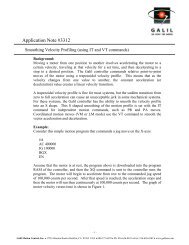
The Qlarity Foundry software package is the QSI programming environment. Qlarity<br />
Foundry is a Visual Basic-like programming environment which makes programming the<br />
interface between the GS124 and a <strong>Galil</strong> motion controller as simple as configuring and<br />
adding predefined objects. Figure 2 shows the basic Qlarity Foundry Layout.<br />
Figure 2: Qlarity Foundry Programming<br />
Environment<br />
Connection Procedure and Brief Programming Overview:<br />
The following procedure will review the connection and programming process for a <strong>Galil</strong><br />
stand alone controller to a QSI GS124. Before starting the connection process it is<br />
recommended that the user review the GS70 User Manual and Qlarity Programming<br />
guide. The GS124 contains the same hardware as the GS70, but has the additional<br />
features used to communicate specifically to <strong>Galil</strong> controllers. On top of offering<br />
instruction and description on how to operate the GS70, the manual will offer many<br />
tutorials to help the user get familiarized with the QSI QTERM and Qlarity Foundry<br />
environment I.<br />
- 2 -<br />
<strong>Galil</strong> Motion Control, Inc. • 270 Technology Way • Rocklin, CA 95765 USA • 800-377-6329 • Ph: 916-626-0101 • Fax: 916-626-0102 • www.galilmc.com
Contents<br />
1 Installation of Qlarity Foundry software………………………………... 4<br />
2 Developing and HMI <strong>Application</strong> Program…………………………….. 4<br />
2.1 Running the <strong>Galil</strong> Demo Program…………………………………………..4<br />
2.2 Starting a New <strong>Application</strong>………………………………………………… 5<br />
2.2.1 From “new workspace” prompt………………………………………. 5<br />
2.2.2 From a “standard workspace” ………………………………………... 5<br />
3 Establishing PC to HMI Connection…………………………………….. 6<br />
3.1 Serial…………...……………….………………………………………….. 6<br />
3.2 Ethernet…………………...………………………………………………... 7<br />
3.2.1 Direct connection between PC and HMI..……………………………. 7<br />
3.2.2 Network Connection………..………………………………………… 8<br />
4 Setup <strong>Galil</strong> for Communication………………………………………….. 8<br />
4.1 RS-232…...……………….………………………………………………... 8<br />
4.2 Ethernet…………………...………………………………………………... 8<br />
4.2.1 Software………………..……………………………………………... 9<br />
4.2.1.1 <strong>Galil</strong>tools/<strong>Galil</strong>tools Lite…………………………………………... 9<br />
4.2.1.1.1 No IP Address………………………………………………… 9<br />
4.2.1.1.2 Existing IP Address…………………………………………... 9<br />
4.2.1.2 Smart Terminal…………………………………………………….. 10<br />
4.2.1.2.1 No IP Address………………………………………………… 10<br />
4.2.1.2.2 Existing IP Address…………………………………………… 10<br />
**Existing IP address conflict, review both options…………………………….. 10<br />
5 Connecting QTERM to <strong>Galil</strong>…………………………………………….. 11<br />
- 3 -<br />
<strong>Galil</strong> Motion Control, Inc. • 270 Technology Way • Rocklin, CA 95765 USA • 800-377-6329 • Ph: 916-626-0101 • Fax: 916-626-0102 • www.galilmc.com
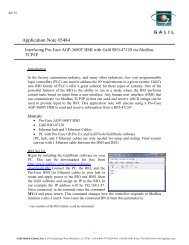
Object Tree<br />
1 Installation of Qlarity Foundry Software<br />
a. Download the latest version of the Qlarity Foundry package found on the QSI<br />
web site at: http://www.qsicorp.com/support/files/ and install II.<br />
b. Download the file galil_demo.zip that can be found on the <strong>Galil</strong> web site at:<br />
http://www.galilmc.com/ftp/pub/appnotes/qsi/ .<br />
Unzip these files into a folder located onto the hard drive of the PC in a<br />
location that is easy to find. A recommended location is: C:\Program<br />
Files\QSI Corporation\Qlarity Foundry\<strong>Galil</strong><br />
2 Developing an HMI <strong>Application</strong> Program<br />
2.1 Running the <strong>Galil</strong> Demo Program:<br />
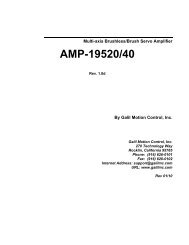
a. Run the Qlarity Foundry software and open the <strong>Galil</strong> demo program through the<br />
Qlarity terminal, galil_demo.qly, which was downloaded from the <strong>Galil</strong> site. A<br />
screen similar to the one below should be displayed.<br />
Program Layout<br />
Object Properties<br />
Figure 3: Details of Qlarity Foundry terminal screen.<br />
- 4 -<br />
<strong>Galil</strong> Motion Control, Inc. • 270 Technology Way • Rocklin, CA 95765 USA • 800-377-6329 • Ph: 916-626-0101 • Fax: 916-626-0102 • www.galilmc.com<br />
Object<br />
Palette
2.2 Starting a new application:<br />
2.2.1 From a “new workspace”<br />
Open a “new workspace;” either by choosing “new workspace” upon<br />
starting Qlarity Foundry software, or by choosing “new workspace” from<br />
an open Qlarity window. This can be done by following: file>new<br />
workspace<br />
a. Select “<strong>Galil</strong> Motion Controller” and click finish.<br />
This will automatically add the <strong>Galil</strong> object libraries installed with the<br />
Qlarity software to the Object Palette (black and yellow icons) and add a<br />
<strong>Galil</strong> connection object to the object tree (<strong>Galil</strong>Comm). By highlighting<br />
this object in the object tree the connection parameters can be set within<br />
the Object Properties window. See Figure 4 for a picture detailing the<br />
<strong>Galil</strong>Comm Object Properties Window.<br />
2.2.2 From a “standard workspace”<br />
Starting from “standard workspace” or if additional libraries are to be<br />
added upon opening new workspace.<br />
a. Add libraries<br />
Follow: Edit>Edit Libraries>Add Existing Libraries>[choose specific<br />
library and click okay, include <strong>Galil</strong>Comm library]<br />
b. Select “<strong>Galil</strong>Comm” object from the Object Pallet. Drop this object on<br />
the workspace. This will place a new object in the object tree called<br />
“<strong>Galil</strong>Comm.” Highlight <strong>Galil</strong>Comm in the object tree and set<br />
communication parameters under Object Properties. For details see Figure<br />
4.<br />
c. A new sheet can be added to the workspace and program development can<br />
take place following Qlarity programming instructions.<br />
- 5 -<br />
<strong>Galil</strong> Motion Control, Inc. • 270 Technology Way • Rocklin, CA 95765 USA • 800-377-6329 • Ph: 916-626-0101 • Fax: 916-626-0102 • www.galilmc.com
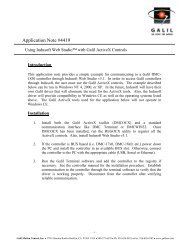
Figure 4: Details of <strong>Galil</strong>Comm Object Properties<br />
**For a description of all <strong>Galil</strong>-specific objects that are available in the Qlarity Foundry<br />
software, see Appendix I**<br />
3 Establish PC to HMI connection<br />
3.1 Serial<br />
a. Connect a straight through RS-232 cable from the COM1 dongle provided<br />
by the QSI cable to the RS-232 port on the PC<br />
b. Power down the HMI, if not done so already. Depress the upper left<br />
corner (see figure 5) of the HMI screen and power up.<br />
c. Use the “next” arrow to toggle over to the COM1 settings.<br />
Follow: Flash Memory>Display>Calibration>Network and review<br />
the COM1 settings<br />
d. If the default settings are not appropriate for this application select COM1<br />
and change settings as desired. If the settings are acceptable, ignore.<br />
e. Configure the HMI to accept the program by changing the “App Mode”<br />
setting, under “Flash Memory” to “Download.”<br />
Follow: COM1
3.2 Ethernet<br />
3.2.1 Direct connection between PC and HMI<br />
a. Connect a cross-over Ethernet cable from the PC Ethernet port to Ethernet<br />
port on the QTERM HMI. III<br />
b. <strong>Note</strong> the PC’s IP address and subnet mask (this can be done by running<br />
ipconfig:<br />
Follow: Start>run>[type]cmd[enter]>[type]ipconfig[enter].<br />
<strong>Note</strong>: for every field of the subnet mask that is set to 255 the corresponding<br />
field of the IP address of the external device eg. the QTERM HMI, must match<br />
the IP address of the PC. Entering ‘0’ allows differences in the IP addresses. IV<br />
Ex. PC; Subnet Mask: 255.255.255.0 IP Address: 169.169.169.1<br />
Device IP Address: 169.169.169.2<br />
PC; Subnet mask: 255.0.0.0 IP Address: 169.169.169.1<br />
Device IP Address: 169.1.1.2<br />
c. Power down the HMI, if not done so already. Depress the upper left<br />
corner (see figure 5) of the HMI screen and power up.<br />
d. Use the “next” arrow to toggle over to the NETWORK setting.<br />
Follow: Flash Memory>Display>Calibration>Network<br />
e. <strong>Note</strong> or set the Subnet Mask on the HMI, following the same rules as<br />
above with PC.<br />
f. Configure the HMI to accept the program by changing the “App Mode”<br />
setting, under “Flash Memory” to “Download.”<br />
Follow: Network
3.2.2 Network Connection II<br />
a. It is possible to have the HMI connected to the PC and other devices<br />
through a network hub or switch. For this configuration follow the same<br />
instructions as in step 3.2.1.a as above except use straight through Ethernet<br />
cables and note the IP addresses of all devices on the network. No two<br />
devices should have the same IP addresses and all subnet mask(s) must<br />
accept all of the relevant IP addresses on the network to communicate. V<br />
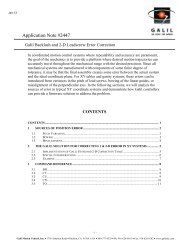
4 Set up <strong>Galil</strong> for Communication<br />
Location to depress to<br />
enter Power On Setup<br />
Figure 5: Illustration of where to depress the screen<br />
of the QTERM upon power up to reach the ‘Power<br />
On Setup’.<br />
This step will require the <strong>Galil</strong> WSDK/SmartTerminal, or <strong>Galil</strong>tools/<strong>Galil</strong>tools<br />
Lite software. If not already installed on the PC, these programs are available for<br />
download on the <strong>Galil</strong> website. Be sure to verify software compatibility with the<br />
specific controller to be used in this system.<br />
http://www.galilmc.com/support/download.html#win2k<br />
4.1 RS-232<br />
If connecting between the HMI and the <strong>Galil</strong> controller via RS-232 no<br />
initialization is necessary. However, note the connection parameters for standard<br />
<strong>Galil</strong> serial connection; Baud rate (set on jumpers or controller default), 8 data<br />
bits, no parity, 1 stop bit, hardware flow control.<br />
4.2 Ethernet<br />
1. <strong>Note</strong> the PC’s IP address and subnet mask, if unknown, open the command<br />
prompt and run ipconfig.<br />
Follow: Start>run>[type]cmd[enter]>[type]ipconfig[enter]<br />
<strong>Note</strong> IP address and subnet mask<br />
- 8 -<br />
<strong>Galil</strong> Motion Control, Inc. • 270 Technology Way • Rocklin, CA 95765 USA • 800-377-6329 • Ph: 916-626-0101 • Fax: 916-626-0102 • www.galilmc.com
4.2.1 Software<br />
4.2.1.1 <strong>Galil</strong>tools/<strong>Galil</strong>tools Lite<br />
<strong>Note</strong>: Please see <strong>Application</strong> <strong>Note</strong>: 4422 for more details as to how to<br />
communicate to Ethernet stand alone controllers.<br />
4.2.1.1.1 No IP address.<br />
a. Open <strong>Galil</strong>tools and wait for the connection window to appear.<br />
b. Choose the “No IP Address” tab at the top of the window and<br />
select desired controller, click assign, then wait under the available<br />
controllers tab for the controller to appear next to the new IP<br />
address.<br />
c. Establish connection and burn IP address into EEPROM by issuing<br />
a “burn parameters” command by entering BN into the command<br />
line.<br />
4.2.1.1.2 Existing IP address.<br />
a. Open <strong>Galil</strong>tools and wait for connection window to appear.<br />
b. <strong>Note</strong> IP address listed for particular controller under “available”<br />
tab.<br />
c. Be sure it does not conflict with any other controllers on the<br />
network and will be accepted by all subnet masks. If it is not, then<br />
proceed to step **. If this IP address is acceptable highlight<br />
particular controller and click “connect” button to establish<br />
connection.<br />
d. If the IP address is not already burned into the controller’s<br />
EEPROM, establish communication and burn in IP address with<br />
“burn parameters” command or by entering the BN command in<br />
the command line,<br />
- 9 -<br />
<strong>Galil</strong> Motion Control, Inc. • 270 Technology Way • Rocklin, CA 95765 USA • 800-377-6329 • Ph: 916-626-0101 • Fax: 916-626-0102 • www.galilmc.com
4.2.1.2 SmartTerminal<br />
4.2.1.2.1 No IP address.<br />
a. Register controller<br />
Follow: Tools>Controller Registration>Find Ethernet<br />
Controllers>[choose controller] click okay> assign IP address.<br />
b. Return to main screen and establish connection to controller by<br />
selecting controller<br />
Follow: Tools>Select Controller>[choose specific<br />
controller]>okay<br />
Burn in IP address into EEPROM by issuing a “burn parameters”<br />
command or BN in command line.<br />
4.2.1.2.2 Existing IP address.<br />
a. Open SmartTerminal and select controller<br />
Follow: Tools> Select Controller, highlight the particular<br />
controller and note IP address listed for particular controller in<br />
Controller Details window with specific controller highlighted.<br />
b. Be sure it does not conflict with any other controllers on the network<br />
and will be accepted by all subnet masks.<br />
c. If acceptable, choose controller and click okay.<br />
d. If IP address is not already burned into the controller’s EEPROM,<br />
establish communication and burn in IP address with “burn<br />
parameters” command or by entering the BN command in the<br />
command line.<br />
**If the controller has an IP address that will conflict with another component in the<br />
system or will be denied by any subnet mask choose one of the two below<br />
options.**<br />
1.Master Reset the controller by installing MRST jumper and cycling power (once<br />
the power has been applied and the red LED has turned off, the jumper can be<br />
removed). At this point the controller will be in the “factory default” condition<br />
and no IP address will exist in memory. Follow the steps in 4 to assign an IP<br />
address.<br />
Warning: A Master Reset clears all parameters, programs and user<br />
variables. All data must be backed up before Master Resetting the<br />
controller.<br />
- 10 -<br />
<strong>Galil</strong> Motion Control, Inc. • 270 Technology Way • Rocklin, CA 95765 USA • 800-377-6329 • Ph: 916-626-0101 • Fax: 916-626-0102 • www.galilmc.com
2.Connect straight through RS-232 cable from PC to the controller.<br />
a. <strong>Galil</strong>tools: open <strong>Galil</strong>tools and choose appropriate com port and<br />
connection speed from the connections window to the specific<br />
controller, go to step c below.<br />
b. SmartTerminal: Open SmartTerminal. If registered choose<br />
Tools> Select Controller, [highlight specific controller]> [click]<br />
okay. If not registered select: Tools>Register Controller><br />
[Follow instructions to set up Serial Communication]>[return to<br />
main screen], then follow Tools> Select Controller>[select specific<br />
controller] >[click] okay<br />
c. Establish connection and set desired IP address by issuing an IA<br />
command. See the controller’s specific command reference for a<br />
complete description. Burn in IP address into EEPROM by issuing<br />
a “burn parameters” command or BN in command line.<br />
5 Connect QTERM to <strong>Galil</strong><br />
At this point the QTERM HMI should be able to connect and<br />
communicate to the <strong>Galil</strong> controller and the developed installed program<br />
run.<br />
I. One feature of the QSI GS124 worth noting is the Simulation mode with “virtual”<br />
ports. This mode will emulate the presence of a controller to allow for preliminary<br />
programming and debugging prior to actually being connected to a controller. Another<br />
important feature worth reviewing in the user manual is the Object Tree. Much like<br />
Visual Basic, this feature allows the user to view and navigate through all of the<br />
interface’s screens, buttons and objects.<br />
II. The Qlarity Foundry software package contains the <strong>Galil</strong> Object Library (<strong>Galil</strong>.mg.lib)<br />
and sample program (galil_demo.qly)<br />
III. The <strong>Galil</strong> Accelera series stand alone controllers (DMC-40x0) offer an “autorecognition”<br />
feature that will automatically configure the communication signals,<br />
regardless of the cable type. This means that the DMC-40x0 can use either straightthrough<br />
or crossover Ethernet cables.<br />
IV. A good rule of thumb is to use the same subnet masks on all components on the<br />
network and to simply add 1 to the last sector of the IP address. If the last sector of the IP<br />
address is 254 leave it the same and add 1 to the 3 rd sector.<br />
V. If the components are connected to a network with a DHCP server the IP addresses<br />
may be assigned automatically.<br />
- 11 -<br />
<strong>Galil</strong> Motion Control, Inc. • 270 Technology Way • Rocklin, CA 95765 USA • 800-377-6329 • Ph: 916-626-0101 • Fax: 916-626-0102 • www.galilmc.com
Conclusion<br />
Communication between <strong>Galil</strong> stand alone controllers and external devices can be done<br />
by issuing standard ASCII commands. This allows for communication between many 3 rd<br />
party HMI’s and <strong>Galil</strong> stand alone controllers. One HMI that takes advantage of this<br />
communication protocol is the QSI QTERM-G127 HMI. Using the -G127, coupled with<br />
the Qlarity Foundry software package, offers many pre-built, <strong>Galil</strong>-specific<br />
communication objects. This eases the communication and motion programming through<br />
a -G127 and a <strong>Galil</strong> stand alone controller. The above steps offer instruction as to how to<br />
communicate to a <strong>Galil</strong> stand alone controller and develop a motion program through the<br />
Qlarity Foundry software package. For more information or assistance with setting up a<br />
QSI GS124 with a <strong>Galil</strong> controller, please contact a <strong>Galil</strong> Motion Control <strong>Application</strong>s<br />
Engineer at 1.800.377.6329.<br />
- 12 -<br />
<strong>Galil</strong> Motion Control, Inc. • 270 Technology Way • Rocklin, CA 95765 USA • 800-377-6329 • Ph: 916-626-0101 • Fax: 916-626-0102 • www.galilmc.com
Appendix I– Pre-Built Object Descriptions<br />
Object: <strong>Galil</strong>CommV2<br />
Description: <strong>Galil</strong> motion controller communications object<br />
This object forms the core of the <strong>Galil</strong> library. This object controls all interaction<br />
between the motion controller and the QTERM-G70. It is capable of communicating with<br />
a motion controller either serially or via ethernet. To communicate with a motion<br />
controller, create an instance of this object and set up its properties as appropriate. Then<br />
create other GMC objects and set their commObject property to refer to this object. You<br />
can communicate with multiple motion controllers by creating one <strong>Galil</strong>Communication<br />
object per controller. There is a limit of one controller per serial port on the G70 and a<br />
limit of 8 Ethernet controllers that can be used at once.<br />
Object: GMCCommandDisplayV2<br />
Description: Executes a command (or series of commands)<br />
on the motion controller when you push this button<br />
When the command(s) complete execution, the results<br />
are optionally displayed.<br />
This object provides a simple interface to execute an arbitrary command (or series of<br />
commands) on your <strong>Galil</strong> Motion Controller. This object appears as a push button which<br />
when pushed, executes the commands defined by the command property, then optionally<br />
displays the results in the button.<br />
Object: GMCCommandExecV2<br />
Description: Executes a command (or series of commands)<br />
on the motion controller<br />
This object provides a simple interface to execute an arbitrary command (or series of<br />
commands) on your <strong>Galil</strong> Motion Controller. Unlike the GMCCommandDisplay object,<br />
this object has no graphical interface. It is used to programmatically execute commands<br />
on the controller. The ResponseReceived event can be used to process any data returned<br />
by the controller in response to your commands.<br />
Object: GMCGaugeV2<br />
Description: a vertical/horizontal bar gauge for visual representation<br />
This object implements a flexible bar graph to graphically indicate the level of a floatingpoint<br />
value. The bar graph may be horizontal or vertical. The color of the bar and<br />
background are user settable. The value of the gauge may optionally be displayed as text<br />
infront of the graph.<br />
- 13 -<br />
<strong>Galil</strong> Motion Control, Inc. • 270 Technology Way • Rocklin, CA 95765 USA • 800-377-6329 • Ph: 916-626-0101 • Fax: 916-626-0102 • www.galilmc.com
Object: GMCPathTraceV2<br />
Description: <strong>Galil</strong> motion controller Path tracing object<br />
This object implements a type of 2D graph that can be used to plot the recent positions of<br />
the motor. Generally you would be interested in polling the motor position along two of<br />
the motor axis (such as the X and the Y axis). This object is robust and can consume a lot<br />
of the processing power available. As such, you should minimize the use of other polling<br />
type objects on the same screen as you place this path trace object. You can also improve<br />
performance, if necessary, by increasing pollInterval, and decreasing numTracePoints.<br />
Object: GMCPollV2<br />
Description: <strong>Galil</strong> motion controller polling object<br />
This object polls the controller with an arbitrary command at regular intervals. It then<br />
displays the controller's response. It is useful for displaying values that will change over<br />
time, such as the motor position. Many properties are provided which control the<br />
appearance of this object, the polling frequency and what is being polled.<br />
Object: GMCSimpleTerminal<br />
Description: A simple terminal for entering interactive commands<br />
to the controller.<br />
This object is a simple terminal window used to send arbitrary commands to the<br />
controller. You can use this object to compose commands to send to the motion controller<br />
using a simple on-screen keypad. Recent commands are saved so that they may be resent.<br />
The results of the commands are displayed in the terminal window at the bottom of the<br />
object.<br />
Object: GMCTrendChartV2<br />
Description: This object draws a graph of data received<br />
This object implements a line graph that can be used to chart data. Data is assigned to the<br />
“newdatapoint” property one point at a time. As new data is assigned, the chart shifts to<br />
the left, presenting a rolling history of the last N data points. The number of points on the<br />
plot is determined by the width of the chart and the “pointseparation” property.<br />
Object: GMCDownloadV2<br />
Description: An object used to easily download a program to the <strong>Galil</strong> motion controller<br />
This is a simple object which can either download a program to a <strong>Galil</strong> Motion Controller<br />
or upload an existing program from the controller. To download a program, set the<br />
DLProgram property (either in Layout View, or at runtime) then call the Download<br />
method at runtime.<br />
- 14 -<br />
<strong>Galil</strong> Motion Control, Inc. • 270 Technology Way • Rocklin, CA 95765 USA • 800-377-6329 • Ph: 916-626-0101 • Fax: 916-626-0102 • www.galilmc.com
The easiest way to add a motion controller program to your workspace, is to include the<br />
program as a Binary Resource in Qlarity Foundry. You then use the LoadFromResource<br />
method to load the specified binary resource into the DLProgram property. You can then<br />
call Download() to send the program to the controller. You can also set the DLProgram<br />
property by calling the LoadFromFile method at runtime to load a program that has been<br />
saved to the terminal's flash file system.<br />
To upload a file, simply call the Upload method at runtime. This will set the ULProgram<br />
property. You can then either examine the value of this property, or call the SaveToFile<br />
method to save the uploaded program to a file.<br />
Object: GMCTachometerV2<br />
Description: Analogue gauge for displaying data.<br />
This meter is an analog dial gauge which allows the user a way to quickly glance at the<br />
status of a value.<br />
- 15 -<br />
<strong>Galil</strong> Motion Control, Inc. • 270 Technology Way • Rocklin, CA 95765 USA • 800-377-6329 • Ph: 916-626-0101 • Fax: 916-626-0102 • www.galilmc.com