Instruction manual - Foster S.p.A.
Instruction manual - Foster S.p.A.
Instruction manual - Foster S.p.A.

You also want an ePaper? Increase the reach of your titles
YUMPU automatically turns print PDFs into web optimized ePapers that Google loves.
USER'S MANUAL<br />
FULLY BUILT-IN DISHWASHER S4000<br />
cod. 2910 010
EN CONTENTS<br />
1/ FOR THE USER’S ATTENTION<br />
• Safety instructions ______________________________________ 32<br />
• Protection of the environment ____________________________ 32<br />
• Economical, environmentally friendly washing ________________ 33<br />
2/ DESCRIPTION OF YOUR APPLIANCE<br />
• General presentation of the dishwasher ____________________ 34<br />
• Presentation of the control panel __________________________ 35<br />
3/ INFORMATION<br />
• The water hardness______________________________________ 36<br />
4/ ACTIONS BEFORE FIRST USE<br />
• Measure the water hardness and select the detergent ________ 37<br />
• Hardness table__________________________________________ 37<br />
5/ DETERGENT PRODUCTS AND SETTING THE WATER SOFTENER<br />
• For traditional products __________________________________ 38<br />
• For multi-purpose products ________________________________ 38<br />
6/ LOADING THE REGENERATING SALT __________________________ 40<br />
7/ LOADING THE RINSING PRODUCT ____________________________ 41<br />
8/ YOUR DISHWASHER’S EQUIPMENT<br />
• The lower basket ________________________________________ 42<br />
• The upper basket________________________________________ 43<br />
• The cutlery basket ______________________________________ 44<br />
9/ THE DISHWASHER’S SAFETY SYSTEMS________________________ 45<br />
10/ WASHING PROGRAMMES __________________________________ 46<br />
11/ PROGRAMMING __________________________________________ 48<br />
12/ CLEANING YOUR APPLIANCE<br />
• Cleaning the waste filters ________________________________ 50<br />
13/ IF OPERATING ANOMALIES OCCUR __________________________ 52<br />
14/ AFTER-SALES SERVICE ____________________________________ 57<br />
15/ INDICATIONS FOR THE TESTING LABORATORIES ______________ 58<br />
31
EN 1/ FOR THE USER’S ATTENTION<br />
Important :<br />
Keep this user’s <strong>manual</strong> with your appliance.<br />
If the appliance is sold or transferred to<br />
someone else, ensure that the <strong>manual</strong> is with<br />
it. Please take note of these instructions<br />
before installing and using your appliance.<br />
They have been drawn up for your own and<br />
other people’s safety.<br />
• SAFETY INSTRUCTIONS<br />
• Installation<br />
— When you receive your appliance, unpack it<br />
or have it unpacked immediately. Check that it<br />
has not suffered any damage during transport.<br />
Express any reservations in writing on the<br />
delivery note, of which you keep a copy. Never<br />
connect up a damaged machine. If your appliance<br />
is damaged, please contact your dealer.<br />
— Before proceeding to connect up your<br />
machine, please refer to the instructions in<br />
your Installation Guide.<br />
— Your dishwasher must be kept disconnected<br />
from the mains supply throughout the whole<br />
of the installation process.<br />
— The electrical connection details on your<br />
appliance’s description plate must comply<br />
with those for the mains supply.<br />
— The socket must still be accessible once<br />
your appliance has been installed.<br />
— Do not alter or attempt to alter the appliance’s<br />
characteristics. This could put you at<br />
risk.<br />
— If your installation has to be altered, only<br />
entrust the electrical and plumbing work to a<br />
qualified electrician or plumber respectively.<br />
— Your appliance is designed for normal<br />
domestic use. Do not use it for industrial or<br />
commercial purposes or for any other purpose<br />
than that for which it has been designed.<br />
— The dishwasher’s walls must not be pierced<br />
under any circumstances.<br />
32<br />
• Children’s safety<br />
— This appliance is not intended for use by<br />
young children or infirm persons unless they<br />
have been adequately supervised by a responsible<br />
person to ensure that they can use the<br />
appliance safely.<br />
— This appliance must only be used by adults.<br />
Ensure that children do not touch it and do not<br />
use it as a toy. Ensure that they do not operate<br />
the appliance’s controls.<br />
— Keep young children away from the appliance<br />
when it is operating.<br />
— Detergents contain irritant and abrasive substances.<br />
These products can have caustic<br />
effects on the eyes, the mouth or the throat.<br />
They can be extremely dangerous if ingested.<br />
Avoid any contact with the skin and the eyes.<br />
Ensure that the appliance’s detergent container<br />
is empty at the end of the washing cycle.<br />
— Place detergents out of children’s reach and<br />
do not put any detergent in the machine until<br />
just before you start the washing programme.<br />
— The water in your dishwasher is not drinking<br />
water; this is why children must not go near<br />
the appliance when its door is open.<br />
— Do not let your children play or sit on the<br />
door when it is open.<br />
— Once you have unpacked your appliance,<br />
place the packaging out of children’s reach.<br />
— Keep all the packaging materials (e.g. plastic<br />
bags, polystyrene, etc.) out of children’s reach<br />
because they can be dangerous for children<br />
(ie. risk of suffocation).<br />
• Use<br />
— This appliance is not intended for use by persons<br />
(including children) with reduced physical,<br />
sensory or mental capabilities, or lack of<br />
experience and knowledge, unless they have<br />
been given supervision or instruction concerning<br />
use of the appliance by a person responsible<br />
for their safety.<br />
— When machine is running, do not open door.<br />
This may provoke steam leakage or splattering<br />
of water.
EN 1/ FOR THE USER’S ATTENTION<br />
— Only use products specially designed for your dishwasher (water softening salt, detergent and<br />
rinsing products).<br />
— As far as possible, avoid opening the dishwasher’s door when it is operating, and in particular<br />
during the heating phases, because scalding steam may escape or you may be splashed with hot<br />
water. The machine is fitted<br />
with a safety system that immediately blocks the dishwasher’s operation if the door is opened.<br />
— Never use chemical solvents in your appliance because these could cause an explosion.<br />
— Always close your appliance’s door after loading or removing your items.<br />
— Do not lean or sit on your appliance’s door when it is open.<br />
— You are strongly advised to disconnect the machine after use and turn off the water supply.<br />
— Unplug your machine before carrying out any technical work on it.<br />
— Avoid placing your machine immediately next to a cooking or heating appliance to prevent any<br />
risk of heat damage;<br />
— Do not place any items in your machine, which are not certified as dishwasher safe.<br />
— If you have removed an item before the end of the washing programme, it is important to rinse it<br />
carefully to remove any residual washing products.<br />
— If your appliance breaks down, never attempt to repair it yourself. Any repairs made by non-qualified<br />
personnel can cause significant damage or lack of control.<br />
— The machine complies with applicable safety regulations. Any repairs should be carried out by<br />
qualified technicians. Repairs or changes that do not conform may be dangerous for the users. In<br />
case of replacement, only use original parts.<br />
— If the machine malfunctions due to other causes than those mentioned in this booklet, disconnect<br />
the machine (remove the plug) or break the circuit concerned and contact after-sales service.<br />
• ENVIRONMENTAL PROTECTION<br />
This appliance’s packaging material is recyclable. Help recycle it and protect the environment by<br />
dropping it off in the municipal receptacles provided for this purpose.<br />
Your appliance also contains a great amount of recyclable material. It is marked with this<br />
label to indicate that in countries that are a members of the European Union the used<br />
appliances should not be mixed with other waste. This way, the appliance recycling organised<br />
by your manufacturer will be done under the best possible conditions, in compliance<br />
with European Directive 2002/96/EC on Waste Electrical and Electronic Equipment. Contact your<br />
town hall or your retailer for the used appliance collection points closest to your home.<br />
We thank you doing your part to protect the environment.<br />
• ECONOMICAL, ENVIRONMENTALLY FRIENDLY WASHING<br />
— Remove any food residue from your crockery (bones, pips, etc.)<br />
— Do not pre-wash your items by hand (useless waste of water).<br />
— Utilise your dishwasher’s capabilities to the full for an economical, environmentally friendly wash.<br />
— Always select a washing programme suitable for the crockery type and how dirty they are.<br />
— Avoid overdosing with detergent, regenerating salt and rinsing liquid. Follow the recommendations<br />
in this guide (pages 39-40-41) and the instructions on the product packs.<br />
— Ensure that the water softener is correctly set (see page 38).<br />
33
EN 2/ DESCRIPTION OF YOUR APPLIANCE<br />
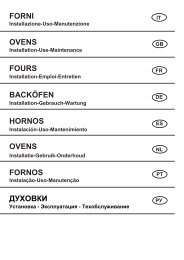
• GENERAL PRESENTATION OF THE DISHWASHER<br />
Fig. 01<br />
A<br />
B<br />
C<br />
D<br />
E<br />
B<br />
C<br />
D<br />
A<br />
Control panel<br />
Upper basket<br />
Washing products dispenser<br />
Anti-blocking gauge wire<br />
Lower sprinkler arm<br />
34<br />
F<br />
G<br />
H<br />
I<br />
J<br />
Regenerating salt tank<br />
Waste filter<br />
Main filter<br />
Rinsing product dispenser<br />
Description plate (After-Sales Ref)<br />
Advice :<br />
This user’s guide is applicable to several models. There may be some slight differences<br />
in the details and the equipment between your appliance and the descriptions provided here.<br />
J<br />
G<br />
H<br />
I<br />
E<br />
F
EN<br />
2/ DESCRIPTION OF YOUR APPLIANCE<br />
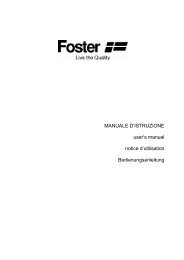
• PRESENTATION OF THE CONTROL PANEL<br />
Fig. 02<br />
A<br />
On/ Off :<br />
On/Off<br />
Press this button to start your dishwasher :<br />
the screen lights up.<br />
B DCS : “Dirt Control System”<br />
This exclusive concept gives a direct access to<br />
3 types of dishes only, but offers a large<br />
choice of programs by adjustment of your<br />
dirty mark level estimation. (See 10 / Washing<br />
programmes).<br />
Choosing a programme: briefly<br />
C<br />
press one button or the other in succession to<br />
select your programme.<br />
D Set :<br />
• Set the water softerner.<br />
(See 5/ Detergent products and setting the<br />
water softener).<br />
- Activate or deactivate use of “regenerating<br />
salt”, “rinsing product” or “4-in-1” (depending<br />
on the water softener setting on the next page).<br />
• Setting the audible signal.<br />
(See 11/ Programming).<br />
35<br />
Delayed programme start<br />
E<br />
Press this button to delay the programme by 1<br />
to 12 hours.<br />
F Start / C : Briefly press this button to<br />
start your programme.<br />
If you make an error, to cancel a selection or<br />
cancel a programme while it is running, hold<br />
down this button for 3 seconds.<br />
The indicator lights :<br />
SSaalltt:<br />
lit; indicates lack of regenerating salt.<br />
Rinsing liquid:<br />
lit; indicates lack of rinsing product.<br />
washing product:<br />
lit; indicates that your dishwasher is set to use<br />
“2, 3 4-in-1” pellets.<br />
In progress<br />
lit; indicates that your programme is running.<br />
End :<br />
lit; indicates that your programme has finished<br />
Advice :<br />
A short audible signal (beep) confirm the button’s selection, except for the “On/Off” button.<br />
(See 10/ Washing Programmes).<br />
Bio Quick<br />
C<br />
A D E F<br />
B<br />
DCS<br />
Dirty<br />
Auto<br />
End<br />
SET<br />
Start / C
EN<br />
3/ INFORMATIONS<br />
Important:<br />
For your dishwasher to provide impeccable<br />
washing and drying results with no<br />
marks, you must set it correctly using the<br />
water softening system, which uses regenerating<br />
salt.<br />
• THE WATER HARDNESS<br />
• Lime: rainwater filtering through the<br />
ground picks up mineral salts; some minerals<br />
are found in solid form commonly termed<br />
lime. This reduces the washing detergent’s<br />
performance, furs up the dishwasher and leaves<br />
white marks on the crockery.<br />
The more lime there is in the water, the more the<br />
water is called “hard”.<br />
Use the most suitable products for the level of<br />
water hardness in your town.<br />
There are several types of products; how to<br />
choose:<br />
36<br />
For impeccable results, preferably<br />
use a combination of traditional products:<br />
① Washing detergent to clean the<br />
crockery perfectly (powder, liquid or standard<br />
tablets).<br />
② Regenerating salt to enable your dishwasher’s<br />
water softener to operate correctly.<br />
③ Rinsing liquid to assist drying and to<br />
eliminate marks from water droplets.<br />
Important:<br />
Never use washing-up liquid.<br />
For ease of use and only in certain<br />
water hardness conditions < 35°F,<br />
multi-purpose products may make the<br />
use of rinsing liquid or salt unnecessary.<br />
• “Two-in-one” products contain<br />
detergents, rinsing liquid or an agent acting<br />
as the salt.<br />
• “Three-in-one” products contain<br />
detergents, rinsing liquid and an agent acting<br />
as the salt.<br />
• “Four-in-one” products also<br />
contain additives that prevent wear on poor<br />
quality glasses and /or prevent the risks of<br />
the stainless steel corroding.<br />
Important:<br />
Follow the instructions for using the<br />
multi-purpose product and the recommendations<br />
on the pack.<br />
NB:<br />
If in any doubt, please contact the<br />
detergent manufacturer if the crockery is<br />
very wet at the end of the programme or if<br />
chalky deposits appear.
EN<br />
4/ ACTIONS BEFORE FIRST USE<br />
• MEASURE THE WATER HARDNESS AND SELECT THE TYPE OF DETER-<br />
GENT: TRADITIONAL OR MULTI-PURPOSE<br />
First of all, in one simple action, you can test the lime content in your water using the testing strip<br />
supplied with your dishwasher or you can contact your local water utility to find out how hard your<br />
water is.<br />
— Turn on the tap and let the water run for a few minutes.<br />
— Fill a glass with water.<br />
— Take the testing strip out of its casing and immerse it for 3 seconds.<br />
— Wait 1 minute, shake the strip and look at the colours to find out how hard your water is.<br />
• HARDNESS TABLE<br />
Testing strip<br />
Hardness 0-10°F 10-25°F 25-40°F 40-55°F 55-70°F > 70°F<br />
Water Soft Slightly hard Slightly hard Hard Hard Very hard<br />
Softening and<br />
use of salt<br />
Optional<br />
Essential if<br />
using traditional<br />
products<br />
Essential if<br />
using traditional<br />
products<br />
Essential Essential Essential<br />
➊<br />
Possible to use<br />
traditional products ➊<br />
or<br />
+<br />
or ➋ multi-purpose products<br />
➋<br />
+<br />
R<br />
37<br />
Use of traditional products<br />
only ➊<br />
or + +<br />
➊ Traditional products:<br />
P : Powder detergent or L: Liquid detergent + S: regenerating Salt + R: Rinsing product<br />
➋ Multi-purpose products: “multi-purpose” tablets.<br />
R
EN<br />
5/ DETERGENT PRODUCTS AND SETTING THE WATER SOFTENER<br />
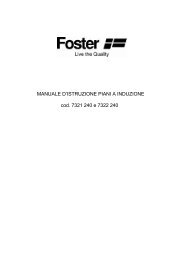
• FOR TRADITIONAL PRODUCTS<br />
• Your appliance must be specially set to use traditional products.<br />
• Proceed as follows to adjust the water softener<br />
on the control panel:<br />
— Access setting mode by holding down the “Set ” button until<br />
you hear a double audible signal (long beep).<br />
— The screen displays “SEt” to indicate that you are in Setting<br />
mode.<br />
— To adjust and alter the setting to suit the water hardness, keep on briefly pressing one of the<br />
keys or the other. The screen shows you the setting H0, H1, H2 etc...<br />
— The setting is validated automatically after 10 seconds if the “Set” button in not pressed again.<br />
Testing strip<br />
Hardness<br />
Traditional<br />
product<br />
Factory setting: H4.<br />
Important:<br />
It is very important to set your water softener correctly.<br />
- If the setting is too low, there is a risk of chalky marks<br />
- If the setting is too high, there is the risk of the glasses becoming cloudy<br />
If you move house, re-adjust the setting on your water softener.<br />
• Traditional tablets<br />
Place tablets that are not multi-purpose in the external compartment (Fig 04)<br />
or, for optimum operation, pull out the distributor’s drawer and lay the tablet there. (Fig 05)<br />
• Powder or liquid in the distributor’s drawer (Fig 03)<br />
Fill at least up to the minimum mark for slightly dirty crockery and up to the maximum mark for dirty<br />
crockery. If the crockery is very dirty or for programmes with pre-wash, we recommend that you<br />
add 5g of detergent (a dessertspoonful) to the tub in accordance with the programmes table.<br />
Important:<br />
Keep these products in a dry place, out of children’s reach.<br />
Only use products specially designed for dishwashers.<br />
Fig. 03<br />
0-10°F 10-18°F 18-25°F 25-40°F 40-55°F 55-70°F > 70°F<br />
0-1mmol/l 1-1.8 mmol/l 1.8-2.5 mmol/l 2.5-4 mmol/l 4-5.5 mmol/l 5.5-7 mmol/l > 7 mmol/l<br />
H0 HI H2 H3 H4 H5 H6<br />
Fig. 04 Fig. 05<br />
38<br />
DCS<br />
Dirty<br />
Bio<br />
Quick<br />
End<br />
SET
EN<br />
5/ DETERGENT PRODUCTS AND SETTING THE WATER SOFTENER<br />
• FOR MULTI-PURPOSE PRODUCTS: OPTION<br />
• Your appliance can be specially set to use multi-purpose if the water hardness is<br />
< 25°F or < 2,5 mmo/l.<br />
Advice:<br />
To provide better coverage of the wide range of multi-purpose products available, your<br />
dishwasher’s “4-in-1” option has two possible settings, accessible via the “Set” button.<br />
“Extra Dry” improves the drying results in the event of reduced performance from the “2-in-1”, “3-in-1”<br />
or “4-in-1” types of multi-purpose product.<br />
“Sparkling Clean” enables you to prioritise the sparkle of your crockery whatever the type of<br />
multi-purpose product used.<br />
• Proceed as follows to adjust the water softener on the control panel:<br />
— Access setting mode by holding down the “Set ” button until<br />
Dirty<br />
you hear a double audible signal (long beep).<br />
DCS<br />
— The screen displays “SEt” to indicate that you are in<br />
Bio Quick<br />
Setting mode.<br />
To use multi-purpose tablets, you must select setting H0 or<br />
End<br />
SET<br />
H I or H2, depending on the water hardness. To do this, keep on briefly pressing one or other of the<br />
keys until you reach the desired setting.<br />
• Proceed to set the option, if necessary<br />
(Light unlit) : deactivates the “4 en 1” option (Light flashing): corresponds to activation of the<br />
“4 en 1” function with the setting for “Sparkling Clean”. This enables you to prioritise a<br />
brilliant finish for your crockery.<br />
(Light permanently lit) : corresponds to activation of the “4 en 1” function with the setting for “Extra Dry”.<br />
“Extra dry” enhances the drying results if performance is reduced.<br />
— The setting is validated automatically after 10 seconds if the “Set” button in not pressed again.<br />
SET<br />
HI<br />
Testing strip<br />
Hardness<br />
Function Deactivated<br />
Multi-purpose products<br />
“Sparkling Clean”<br />
Multi-purpose products<br />
“Extra Dry”<br />
0-10°F 10-18°F 18-25°F<br />
0-1mmol/l 1-1.8 mmol/l 1.8-2.5 mmol/l<br />
Important :<br />
The multi-purpose products setting enables you to deactivate the rinsing and salt warning<br />
lights only on H0 and “4-in-1”.<br />
• Loading multi-purpose tablets<br />
To make loading the detergent easier, the distributor is located on the front of the upper basket; it<br />
is compatible with all the products recommended for your dishwasher.<br />
• Place the tablet in the external compartment (Fig 04 on previous page) or<br />
or, for optimum operation, pull out the distributor’s drawer and lay the tablet there. (Fig 05 on previous<br />
page).<br />
- Close the distributor.<br />
39<br />
H0<br />
H0<br />
H0<br />
HI<br />
HI<br />
HI<br />
H2<br />
H2<br />
H2
EN<br />
6/ LOADING THE REGENERATING SALT<br />
• Loading the regenerating salt<br />
(Fig. 06)<br />
Important :<br />
Only use special dishwasher regenerating<br />
salt. Do not use table salt or any type<br />
of cooking salt: this could damage your<br />
appliance’s water softener.<br />
A<br />
Unscrew and remove the stopper on the<br />
salt tank.<br />
B Fill the tank with regenerating salt specially<br />
designed for dishwashers.<br />
C Use the funnel supplied with your dishwasher.<br />
The first time, top up with water up<br />
to the rim of the tank.<br />
• Regenerating salt indicator :<br />
This illuminates when salt must be added.<br />
After the tank has been filled with regenerating<br />
salt, the indicator light may remain lit until<br />
the salt has dissolved sufficiently, usually after<br />
one cycle (of if the tank has not been filled<br />
completely; for example, when first putting the<br />
machine into service using the sample).<br />
This can be deactivated as indicated in the<br />
paragraph “For multi-purpose products” setting<br />
table.<br />
Important :<br />
If the salt overflows when filling the<br />
tank, to avoid oxidization of the tub it is<br />
advisable to remove the salt crystals or to<br />
run a Soaking programme.<br />
40<br />
Fig. 06<br />
A<br />
B<br />
C<br />
SEL<br />
EAU
EN<br />
7/ LOADING THE RINSING PRODUCT<br />
• The rinsing product (Fig. 07)<br />
Important:<br />
Use a special dishwasher rinsing product;<br />
this will give you dry, sparkling crockery.<br />
A<br />
B Before switching on the appliance, fill<br />
the rinsing product container until the level is<br />
flush with the top of the setting lever.<br />
Adjust, if necessary; the original setting is 2. If<br />
you experience poor drying or residual marks<br />
after a few cycles, increase the setting by turning<br />
the lever (fig 07 C : marking 3 to increase it)<br />
• Checking the level of rinsing liquid<br />
:<br />
This lights when rinsing liquid must be added.<br />
It can be deactivated as shown in the paragraph<br />
“For multi-purpose products” setting<br />
table.<br />
Important:<br />
If any rinsing liquid overflows onto the<br />
door when filling the container, sponge away<br />
the excess to avoid foam forming.<br />
41<br />
Fig. 07<br />
A<br />
B<br />
C<br />
123<br />
123<br />
Adjustment lever
EN<br />
8/ YOUR DISHWASHER’S EQUIPMENT<br />
Very important :<br />
Items not suitable for washing in a dishwasher<br />
- Wooden cutting boards,<br />
- Stainless steel utensils or plastic utensils that are not heat-resistant,<br />
- Copper or pewter items,<br />
- Glued crockery and cutlery,<br />
- Cutlery with wooden, horn or mother-of-pearl handles,<br />
- Antique or hand-painted porcelain.<br />
When purchasing crockery, glasses or cutlery, ensure that it is dishwasher-safe.<br />
• THE LOWER BASKET<br />
Arrange your items so that the water can circulate<br />
freely and spray over all the utensils.<br />
Place large diameter dishes and pans at the<br />
sides.<br />
Do not intersperse, jam together or superimpose<br />
flat plates and concave dishes (Fig. 08).<br />
The folding spikes make it easier to arrange<br />
your large dishes (Fig. 09) (depending on the<br />
model).<br />
Advice :<br />
When you re-insert the lower basket,<br />
ensure that nothing catches on the upper<br />
basket’s gauge wire to avoid blocking the<br />
rotor.<br />
Unloading your items<br />
First of all empty the lower basket to avoid<br />
drips from the upper basket falling onto the<br />
lower basket.<br />
42<br />
Fig. 08<br />
Fig. 09
EN<br />
8/ YOUR DISHWASHER’S EQUIPMENT<br />
• THE UPPER BASKET<br />
This basket is particularly designed to take:<br />
glasses, cups, ramekins, small salad bowls,<br />
bowls, saucers, etc...<br />
Arrange your items methodically to save on<br />
space (arranging glasses, cups or bowls<br />
together, etc.)<br />
You can also arrange cups, ladles, etc. on the<br />
retractable supports (Fig. 10)<br />
Advice :<br />
Position the cavities of glasses, cups<br />
or bowls facing downwards.<br />
• Adjusting the height of the upper<br />
basket (depending on the model)<br />
For large dishes to be loaded in the lower basket,<br />
the upper basket must be set in to high<br />
position. This can be done with the basket<br />
fully loaded (Fig. 11)<br />
① Setting in HIGH POSITION :<br />
Gently raise your basket on each side until it<br />
engages.<br />
② Setting in LOW POSITION :<br />
Raise your basket completely on both sides to<br />
unlock it and then lower it to the low position.<br />
Important :<br />
Check that the two slides are set to the<br />
same height and the basket is horizontal.<br />
43<br />
Fig. 10<br />
Fig. 11<br />
Cutlery basket
EN<br />
8/ YOUR DISHWASHER’S EQUIPMENT<br />
• THE CUTLERY BASKET<br />
The cutlery basket slides to allow for modulable<br />
loading.<br />
It can be placed anywhere in the lower basket.<br />
You can therefore make a variety of loads<br />
depending on the items (Fig. 12).<br />
If your cutlery items or your dishes are too<br />
large, alter the height setting for the upper<br />
basket (if it can be adjusted, depending on the<br />
model).<br />
Movable grills are available for if you wish to<br />
load your cutlery in an orderly manner (Fig.<br />
13).<br />
For optimum washing and drying, use these<br />
separation grills partially or totally.<br />
Point the handles on the cutlery downwards.<br />
Important :<br />
For safety reasons, we recommend<br />
that you place knives with pointed ends with<br />
the point facing downwards in the cutlery<br />
basket (to avoid the risk of an accident).<br />
Long-bladed knives and other sharp kitchen<br />
utensils must be placed flat in the upper basket.<br />
Avoid washing cutlery with horn handles in<br />
your dishwasher.<br />
Separate silverware from other metals using<br />
the separation grill.<br />
44<br />
Fig. 12<br />
Fig. 13
EN<br />
9/ THE DISHWASHER’S SAFETY SYSTEMS<br />
• Anti-overflow system<br />
This system automatically activates the drain pump if the water level in the tub reaches an abnormal<br />
height.<br />
• Anti-leak system<br />
This system interrupts the water supply if a leak is detected under the appliance.<br />
• Total safety<br />
This supply pipe is fitted with a device to cut off the water supply directly at the tap if there is a leak.<br />
• If an anomaly occurs<br />
The “End” light flashes rapidly.<br />
The screen shows the anomaly code: please refer to the table on page 51.<br />
45
EN<br />
10/ WASHING PROGRAMMES<br />
• PROGRAMMES TABLE<br />
Type of items:<br />
- porcelain, pans,<br />
cutlery, glasses,<br />
etc.<br />
Quantity, type and<br />
amount of food<br />
residue.<br />
Programmes<br />
Programme<br />
sequence<br />
As an indication<br />
only:<br />
Duration in min.<br />
Water (l.)<br />
Energy (kWh)<br />
Resistant<br />
Very dirty<br />
large dishes and<br />
pans, with baked on<br />
residue, grease,<br />
cooked cheese,<br />
sauce, etc.<br />
DCS<br />
Intensiv<br />
Hot pre-wash<br />
Washing at 70°C<br />
Rinse<br />
Hot rinse<br />
Drying<br />
120’ - 140’<br />
14,5 - 16,5<br />
1,7 - 1,8<br />
46<br />
Mixed<br />
Normally dirty<br />
Washing at low temperature,<br />
economical and particularly<br />
suitable for<br />
compact –<br />
enzymatic<br />
detergents<br />
Normal **<br />
Pre-wash<br />
Washing at 60°C<br />
Rinse<br />
Hot rinse<br />
Drying<br />
90’ - 120’<br />
14,5 - 16,5<br />
1,5 - 1,6<br />
Glasses<br />
Delicate<br />
For glasses and<br />
delicate crockery<br />
Meaning a smaller<br />
quantity of not very<br />
sticky residues.<br />
Dirty Dirty Dirty<br />
DCS DCS<br />
Washing at 45°C<br />
Rinse<br />
Hot rinse<br />
Drying<br />
60’ - 75’<br />
13,5<br />
0,95<br />
These values refer:<br />
- to normal usage conditions with separated products (detergents, salt, rinsing product).<br />
- only to multifunction product usage conditions<br />
They may vary depending on the load, the water temperature, the softener setting, the presence of rinsing<br />
product and the supply voltage.
EN<br />
10/ WASHING PROGRAMMES<br />
Mixed<br />
Automatic<br />
detection of the<br />
amount of residue.<br />
Optimises the<br />
results and<br />
prioritises<br />
energy savings.<br />
Pre-wash<br />
Hot rinse<br />
Drying<br />
100’ - 130’<br />
14,5 - 16,5<br />
1,4 - 1,6<br />
Mixed<br />
Hot rinse<br />
Drying<br />
160’ - 165’<br />
12 - 14<br />
1,05 - 1,30<br />
47<br />
Mixed<br />
Very short 30-minute<br />
wash<br />
specially designed<br />
for a small amount<br />
of daily items with a<br />
limited amount of<br />
non-greasy residue,<br />
not dried on<br />
Washing at 55/65°C Washing at 50°C Washing at 45°C<br />
Rinse<br />
Recommended programme:<br />
* EN50242<br />
** IEC 436/DIN 44990<br />
Normally dirty<br />
A normal amount of<br />
dried-on and greasy<br />
residue on<br />
everyday items.<br />
Faster, but<br />
consumes more<br />
energy.<br />
Bio<br />
*<br />
Quick<br />
Rinse Rinse<br />
Hot rinse 60°C<br />
Drying<br />
30’<br />
11<br />
0,8<br />
Soak<br />
Mixed<br />
Very short cycle<br />
(with no<br />
detergent) for rinsing<br />
and<br />
re-dampening the<br />
items while<br />
waiting for a wash<br />
expected the following<br />
day or even the<br />
day after<br />
Cold pre-wash<br />
15’<br />
4,5<br />
0,02
EN<br />
Fig. 02<br />
11/ PROGRAMMING<br />
On/Off<br />
Advice :<br />
Consult the Programmes table on the preceding pages to determine the programme you<br />
need for the type of items, the quantity and the amount of food residue.<br />
• Immediate programme start<br />
Press “On/Off” A , to switch on your<br />
appliance and select your programme by<br />
pressing one button .<br />
— When a programme is selected, the associated<br />
light illuminates.<br />
Press “Start/C” F , the “In progress”<br />
light illuminates. Close the door and the programme<br />
starts.<br />
A short audible signal (beep) confirm the<br />
button’s selection, except for the “On/Off”<br />
button.<br />
• Delayed programme start<br />
Delay your programme by 1 to 12 hours by<br />
keeping on briefly pressing, or holding down,<br />
the “Delayed Start” E button, as you prefer.<br />
Confirm by pressing “Start/C”.<br />
The screen counts down the hours until the<br />
programme starts.<br />
48<br />
Programme length<br />
Remaining time<br />
Bio Quick<br />
A B C D E F<br />
DCS<br />
Dirty<br />
Auto<br />
End of programme<br />
Waiting for delayed start<br />
Remaining time<br />
Remaining time for<br />
programme<br />
End of programme<br />
End<br />
SET<br />
Start / C
EN<br />
11/ PROGRAMMING<br />
• Cancelling a programme<br />
Hold down the “Start/C” F button for a few seconds.<br />
• Stopping the appliance<br />
When the programme has finished, press the “On/Off” button A .<br />
• Setting the audible signal<br />
The setting enables you to activate or de-activate the beep at the end of the programme.<br />
— Access the setting by holding down “Set” juntil you hear a double audible signal (long beep). Select<br />
your preference by pressing the “Delayed Start” button E :<br />
- Beep activated : an audible signal is heard and the “End” light flashes. The screen shows BIP.<br />
- Beep de-activated : no audible signal and the “End” light is unlit.<br />
The setting is confirmed automatically after approximately 10 seconds.<br />
• L’OPTION “DCS” DIRT SYSTEM CONTROL B<br />
This option is available for all « Intensiv » « Normal » « Glasses » programs.<br />
Press DCS key to adjust the program according to dirty<br />
mark of your dishes :<br />
- Very dirty (+), or Dirty for “Intensiv”<br />
- Very dirty (+), or Not very dirty (- ) for “Normal”<br />
- Dirty or Not very dirty (- ) for “Glasses” program.<br />
49<br />
DCS<br />
Dirty
EN 12/ CLEANING YOUR APPLIANCE<br />
• CLEANING THE WASTE FILTERS<br />
The filtration system consists of several<br />
elements:<br />
A<br />
- The waste filter.<br />
B<br />
C<br />
- The large main filter.<br />
- The micro filter.<br />
The filters are located in the centre of the tub<br />
and must be washed regularly to obtain optimum<br />
washing results.<br />
• Actions :<br />
➀ Before removing the filters, remove any<br />
waste on the large main filter B with a<br />
sponge so that the waste does not block the<br />
sprinkler arms. Orient the rotor as shown in<br />
the drawing. (Fig. 14)<br />
➁ Loosen the waste filter a quarter of a turn<br />
and then remove it A .<br />
③ Remove the main filter B .<br />
④ Remove the micro filter screen C .<br />
⑤ Carefully clean filters A , B and C<br />
under running water. (Fig. 15)<br />
Reinstallation:<br />
Proceed in reverse order, inserting filters C<br />
and B and then A .<br />
Important :<br />
Remember to lock the waste filter in<br />
A place by pushing it in fully and turning it a<br />
quarter turn.<br />
50<br />
➀<br />
➁<br />
③<br />
④<br />
Fig. 14<br />
⑤<br />
A<br />
Fig. 15<br />
A B C<br />
B<br />
B<br />
A<br />
C<br />
C
EN 12/ CLEANING YOUR APPLIANCE<br />
• Periodically :<br />
Every 3 or 4 months, in order to remove any deposits, run a special maintenance programme, without<br />
any items in the machine, using a commercially available special dishwasher cleaning product.<br />
Important :<br />
Keep this product out of children’s reach..<br />
• Prolonged stoppage<br />
Clean your dishwasher completely and then unplug it from the electricity supply and close the water<br />
tap. Protect your machine from potential frosts<br />
Advice :<br />
Do not use abrasive powders, metal sponges and alcohol-based or thinner-based products.<br />
Use a cloth or a sponge.<br />
If you are moving house, run a soaking programme first of all, in order to avoid any water escaping.<br />
• Cleaning and upkeep of your appliance<br />
To keep your appliance in good working order, we recommend that you use Clearit household products.<br />
Professional expertise for the general public<br />
Clearit offers you professional products and adapted solutions for the daily upkeep of your household<br />
and kitchen appliances.<br />
You may find them in conventional retail outlets, along with a complete line of by-products and<br />
consumables.<br />
51
EN 13/ IF OPERATING ANOMALIES OCCUR<br />
• SUMMARY OF THE FAULTS<br />
d01: water supply fault (tap) d07: overflow / anti-leak fault<br />
d02: draining fault d08: sprinkling distribution fault<br />
d03: heating fault d11: pressure sensor fault<br />
d04: temperature fault d12: filling fault (water inlet detection system)<br />
d05: fault – motor under load d13: overheating fault<br />
d06: fault - motor overload<br />
• BEFORE CALLING FOR SERVICE<br />
d14 : installation fault : (incorrect drainage<br />
connection or inadequate flow rate and tap).<br />
Tip:<br />
If one of the above faults occurs and you need to call a repair man, remember to tell him<br />
the message displayed (d01, d02..) as this information will help him.<br />
Problem Possible Causes What to do?<br />
The door falls heavily when - Door springs not tensioned - Tighten the two tensioning<br />
opened (integratable model) enough to compensate for the screws accessible in the bot-<br />
weight of the panel.<br />
tom section above the front<br />
feet.<br />
The door does not stay horizontal<br />
when open or returns too quickly<br />
(integratable model)<br />
- Door springs tensioned too<br />
much.<br />
- No wooden panel.<br />
The door catches when closing - Appliance not stable<br />
- Door not centred on the tub<br />
The upper basket does not stay - Poor manipulation (the basket<br />
in the high position<br />
is being pulled upwards too<br />
quickly)<br />
Small leak around or under the - Leak from the tap.<br />
appliance (move the appliance<br />
to locate the leak)<br />
- Leak from the appliance.<br />
(Cf. table fault d07).<br />
Small leak at the door - Appliance not stable or not level<br />
- Door not centred on the tub.<br />
52<br />
- Loosen the two tensioning<br />
screws accessible in the bottom<br />
section above the front<br />
feet.<br />
- Fit a temporary wooden panel<br />
on the appliance and adjust<br />
the springs.<br />
- Adjust the feet.<br />
- Re-centre by adjusting the<br />
rear feet.<br />
- Act more progressively (see<br />
instructions), one side and<br />
then the other.<br />
- Check that a seal is fitted and<br />
retighten the nut.<br />
- Close the water tap and call a<br />
technician.<br />
- Adjust the feet.<br />
- Re-centre by adjusting the rear<br />
feet.
EN 13/ IF OPERATING ANOMALIES OCCUR<br />
• THE INDICATOR LIGHTS<br />
Problem Possible Causes What to do ?<br />
The salt light does not go out - No salt or an insufficient quan-<br />
The lights all light up one after<br />
the other<br />
A light flashes and the<br />
programme does not start<br />
tity of salt in the tank to trigger<br />
the float.<br />
- Wrong programme.<br />
- Programme selector wrongly<br />
positioned (between two notches)<br />
• RELATING TO PROGRAMMING, DISPLAY<br />
53<br />
- Refill the tank and wait for the<br />
cycle to end. If you have soft<br />
water that requires no salt, the<br />
light is constantly lit.<br />
- Cancel the current programming<br />
by holding down the Start<br />
button for 3 seconds and then<br />
re-programme.<br />
- Reposition the selector on a<br />
programme.<br />
Problem Possible Causes What to do ?<br />
The cycle lasts too long - lThe energy-saving programmes<br />
last longer because the<br />
agitation and drying times are<br />
longer to compensate for the<br />
lower washing and drying temperatures<br />
The appliance trips the circuit - Insufficient amperage to sup-<br />
breaker<br />
ply all the appliances being<br />
operated simultaneously.<br />
- Internal fault in the appliance.<br />
- Use these programmes preferably<br />
at night when it is not so<br />
important how long the programme<br />
lasts or when it ends.<br />
- Check the socket’s amperage<br />
(10A minimum) and the<br />
meter’s capacity.<br />
- Call a technician.<br />
The appliance does not start - No mains power to the socket. - Check the socket and the fuse<br />
- Tap closed. (Cf. table fault d01). - Check the tap is open.<br />
- Check the hose line is OK.<br />
- Selection error or programme<br />
lock.<br />
- Cancel by holding down Start<br />
for 3” and re-programme.<br />
- Start button pressed too long<br />
(>2”).<br />
- Just press Start briefly to start<br />
the programme.<br />
- Appliance in Safety mode (antileak).(Cf.<br />
table fault d07). - Call a technician.
EN 13/ IF OPERATING ANOMALIES OCCUR<br />
Problem Possible Causes What to do?<br />
The appliance will not restart - Door opened during a<br />
washing cycle.<br />
The appliance does not drain<br />
(Cf. table fault d02).<br />
The appliance will no longer<br />
function (see table, fault 14).<br />
• POOR WASHING RESULTS<br />
Problem Possible Causes What to do?<br />
Food traces and deposits in the<br />
glasses<br />
- The cover has not been removed<br />
from the sink’s U-bend.<br />
- Drain hose kinked.<br />
- Filters totally blocked.<br />
- Pump blocked.<br />
- installation of non-compliant drainage<br />
system: drainage too low<br />
down or pipe pushed too far in.<br />
- siphoning: the appliance is<br />
emptying as the same time as<br />
it is filling up.<br />
- Items poorly arranged (masked<br />
by another larger item or<br />
situated underneath it, items<br />
nested or jammed together).<br />
- Upper spray arm blocked by<br />
cutlery or a dish etc.<br />
- Filter poorly locked and lifting<br />
during washing.<br />
- Micro filter screen clogged.<br />
- One or more holes in the spray<br />
arm blocked.<br />
Traces of grease - Detergent dose too low; inefficient<br />
detergent; stale product.<br />
- Inappropriate programme<br />
(temperature too low; duration<br />
too short).<br />
54<br />
- Wait for the time delay to end<br />
(controlled internally by the<br />
appliance).<br />
- Remove the cover.<br />
- Check the drain hose line<br />
behind the machine is OK.<br />
- Remove and clean the filters<br />
and the drain.<br />
- Initiate a Soaking programme<br />
If the fault persists, call a tech-<br />
nician.<br />
- adhere to the drainage tube<br />
installation dimensions.<br />
- Arrange the items properly.<br />
Use the most appropriate<br />
areas and accessories for each<br />
type of item (see instructions).<br />
- Check that the spray arm<br />
rotates freely. Set the basket in<br />
the high position if necessary.<br />
- Check the filter’s facing and that<br />
the filter is locked in place (push<br />
it in fully, turning it to the right).<br />
- Remove all the filters and clean<br />
them (in warm water), including<br />
the micro filter’s screen (once<br />
a month).<br />
- Remove the spray arm by turning<br />
the lever a quarter of a turn<br />
and clean it under the tap (do<br />
not use any tool that could<br />
damage the holes). Re-install<br />
the spray arm.<br />
- Increase the dose; try another<br />
detergent.<br />
- Select a programme with a<br />
higher temperature.
EN 13/ IF OPERATING ANOMALIES OCCUR<br />
• POOR WASHING RESULTS...<br />
White marks<br />
(identify what type)<br />
White marks<br />
(identify what type)<br />
Coloured marks (tea, wine, coffee)<br />
Streaks or dried droplets on<br />
glasses<br />
Dried-on marks on glasses,<br />
dullness<br />
- Chalky film (removable with<br />
vinegar).<br />
- Traces of salt (items have a<br />
salty taste).<br />
- Glass cloudy because water<br />
too soft (cannot be removed).<br />
- Items poorly arranged<br />
- Detergent dose too low ; inefficient<br />
detergent<br />
- Programme temperature too<br />
low.<br />
- If you use a multifunction<br />
product.<br />
- Lack or insufficient amount of<br />
rinsing product.<br />
- Rinsing product out-of-date or<br />
inefficient.<br />
- If you use a multifunction<br />
product.<br />
- If you use a multifunction<br />
product.<br />
55<br />
- Check that there is salt in the<br />
tank (light unlit = OK).<br />
- Check the water hardness at<br />
the tap and that the water softener<br />
is set correctly. Adjust it<br />
to a higher level if necessary.<br />
- Water too hard for using a “4in-1”<br />
detergent without the<br />
addition of salt.<br />
- Check that the stopper on the<br />
salt container is closed correctly.<br />
- Check the water hardness at<br />
the tap and that the water softener<br />
is set correctly. Some<br />
detergents in pellet form are<br />
more aggressive to glasses<br />
and decorations (change the<br />
product and use a protective<br />
product if necessary).<br />
- Turn the cavities in the items<br />
towards the jets.<br />
- Increase the dose; try another<br />
detergent.<br />
- Select a more suitable programme<br />
with a higher temperature.<br />
- Use the “4-in-1” option.<br />
(depending on the model).<br />
- Check the indicator light and<br />
fill the tank completely. Adjust<br />
the dispensing unit to a higher<br />
position if necessary.<br />
- Use a recent product (a good<br />
product dilutes easily and<br />
foams in cold water).<br />
- Use the “4-in-1” option with a<br />
setting prioritizing drying<br />
(parametering from the menu -<br />
depending on the model).<br />
- Use the “4-in-1” option with a<br />
setting prioritizing brilliance<br />
(parametering from the menu -<br />
depending on the model).
EN 13/ IF OPERATING ANOMALIES OCCUR<br />
• POOR OPERATION<br />
Constant filling<br />
Problem Possible Causes What to do ?<br />
A lot of waste on the large filter<br />
at the end of the cycle.<br />
- (Cf. table fault d12). Drain hole<br />
situated too low for the<br />
appliance.<br />
- The filters and drain outlets are<br />
blocked with too much<br />
residue.<br />
Traces of rust on stainless steel - Quality of the stainless steel<br />
not dishwasher-safe (knives in<br />
particular)<br />
• POOR DRYING RESULTS<br />
56<br />
- Drain wand fallen on the floor.<br />
- Remove and clean the filters<br />
and the bottom of the drain<br />
outlets. Remove large residue<br />
from the plates before putting<br />
them in the machine.<br />
- Use “special dishwasher-safe”<br />
cutlery.<br />
- Check that the stopper on the<br />
salt container is closed correctly.<br />
Problem Possible Causes What to do?<br />
A lot of droplets on the glasses. - Lack or insufficient amount of<br />
rinsing product.<br />
- The dose has not been distributed.<br />
- Positioning of the items.<br />
Droplets on plastic items, Tefal - These insulating items have a<br />
coatings, etc.<br />
low calorific mass.<br />
Poorer drying on rapid<br />
programmes<br />
- On rapid programmes, the drying<br />
temperature and drying period are<br />
reduced to cut down the duration<br />
of the cycle as much as possible.<br />
Condensation on the wall of the<br />
inside door or the tub.<br />
- Condensation may form on the<br />
walls, particularly after the<br />
appliance has cooled down<br />
(sound insulation increases the<br />
phenomenon)<br />
- Check the indicator light and<br />
fill the tank completely.<br />
- If the tank is not empty after<br />
approximately 60 washings,<br />
call a technician.<br />
- To alleviate the phenomenon,<br />
arrange the items to restrict<br />
water retention as much as<br />
possible. Leave the door ajar<br />
for a few minutes, if possible<br />
- Arrange them preferably in the<br />
upper basket.<br />
- Select a rapid programme<br />
carefully or leave the door ajar<br />
for a few minutes.
EN 14/ AFTER-SALES SERVICE<br />
•• INTERVENTION WORK<br />
Any intervention work on your appliance must<br />
be performed by a qualified professional<br />
approved by the manufacturer. When you call,<br />
please mention the full reference for your<br />
appliance (model, type and serial number).<br />
This information is shown on the description<br />
plate (see Fig. 16)<br />
ORIGINAL PARTS<br />
When maintenance is being carried out, ask<br />
for only certified original spare parts to be<br />
used.<br />
57<br />
Fig. 16
INDICATIONS FOR THE TESTING LABORATORIES<br />
• Details common to all models<br />
— Washing capacity - - - - - - - - - - - - - - - - - - - - - - - - - - - - - - - - - - - - 13 standard place settings<br />
— Arrangement of the items - - - - - - - - - - - - - - - - - - - - - - - - - - - - - Figs. A-B-C; see above and next page<br />
— Loading as per the indications on next page, without side shelves<br />
— Setting for upper basket - - - - - - - - - - - - - - - - - - - - - - - - - - - - - - Low position<br />
— Setting for rinsing product distributor - - - - - - - - - - - - - - - - - - - 3<br />
— Adjusting the water softener - - - - - - - - - - - - - - - - - - - - - - - - - - - 1.8 - 2.5 mmol/l<br />
(See § 5 “detergent products and adjusting the water softener” for details).<br />
For detailed information on the comparison tests regarding the level of soiling, the types of<br />
crockery and cutlery, etc., contact the equipment manufacturer before commencing the tests.<br />
• Tests to Standard EN 50242<br />
— Recommended programme - - - - - - - - - - - - - - - - - - - - - - - - - - - see Programmes table<br />
— Dosage of detergent - - - - - - - - - - - - - - - - - - - - - - - - - - - - - - - - - 32.5 g of detergent B<br />
• Tests according to the mixed IEC 436/DIN 44990 method<br />
— Recommended programme - - - - - - - - - - - - - - - - - - - - - - - - - - - see Programmes table<br />
— Dosage of detergent - - - - - - - - - - - - - - - - - - - - - - - - - - - - - - - - - 5 + 27.5 g of detergent C<br />
NB: When conducting tests using a multi-function tablet: Setting for hardness < 2.5 mmol/l<br />
(See § 5 for details)<br />
— Check that the water softener is correctly set for the water hardness<br />
— Pull out the detergent distribution drawer and place the tablet in the interior compartment.<br />
• Built in or full built in model: Measuring the noise level in accordance with<br />
Standard EN60704-2-3<br />
— Align the plinth on the housing unit with the door panel.<br />
B 7<br />
2<br />
8 8 1<br />
1<br />
2<br />
2<br />
8 8<br />
1<br />
1<br />
1 2 3 4 5 6 7 8<br />
2<br />
2<br />
8 8<br />
1<br />
1<br />
NOK NOK OK<br />
58<br />
333 3333333<br />
3 3 3<br />
1 22<br />
222<br />
2<br />
8<br />
1<br />
8 8 8<br />
6<br />
8 8<br />
1<br />
111<br />
4 444444 444<br />
8<br />
6 5 2 2 1<br />
444
INDICATIONS FOR THE TESTING LABORATORIES<br />
A<br />
A<br />
C<br />
e: egg/oeuf m: meat/viande s: spinach/épinards<br />
s<br />
e<br />
e<br />
59<br />
m<br />
s<br />
s<br />
m<br />
e e<br />
mmmmmmeeeeee ee /<br />
sssss s<br />
s<br />
e<br />
e<br />
/<br />
m
.<br />
<strong>Foster</strong> spa<br />
42041 Brescello (RE) - Italy<br />
tel. +39.0522.687425 - tel. Servizio Assistenza +39.0522.684450<br />
fax +39.0522.686019 - fax Servizio Ricambi +39.0522.962166<br />
e-mail: service@fosterspa.com<br />
www.fosterspa.com