OM, Gardena, Watering Controller, Art 01283-20, Art 01284-20 ...
OM, Gardena, Watering Controller, Art 01283-20, Art 01284-20 ...
OM, Gardena, Watering Controller, Art 01283-20, Art 01284-20 ...

You also want an ePaper? Increase the reach of your titles
YUMPU automatically turns print PDFs into web optimized ePapers that Google loves.
®<br />
GARDENA<br />
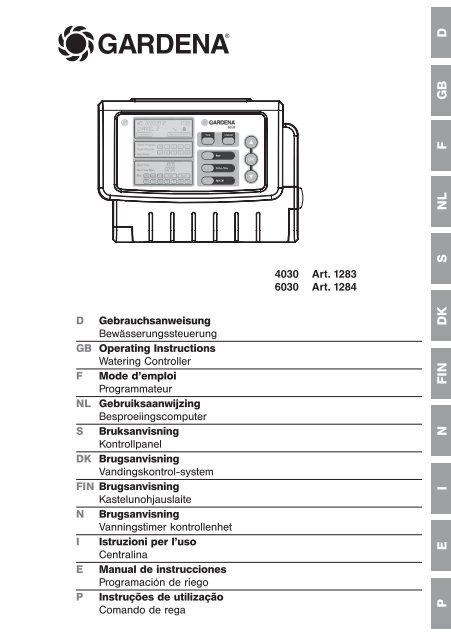
D Gebrauchsanweisung<br />
Bewässerungssteuerung<br />
GB Operating Instructions<br />
<strong>Watering</strong> <strong>Controller</strong><br />
F Mode d’emploi<br />
Programmateur<br />
NL Gebruiksaanwijzing<br />
Besproeiingscomputer<br />
S Bruksanvisning<br />
Kontrollpanel<br />
DK Brugsanvisning<br />
Vandingskontrol-system<br />
FIN Brugsanvisning<br />
Kastelunohjauslaite<br />
N Brugsanvisning<br />
Vanningstimer kontrollenhet<br />
I Istruzioni per l’uso<br />
Centralina<br />
E Manual de instrucciones<br />
Programación de riego<br />
P Instruções de utilização<br />
Comando de rega<br />
4030 <strong>Art</strong>. 1283<br />
6030 <strong>Art</strong>. 1284<br />
D<br />
GB<br />
F<br />
NL<br />
S<br />
DK<br />
FIN<br />
N<br />
I<br />
E<br />
P
GARDENA <strong>Watering</strong> <strong>Controller</strong> 4030 / 6030<br />
A For<br />
Contents<br />
Proper use<br />
Translation of the original instructions from German.<br />
Please read these operating instructions carefully and observe the information they<br />
contain. Use these operating instructions to familiarise yourself with the product, the<br />
proper use and the safety instructions.<br />
safety reasons, children and young people under the age of 16, as well as people<br />
not familiar with these operating instructions, should not use this product.<br />
Persons with reduced physical or mental abilities may use the product only if they are<br />
supervised or instructed by a responsible person.<br />
v Please keep these instructions in a safe place.<br />
1. Where to Use your GARDENA <strong>Watering</strong> <strong>Controller</strong> . . . . . . . . . . 15<br />
2. Safety Instructions . . . . . . . . . . . . . . . . . . . . . . . . . . . . . . . . . . . . . . . . . . . . . 16<br />
3. Function . . . . . . . . . . . . . . . . . . . . . . . . . . . . . . . . . . . . . . . . . . . . . . . . . . . . . . . 16<br />
4. Initial Operation . . . . . . . . . . . . . . . . . . . . . . . . . . . . . . . . . . . . . . . . . . . . . . . . 17<br />
5. Operation . . . . . . . . . . . . . . . . . . . . . . . . . . . . . . . . . . . . . . . . . . . . . . . . . . . . . . 19<br />
6. Putting Out of Operation . . . . . . . . . . . . . . . . . . . . . . . . . . . . . . . . . . . . . . 25<br />
7. Trouble-Shooting . . . . . . . . . . . . . . . . . . . . . . . . . . . . . . . . . . . . . . . . . . . . . . 25<br />
8. Technical Data . . . . . . . . . . . . . . . . . . . . . . . . . . . . . . . . . . . . . . . . . . . . . . . . . 26<br />
9. Service / Warranty . . . . . . . . . . . . . . . . . . . . . . . . . . . . . . . . . . . . . . . . . . . . . 26<br />
1. Where to Use Your GARDENA <strong>Watering</strong> <strong>Controller</strong><br />
The <strong>Watering</strong> <strong>Controller</strong> is suitable for use indoors and in outdoor<br />
locations protected against rain.<br />
This <strong>Watering</strong> <strong>Controller</strong> is part of a garden irrigation system.<br />
Recommended accessories: the watering valve (24 V) <strong>Art</strong>. 1278,<br />
the valve boxes <strong>Art</strong>. 1254 / 1255 and the connection cable<br />
<strong>Art</strong>. 1280 and the cable clips <strong>Art</strong>. 1282.<br />
These products allow you to set up fully automatic irrigation systems,<br />
which can be designed to cater for varying water requirements<br />
of different plant areas and ensure that the entire system<br />
functions correctly in case of insufficient water supply.<br />
Compliance with the operating instructions provided by GARDENA<br />
is a prerequisite for proper use of the <strong>Watering</strong> <strong>Controller</strong>.<br />
15<br />
GB
GB<br />
Please note<br />
3. Function<br />
16<br />
2. Safety Instructions<br />
<strong>Watering</strong> <strong>Controller</strong>:<br />
The <strong>Watering</strong> <strong>Controller</strong> must only<br />
be operated with the 24-V (AC)<br />
power supply unit provided.<br />
v Protect the 24-V (AC) power supply unit<br />
from moisture when connected.<br />
The <strong>Watering</strong> <strong>Controller</strong> is not splash proof.<br />
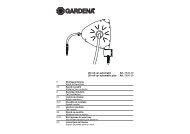
Keypad:<br />
3<br />
4<br />
5<br />
1 2<br />
7<br />
<strong>Watering</strong> <strong>Controller</strong> display:<br />
8<br />
9<br />
B<br />
E<br />
F<br />
6<br />
0<br />
A<br />
C<br />
D<br />
G<br />
The <strong>Watering</strong> <strong>Controller</strong> must be used only for controlling<br />
commercially available 24 V (AC) valves. The electric power<br />
consumption per channel must not exceed 600 mA (a<br />
GARDENA Irrigation Valve <strong>Art</strong>. 1278 requires 150 mA).<br />
In order not to lose any data in the event of<br />
power failure, an alkaline 9 V block battery<br />
(type 6LR61) must be used for buffering data.<br />
We recommend using batteries manufactured<br />
by Duracell and Energizer (do not use<br />
rechargeable batteries).<br />
1 Time key: Selects date and time.<br />
2 Channel key: Calls the channels.<br />
3 Man. key: Manually opens / closes individual<br />
channels.<br />
4 % Run-Time key: Calls up the % run-time function.<br />
5 Rain Off key: Selects a watering break.<br />
6 ▲-▼ keys: Changes data already entered.<br />
(If you press and hold down the ▲-▼<br />
keys you can change data in the quick<br />
run-through mode.)<br />
7 OK key: Confirms the settings you selected<br />
using the ▲-▼ keys.<br />
8 Date and time display:<br />
Indicates the day of the week, date and current time.<br />
9 Status display:<br />
Indicates the current programming or watering status.<br />
0 % Run-Time display:<br />
Sets the duration of watering between 10-<strong>20</strong>0% for all<br />
channels.<br />
A Key lock:<br />
Protects against unintentional changing of settings (the reset<br />
function cannot be locked).<br />
B Battery status display:<br />
When the Low Battery display flashes, the battery is almost<br />
empty and has to be replaced.<br />
When the Low Battery display appears, the battery is empty<br />
or no battery has been inserted.<br />
The Low Battery display is re-set once the new battery has<br />
been inserted.
8<br />
9<br />
B<br />
E<br />
F<br />
4. Initial Operation<br />
Connecting your <strong>Watering</strong><br />
<strong>Controller</strong>:<br />
2<br />
zS<br />
1<br />
4<br />
0<br />
A<br />
C<br />
D<br />
G<br />
5<br />
zL<br />
3<br />
C Sensor display:<br />
If the sensor is inserted, the DRY or WET status report<br />
appears. When WET is displayed the watering programs<br />
are disabled.<br />
D Program / channel display:<br />
Indicates which program of the particular channel is being<br />
programmed. If a channel is currently open, the frame of the<br />
opened watering channel flashes.<br />
E Display of watering times:<br />
Indicates the start time and duration of watering.<br />
F Manual watering display:<br />
When manual watering is selected, Run Time Man. is<br />
displayed.<br />
G <strong>Watering</strong> cycles / watering days:<br />
To display the watering cycles (24 h every day, 2nd every<br />
2nd day, 3rd every 3rd day, Odd every odd day Even every<br />
even day) or the programmed watering days (Mo, Tu, We, Th,<br />
Fr, Sa, Su).<br />
ATTENTION !<br />
The <strong>Watering</strong> <strong>Controller</strong> is ruined if the power<br />
A supply unit is connected to terminals other than<br />
the 24 V AC terminals!<br />
V Connect the power supply unit to the 24 V AC<br />
terminals only!<br />
Before programming your <strong>Watering</strong> <strong>Controller</strong>, install a 9-V<br />
battery to prevent loss of data if a power failure occurs.<br />
1. Release snap lock 1 and open cover 2.<br />
2. Connect the cable of the power supply unit to the 24 V AC<br />
terminals.<br />
3. Connect the cables for the valves (e.g. 7-wire GARDENA<br />
Connection Cable <strong>Art</strong>. 1280 for up to 6 valves) to the<br />
terminals for the channels (CHANNELS 1…) and C<br />
(see also “Connecting the valves” ).<br />
4. If required, connect the sensor (e.g. GARDENA Moisture Sensor<br />
<strong>Art</strong>. 1188) using the accompanying adapter cable zS and connect<br />
the latter to the SENSOR terminals.<br />
5. If necessary (e.g. <strong>Art</strong>. 1273) connect the cable for the master<br />
channel to the PUMP terminals (see “Master channel” ).<br />
6. Remove the empty battery as necessary: Depress the clip zL<br />
(the battery is released) and remove the empty battery.<br />
7. Attach the battery 3 to the battery clip 4 and insert it into the<br />
battery compartment 5.<br />
8. Close cover 2 and let snap lock 1 engage.<br />
9. Plug the mains plug of the 24 V (AC) power supply unit into a<br />
mains socket.<br />
After this it is necessary to set the date and time<br />
(see 5. Operation “Setting the date and time”).<br />
17<br />
GB
GB<br />
Master Channel:<br />
Connecting the valves:<br />
18<br />
The master channel is a channel that can be operated at the same<br />
time as other channels. This is important, for example, if you want<br />
to use a pump to supply your irrigation system with water and if<br />
the pump should always be activated each time an irrigation valve<br />
is activated.<br />
The pump can be operated, for example, using the GARDENA<br />
Pump Control <strong>Art</strong>. 1273 that is connected to the master channel.<br />
The example shows the connection of 2 valves <strong>Art</strong>. 1278 in the<br />
Valve Box <strong>Art</strong>. 1255 to the <strong>Watering</strong> <strong>Controller</strong> 4030 / 6030.<br />
As the output of the <strong>Watering</strong> <strong>Controller</strong> is 24 V AC (alternating<br />
current) for switching the valves, it is does not matter which of<br />
the two cables of a valve is inserted into C.<br />
Labelling the valves:<br />
1 Label the valves (1-6), so that the channels (CHANNELS 1,<br />
CHANNELS 2, …) of the <strong>Watering</strong> <strong>Controller</strong> can be clearly<br />
assigned to the valves.<br />
Connecting the valves to the Valve Box:<br />
2 Connect one cable of the valve V1 to the cable terminal 1 of<br />
the valve box.<br />
3 Connect the other cable of the valve V1 to a cable terminal C<br />
of the valve box (All 4 cable terminals C are interconnected<br />
and equivalent to one another).<br />
4 Connect one cable of the valve V2 to the cable terminal 2 of<br />
the valve box.<br />
5 Connect the other cable of the valve V2 to a cable terminal C<br />
of the valve box.<br />
Other valves can be connected similarly to V1 and V2.<br />
Connecting the <strong>Watering</strong> <strong>Controller</strong> to the Valve Box:<br />
6 Connect a cable terminal C of the <strong>Watering</strong> <strong>Controller</strong> to a<br />
cable terminal C of the valve box. Both cable clips C are<br />
connected to each other and equivalent.<br />
7 Connect the cable terminal of channel 1 CHANNELS 1 to<br />
the cable terminal 1 of the valve box.<br />
8 Connect the cable terminal of channel 2 CHANNELS 2 to<br />
the cable terminal 2 of the valve box.<br />
Other channels can be connected similarly to CHANNELS 1<br />
and CHANNELS 2.<br />
Cable cross-section of the connection cable:<br />
The maximum permissible distance between the <strong>Watering</strong><br />
<strong>Controller</strong> and the valve depends on the cross-section of the<br />
connection cable. For a distance of 30 m, the cross section is<br />
0.5 mm 2 and 0.75 mm 2 for a distance of 45 m. No more than<br />
3 valves must be in operation at the same time.<br />
The GARDENA connection cable <strong>Art</strong>. 1280 is 0.5 mm 2 in size<br />
and is 15 m long. Up to 6 valves can be connected using this<br />
cable. The connection cable can be connected so that it is<br />
watertight using the cable clip <strong>Art</strong>. 1282.
Wall-mounting the <strong>Watering</strong><br />
<strong>Controller</strong>:<br />
5. Operation<br />
Setting the date and time:<br />
1.<br />
2.<br />
3.<br />
4.<br />
5.<br />
6.<br />
6<br />
6<br />
7<br />
6<br />
The two screws (not supplied) for attaching the <strong>Watering</strong><br />
<strong>Controller</strong> have to be screwed into place 80 mm apart and the<br />
screw head diameter must not exceed 8 mm.<br />
1. Screw the screws 6 into the wall 80 mm apart.<br />
2. Attach the <strong>Watering</strong> <strong>Controller</strong>.<br />
3. Release snap lock 1 and open cover 2 (see “Connecting<br />
your <strong>Watering</strong> <strong>Controller</strong>” ) and mark hole for screw 6 of the<br />
elongated hole 7.<br />
4. Screw the screw 6 into the elongated hole 7 for fixation.<br />
5. Close cover 2 and let snap lock 1 engage.<br />
5.1 Basic Programming<br />
Date and Time (Time Key)<br />
You can end the programming mode at any time by pressing the<br />
Time key.<br />
You must set the date and time before you can set the watering<br />
programs. The day of the week is selected automatically using<br />
the date. When the Time key is pressed, all the valves are closed<br />
as a precaution.<br />
1. Plug in the power supply unit – or – press the Time key.<br />
YEAR and date-year flash in the display.<br />
2. Select the date-year using the ▲-▼ keys (e.g. <strong>20</strong>10) and<br />
confirm by pressing the OK key.<br />
MONTH and date-month flash.<br />
3. Select the date-month using the ▲-▼ keys (e.g. 05) and<br />
confirm by pressing the OK key.<br />
Day and date-day flash.<br />
4. Select the date-day using the ▲-▼ keys (e.g. 23) and<br />
confirm by pressing the OK key.<br />
TIME and time-hours flash.<br />
5. Select the time-hours using the ▲-▼ keys (e.g. 12 hours) and<br />
confirm by pressing the OK key.<br />
TIME and time-minutes flash.<br />
6. Select the time-minutes using the ▲-▼ keys (e.g. 30 minutes)<br />
and confirm by pressing the OK key.<br />
The date and time have been set and the main level is displayed.<br />
19<br />
GB
GB<br />
Ending the programming<br />
mode prematurely:<br />
Setting the<br />
watering programs:<br />
1.<br />
2.<br />
3.<br />
4.<br />
5.<br />
6.<br />
<strong>20</strong><br />
<strong>Watering</strong> Programs (Channel Key)<br />
Prerequisite: The date and time have been set.<br />
To give you a better overview, we recommend that before starting<br />
to enter the watering data you enter the data for your valves into<br />
the watering plan in the appendix of these operating instructions.<br />
You can save 3 watering programs for each channel (a maximum<br />
of 3 programs x 4 (<strong>Art</strong>. 1283) / 6 (<strong>Art</strong>. 1284) channels = 12 (1283) /<br />
18 (1284) programs).<br />
You can exit the programming mode prematurely at any time.<br />
v Press the Channel key twice.<br />
The main level is displayed.<br />
PLEASE NOTE !<br />
If two programs overlap on one channel, this results in<br />
the total watering duration being less than planned.<br />
If two programs overlap on different channels, the water<br />
pressure may drop to an extent such that watering is<br />
inadequate or the pop-up sprinklers fail to extend.<br />
V Make sure that the watering times of the programs do<br />
not overlap.<br />
Selecting the channel and program memory location:<br />
1. Press the Channel key.<br />
SELECT CHANNEL and the channel flash.<br />
You can end the programming mode at any time by pressing the<br />
Channel key.<br />
2. Select the channel using the ▲-▼ keys (e.g. channel 2) and<br />
confirm by pressing the OK key.<br />
Channel appears on the display (e.g. 2) and<br />
Select Program and the program memory location flash.<br />
3. Select the program memory location using the ▲-▼ keys<br />
(e.g. program memory location 3) and confirm by pressing<br />
the OK key.<br />
Start Time and the hours for the watering start time flash.<br />
Setting the watering start time:<br />
4. Select the hours for the watering start time using the ▲-▼ keys<br />
(e.g. 16 ) and confirm by pressing the OK key.<br />
Start Time and the minutes for the watering start time flash.<br />
5. Select the minutes for the watering start time using the ▲-▼<br />
keys (e.g. 30 ) and confirm by pressing the OK key.<br />
Run Time and the hours for watering duration flash.<br />
Setting the watering duration:<br />
(This always corresponds to 100% run-time)<br />
6. Select the hours for watering duration using the ▲-▼ keys (e.g.<br />
1 hour) and confirm by pressing the OK key.<br />
Run Time and the minutes for watering duration flash.
7.<br />
8a)<br />
8b)<br />
10.<br />
Changing an existing<br />
watering program:<br />
7. Select the minutes for watering duration using the ▲-▼ keys<br />
(e.g. <strong>20</strong> minutes) and confirm by pressing the OK key.<br />
24h flashes.<br />
Setting the watering cycle / watering days:<br />
(a) <strong>Watering</strong> cycle:<br />
<strong>Watering</strong> options are every 24 hours “24h”, every second day<br />
“2nd”, every third day “3rd”, every “Odd” day odd or every<br />
even day “Even”.<br />
(b) <strong>Watering</strong> days:<br />
Every day Mo, Tu, We, Th, Fr, Sa, Su can be individually set.<br />
8. (a) <strong>Watering</strong> cycle:<br />
Using the ▲-▼ keys, select the desired watering cycle (e.g.<br />
2nd = every 2nd day) and confirm by pressing the OK key.<br />
The watering cycle (e.g. 2nd ) and the preview for the week<br />
(e.g. Su , Tu , Th , Sa ) are shown on the display in frames.<br />
The days in the preview for the week are always with respect<br />
to the day of the week set in the system (e.g. Sunday Su).<br />
– or –<br />
(b) <strong>Watering</strong> days:<br />
Using the ▲-▼ keys, select the desired day of the week (e.g.<br />
Mo = Monday) and select / deselect the day by pressing the<br />
OK key.<br />
The selected watering days (e.g. Mo , We , Fr ) are shown<br />
on the display in frames.<br />
9. Press the Channel key and set up more watering programs.<br />
The program is saved and SELECT CHANNEL and the channel<br />
flash (program step 1.).<br />
10. Press the Channel key.<br />
The programs have been set up and the main level is<br />
displayed.<br />
The main level displays the next programmed watering. In this<br />
example: watering on 2 (Channel 2 ), watering start time 16:30<br />
(Start Time 16 :30 ) on Monday (Mo ).<br />
Programming of the <strong>Watering</strong> <strong>Controller</strong> is now completed, i.e. the<br />
valves installed open / close entirely automatically and therefore<br />
water at the programmed times.<br />
You can change an existing program stored in one of the<br />
3 program memory locations without having to create the<br />
program from scratch.<br />
The data for the watering start time, duration, and cycle are preset;<br />
therefore you only need to change the specific values of the watering<br />
program you want to change. You can transfer all other values<br />
from "Setting the watering programs" by pressing the OK key.<br />
21<br />
GB
GB<br />
Blocking a channel:<br />
1.<br />
2.<br />
3.<br />
4.<br />
Manual watering:<br />
1.<br />
2.<br />
3.<br />
22<br />
5.2 Special Functions<br />
If Program Off is selected as program memory location for a<br />
channel, the respective channel is blocked and the watering<br />
programs of the channel are no longer executed. The programs<br />
of the channel are retained.<br />
You can end the programming mode at any time by pressing the<br />
Channel key.<br />
1. Press the Channel key.<br />
SELECT CHANNEL and the channel flash.<br />
2. Select the channel using the ▲-▼ keys (e.g. channel 2) and<br />
confirm by pressing the OK key.<br />
Channel appears on the display (e.g. 2) and Select Program<br />
and the program memory location flash.<br />
3. Select the program memory location Off using the ▲-▼ keys<br />
and confirm by pressing the OK key.<br />
Select CHANNEL flashes in the display.<br />
4. Press the Channel key.<br />
CHANNEL OFF and the channel (e.g. channel 2) is shown in<br />
the display.<br />
If several channels are blocked, Channels off is displayed.<br />
If the run time % is not equal to 100, the display alternates<br />
every 3 seconds between Channel off and Run Time %.<br />
Manual <strong>Watering</strong> (Man Key)<br />
The manual watering duration can be set between 0 to 59 min.<br />
Channels which are already open are displayed in frames.<br />
1. Press the Man. key.<br />
SELECT CHANNEL and the channel flash.<br />
2. Select the channel desired using the ▲-▼ keys (e.g. channel 4)<br />
and confirm by pressing the OK key.<br />
Run Time Man. and minutes flash in the display.<br />
3. Select the manual watering duration (00:30 minutes are<br />
preset) using the ▲-▼ keys (e.g. 00:15) and confirm by<br />
pressing the OK key.<br />
Manual watering starts and the frame around the active<br />
channel flashes.<br />
If the watering duration is not confirmed within 10 seconds by<br />
pressing the OK key, the watering begins with the watering<br />
duration selected.
Ending active watering<br />
prematurely:<br />
1.<br />
2.<br />
Water all channels<br />
manually:<br />
1.<br />
3.<br />
% run-time-function:<br />
1.<br />
2.<br />
You can exit active watering (programmed or started manually)<br />
prematurely without changing the programs.<br />
1. Press the Man. key.<br />
SELECT CHANNEL and the channel flash.<br />
2. Select the active channel desired (in the frame e.g. channel 4)<br />
using the ▲-▼ keys and confirm by pressing the OK key.<br />
<strong>Watering</strong> is ended and the main level is displayed.<br />
If all the channels are to be enabled manually, the channels are<br />
opened manually one after the other with the manual watering<br />
duration.<br />
1. Press and hold down the OK key.<br />
2. Also press and hold down the Man. key for 3 seconds.<br />
Run Time Man., MANUAL ALL and minutes flash in the display.<br />
3. Select the manual watering duration (00:30 minutes are preset)<br />
using the ▲-▼ keys (e.g. 00:15) and confirm by pressing the<br />
OK key.<br />
Manual watering starts with channel 1, MANUAL ALL and the<br />
frame around the active channel flashes.<br />
If the watering duration is not confirmed within 10 seconds by<br />
pressing the OK key, the watering begins with the watering<br />
duration displayed.<br />
You can exit watering all the channels prematurely by pressing<br />
the OK key + Man. key for 3 seconds.<br />
Percentage <strong>Watering</strong> Duration<br />
(% Run-Time Key)<br />
You can end the programming mode at any time by pressing the<br />
Run-Time key.<br />
The programmed watering durations of all the watering programs<br />
can be changed centrally in 10 % increments from 10 % to <strong>20</strong>0 %,<br />
without having to change the individual programs (e.g. if you wish<br />
to water your garden less in the autumn than in the summer).<br />
ATTENTION ! If the run-time % figures are above 100 %,<br />
programs may overlap as a result (see “Setting the watering<br />
programs”).<br />
1. Press the % Run-Time key.<br />
Run TimE % and the percentage watering duration flash.<br />
2. Select the figure for the percentage watering duration using<br />
the ▲-▼ keys (e.g. Run Time 60 %) and confirm by pressing<br />
the OK key.<br />
The percentage watering duration has been transferred and<br />
the main level is displayed.<br />
23<br />
GB
GB<br />
Rain Off function:<br />
1.<br />
2.<br />
3.<br />
Key lock:<br />
24<br />
E.g. In case of 60% run-time, a programmed watering duration<br />
of 60 min. is reduced to 36 min.<br />
Note:<br />
When the percentage of the watering duration is changed the<br />
display of the originally programmed watering durations in the<br />
programs stays as it is. When setting up / modifying a program,<br />
this is automatically set to 100 % Run-Time. The % Run-Time<br />
does not apply to manual watering.<br />
<strong>Watering</strong> Breaks (Rain Off Key)<br />
You can end the programming mode at any time by pressing the<br />
Rain Off key.<br />
If watering is not necessary, e.g. due to lengthy rainfall, a<br />
watering break can be set. All the programs can be set for a<br />
1 to 9-day break ( 1 to 9 ) or they can all be blocked ( Off ),<br />
in which case manual watering is still possible.<br />
1. Press the Rain Off key.<br />
Rain Off and Off is displayed.<br />
2. Using the ▲-▼ keys, set the desired break<br />
(e.g. 3 days 3 ).<br />
Day Delay and the frame flash.<br />
3. Confirm the break by pressing the OK key.<br />
The selected break (e.g. 3 days 3 Days Off) is displayed and<br />
the programs are suspended for the break selected.<br />
From 2 days onwards, the remaining break period displayed in<br />
hours (48h off (48 hours) … 1h off (1 hour)).<br />
To deselect the Rain Off function the Rain Off key has to<br />
be pressed.<br />
The keypad can be locked to protect against unintentional<br />
changing of the settings.<br />
1. Press and hold down the OK key.<br />
2. Also press and hold down the Rain Off key for 3 seconds.<br />
The lock symbol is displayed.<br />
To disable the key lock, the OK key + Rain Off key have to be<br />
pressed and held down for 3 seconds.
Reset function:<br />
6. Putting Out of Operation<br />
Wintering / Storage:<br />
Important:<br />
Disposal:<br />
(in accordance with<br />
RL<strong>20</strong>02 /96 /EC)<br />
7. Trouble-Shooting<br />
The <strong>Watering</strong> <strong>Controller</strong> is reset to the default setting and<br />
all the program data is deleted.<br />
1. Press and hold down the OK key.<br />
2. Also press and hold down the Channel key for 3 seconds.<br />
The lock symbol is displayed.<br />
• All the symbols of the display light up for 2 seconds.<br />
• The program data for all programs is deleted.<br />
• The date and time are retained.<br />
• The key lock is cancelled.<br />
A reset can be triggered at any time.<br />
Tip: Should you have any questions about operating and<br />
programming your <strong>Watering</strong> <strong>Controller</strong>, please do not hesitate<br />
to contact your nearest GARDENA Service Centre.<br />
The watering controller is frost-proof. No measures are required<br />
when frost commences. Legibility of the display is restricted<br />
below 0 °C.<br />
v Check battery status display before the power supply unit is<br />
disconnected.<br />
Only dispose of batteries when they are flat.<br />
v Return flat batteries to the place you bought them or dispose<br />
of them properly at your local recycling/disposal centre.<br />
The product must not be added to normal household waste. It<br />
must be disposed of in line with local environmental regulations.<br />
v Important: Make sure that the unit is disposed of via your<br />
municipal recycling collection centre.<br />
Fault Possible Cause Remedy<br />
No display External temperature below v Wait until the external air<br />
0 °C or above +60 °C. temperature returns to the<br />
operating temperature range.<br />
AC OFF The power supply unit is not v Plug the power supply unit<br />
is indicated on the display plugged in. into a mains socket.<br />
(the programs are retained)<br />
Overload The power supply is over- v Only so many valves may be<br />
is indicated on the display loaded because valves from opened at the same time that<br />
(the programs are retained). other manufacturers have the total power consumption<br />
been used. does not exceed 800 mA.<br />
Cabling of the valves has a v Cable the valves properly<br />
short circuit. (see 4. Initial Operation<br />
“Connecting the valves” ).<br />
25<br />
GB
GB<br />
AIn the event of other faults please contact GARDENA Service.<br />
Repairs should only be carried out by GARDENA service centres or dealers<br />
authorised by GARDENA.<br />
8. Technical Data<br />
Power supply from power supply unit: 24 V (AC) / 800 mA (sufficient for 5 simultaneously<br />
open GARDENA <strong>Watering</strong> Valves <strong>Art</strong>. 1278)<br />
Power supply for memory in case of<br />
mains power failure: 9V block battery (type 6LR61)<br />
Life of the battery: At least 1 year (to retain data if there is<br />
a mains failure)<br />
Operating temperature range: From 0 °C to + 60 °C<br />
Temperature range for storage: – <strong>20</strong> °C to + 70 °C<br />
Air humidity: max. 95 % relative humidity<br />
Soil moisture/rain sensor connection: GARDENA-specific<br />
Program saved when replacing battery: Yes (if power supply unit connected)<br />
Number of channels: <strong>Art</strong>. 1283: 4 channels and one master channel<br />
<strong>Art</strong>. 1284: 6 channels and one master channel<br />
Number of program-controlled<br />
watering cycles per channel: Up to 3<br />
<strong>Watering</strong> duration per program: 1 minute to 24 min. (10 % Run-Time)<br />
1 minute to 3 h 59 min. (100 % Run-Time)<br />
2 minutes to 7 h 58 min. (<strong>20</strong>0 % Run-Time)<br />
9. Service / Warranty<br />
Warranty<br />
26<br />
GARDENA guarantees this product for 2 years (from date of<br />
purchase). This guarantee covers all serious defects of the unit<br />
that can be proved to be material or manufacturing faults. Under<br />
warranty we will either replace the unit or repair it free of charge<br />
if the following conditions apply:<br />
• The unit must have been handled properly and in keeping<br />
with the requirements of the operating instructions.<br />
• Neither the purchaser or a non-authorised third party have<br />
attempted to repair the unit.<br />
GARDENA will not replace <strong>Watering</strong> <strong>Controller</strong>s with defects resulting<br />
from incorrect installation of the battery or leaking batteries.<br />
This manufacturer’s guarantee does not affect the user’s existing<br />
warranty claims against the dealer/seller.<br />
If you have any problems with your watering controller, please<br />
contact our Customer Service or return the defective unit<br />
together with a short description of the problem directly to one<br />
of the GARDENA Service Centres listed on the back of this<br />
leaflet.
Channel<br />
Prog. START TIME RUN TIME 24 h 2nd 3rd Odd Even Mo Tu We Th Fr Sa Su<br />
1<br />
2<br />
3<br />
Channel<br />
Prog. START TIME RUN TIME 24 h 2nd 3rd Odd Even Mo Tu We Th Fr Sa Su<br />
1<br />
2<br />
3<br />
Channel<br />
Prog. START TIME RUN TIME 24 h 2nd 3rd Odd Even Mo Tu We Th Fr Sa Su<br />
1<br />
2<br />
3<br />
Channel<br />
Prog. START TIME RUN TIME 24 h 2nd 3rd Odd Even Mo Tu We Th Fr Sa Su<br />
1<br />
2<br />
3<br />
Channel<br />
Prog. START TIME RUN TIME 24 h 2nd 3rd Odd Even Mo Tu We Th Fr Sa Su<br />
1<br />
2<br />
3<br />
Channel<br />
Prog. START TIME RUN TIME 24 h 2nd 3rd Odd Even Mo Tu We Th Fr Sa Su<br />
1<br />
2<br />
3<br />
137
D Produkthaftung<br />
Wir weisen ausdrücklich darauf hin, dass wir nach dem Produkthaftungsgesetz nicht für durch unsere Geräte<br />
hervorgerufene Schäden einzustehen haben, sofern diese durch unsachgemäße Reparatur verursacht oder bei<br />
einem Teileaustausch nicht unsere Original GARDENA Teile oder von uns freigegebene Teile verwendet werden<br />
und die Reparatur nicht vom GARDENA Service oder dem autorisierten Fachmann durchgeführt wird.<br />
Entsprechendes gilt für Ergänzungsteile und Zubehör.<br />
GB Product Liability<br />
We expressly point out that, in accordance with the product liability law, we are not liable for any damage caused<br />
by our units if it is due to improper repair or if parts exchanged are not original GARDENA parts or parts approved<br />
by us, and, if the repairs were not carried out by a GARDENA Service Centre or an authorised specialist.<br />
The same applies to spare parts and accessories.<br />
F Responsabilité<br />
Nous vous signalons expressément que GARDENA n’est pas responsable des dommages causés par ses appareils,<br />
dans la mesure où ces dommages seraient causés suite à une réparation non conforme, dans la mesure<br />
où, lors d’un échange de pièces, les pièces d’origine GARDENA n’auraient pas été utilisées, ou si la réparation<br />
n’a pas été effectuée par le Service Après-Vente GARDENA ou l’un des Centres SAV agréés GARDENA. Ceci<br />
est également valable pour tout ajout de pièces et d’accessoires autres que ceux préconisés par GARDENA.<br />
NL Productaansprakelijkheid<br />
Wij wijzen er nadrukkelijk op, dat wij op grond van de wet aansprakelijkheid voor producten niet aansprakelijk zijn<br />
voor schade ontstaan door onze apparaten, indien deze door onvakkundige reparatie veroorzaakt zijn, of er bij<br />
het uitwisselen van onderdelen geen gebruik gemaakt werd van onze originele GARDENA onderdelen of door<br />
ons vrijgegeven onderdelen en de reparatie niet door de GARDENA technische dienst of de bevoegde vakman<br />
uitgevoerd werd. Ditzelfde geldt voor extra-onderdelen en accessoires.<br />
S Produktansvar<br />
Tillverkaren är inte ansvarig för skada som orsakats av produkten om skadan beror på att produkten har reparerats<br />
felaktigt eller om, vid reparation eller utbyte, andra än Original GARDENA reservdelar har använts. Samma<br />
sak gäller för kompletteringsdelar och tillbehör.<br />
DK Produktansvar<br />
Vi gør udtrykkeligt opmærksom på at i henhold til produktansvarsloven er vi ikke ansvarlige for skader forårsaget<br />
af vores udstyr, hvis det skyldes uautoriserede reparationer eller hvis dele er skiftet ud og der ikke er anvendt<br />
originale GARDENA dele eller dele godkendt af os, eller hvis reparationerne ikke er udført af GARDENA-service<br />
eller en autoriseret fagmand. Det samme gælder for ekstra udstyr og tilbehør.<br />
FIN Tuotevastuu<br />
Korostamme nimenomaan, että tuotevastuulain nojalla emme ole vastuussa laitteistamme johtuneista vahingoista,<br />
mikäli nämä ovat aiheutuneet epäasianmukaisesta korjauksesta tai osia vaihdettaessa ei ole käytetty alkuperäisiä<br />
GARDENA- varaosia tai hyväksymiämme osia ja korjauksen on suorittanut muu kuin GARDENA -huoltokeskus tai<br />
valtuuttamamme ammattihenkilö. Tämä pätee myös lisäosiin ja lisävarusteisiin.<br />
I Responsabilità del prodotto<br />
Si rende espressamente noto che, conformemente alla legislazione sulla responsabilità del prodotto, non si<br />
risponde di danni causati da nostri articoli se originati da riparazioni eseguite non correttamente o da sostituzioni<br />
di parti effettuate con materiale non originale GARDENA o comunque da noi non approvato e, in ogni caso,<br />
qualora l’intervento non venga eseguito da un centro assistenza GARDENA o da personale specializzato autorizzato.<br />
Lo stesso vale per le parti complementari e gli accessori.<br />
E Responsabilidad de productos<br />
Advertimos que conforme a la ley de responsabilidad de productos no nos responsabilizamos de daños causados<br />
por nuestros aparatos, siempre y cuando dichos daños hayan sido originados por arreglos o reparaciones indebidas,<br />
por recambios con piezas que no sean piezas originales GARDENA o bien piezas autorizadas por nosotros,<br />
así como en aquellos casos en que la reparación no haya sido efectuada por un Servicio Técnico GARDENA o<br />
por un técnico autorizado. Lo mismo es aplicable para las piezas complementarias y accesorios.<br />
P Responsabilidade sobre o produto<br />
Queremos salientar que segundo a lei da responsabilidade do fabricante, nós não nos responsabilizaremos por<br />
danos causados pelo nosso equipamento, quando estes ocorram em decorrência de reparações inadequadas ou<br />
da substituição de peças por peças não originais da GARDENA, ou peças não autorizadas. A responsabilidade<br />
tornar-se-à nula também depois de reparações realizadas por oficinas não autorizadas pela GARDENA. Esta<br />
restrição valerá também para peças adicionais e acessórios.<br />
138
D EG-Konformitätserklärung<br />
Der Unterzeichnete Husqvarna AB, 561 82 Huskvarna, Sweden bestätigt, dass die<br />
nachfolgend bezeichneten Geräte in der von uns in Verkehr gebrachten Ausführung<br />
die Anforderungen der harmonisierten EU-Richtlinien, EU-Sicherheitsstandards<br />
und produktspezifischen Standards erfüllen. Bei einer nicht mit uns abgestimmten<br />
Änderung der Geräte verliert diese Erklärung ihre Gültigkeit.<br />
GB EU Declaration of Conformity<br />
The undersigned Husqvarna AB, 561 82 Huskvarna, Sweden, hereby certifies that,<br />
when leaving our factory, the units indicated below are in accordance with the<br />
harmonised EU guidelines, EU standards of safety and product specific standards.<br />
This certificate becomes void if the units are modified without our approval.<br />
F Certificat de conformité aux directives européennes<br />
Le constructeur, soussigné : Husqvarna AB, 561 82 Huskvarna, Sweden, déclare<br />
qu’à la sortie de ses usines le matériel neuf désigné ci-dessous était conforme<br />
aux prescriptions des directives européennes énoncées ci-après et conforme aux<br />
règles de sécurité et autres règles qui lui sont applicables dans le cadre de l’Union<br />
européenne. Toute modification portée sur ce produit sans l’accord express de<br />
Husqvarna supprime la validité de ce certificat.<br />
NL EU-overeenstemmingsverklaring<br />
Ondergetekende Husqvarna AB, 561 82 Huskvarna, Sweden, bevestigt, dat het<br />
volgende genoemde apparaat in de door ons in de handel gebrachte uitvoering<br />
voldoet aan de eis van, en in overeenstemming is met de EU-richtlijnen, de<br />
EU-veiligheidsstandaard en de voor het product specifieke standaard. Bij een niet<br />
met ons afgestemde verandering aan het apparaat verliest deze verklaring haar<br />
geldigheid.<br />
S EU Tillverkarintyg<br />
Undertecknad firma Husqvarna AB, 561 82 Huskvarna, Sweden, intygar härmed<br />
att nedan nämnda produkter överensstämmer med EU:s direktiv, EU:s säkerhetsstandard<br />
och produktspecifikation. Detta intyg upphör att gälla om produkten ändras<br />
utan vårt tillstånd.<br />
DK EU Overensstemmelse certificat<br />
Undertegnede Husqvarna AB, 561 82 Huskvarna, Sweden bekræfter hermed, at<br />
enheder listet herunder, ved afsendelse fra fabrikken, er i overensstemmelse med<br />
harmoniserede EU retningslinier, EU sikkerhedsstandarder og produkt-specifikationsstandarder.<br />
Dette certifikat træder ud af kraft hvis enhederne er ændret uden<br />
vor god kendelse.<br />
FIN EY-vaatimustenmukaisuusvakuutus<br />
Allekirjoittanut Husqvarna AB, 561 82 Huskvarna, Sweden vakuuttaa, että allamainitut<br />
laitteet täyttävät tehtaaltamme lähtiessään yhdenmukaistettujen EY-direktiivien,<br />
EY-turvallisuusstandardien ja tuotekohtaisten standardien vaatimukset. Laitteisiin<br />
tehdyt muutokset, joista ei ole sovittu kanssamme, johtavat tämän vakuutuksen<br />
raukeamiseen.<br />
I Dichiarazione di conformità alle norme UE<br />
La sottoscritta Husqvarna AB, 561 82 Huskvarna, Sweden, certifica che il prodotto<br />
qui di seguito indicato, nei modelli da noi commercializzati, è conforme alle direttive<br />
armonizzate UE nonché agli standard di sicurezza e agli standard specifici di prodotto.<br />
Qualunque modifica apportata al prodotto senza nostra specifica autorizzazione<br />
invalida la presente dichiarazione.<br />
E Declaración de conformidad de la UE<br />
El que subscribe Husqvarna AB, 561 82 Huskvarna, Sweden, declara que la presente<br />
mercancía, objeto de la presente declaración, cumple con todas las normas<br />
de la UE, en lo que a normas técnicas, de homologación y de seguridad se refiere.<br />
En caso de realizar cualquier modificación en la presente mercancía sin nuestra<br />
previa autorización, esta declaración pierde su validez.<br />
P Certificado de conformidade da UE<br />
Os abaixo mencionados Husqvarna AB, 561 82 Huskvarna, Sweden, por este meio<br />
certificam que ao sair da fábrica o aparelho abaixo mencionado está de acordo<br />
com as directrizes harmonizadas da UE, padrões de segurança e de produtos<br />
específicos. Este certificado ficará nulo se a unidade for modificada sem a nossa<br />
aprovação.<br />
Bezeichnung des Gerätes: Bewässerungssteuerung<br />
Description of the unit: <strong>Watering</strong> <strong>Controller</strong><br />
Désignation du matériel : Programmateur<br />
Omschrijving van het apparaat: Besproeiingscomputer<br />
Produktbeskrivning: Vandingskontrol-system<br />
Beskrivelse af enhederne: <strong>Watering</strong> <strong>Controller</strong><br />
Laitteiden nimitys: <strong>Watering</strong> <strong>Controller</strong><br />
Descrizione del prodotto: Centralina<br />
Descripción de la mercancía: Programación de riego<br />
Descrição do aparelho: Comando de rega<br />
Typ: <strong>Art</strong>.-Nr.: Type: Varenr. :<br />
Type: <strong>Art</strong>. No.: Tyypit: <strong>Art</strong>.-n:o. :<br />
Type : Référence : Modello: <strong>Art</strong>. :<br />
Typ: <strong>Art</strong>. nr.: Tipo: <strong>Art</strong>. Nº:<br />
Typ: <strong>Art</strong>.nr. : Tipo: <strong>Art</strong>. Nº:<br />
4030 1283 6030 1284<br />
EU-Richtlinien: EU Retningslinier :<br />
EU directives: EY-direktiivit:<br />
Directives européennes : Direttive UE:<br />
EU-richtlijnen: Normativa UE:<br />
EU direktiv: Directrizes da UE:<br />
<strong>20</strong>06/95/EC<br />
<strong>20</strong>04/108/EC<br />
93/68/EC<br />
Harmonisierte EN:<br />
DIN EN ISO 12100-1<br />
DIN EN ISO 12100-2<br />
Hinterlegte Dokumentation: GARDENA Technische Dokumentation<br />
E. Renn 89079 Ulm<br />
Deposited Documentation: GARDENA Technical Documentation<br />
E. Renn 89079 Ulm<br />
Documentation déposée : Documentation technique GARDENA<br />
E. Renn 89079 Ulm<br />
Anbringungsjahr der CE-Kennzeichnung:<br />
Year of CE marking:<br />
Date d’apposition du marquage CE :<br />
Installatiejaar van de CE-aanduiding:<br />
CE-Märkningsår :<br />
CE-Mærkningsår : <strong>20</strong>10<br />
CE-merkin kiinnitysvuosi:<br />
Anno di rilascio della certificazione CE:<br />
Colocación del distintivo CE:<br />
Ano de marcação pela CE:<br />
Ulm, den 07.10.<strong>20</strong>10 Der Bevollmächtigte<br />
Ulm, 07.10.<strong>20</strong>10 Authorised representative<br />
Fait à Ulm, le 07.10.<strong>20</strong>10 Représentant légal<br />
Ulm, 07-10-<strong>20</strong>10 Gemachtigde<br />
Ulm, <strong>20</strong>10.10.07. Behörig Firmatecknare<br />
Ulm, 07.10.<strong>20</strong>10 Teknisk direktør<br />
Ulmissa, 07.10.<strong>20</strong>10 Valtuutettu edustaja<br />
Ulm, 07.10.<strong>20</strong>10 Rappresentante autorizzato<br />
Ulm, 07.10.<strong>20</strong>10 Representante autorizado<br />
Ulm, 07.10.<strong>20</strong>10 Representante autorizado<br />
Vice President<br />
Category <strong>Watering</strong><br />
139
Deutschland / Germany<br />
GARDENA GmbH<br />
Central Service<br />
Hans-Lorenser-Straße 40<br />
D-89079 Ulm<br />
Produktfragen:<br />
(+49) 731 490-123<br />
Reparaturen:<br />
(+49) 731 490-290<br />
service@gardena.com<br />
Albania<br />
EIG Sh.p.k - Rruga. Siri Kodra<br />
Blloku i Magazinave<br />
Frigoriferi Metalik Blu<br />
4000 Tirana<br />
Argentina<br />
Husqvarna Argentina S.A.<br />
Vera 745<br />
(C1414AOO) Buenos Aires<br />
Phone: (+54) 11 4858-5000<br />
diego.poggi@ar.husqvarna.com<br />
Australia<br />
Husqvarna Australia Pty. Ltd.<br />
Locked Bag 5<br />
Central Coast BC, NSW 2252<br />
Phone: (+61) (0) 2 4352 7400<br />
customer.service@<br />
husqvarna.com.au<br />
Austria / Österreich<br />
Husqvarna Austria GmbH<br />
Consumer Products<br />
Industriezeile 36<br />
4010 Linz<br />
Tel.: (+43) 732 77 01 01- 90<br />
consumer.service@husqvarna.at<br />
Belgium<br />
GARDENA Belgium NV/SA<br />
Sterrebeekstraat 163<br />
1930 Zaventem<br />
Phone: (+32) 2 7 <strong>20</strong> 92 12<br />
Mail: info@gardena.be<br />
Bosnia / Herzegovina<br />
SILK TRADE d.o.o.<br />
Industrijska zona Bukva bb<br />
74260 Tešanj<br />
Brazil<br />
Palash Comércio e<br />
Importação Ltda.<br />
Rua São João do Araguaia, 338<br />
– Jardim Califórnia –<br />
Barueri – SP - Brasil –<br />
CEP 06409-060<br />
Phone: (+55) 11 4198-9777<br />
eduardo@palash.com.br<br />
Bulgaria<br />
Хускварна България ЕООД<br />
Бул. „Андрей Ляпчев” Nº 72<br />
1799 София<br />
Тел.: (+359) 02/9753076<br />
www.husqvarna.bg<br />
Canada / USA<br />
GARDENA Canada Ltd.<br />
100 Summerlea Road<br />
Brampton, Ontario L6T 4X3<br />
Phone: (+1) 905 792 93 30<br />
info@gardenacanada.com<br />
Chile<br />
Antonio Martinic y Cia Ltda.<br />
Cassillas 272<br />
Centro de Cassillas<br />
Santiago de Chile<br />
Phone: (+56) 2 <strong>20</strong> 10 708<br />
garfar_cl@yahoo.com<br />
Costa Rica<br />
Compania Exim<br />
Euroiberoamericana S.A.<br />
Los Colegios, Moravia,<br />
<strong>20</strong>0 metros al Sur del Colegio<br />
Saint Francis - San José<br />
Phone: (+506) 297 68 83<br />
exim_euro@racsa.co.cr<br />
140<br />
Croatia<br />
SILK ADRIA d.o.o.<br />
Josipa Lončara 3<br />
10090 Zagreb<br />
Phone: (+385) 1 3794 580<br />
silk.adria@zg.t-com.hr<br />
Cyprus<br />
FARMOKIPIKI LTD<br />
P.O. Box 7098<br />
74, Digeni Akrita Ave.<br />
1641 Nicosia<br />
Phone: (+357) 22 75 47 62<br />
condam@spidernet.com.cy<br />
Czech Republic /<br />
Slovak Republic<br />
Husqvarna Иesko s.r.o.<br />
odљtмpnэ zбvod GARDENA<br />
Tuшanka 1222 /115<br />
627 00 Brno<br />
Phone: (+4<strong>20</strong>) 548 217 777<br />
gardena@gardenabrno.cz<br />
Denmark<br />
GARDENA<br />
Husqvarna Consumer Outdoor<br />
Products<br />
Salgsafdelning Danmark<br />
Box 9003<br />
S-<strong>20</strong>0 39 Malmö<br />
info@gardena.dk<br />
Estonia<br />
Husqvarna Eesti OÜ<br />
Consumer Outdoor Products<br />
Kesk tee 10, Aaviku küla<br />
Rae vald<br />
Harju maakond<br />
75305 Estonia<br />
kontakt.etj@husqvarna.ee<br />
Finland<br />
Oy Husqvarna Ab<br />
Consumer Outdoor Products<br />
Lautatarhankatu 8 B / PL 3<br />
00581 HELSINKI<br />
info@gardena.fi<br />
France<br />
GARDENA France<br />
Immeuble Exposial<br />
9-11 allée des Pierres Mayettes<br />
ZAC des Barbanniers, B.P. 99<br />
-F- 92232 GENNEVILLIERS<br />
cedex<br />
Tél. (+33) 01 40 85 30 40<br />
service.consommateurs@<br />
gardena.fr<br />
Great Britain<br />
Husqvarna UK Ltd<br />
Preston Road<br />
Aycliffe Industrial Park<br />
Newton Aycliffe<br />
County Durham<br />
DL5 6UP<br />
info.gardena@husqvarna.co.uk<br />
Greece<br />
HUSQVARNA ΕΛΛΑΣ Α.Ε.Β.Ε.<br />
Υπ /μα Ηφαίστυ 33Α<br />
Βι. Πε. Κρωπίυ<br />
194 00 Κρωπί Αττικής<br />
V.A.T. EL094094640<br />
Phone: (+30) 210 66 <strong>20</strong> 225<br />
info@husqvarna-consumer.gr<br />
Hungary<br />
Husqvarna Magyarország Kft.<br />
Ezred u. 1- 3<br />
1044 Budapest<br />
Phone: (+36) 1 251-4161<br />
vevoszolgalat.husqvarna@<br />
husqvarna.hu<br />
Iceland<br />
Ó. Johnson & Kaaber<br />
Tunguhalsi 1<br />
110 Reykjavik<br />
ooj@ojk.is<br />
Ireland<br />
McLoughlin’s RS<br />
Unit 5,<br />
Northern Cross Business Park<br />
North Road, Finglas<br />
Dublin 11<br />
Italy<br />
Husqvarna Italia S.p.A.<br />
Via Como, 72<br />
23868 VALMADRERA (LC)<br />
Phone: (+39) 0341.<strong>20</strong>3.111<br />
info@gardenaitalia.it<br />
Japan<br />
KAKUICHI Co. Ltd.<br />
Sumitomo Realty &<br />
Development Kojimachi<br />
BLDG., 8F, 5-1 Nibanncyo,<br />
Chiyoda-ku, Tokyo 102-0084<br />
Phone: (+81) 33 264 4721<br />
m_ishihara@kaku-ichi.co.jp<br />
Latvia<br />
Husqvarna Latvija<br />
Consumer Outdoor Products<br />
Bakužu iela 6<br />
LV-1024 Riga<br />
info@husqvarna.lv<br />
Lithuania<br />
UAB Husqvarna Lietuva<br />
Consumer Outdoor Products<br />
Ateities pl. 77C<br />
LT-52104 Kaunas<br />
centras@husqvarna.lt<br />
Luxembourg<br />
Magasins Jules Neuberg<br />
39, rue Jacques Stas<br />
Luxembourg-Gasperich 2549<br />
Case Postale No. 12<br />
Luxembourg <strong>20</strong>10<br />
Phone: (+352) 40 14 01<br />
api@neuberg.lu<br />
Netherlands<br />
GARDENA Nederland B.V.<br />
Postbus 50176<br />
1305 AD ALMERE<br />
Phone: (+31) 36 521 00 00<br />
info@gardena.nl<br />
Neth. Antilles<br />
Jonka Enterprises N.V.<br />
Sta. Rosa Weg 196<br />
P.O. Box 8<strong>20</strong>0, Curaçao<br />
Phone: (+599) 9 767 66 55<br />
pgm@jonka.com<br />
New Zealand<br />
Husqvarna New Zealand Ltd.<br />
PO Box 76437<br />
Manukau City 2241<br />
Phone: (+64) (0) 9 9<strong>20</strong>2410<br />
support.nz@husqvarna.co.nz<br />
Norway<br />
GARDENA / Husqvarna<br />
Consumer Outdoor Products<br />
Salgskontor Norge<br />
Kleverveien 6<br />
1540 Vestby<br />
info@gardena.no<br />
Poland<br />
Husqvarna Poland Spółka z o.o.<br />
ul. Wysockiego 15 b<br />
03-371 Warszawa<br />
Oddział w Szymanowie<br />
Szymanów 9 d<br />
05-532 Baniocha<br />
Phone: (+48) 22 727 56 90<br />
gardena@gardena.pl<br />
Portugal<br />
GARDENA Portugal Lda.<br />
Sintra Business Park<br />
Edifício 1, Fracção 0-G<br />
2710-089 Sintra<br />
Phone: (+351) 21 922 85 30<br />
info@gardena.pt<br />
Romania<br />
Madex International Srl<br />
Soseaua Odaii 117- 123,<br />
RO 013603, Bucureєti, S1<br />
Phone: (+40) 21 352.76.03<br />
madex@ines.ro<br />
Russia<br />
ООО „Хускварна“<br />
141400, Московская обл.,<br />
г. Химки,<br />
улица Ленинградская,<br />
владение 39,<br />
Химки Бизнес Парк,<br />
Здание II, 4 этаж.<br />
Serbia<br />
Domel d.o.o.<br />
Savski nasip 7<br />
11070 Novi Beograd<br />
Phone: (+381) 11 2772 <strong>20</strong>4<br />
miroslav.jejina@domel.co.yu<br />
Singapore<br />
Hy- Ray PRIVATE LIMITED<br />
40 Jalan Pemimpin<br />
#02-08 Tat Ann Building<br />
Singapore 577185<br />
Phone: (+65) 6253 2277<br />
shiying@hyray.com.sg<br />
Slovenia<br />
GARDENA d.o.o.<br />
Brodiљиe 15<br />
1236 Trzin<br />
Phone: (+386) 1 580 93 32<br />
servis@gardena.si<br />
South Africa<br />
GARDENA<br />
South Africa (Pty.) Ltd.<br />
P.O. Box 11534<br />
Vorna Valley 1686<br />
Phone: (+27) 11 315 02 23<br />
sales@gardena.co.za<br />
Spain<br />
Husqvarna España S.A.<br />
C/ Basauri, nº 6<br />
La Florida<br />
28023 Madrid<br />
Phone: (+34) 91 708 05 00<br />
atencioncliente@gardena.es<br />
Sweden<br />
GARDENA / Husqvarna<br />
Consumer Outdoor Products<br />
Försäljningskontor Sverige<br />
Box 9003<br />
<strong>20</strong>0 39 Malmö<br />
info@gardena.se<br />
Switzerland / Schweiz<br />
Husqvarna Schweiz AG<br />
Consumer Products<br />
Industriestrasse 10<br />
5506 Mägenwil<br />
Phone: (+41) (0) 848 800 464<br />
info@gardena.ch<br />
Turkey<br />
GARDENA Dost Diþ Ticaret<br />
Mümessillik A.Þ.<br />
Sanayi Çad. Adil Sokak<br />
No: 1/B Kartal<br />
34873 Istanbul<br />
Phone: (+90) 216 38 93 939<br />
info@gardena-dost.com.tr<br />
Ukraine / Україна<br />
ТОВ «Хусварна Україна»<br />
вул. Васильківська, 34,<br />
офіс <strong>20</strong>4-г<br />
03022, Київ<br />
Тел. (+38) 044 498 39 02<br />
info@gardena.ua<br />
1283-<strong>20</strong>.960.02 / 1110<br />
© GARDENA<br />
Manufacturing GmbH<br />
D-89070 Ulm<br />
http://www.gardena.com