OM, Gardena, Rain Water Tank Pump, Art 0,1740-20, Art 01742-20 ...
OM, Gardena, Rain Water Tank Pump, Art 0,1740-20, Art 01742-20 ...
OM, Gardena, Rain Water Tank Pump, Art 0,1740-20, Art 01742-20 ...

You also want an ePaper? Increase the reach of your titles
YUMPU automatically turns print PDFs into web optimized ePapers that Google loves.
GB<br />
Ensure that the electrical connections for<br />
plugs and sockets are made in areas safe<br />
from flooding.<br />
Protect the mains plug and the mains<br />
power cable from heat, oil and sharp<br />
edges.<br />
Observe the mains voltage. The information on<br />
the nameplate must be in agreement with the<br />
data for the mains power grid.<br />
The pump’s mains plug must be disconnected<br />
before anybody enters the swimming pool.<br />
Do not interrupt the mains supply by unplugging<br />
at the power extension cable. Disconnect at the<br />
outlet socket.<br />
The mains power cable must not be used for<br />
fastening or transporting the pump.<br />
Submersion and withdrawal of the pump should<br />
be by means of the telescopic pipe.<br />
Alternatively, a cord can be secured on<br />
the telescopic pipe for submersing, lifting and<br />
securing of the <strong>Rain</strong> <strong>Water</strong> <strong>Tank</strong> <strong>Pump</strong>.<br />
Before using, always subject the pump<br />
(especially the power cables and the power<br />
connections) to a visual inspection.<br />
A pump which is damaged should not be used.<br />
In the event of damage, have the pump checked<br />
by GARDENA Service.<br />
Safety Instructions<br />
Observe the minimum water level in accordance<br />
with the characteristics given for the pump.<br />
Only <strong>Art</strong>. No. <strong>1740</strong>: Allow the pump to run<br />
no longer than 10 minutes against a closed<br />
pressure side.<br />
Thermal overload protection switch<br />
If overloaded, the built-in thermal protection for<br />
the motor will switch the pump off. After cooling<br />
down, the pump will start again automatically<br />
(see 7. Trouble-Shooting).<br />
Visual check<br />
Automatic ventilation<br />
The <strong>Rain</strong> <strong>Water</strong> <strong>Tank</strong> <strong>Pump</strong> is fitted with a venting<br />
outlet. The function of this venting outlet is to force<br />
out any air which may be present inside the pump.<br />
Please regularly check the connecting line. If the Small amounts of water flow out of the gap bet-<br />
connecting line of this appliance is damaged, ween the threaded connection and the housing;<br />
it has to be replaced by the manufacturer or the if the water level drops further down, water also<br />
manufacturer’s aftersales service or a similarly flows out the lower part of the housing. This is no<br />
qualified person to prevent any hazards. defect but occurs due to venting purposes.<br />
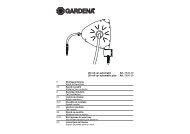
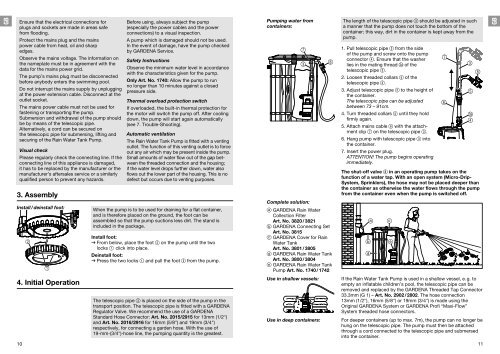
3. Assembly<br />
Install / deinstall foot:<br />
2<br />
1<br />
4. Initial Operation<br />
10<br />
When the pump is to be used for draining for a flat container,<br />
and is therefore placed on the ground, the foot can be<br />
assembled so that the pump suctions less dirt. The stand is<br />
included in the package.<br />
Install foot:<br />
v From below, place the foot 2 on the pump until the two<br />
locks 1 click into place.<br />
Deinstall foot:<br />
v Press the two locks 1 and pull the foot 2 from the pump.<br />
The telescopic pipe 3 is placed on the side of the pump in the<br />
transport position. The telescopic pipe is fitted with a GARDENA<br />
Regulator Valve. We recommend the use of a GARDENA<br />
Standard Hose Connector: <strong>Art</strong>. No. <strong>20</strong>15/2915 for 13mm (1/2")<br />
and <strong>Art</strong>. No. <strong>20</strong>16/2916 for 16mm (5/8") and 19mm (3/4")<br />
respectively, for connecting a garden hose. With the use of<br />
19-mm-(3/4")-hose line, the pumping quantity is the greatest.<br />
<strong>Pump</strong>ing water from<br />
containers:<br />
7<br />
3<br />
8<br />
Complete solution:<br />
a GARDENA <strong>Rain</strong> <strong>Water</strong><br />
Collection Filter<br />
<strong>Art</strong>. No. 38<strong>20</strong> / 3821<br />
b GARDENA Connecting Set<br />
<strong>Art</strong>. No. 3815<br />
c GARDENA Cover for <strong>Rain</strong><br />
<strong>Water</strong> <strong>Tank</strong><br />
<strong>Art</strong>. No. 3801 / 3805<br />
d GARDENA <strong>Rain</strong> <strong>Water</strong> <strong>Tank</strong><br />
<strong>Art</strong>. No. 3800 / 3804<br />
e GARDENA <strong>Rain</strong> <strong>Water</strong> <strong>Tank</strong><br />
<strong>Pump</strong> <strong>Art</strong>. No. <strong>1740</strong> / 1742<br />
The length of the telescopic pipe 3 should be adjusted in such<br />
a manner that the pump does not touch the bottom of the<br />
container; this way, dirt in the container is kept away from the<br />
pump.<br />
1. Pull telescopic pipe 3 from the side<br />
of the pump and screw onto the pump<br />
connector 4. Ensure that the washer<br />
lies in the mating thread ß3a of the<br />
telescopic pipe 3.<br />
2. Loosen threaded collars 5 of the<br />
telescopic pipe 3.<br />
3. Adjust telescopic pipe 3 to the height of<br />
the container.<br />
The telescopic pipe can be adjusted<br />
between 73 – 91cm.<br />
4. Turn threaded collars 5 until they hold<br />
firmly again.<br />
5. Attach mains cable 6 with the attachment<br />
clip 7 on the telescopic pipe 3.<br />
6. Hang pump with telescopic pipe 3 into<br />
the container.<br />
7. Insert the power plug.<br />
ATTENTION! The pump begins operating<br />
immediately.<br />
The shut-off valve 8 in an operating pump takes on the<br />
function of a water tap. With an open system (Micro-Drip-<br />
System, Sprinklers), the hose may not be placed deeper than<br />
the container as otherwise the water flows through the pump<br />
from the container even when the pump is switched off.<br />
a<br />
b<br />
d<br />
Use in shallow vessels: If the <strong>Rain</strong> <strong>Water</strong> <strong>Tank</strong> <strong>Pump</strong> is used in a shallow vessel, e. g. to<br />
empty an inflatable children’s pool, the telescopic pipe can be<br />
removed and replaced by the GARDENA Threaded Tap Connector<br />
33.3mm (G 1) – <strong>Art</strong>. No. 2902 / 2802. The hose connection<br />
13mm (1/2"), 16mm (5/8") or 19mm (3/4") is made using the<br />
Original GARDENA System or GARDENA Profi “Maxi-Flow”<br />
System threaded hose connectors.<br />
Use in deep containers: For deeper containers (up to max. 7m), the pump can no longer be<br />
hung on the telescopic pipe. The pump must then be attached<br />
through a cord connected to the telescopic pipe and submersed<br />
into the container.<br />
11<br />
c<br />
e<br />
7<br />
6<br />
3<br />
5<br />
z<br />
4<br />
3a<br />
8<br />
GB