NOTICE D'INSTALLATION - Foster S.p.A.
NOTICE D'INSTALLATION - Foster S.p.A.
NOTICE D'INSTALLATION - Foster S.p.A.

Create successful ePaper yourself
Turn your PDF publications into a flip-book with our unique Google optimized e-Paper software.
WHAT TO DO IN CASE OF A PROBLEM<br />
When the symbol [ E 4 ] appears:<br />
The table must be reconfigured. Please implement the following steps :<br />
I) Important : before you start, make sure there is no more pot on the hob<br />
II) Disconnect the appliance from the grid by removing the fuse or turning the circuit<br />
breaker off<br />
III) Reconnect the table to the grid<br />
IV) Procedure : take a pot with a ferromagnetic bottom and a minimum diameter of 16 cm<br />
* start the procedure within 2 minutes after reconnecting the hob to the grid<br />
* don’t use the [ O/I ] touch<br />
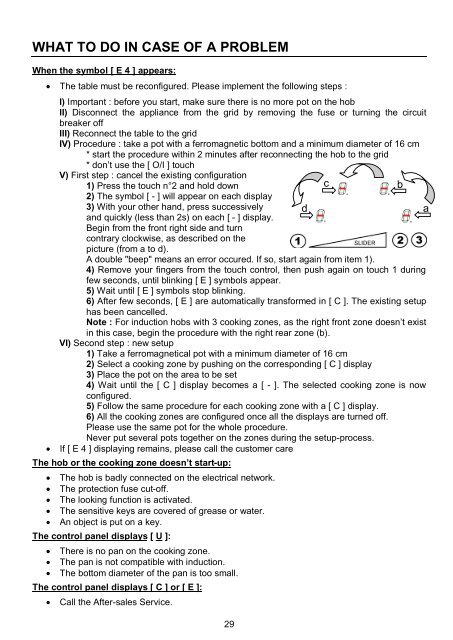
V) First step : cancel the existing configuration<br />
1) Press the touch n°2 and hold down<br />
2) The symbol [ - ] will appear on each display<br />
3) With your other hand, press successively<br />
and quickly (less than 2s) on each [ - ] display.<br />
Begin from the front right side and turn<br />
contrary clockwise, as described on the<br />
picture (from a to d).<br />
29<br />
d<br />
c b<br />
A double "beep" means an error occured. If so, start again from item 1).<br />
4) Remove your fingers from the touch control, then push again on touch 1 during<br />
few seconds, until blinking [ E ] symbols appear.<br />
5) Wait until [ E ] symbols stop blinking.<br />
6) After few seconds, [ E ] are automatically transformed in [ C ]. The existing setup<br />
has been cancelled.<br />
Note : For induction hobs with 3 cooking zones, as the right front zone doesn’t exist<br />
in this case, begin the procedure with the right rear zone (b).<br />
VI) Second step : new setup<br />
1) Take a ferromagnetical pot with a minimum diameter of 16 cm<br />
2) Select a cooking zone by pushing on the corresponding [ C ] display<br />
3) Place the pot on the area to be set<br />
4) Wait until the [ C ] display becomes a [ - ]. The selected cooking zone is now<br />
configured.<br />
5) Follow the same procedure for each cooking zone with a [ C ] display.<br />
6) All the cooking zones are configured once all the displays are turned off.<br />
Please use the same pot for the whole procedure.<br />
Never put several pots together on the zones during the setup-process.<br />
If [ E 4 ] displaying remains, please call the customer care<br />
The hob or the cooking zone doesn’t start-up:<br />
The hob is badly connected on the electrical network.<br />
The protection fuse cut-off.<br />
The looking function is activated.<br />
The sensitive keys are covered of grease or water.<br />
An object is put on a key.<br />
The control panel displays [ U ]:<br />
There is no pan on the cooking zone.<br />
The pan is not compatible with induction.<br />
The bottom diameter of the pan is too small.<br />
The control panel displays [ C ] or [ E ]:<br />
Call the After-sales Service.<br />
a