IMPEDO-Technik - Erkodent
IMPEDO-Technik - Erkodent
IMPEDO-Technik - Erkodent

Create successful ePaper yourself
Turn your PDF publications into a flip-book with our unique Google optimized e-Paper software.
<strong>IMPEDO</strong>-<strong>Technik</strong> - Hautschonende Abformung<br />
Anleitung<br />
• <strong>IMPEDO</strong> Grundschale Gr. II (271 002)<br />
• <strong>IMPEDO</strong> Grundschale Gr. III (271 003)<br />
• <strong>IMPEDO</strong> Grundschale Gr. II hoch (271 004)<br />
• <strong>IMPEDO</strong> Grundschale Gr. III hoch (271 005)<br />
• <strong>IMPEDO</strong> Seitenschale Gr. II (271 006)<br />
Arbeitsmittel<br />
• <strong>IMPEDO</strong> Seitenschale Gr. III (271 007)<br />
• ALGIFORM (433 050)<br />
• Mischbecher 3 l (163 003)<br />
• Trennspatel (271 010)<br />
• LEISTON Gießharz (825 205)<br />
• LEISTON Härterpulver (825 215)<br />
• LEISTON Füllstoff (825 275)<br />
• Schmelzgerät (174 600)<br />
• REVO-Gel (820 105)<br />
• Wundabdeckfolie<br />
• Wunden (Ulcus) am Fuß immer mit Wundabdeckfolie abdecken.<br />
• Um eine gute plantare Abformung zu erreichen, zuerst dünne Schicht<br />
ALGIFORM in Schale eingeben (ca. 500 ml).<br />
• Bei Abformung mit Seitenschalen Grundschale immer bis zum Rand<br />
füllen.<br />
T ips<br />
• Immer in Teilbelastung abformen.<br />
• Schalenboden kann mit Gummituch gegen LEISTON geschützt werden.<br />
• Bei Abdrücken, die später ausgegossen werden, 50 g mehr ALGIFORM<br />
je Liter Wasser verwenden, um Schrumpf des Negativs zu verzögern.<br />
• Wassertemperatur sollte 25 °C nicht überschreiten.<br />
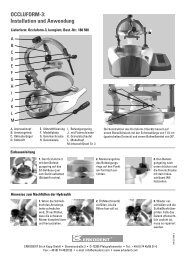
<strong>IMPEDO</strong>-<strong>Technik</strong><br />
Rationelles Abdruckverfahren zur Herstellung<br />
von Negativen im Einlagen- und<br />
Gießleistenbau. Hautfreundliches<br />
Abdruckmaterial, sehr gut geeignet für<br />
Diabetiker und Rheumatiker.<br />
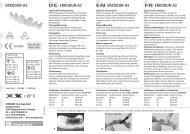
1. Fuß in passende <strong>IMPEDO</strong>-Schale stellen.<br />
Absatzhöhe kann durch Einlegen von Keilen<br />
in die Schale verändert werden. Wasser in<br />
Schale füllen und benötigtes Volumen<br />
feststellen. ALGIFORM mit Wasser<br />
anmischen. Für 1 l Wasser 2 Messbecher<br />
ALGIFORM (ca. 100 g) verwenden.<br />
<strong>IMPEDO</strong>-Grundschalen sind in zwei<br />
Längen (30 / 35 cm) und Höhen<br />
(6 / 11 cm) lieferbar. Eine Absatzhöhe<br />
von 1 cm ist vorgegeben. ALGIFORM ist<br />
in 5 kg und LEISTON-Leistengießharz in<br />
5 l-Gebinden lieferbar.<br />
2. Angemischtes ALGIFORM in <strong>IMPEDO</strong>-<br />
Schale gießen und Fuß in Schale stellen. Fuß<br />
in Teilbelastung abformen, die Beinstellung<br />
sollte 90° betragen. Grundschale bis zum<br />
Rand füllen.<br />
3. Nach Abbinden von ALGIFORM<br />
(ca. 3-4 Min.) Seitenschalen anbringen und<br />
mit Verschlussknöpfen verschließen. Zweite<br />
ALGIFORM Mischung anrühren und bis an<br />
die gewünschte Leistenhöhe aufgießen.<br />
4. Nach Abbinden von ALGIFORM<br />
Verschlussknöpfe abnehmen und ALGIFORM<br />
mit Trennspatel vorne und hinten trennen.<br />
Schalen abnehmen und Fuß entformen.<br />
Abdruck auf ausgebrochene Teile kontrollieren.<br />
Schalen zusammenfügen und mit<br />
Verschlussknöpfen verschließen.<br />
5. Vor Ausgießen mit LEISTON<br />
angesammeltes Wasser aus ALGIFORM-<br />
Abdruck entleeren. Festgestellte Menge<br />
LEISTON anrühren, ALGIFORM Abdruck ausgießen<br />
und aushärten lassen (ca. 30 Min.)<br />
6. Fertigen LEISTON-Leisten aus ALGIFORM<br />
entnehmen und weiter bearbeiten. LEISTON<br />
lässt sich fräsen, schleifen, nageln, anspachteln<br />
und mit handelsüblichen Klebstoffen<br />
können Zugaben angebracht werden.<br />
Leisten aus REVO-Gel<br />
7. Zur Herstellung von Leisten für Bettungen<br />
oder Einlagen aus REVO-Gel wird der<br />
Vorfußbereich nach Entformen des Fußes in<br />
Form einer Einlage in der passenden Größe<br />
ausgeschnitten.<br />
8. In das Schmelzgerät wird REVO-Gel eingefüllt<br />
und bei ca. 165 °C (Stellung 10 Regler)<br />
erwärmt. REVO-Gel ab und zu umrühren.<br />
Erwärmung von REVO-Gel nimmt einige Zeit<br />
in Anspruch, aus diesem Grund das Schmelzgerät<br />
rechtzeitig einschalten, um längere<br />
Wartezeiten zu umgehen.<br />
9. Nach dem Ausgießen des Negatives mit<br />
REVO-Gel und dem vollständigen Abkühlen<br />
des REVO-Gel-Rohlinges aus ALGIFORM-<br />
Abdruck entnehmen.<br />
10. Fertiger REVO-Gel-Rohling kann nun mit<br />
handelsüblichen Schleifmaschinen bearbeitet<br />
werden. Schleifreste können gesammelt<br />
und wieder verwendet werden. Mit der Zeit<br />
ändert sich die Farbe von REVO-Gel und auch<br />
die Eigenschaften ändern sich mit zunehmender<br />
Verschmutzung des Materials.<br />
®<br />
ERKODENT Erich Kopp GmbH • Siemensstr. 3 • D-72285 Pfalzgrafenweiler • Tel. +49 (0) 74 45/85 01-0 • Fax +49 (0) 74 45/20 92<br />
www.erkodent.com • info@erkodent.com
<strong>IMPEDO</strong>-technique - Skin tolerated impression<br />
Instructions<br />
• <strong>IMPEDO</strong> base tray size II (271 002)<br />
• <strong>IMPEDO</strong> base tray size III (271 003)<br />
• <strong>IMPEDO</strong> base tray size II high (271 004)<br />
• <strong>IMPEDO</strong> base tray size III high (271 005)<br />
• <strong>IMPEDO</strong> side tray size II (271 006)<br />
W orking material<br />
• <strong>IMPEDO</strong> side trays III (271 007)<br />
• ALGIFORM (433 050)<br />
• Mixing bowl 3 l (163 003)<br />
• Spatula (271 010)<br />
• LEISTON last resin (825 205)<br />
• Hardener for LEISTON (825 215)<br />
• Filler for LEISTON (825 275)<br />
• Melting device for REVO-Gel (174 600)<br />
• REVO-Gel (820 105)<br />
• Wound cover foil<br />
• Wounds on the feet should always be covered by a wound cover foil.<br />
• In order to obtain a good level mould, a thin layer of ALGIFORM can<br />
first be filled into the casting tray (app. 500 ml).<br />
• When using side trays the base tray should always be filled up to the<br />
brim.<br />
Hints<br />
• The impression should always be made under partial load.<br />
• Protect the bottom of the tray against LEISTON with a rubber sheet.<br />
• Use 50 g more ALGIFORM per litre of water for impressions that are<br />
filled lateron to avoid shrinkage of the negative.<br />
• The water temperature should never exceed 25 °C.<br />
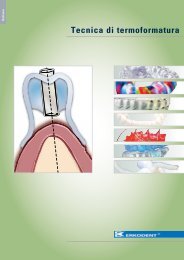
<strong>IMPEDO</strong>-technique<br />
Rational moulding method for the production<br />
of negatives for inner soles and<br />
resin lasts. Skin tolerated impression<br />
material, particularly suited for patients<br />
suffering from diabetes and rheumatism.<br />
1. The foot is placed in an <strong>IMPEDO</strong> tray of<br />
suitable size. The heel height can be changed<br />
by inserting a wedge into the tray. Fill<br />
water in the base tray to find out the required<br />
capacity. 2 measuring beakers ALGIFORM<br />
(app. 100g) are mixed with 1 ltr. of water.<br />
<strong>IMPEDO</strong> trays are supplied in two<br />
lengths (30 / 35 cm) and two heights<br />
(6 / 11 cm). A heel height of 1 cm is<br />
given. ALGIFORM is supplied in packing<br />
units of 5 kg and LEISTON last resin in<br />
5 ltr containers.<br />
2. The mixed ALGIFORM is poured into the<br />
<strong>IMPEDO</strong> tray and the patients foot is placed<br />
in the base tray. In doing so it should be<br />
ensured that the leg position is at 90° and the<br />
impression should always be made under<br />
partial load. The base tray should always be<br />
filled up to the brim.<br />
3. After ALGIFORM has hardened<br />
(app. 3-4 min.) the side trays are fit and<br />
closed with closing buttons. The second<br />
ALGIFORM mixture is prepared and cast up<br />
to the required height of the upper.<br />
4. After hardening of ALGIFORM, the closing<br />
buttons are removed and ALGIFORM cut<br />
through at the front and rear with a separating<br />
spatula. Remove the side trays and the<br />
foot from the base tray. Check the impression<br />
for any broken out parts. The trays are<br />
rejoined and closed with the closing buttons.<br />
5. Before pouring with LEISTON, any accumulated<br />
water is removed from the<br />
ALGIFORM impression. The required quantity<br />
of LEISTON is mixed, pour out the ALGIFORM<br />
impression and allow to harden (app. 30 min.)<br />
6. The finished LEISTON last is removed from<br />
the ALGIFORM impression and the material<br />
further finished. LEISTON can be milled,<br />
ground, nailed, trowelled, glued and with<br />
commercial glues additions can be put on the<br />
LEISTON.<br />
Lasts with REVO-Gel<br />
7. For the production of uppers for beds and<br />
arch supports made of REVO-Gel, the fore<br />
foot region is cut out to the appropriate size<br />
in the form of an arch support.<br />
9. After completely filling the negative with<br />
REVO-Gel it should be allowed to cool down<br />
thoroughly before the blank is removed from<br />
the ALGIFORM impression.<br />
®<br />
8. REVO-Gel is filled into the melting device<br />
and melt at app. 165 °C (position 10 control<br />
knob). Stir up REVO-Gel from time to time.<br />
Since heating up of the REVO-Gel takes some<br />
time, it is advisable to switch on the melting<br />
device well in advance, in order to avoid long<br />
waiting times.<br />
10. The finished REVO-Gel blank can be<br />
ground with comercial grinding machines.<br />
Parts which have been ground or cut off can<br />
be put back in the melting device. After some<br />
time the colour of REVO-Gel changes and<br />
with growing soilings also its properties.<br />
Copyright by ERKODENT • Printed in Germany • P-30-0206-03 • STEEB DRUCK<br />
ERKODENT Erich Kopp GmbH • Siemensstr. 3 • D-72285 Pfalzgrafenweiler • Tel. +49 (0) 74 45/85 01-0 • Fax +49 (0) 74 45/20 92<br />
www.erkodent.com • info@erkodent.com