other snow safety essentials from backcountry access
other snow safety essentials from backcountry access
other snow safety essentials from backcountry access

Create successful ePaper yourself
Turn your PDF publications into a flip-book with our unique Google optimized e-Paper software.
Operating Instructions<br />
Operating Instructions<br />
(2) tells you, in approximate meters, how far you must travel<br />
(1 meter = 1.1 yards or 3.3 feet). If the number on the distance<br />
indicator is increasing, you are on the same axis as the victim’s<br />
signal, but moving in the opposite direction. Turn 180 degrees,<br />
engage the center search light again, and continue your search<br />
in the direction the Tracker is pointing. This is preferable to walking<br />
backwards, in which case the Tracker will often flash “SE”<br />
rather than show a direction and distance. If you are stationary,<br />
but the distance is significantly changing, you are probably<br />
detecting the signal of an<strong>other</strong> rescuer. Make sure all rescuers<br />
are in search mode before continuing.<br />
Move your beacon very slowly along the surface of the <strong>snow</strong><br />
during the final three meters of the pinpoint search. It can be<br />
helpful to tilt the front of the Tracker down, although it is not<br />
necessary. Ignore sudden fluctuations in distance and direction,<br />
often followed by no distance reading and/or "SE" in the<br />
distance indicator. This means you are very close. The lowest<br />
reading will be near this point.<br />
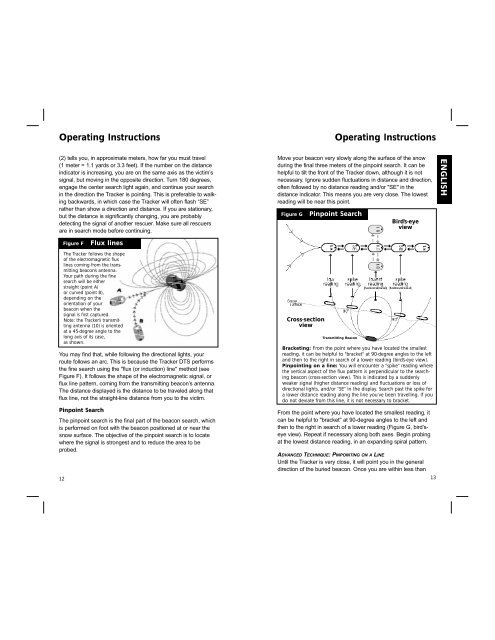
Figure G<br />
Pinpoint Search<br />
Bird’s-eye<br />
view<br />
ENGLISH<br />
Figure F<br />
Flux lines<br />
You may find that, while following the directional lights, your<br />
route follows an arc. This is because the Tracker DTS performs<br />
the fine search using the "flux (or induction) line" method (see<br />
Figure F). It follows the shape of the electromagnetic signal, or<br />
flux line pattern, coming <strong>from</strong> the transmitting beacon’s antenna.<br />
The distance displayed is the distance to be traveled along that<br />
flux line, not the straight-line distance <strong>from</strong> you to the victim.<br />
Pinpoint Search<br />
The pinpoint search is the final part of the beacon search, which<br />
is performed on foot with the beacon positioned at or near the<br />
<strong>snow</strong> surface. The objective of the pinpoint search is to locate<br />
where the signal is strongest and to reduce the area to be<br />
probed.<br />
12<br />
The Tracker follows the shape<br />
of the electromagnetic flux<br />
lines coming <strong>from</strong> the transmitting<br />
beacon’s antenna.<br />
Your path during the fine<br />
search will be either<br />
straight (point A)<br />
or curved (point B),<br />
depending on the<br />
orientation of your<br />
beacon when the<br />
signal is first captured.<br />
Note: the Tracker’s transmitting<br />
antenna (10) is oriented<br />
at a 45-degree angle to the<br />
long axis of its case,<br />
as shown.<br />
Cross-section<br />
view<br />
Transmitting Beacon<br />
Bracketing: From the point where you have located the smallest<br />
reading, it can be helpful to "bracket" at 90-degree angles to the left<br />
and then to the right in search of a lower reading (bird’s-eye view).<br />
Pinpointing on a line: You will encounter a “spike” reading where<br />
the vertical aspect of the flux pattern is perpendicular to the searching<br />
beacon (cross-section view). This is indicated by a suddenly<br />
weaker signal (higher distance reading) and fluctuations or loss of<br />
directional lights, and/or “SE” in the display. Search past the spike for<br />
a lower distance reading along the line you’ve been travelling. If you<br />
do not deviate <strong>from</strong> this line, it is not necessary to bracket.<br />
From the point where you have located the smallest reading, it<br />
can be helpful to "bracket" at 90-degree angles to the left and<br />
then to the right in search of a lower reading (Figure G, bird’seye<br />
view). Repeat if necessary along both axes. Begin probing<br />
at the lowest distance reading, in an expanding spiral pattern.<br />
ADVANCED TECHNIQUE: PINPOINTING ON A LINE<br />
Until the Tracker is very close, it will point you in the general<br />
direction of the buried beacon. Once you are within less than<br />
13