C6TRM + C6 C6TRM + C6 C6TRM + C6 - audio concepts
C6TRM + C6 C6TRM + C6 C6TRM + C6 - audio concepts
C6TRM + C6 C6TRM + C6 C6TRM + C6 - audio concepts

You also want an ePaper? Increase the reach of your titles
YUMPU automatically turns print PDFs into web optimized ePapers that Google loves.
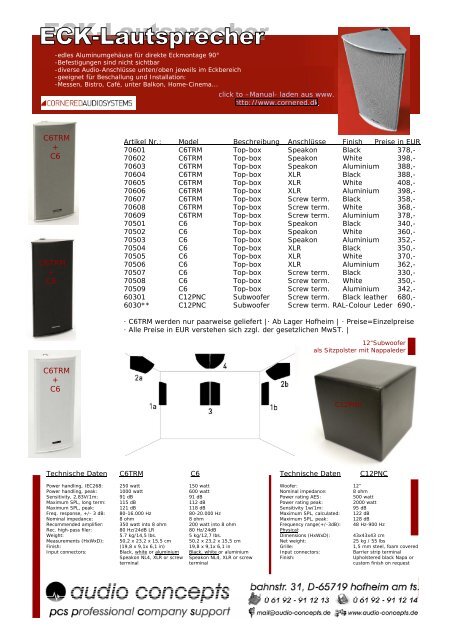
-edles Aluminumgehäuse für direkte Eckmontage 90°<br />
-Befestigungen sind nicht sichtbar<br />
-diverse Audio-Anschlüsse unten/oben jeweils im Eckbereich<br />
-geeignet für Beschallung und Installation:<br />
-Messen, Bistro, Café, unter Balkon, Home-Cinema...<br />
click to –Manual- laden aus www.<br />
http://www.cornered.dk<br />
<strong><strong>C6</strong>TRM</strong><br />
+<br />
<strong>C6</strong><br />
<strong><strong>C6</strong>TRM</strong><br />
+<br />
<strong>C6</strong><br />
<strong><strong>C6</strong>TRM</strong><br />
+<br />
<strong>C6</strong><br />
Technische Daten<br />
Power handling, IEC268:<br />
Power handling, peak:<br />
Sensitivity, 2,83V/1m:<br />
Maximum SPL, long term:<br />
Maximum SPL, peak:<br />
Freq. response, +/- 3 dB:<br />
Nominal impedance:<br />
Recommended amplifier:<br />
Rec. high-pass filer:<br />
Weight:<br />
Measurements (HxWxD):<br />
Finish:<br />
Input connectors:<br />
Artikel Nr.: Model Beschreibung Anschlüsse Finish Preise in EUR<br />
70601 <strong><strong>C6</strong>TRM</strong> Top-box Speakon Black 378,-<br />
70602 <strong><strong>C6</strong>TRM</strong> Top-box Speakon White 398,-<br />
70603 <strong><strong>C6</strong>TRM</strong> Top-box Speakon Aluminium 388,-<br />
70604 <strong><strong>C6</strong>TRM</strong> Top-box XLR Black 388,-<br />
70605 <strong><strong>C6</strong>TRM</strong> Top-box XLR White 408,-<br />
70606 <strong><strong>C6</strong>TRM</strong> Top-box XLR Aluminium 398,-<br />
70607 <strong><strong>C6</strong>TRM</strong> Top-box Screw term. Black 358,-<br />
70608 <strong><strong>C6</strong>TRM</strong> Top-box Screw term. White 368,-<br />
70609 <strong><strong>C6</strong>TRM</strong> Top-box Screw term. Aluminium 378,-<br />
70501 <strong>C6</strong> Top-box Speakon Black 340,-<br />
70502 <strong>C6</strong> Top-box Speakon White 360,-<br />
70503 <strong>C6</strong> Top-box Speakon Aluminium 352,-<br />
70504 <strong>C6</strong> Top-box XLR Black 350,-<br />
70505 <strong>C6</strong> Top-box XLR White 370,-<br />
70506 <strong>C6</strong> Top-box XLR Aluminium 362,-<br />
70507 <strong>C6</strong> Top-box Screw term. Black 330,-<br />
70508 <strong>C6</strong> Top-box Screw term. White 350,-<br />
70509 <strong>C6</strong> Top-box Screw term. Aluminium 342,-<br />
60301 C12PNC Subwoofer Screw term. Black leather 680,-<br />
6030** C12PNC Subwoofer Screw term. RAL-Colour Leder 690,-<br />
· <strong><strong>C6</strong>TRM</strong> werden nur paarweise geliefert |· Ab Lager Hofheim | · Preise=Einzelpreise<br />
· Alle Preise in EUR verstehen sich zzgl. der gesetzlichen MwST. |<br />
<strong><strong>C6</strong>TRM</strong><br />
250 watt<br />
1000 watt<br />
91 dB<br />
115 dB<br />
121 dB<br />
80-16.000 Hz<br />
8 ohm<br />
350 watt into 8 ohm<br />
80 Hz/24dB LR<br />
5.7 kg/14,5 lbs.<br />
50,2 x 23,2 x 15,5 cm<br />
(19,8 x 9,1x 6,1 in)<br />
Black, white or aluminium<br />
Speakon NL4, XLR or screw<br />
terminal<br />
<strong>C6</strong><br />
150 watt<br />
600 watt<br />
91 dB<br />
112 dB<br />
118 dB<br />
80-20.000 Hz<br />
8 ohm<br />
200 watt into 8 ohm<br />
80 Hz/24dB<br />
5 kg/12,7 lbs.<br />
50,2 x 23,2 x 15,5 cm<br />
19,8 x 9,1x 6,1 in<br />
Black, white or aluminium<br />
Speakon NL4, XLR or screw<br />
terminal<br />
Technische Daten<br />
Woofer:<br />
Nominal impedance:<br />
Power rating AES:<br />
Power rating peak:<br />
Sensitivity 1w/1m:<br />
Maximum SPL, calculated:<br />
Maximum SPL, peak:<br />
Frequency range(+/-3dB):<br />
Physical:<br />
Dimensions (HxWxD):<br />
Net weight:<br />
Grille:<br />
Input connectors:<br />
Finish:<br />
12“Subwoofer<br />
als Sitzpolster mit Nappaleder<br />
C12PNC<br />
C C12PNC 6<br />
12”<br />
8 ohm<br />
500 watt<br />
2000 watt<br />
95 dB<br />
122 dB<br />
128 dB<br />
48 Hz-900 Hz<br />
43x43x43 cm<br />
25 kg / 55 lbs<br />
1,5 mm steel, foam covered<br />
Barrier strip terminal<br />
Upholstered black Napa or<br />
custom finish on request
User manual<br />
CORNORED speakers mount directly<br />
onto walls and ceilings without the use<br />
of brackets and as such they are discrete<br />
and fast to install.<br />
But above all, they are truly professional<br />
sound reinforcement speakers. When<br />
used properly, Cornered speakers are<br />
capable of delivering serious sound<br />
pressure levels and dynamics, as well as<br />
providing excellent coverage control and<br />
reliability.<br />
So take some time to study this manual<br />
in order to get the most out of your<br />
CORNORED speaker system.<br />
Thanks for getting CORNORED!<br />
Introduction<br />
The CORNORED product range consists of near-fi eld top-boxes with wide<br />
coverage for medium SPL applications. These products are typically used in<br />
cafes, bars and smaller lounges.<br />
The 90 degree triangular design of the CORNORED top-boxes makes for a<br />
discrete and elegant installation, particularly so in corners, but also in almost<br />
any other type of application. With mounting holes integrated into the cabinet<br />
design, installation takes a minimum of time and the speaker mounts fl ush to<br />
the wall with the grille covering the mounting points. Coupled together back to<br />
back, two CORNORED cabinets can be mounted fl ush onto walls and ceilings,<br />
offering up to 180 degrees of coverage.<br />
The top-boxes are extruded in aluminium and are therefore more compact and<br />
lighter than a similar wooden cabinet. At the same time, the aluminium cabinet<br />
works as a large cooling surface, thus reducing power compression signifi -<br />
cantly. The low weight allows the products to be installed easily by one person.<br />
Drive units and crossover can be easily accessed behind the grille, which can be<br />
removed without tools in a matter of seconds.<br />
2a<br />
4 4<br />
1a 3 3<br />
1b<br />
1a: Vertical in corner, 1b: Vertical on wall, 2a: Horizontal in corner, 2b: Horizontal mid-wall<br />
3: Coupled together in mid-wall position, 4: Coupled together in mid-ceiling position<br />
2b
Installing the speaker<br />
Although the CORNORED top-boxes are very light, before installing the speaker make sure<br />
that the wall structure is solid and can support the weight of the speaker. Also, make sure that<br />
you comply with all local health and safety regulations.<br />
As the speaker is pre-angled and cannot be tilted when mounted flush against a wall or ceil-<br />
ing, coverage can be adjusted by positioning the cabinet higher or lower in the room away from<br />
the corner, until the desired coverage is obtained. This can also be done when installing only<br />
one speaker horizontally as described below.<br />
Corner position<br />
1. Remove grille<br />
Press one side of the grille downward and out<br />
Grille will become loose and can be removed<br />
Push the edge of the grille down and out<br />
2. Place speaker at desired position<br />
3. Mark drilling positions on wall by shading through the four mounting holes behind the grille<br />
4. Drill holes in wall (if the speaker is equipped with a barrier strip cable terminal, connect the<br />
cables at this time)<br />
5. Reposition speaker at desired position and mount the screws<br />
6. Reinstall grille<br />
Place one side of the grille in the groove in the cabinet’s side<br />
Press the grille together so that the other side slides into the groove<br />
Do not push the grille down into the grove in which is it mounted. Unlike traditional grills,<br />
the grille has to be pulled out towards the front of the grove in order to make sure that<br />
the woofer will not touch the grille when moving at maximum excursion<br />
7. Insert Speakon or XLR cable into either side of the speaker<br />
8. If needed, use the other Speakon or XLR plug to link other speakers<br />
All CORNORED top-boxes are 8 ohm and as such a typical amplifier will allow for three<br />
top-boxes to be linked per amplifier channel. Refer to the minimum required impedance<br />
of the amplifier.
One speaker vertical on wall<br />
1. Remove grille<br />
Press one side of the grille downward and out<br />
Grille will become loose and can be removed<br />
2. Place speaker at desired position<br />
3. Mark drilling positions on wall using only two of the mounting holes at the side of the cabinet<br />
4. Drill holes in wall (if the speaker is equipped with a barrier strip cable terminal, connect the<br />
cables at this time)<br />
5. Reposition speaker at desired position and mount the screws<br />
6. Reinstall grille<br />
Place one side of the grille in the groove in the cabinet’s side<br />
Press the grille together so that the other side slides into the groove<br />
7. Insert Speakon or XLR cable into either side of the speaker<br />
Two speakers vertical or horizontal<br />
on wall or ceiling<br />
1. Repeat steps 1 to 4<br />
2. Screw the cabinets together using the two bolts supplied<br />
3. Repeat steps 5 to 7<br />
One speaker horizontal on wall<br />
If a given installation calls for one speaker to be mounted<br />
horizontally on the wall, this can be done by the use of a<br />
small bracket as described below:<br />
1. Remove grille<br />
Press one side of the grille downward and out<br />
Grille will become loose and can be removed<br />
2. Place speaker at desired position<br />
3. Mark drilling positions on wall using only the two lower mounting holes at the side of the<br />
cabinet<br />
4. Drill holes in wall<br />
5. Mark mounting position on wall through the bracket holes. Mount bracket on wall. (if the<br />
speaker is equipped with a barrier strip cable terminal, connect the cables at this time)<br />
6. Reposition speaker at desired position and mount the screws into the wall. After that<br />
connect the cabinet to the bracket by placing the nut on top of the bracket and mounting the<br />
bolt through the cabinet mounting holes and into the nut<br />
7. Reinstall grille<br />
8. Insert Speakon or XLR cable into either side of the speaker
Installation hint<br />
Connection<br />
CORNORED top-boxes are available with either XLR/Speakon plugs or barrier<br />
strip terminals:<br />
a. The Speakon version is recommended when the product is used in a non-<br />
fixed installation such as low-level stage monitoring, broadcast, etc.<br />
b. The XLR version is recommended in applications where the speaker cable<br />
is located externally on the wall or ceiling. Being smaller and more elegant<br />
than the Speakon plug, the XLR connector will become part of the design<br />
when mounted into the cabinet.<br />
c. The barrier strip terminal is recommended in applications where the cable<br />
is hidden inside the wall or ceiling and emerges directly behind the speaker<br />
cabinet. In this application there are no visible speaker terminals when the<br />
speaker is installed.<br />
Connect a Speakon plug<br />
The Speakon pin configuration is standard. Plus (+) is connected to 1+ in the<br />
Speakon socket and minus (–) is connected to 1- in the Speakon socket. Simply<br />
insert the plug and turn it to the right until you hear or feel it click into the<br />
Speakon socket. To remove the Speakon connector, pull back the metal bar,<br />
turn the plug to the left and pull it out.<br />
The XLR pin configuration is standard. Plus (+) is connected to 2 in the XLR<br />
socket and minus (–) is connected to 1 in the XLR socket. Simply insert the<br />
XLR connector into the XLR socket until you hear or feel it click. To remove the<br />
XLR connector, push the metal bar on the socket down and pull out the XLR<br />
connector.<br />
If the corner is more than 90 degree or if cables or lists takesup space<br />
behind the cabinet, not allowing it to come flush with wall or ceiling,<br />
simply leave some space between the speaker cabinet and either wall or ceiling<br />
by placing a small washer.<br />
Connect an XLR plug<br />
Connect to the barrier strip terminal<br />
The barrier strip terminal will accept bare wire or a U-type cable shoe (ill. x).<br />
To ensure correct polarity, make sure that + (red) on the amplifier output is<br />
connected to + on the barrier strip terminal and that – (black) on the amplifier<br />
output is connected to – on the barrier strip terminal.<br />
Recommended speaker cables<br />
Speaker cables present the amplifier with different loads. Cables with high<br />
capacitance, high inductance and high impedance have a strong negative influ-<br />
ence on sound quality as well as amplifier reliability, so in order to get the most<br />
out of the speaker system, avoid using thin speaker cables.<br />
As a rule of thumb, 2 mm2 (14 AWG) cable can be used for lengths up to 20<br />
meters. 4 mm2 (11 AWG) cable should be used for lengths over 20 meters. For<br />
lengths over 50 meters, most amplifiers will become unstable and sound qual-<br />
ity is reduced significantly.<br />
Safety wire<br />
In installation terms, the CORNORED top-boxes are ‘as much brackets as they<br />
are speakers,’ so no safety wire is needed, just as you wouldn’t need a safety<br />
wire from the wall to a bracket. However, if required, simply attach the wire to<br />
one of the top plate screws.<br />
Warranty<br />
For warranty information, please refer to your local CORNORED distributor or<br />
dealer.<br />
Service<br />
Spare parts for your CORNORED speakers are available through your local<br />
CORNORED distributor. In case you are not able to source spare parts locally,<br />
please contact us directly at info@CORNORED.com.
Specifications<br />
Power handling, IEC268: 250 watt<br />
Power handling, peak: 1000 watt<br />
Sensitivity, 2,83V/1m: 91 dB<br />
Maximum SPL, long term: 115 dB<br />
Maximum SPL, peak: 121 dB<br />
Freq. response, +/- 3 dB: 80-16.000 Hz<br />
Nominal impedance: 8 ohm<br />
Recommended amplifier: 350 watt into 8 ohm<br />
Rec. high-pass filer: 80 Hz/24dB<br />
Weight: 5.7 kg/14,5 lbs.<br />
Measurements (HxWxD): 50,2 x 23,2 x 15,5 cm/19,8 x 9,1x 6,1 in<br />
Finish: Black, white or aluminum<br />
Input connectors: Speakon NL4, XLR or barrier strip terminal<br />
Front Top plate<br />
������<br />
������<br />
�����<br />
������<br />
������<br />
���<br />
������<br />
������<br />
�������<br />
Declaration of conformity<br />
Manufacturer:<br />
CORNORED Audio Systems<br />
Roskildevej 16A<br />
2620 Albertslund<br />
Denmark<br />
Tel/fax: +45 86 180017<br />
http://www.cornored.com<br />
We, CORNORED Audio Systems, declare under our responsibility that the fol-<br />
lowing product(s):<br />
<strong>C6</strong>, <strong><strong>C6</strong>TRM</strong>, Type: Speaker<br />
…are in conformity with COUNCIL DIRECTIVE of 3 May 1989 on the approxima-<br />
tion of the laws of the Member States relating to electromagnetic compatibility<br />
(89/336/EEC) and has been manufactured in conformity with the following<br />
national standards that implements a harmonized standard:<br />
EN 55013<br />
Limits and methods of measurement of radio disturbance characteristics of<br />
broadcast receivers and associated equipment.<br />
Hans V. Madsen<br />
Date: 14-01-2006<br />
Contents of the manual are subject to change without notice. CORNORED Audio Systems does not accept<br />
any liability for loss or damage caused or alleged to be caused directly or indirectly by these instructions.<br />
CORNORED Audio Systems makes no guarantee of any kind with regard to these instructions.<br />
Copyright 2005 CORNORED Audio Systems, Denmark.