C6TRM + C6 C6TRM + C6 C6TRM + C6 - audio concepts
C6TRM + C6 C6TRM + C6 C6TRM + C6 - audio concepts
C6TRM + C6 C6TRM + C6 C6TRM + C6 - audio concepts

You also want an ePaper? Increase the reach of your titles
YUMPU automatically turns print PDFs into web optimized ePapers that Google loves.
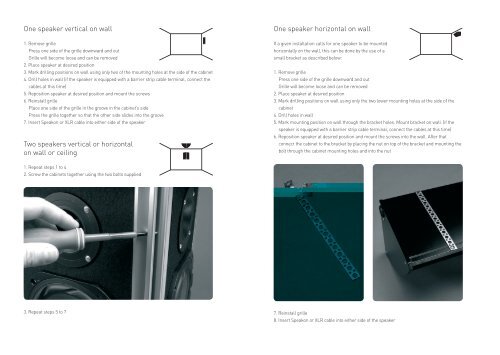
One speaker vertical on wall<br />
1. Remove grille<br />
Press one side of the grille downward and out<br />
Grille will become loose and can be removed<br />
2. Place speaker at desired position<br />
3. Mark drilling positions on wall using only two of the mounting holes at the side of the cabinet<br />
4. Drill holes in wall (if the speaker is equipped with a barrier strip cable terminal, connect the<br />
cables at this time)<br />
5. Reposition speaker at desired position and mount the screws<br />
6. Reinstall grille<br />
Place one side of the grille in the groove in the cabinet’s side<br />
Press the grille together so that the other side slides into the groove<br />
7. Insert Speakon or XLR cable into either side of the speaker<br />
Two speakers vertical or horizontal<br />
on wall or ceiling<br />
1. Repeat steps 1 to 4<br />
2. Screw the cabinets together using the two bolts supplied<br />
3. Repeat steps 5 to 7<br />
One speaker horizontal on wall<br />
If a given installation calls for one speaker to be mounted<br />
horizontally on the wall, this can be done by the use of a<br />
small bracket as described below:<br />
1. Remove grille<br />
Press one side of the grille downward and out<br />
Grille will become loose and can be removed<br />
2. Place speaker at desired position<br />
3. Mark drilling positions on wall using only the two lower mounting holes at the side of the<br />
cabinet<br />
4. Drill holes in wall<br />
5. Mark mounting position on wall through the bracket holes. Mount bracket on wall. (if the<br />
speaker is equipped with a barrier strip cable terminal, connect the cables at this time)<br />
6. Reposition speaker at desired position and mount the screws into the wall. After that<br />
connect the cabinet to the bracket by placing the nut on top of the bracket and mounting the<br />
bolt through the cabinet mounting holes and into the nut<br />
7. Reinstall grille<br />
8. Insert Speakon or XLR cable into either side of the speaker