
Create successful ePaper yourself
Turn your PDF publications into a flip-book with our unique Google optimized e-Paper software.
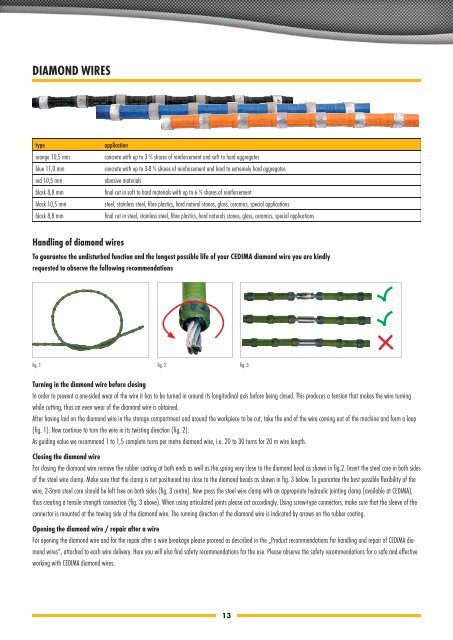
DIAMOND WIRES<br />
type<br />
orange 10,5 mm<br />
blue 11,0 mm<br />
red 10,5 mm<br />
black 8,8 mm<br />
black 10,5 mm<br />
black 8,8 mm<br />
application<br />
concrete with up to 3 % shares of reinforcement and soft to hard aggregates<br />
concrete with up to 3-8 % shares of reinforcement and hard to extremely hard aggregates<br />
abrasive materials<br />
fi nal cut in soft to hard materials with up to 6 % shares of reinforcement<br />
steel, stainless steel, fi bre plastics, hard natural stones, glass, ceramics, special applications<br />
fi nal cut in steel, stainless steel, fi bre plastics, hard naturals stones, glass, ceramics, special applications<br />
Handling of diamond wires<br />
To guarantee the undisturbed function and the longest possible life of your CEDIMA diamond wire you are kindly<br />
requested to observe the following recommendations<br />
fi g. 1 fi g. 2<br />
fi g. 3<br />
Turning in the diamond wire before closing<br />
In order to prevent a one-sided wear of the wire it has to be turned in around its longitudinal axis before being closed. This produces a tension that makes the wire turning<br />
while cutting, thus an even wear of the diamond wire is obtained.<br />
After having laid on the diamond wire in the storage compartment and around the workpiece to be cut, take the end of the wire coming out of the machine and form a loop<br />
(fi g. 1). Now continue to turn the wire in its twisting direction (fi g. 2).<br />
As guiding value we recommend 1 to 1,5 complete turns per metre diamond wire, i.e. 20 to 30 turns for 20 m wire length.<br />
Closing the diamond wire<br />
For closing the diamond wire remove the rubber coating at both ends as well as the spring very close to the diamond bead as shown in fi g.2. Insert the steel core in both sides<br />
of the steel wire clamp. Make sure that the clamp is not positioned too close to the diamond beads as shown in fi g. 3 below. To guarantee the best possible fl exibility of the<br />
wire, 2-3mm steel core should be left free on both sides (fi g. 3 centre). Now press the steel wire clamp with an appropriate hydraulic jointing clamp (available at CEDIMA),<br />
thus creating a tensile strength connection (fi g. 3 above). When using articulated joints please act accordingly. Using screw-type connectors, make sure that the sleeve of the<br />
connector is mounted at the towing side of the diamond wire. The running direction of the diamond wire is indicated by arrows on the rubber coating.<br />
Opening the diamond wire / repair after a wire<br />
For opening the diamond wire and for the repair after a wire breakage please proceed as described in the „Product recommendations for handling and repair of CEDIMA diamond<br />
wires“, attached to each wire delivery. Here you will also fi nd safety recommendations for the use. Please observe the safety recommendations for a safe and effective<br />
working with CEDIMA diamond wires.<br />
13