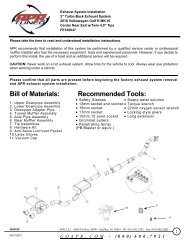
LABOUR ESTIMATE GUIDE - APR
LABOUR ESTIMATE GUIDE - APR
LABOUR ESTIMATE GUIDE - APR

Create successful ePaper yourself
Turn your PDF publications into a flip-book with our unique Google optimized e-Paper software.
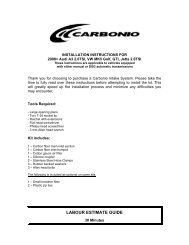
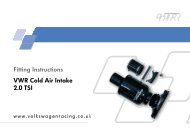
INSTALLATION INSTRUCTIONS FOR CI100009<br />
CARBON FIBER PERFORMANCE AIR INTAKE SYSTEM<br />
B5 1997-2001 Audi A4 1.8T & VW Passat 1.8T<br />
These instructions are applicable to vehicles equipped<br />
with either manual or automatic transmissions<br />
Thank you for choosing to purchase an <strong>APR</strong> by Carbonio Intake System. Please<br />
take the time to fully read over these instructions before attempting to install the<br />
kit. This will greatly speed up the installation process and minimize any difficulties<br />
you may encounter.<br />
Tools Required:<br />
- Philips head (star) screwdriver<br />
- Flat head (slot) screwdriver<br />
- 10mm open-ended wrench<br />
- 3mm Allen wrench<br />
- Sharp knife<br />
Kit includes:<br />
1 – Carbon fiber main inlet section<br />
1 – Air filter<br />
1 – Side heat shield<br />
1 – Front heat shield<br />
1 – Plastic plug<br />
2 – Plastic Zip Ties<br />
1 – Plastic air pump hose adapter<br />
2 – M6 bolts<br />
2 – Side bolts<br />
3 – Lid bolts<br />
3 – Lid washers<br />
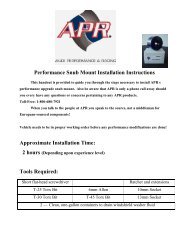
<strong>LABOUR</strong> <strong>ESTIMATE</strong> <strong>GUIDE</strong><br />
1 – 1.5 Hours
SAFETY WARNING<br />
The installation of this intake requires that the installer’s hands be very close<br />
to engine and exhaust components which get extremely hot. Only attempt the<br />
installation of this kit on a vehicle that has had plenty of time to cool off.<br />
Step 1:<br />
Using a Phillips head (star) screwdriver remove the<br />
2 screws holding the factory air inlet scoop. The<br />
location of these screws is marked with arrows<br />
right. Once these screws are out, the entire inlet<br />
scoop can be pulled out. At this time also pull off<br />
the plastic cover that is on top of the airbox. There<br />
are no fasteners holding it in place. Set the forward<br />
most portion of the scoop aside for later.<br />
Step 2:<br />
Using a 10mm wrench remove the bolt that<br />
attaches the airbox to the passenger side inner<br />
fender. SAVE THIS BOLT FOR LATER.<br />
Step 3 (2000-2001 Cars Only):<br />
Leading to the side of the factory airbox is a<br />
corrugated hose. Disconnect this hose by pulling it<br />
off of the airbox. Make sure that the rubber ring<br />
remains on the inside of the hose end.
Step 4 (1997-1999 Cars Only):<br />
On top of the airbox is an oval shaped sensor<br />
with 2 wires leading to it. Disconnect the 2<br />
wires by pressing on the metal tab on its<br />
connector while pulling apart.<br />
Step 5:<br />
Loosen the hose clamp that leads to the MAF<br />
sensor and separate the hose from the<br />
sensor.<br />
Step 6:<br />
On top of the airbox is a rubber cone shaped<br />
piece with a wire passing through its center.<br />
Below it is the MAF connector. Use a flathead<br />
screwdriver to pry off this cone. Once<br />
removed the MAF connector will be exposed.<br />
Disconnect it by pressing on the metal tabs<br />
on either side of the connector while pulling<br />
up. You may find that a flat-headed<br />
screwdriver will help you better reach the<br />
metal tabs.
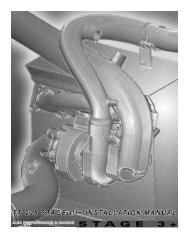
Step 7:<br />
On the side of the airbox is a metal shield.<br />
Remove this shield using a small Phillips screw<br />
driver or (as shown right) or a Phillips screwdriver<br />
tip held by a small ratchet.<br />
MAKE SURE THAT THE ENGINE IS COLD OR<br />
YOU WILL BURN YOURSELF<br />
Step 8:<br />
Below the metal shield is a hard metal pipe that is screwed to the OEM airbox. Using the same<br />
tools as in the previous step, remove the screws that hold this pipe in place.<br />
Step 9:<br />
Pull the airbox out of the car being careful not<br />
to snag any wires or hoses on the way out.
Step 10:<br />
Using a 10mm wrench, remove the<br />
bolt that is on the passenger side<br />
chassis next to the turbo. SAVE<br />
THIS BOLT FOR LATER. The<br />
location of this bolt is shown right.<br />
Replace the bolt with the bolt<br />
removed in Step 2. Do not tighten<br />
it. Only screw it in a few threads.<br />
MAKE SURE THE ENGINE HAS<br />
HAD AMPLE TIME TO COOL. IT<br />
IS VERY EASY TO BURN YOUR<br />
HANDS AT THIS STAGE<br />
Step 11:<br />
Grab the airbox removed in Step 8 and,<br />
using a flat-head screwdriver, loosen the<br />
metal clips that hold the two halves of the<br />
airbox together.<br />
Once this is done, turn the top lid of the<br />
airbox upside down and, using a Phillipshead<br />
screwdriver remove the 2 screws<br />
that hold the MAF to the airbox lid.<br />
Pull the MAF out of the lid and pull it<br />
apart from the plastic horn that held it in<br />
place (refer to picture right)<br />
Step 12a:<br />
Using the two M6 bolts, bolt the MAF to the<br />
front shield included in the kit. Make sure that<br />
the MAF is on the side where the lips of the<br />
shield bend away from the edges, & that the<br />
MAF connector is in the 2 o’clock position.<br />
1997-1999 cars require the included<br />
aluminum ring to be placed between the<br />
MAF and front shield.<br />
Step 12b (2000-2001 Cars Only):<br />
To the left of the MAF is a hole. Included in<br />
the kit is a 2-piece gray plastic adapter.<br />
Screw the two pieces of the adapter together<br />
(in this hole) sandwiching the front shield in<br />
the middle. Make sure that the LONG end is<br />
on the MAF side
Step 12c (1997-1999 Cars Only):<br />
To the left of the MAF is a hole. Included in the kit is a round plastic plug. Cover this hole by<br />
pressing the plug into the hole until it snaps into place.<br />
Step 13:<br />
Unwrap the included air filter and fit it over the MAF sensor on the inside of the shield assembly.<br />
Using a flat-headed screwdriver, tighten down the hose clamp thereby fixing the filter to the MAF.<br />
Ensure that the hose clamp is tightening FULLY over the neck of the MAF otherwise the<br />
filter can come loose.<br />
Step 14:<br />
Using the small Allen bolts provided, screw the side shield to the front shield<br />
Step 15:<br />
Lower the entire assembly into place.<br />
Make sure that the groove in the side<br />
shield fits over the threads of the bolt<br />
installed in Step 10. DO NOT<br />
TIGHTEN THIS BOLT YET<br />
The hard pipe loosened in Step 8 fits<br />
into the groove shown by the arrow<br />
on the image right.<br />
Step 16:<br />
Re-connect the hose leading to the<br />
MAF (removed in Step 5) and tighten<br />
its hose clamp.<br />
Re-connect the wire to the MAF<br />
(removed in Step 6)<br />
(2000-2001 Cars Only)<br />
Connect the air pump breather hose<br />
(Removed Step 3) to the plastic<br />
breather hose adapter (installed Step<br />
17b). The hose just presses on and<br />
ensure that the fit is tight .
Step 17 (1997-1999 Cars Only):<br />
In Step 4, wires that led to an oval sensor were disconnected. Start by removing the sensor from<br />
the OEM airbox lid. It is held in place by a rubber grommet that surrounds it. A flat-head<br />
screwdriver will aid in prying the sensor out. Once the sensor is out, re-connect the wires<br />
removed in Step 4 and, using the included plastic ties, tie the sensor tightly to any firm rubber line<br />
that is in the area enclosed by the intake. An air conditioning line is perfect for this. Try to ensure<br />
that the fins on the sensor are pointing upwards where they will receive the most air for cooling<br />
Step 18:<br />
In Step 1 a plastic inlet<br />
scoop was removed.<br />
Using a sharp utility<br />
knife, start by trimming<br />
off the 4 ‘bumps’ that<br />
are on the small end of<br />
the scoop. Next, there<br />
is a tab that fits into a<br />
grove inside the small<br />
end of the scoop. Be<br />
sure to unclip this tab<br />
from the groove.<br />
Step 19:<br />
Connect the small end of the plastic<br />
scoop to the small end of the carbon<br />
fiber airbox lid. The fit may be a little<br />
tight and some lubricant can be used to<br />
make the connection easier.<br />
DO NOT USE EXCESSIVE FORCE<br />
AS THIS CAN CRACK THE CARBON<br />
FIBER AND VOID PRODUCT<br />
WARRANTY
Step 20:<br />
Lower the entire lid assembly into<br />
place being sure to slip the flat end of<br />
the carbon piece UNDER the factory<br />
hood seal (shown by arrows on image<br />
right).<br />
Fix the carbon scoop to the metal<br />
mounting shield using the three<br />
included bolts and washers. Make<br />
sure that the rubber side of the<br />
washer is the side that contacts the<br />
carbon.<br />
Step 21:<br />
Re-install the two Phillips screws removed in Step 1.<br />
Step 22:<br />
Make sure that the entire system is installed with no wires or hoses being stressed or pulled.<br />
Tighten the bolt prepared in Step 15 making sure that the top of the carbon section is well below<br />
the height of the OEM weather stripping it borders.<br />
Step 23:<br />
Start the car and let it idle for 5-10 minutes. During this time DO NOT ACCELERATE THE<br />
ENGINE AT ALL. This will allow the computer a chance to re-calibrate itself to the increased<br />
airflow offered by the intake. The install is now complete. Be sure to double check the tightness of<br />
all connections, bolts, and clamps before driving the vehicle.<br />
A NOTE ON FILTER MAINTENANCE<br />
The filter on your <strong>APR</strong> by Carbonio Intake is washable and will last for many<br />
years if cleaned periodically. The best way to clean the filter is to remove it<br />
and service it with a commercially available cleaning kit. These kits are very<br />
inexpensive and require that you wash the filter and oil it after it has had the<br />
opportunity to dry. DO NOT OVER-OIL THE FILTER. BE SPARING WITH<br />
THE OIL AS EXCESSIVE OILING CAN LEAD TO DAMAGE TO THE MAF<br />
SENSOR.