Spirometer Demo with Freescale Microcontrollers
Spirometer Demo with Freescale Microcontrollers
Spirometer Demo with Freescale Microcontrollers
You also want an ePaper? Increase the reach of your titles
YUMPU automatically turns print PDFs into web optimized ePapers that Google loves.
• Instant volume—The volume of air acquired by the spirometer during the current sample (liters).<br />
• Volume—The sum of instant volumes obtained <strong>with</strong> each measurement.<br />
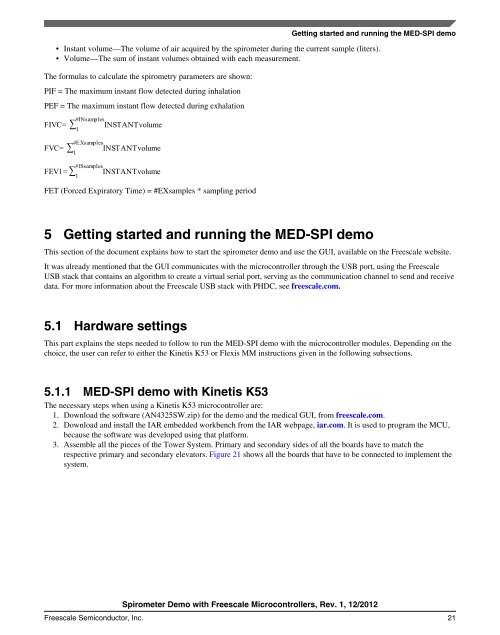
The formulas to calculate the spirometry parameters are shown:<br />
PIF = The maximum instant flow detected during inhalation<br />
PEF = The maximum instant flow detected during exhalation<br />
Getting started and running the MED-SPI demo<br />
FET (Forced Expiratory Time) = #EXsamples * sampling period<br />
5 Getting started and running the MED-SPI demo<br />
This section of the document explains how to start the spirometer demo and use the GUI, available on the <strong>Freescale</strong> website.<br />
It was already mentioned that the GUI communicates <strong>with</strong> the microcontroller through the USB port, using the <strong>Freescale</strong><br />
USB stack that contains an algorithm to create a virtual serial port, serving as the communication channel to send and receive<br />
data. For more information about the <strong>Freescale</strong> USB stack <strong>with</strong> PHDC, see freescale.com.<br />
5.1 Hardware settings<br />
This part explains the steps needed to follow to run the MED-SPI demo <strong>with</strong> the microcontroller modules. Depending on the<br />
choice, the user can refer to either the Kinetis K53 or Flexis MM instructions given in the following subsections.<br />
5.1.1 MED-SPI demo <strong>with</strong> Kinetis K53<br />
The necessary steps when using a Kinetis K53 microcontroller are:<br />
1. Download the software (AN4325SW.zip) for the demo and the medical GUI, from freescale.com.<br />
2. Download and install the IAR embedded workbench from the IAR webpage, iar.com. It is used to program the MCU,<br />
because the software was developed using that platform.<br />
3. Assemble all the pieces of the Tower System. Primary and secondary sides of all the boards have to match the<br />
respective primary and secondary elevators. Figure 21 shows all the boards that have to be connected to implement the<br />
system.<br />
<strong>Spirometer</strong> <strong>Demo</strong> <strong>with</strong> <strong>Freescale</strong> <strong>Microcontrollers</strong>, Rev. 1, 12/2012<br />
<strong>Freescale</strong> Semiconductor, Inc. 21


